It’s frustrating to build a feature-rich WordPress site, only to discover it loads painfully slow on a smartphone. We’ve seen firsthand how a clunky mobile experience can turn away visitors in seconds, and heavy plugins are often the main culprits.
That lag doesn’t just annoy users; it can seriously impact your traffic and search engine rankings. But the thought of disabling plugins often brings the fear of accidentally breaking your site for everyone.
Based on our experience managing high-traffic sites, we found a safe way to solve this. You can selectively turn off certain plugins just for mobile users, dramatically speeding things up without affecting the desktop version.
This guide will walk you through the exact steps to implement this technique. Let’s start by looking at why this is such a powerful optimization.
Why Disable Specific WordPress Plugins for Mobile Users
More than 50% of your visitors will access your WordPress website using a mobile phone. That’s why it’s critical to deliver a fast, smooth experience for visitors on both smartphones and tablets.
However, plugins may be slowing down the mobile version of your site.
When someone visits your website, WordPress will load all active plugins along with any required scripts and stylesheets. It does not load any inactive plugins.
To learn more, you can see our infographic on how WordPress actually works for a behind-the-scenes look at how plugins are loaded.
All good WordPress plugins should load only when needed. However, sometimes, it is difficult for plugin authors to guess whether you will need the plugin or not. In such situations, they opt to load the required files just in case.
Users who are trying to get a perfect speed and performance score often want to disable specific plugins for mobile. That’s where this article can help.
Let’s take a look at how to easily disable individual WordPress plugins for the mobile version of your website.
Setting Up the WordPress Plugin Organizer Plugin
The first thing you need to do is install and activate the Plugin Organizer plugin. For more details, see our step-by-step guide on how to install a WordPress plugin.
Important: Plugin Organizer is very powerful. Disabling plugins can cause unexpected conflicts and behavior and may even make your site inaccessible. We recommend that you create a complete WordPress backup before disabling any plugins.
Upon activation, you need to visit the Plugin Organizer » Settings page to configure the plugin.
Apart from the default options, you just need to turn on the following options:
- Selective plugin loading
- Selective mobile plugin loading
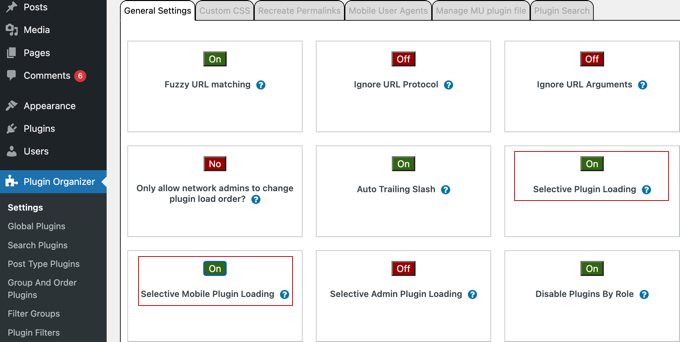
Don’t forget to click the ‘Save Settings’ button at the bottom of the page to store your changes.
Creating a Must-Use Plugin for Plugin Organizer
Plugin Organizer needs a must-use (MU) plugin to work properly. A ‘Must-Use’ or ‘MU’ plugin is a special type of plugin that is always active on your site. This allows Plugin Organizer to load first and manage your other plugins correctly.
The plugin will automatically try to create this file for you, but if it fails, then you will have to create it on your own.
Checking Whether the Must-Use Plugin Was Created Automatically
Let’s start by checking if the plugin was able to create the MU plugin automatically.
You can do this by going to the Plugins » Installed Plugins page. You will see a new link labeled ‘Must-Use’, and clicking on it will show you the installed MU plugins on your site.
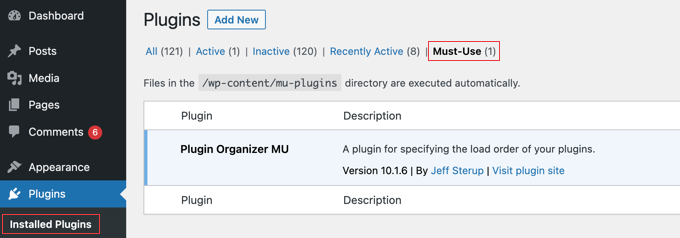
If you don’t see the ‘Plugin Organizer MU’ plugin or ‘Must-Use’ link, then this means that the plugin organizer failed to create the file, and you will need to do it yourself manually.
Creating the Must-Use Plugin if Necessary
First, you need to connect to your website using an FTP client or the File Manager app in cPanel. Then, you need to go to the /wp-content/plugins/plugin-organizer/lib/ folder.
Now, you should download the file called PluginOrganizerMU.class.php to your computer.
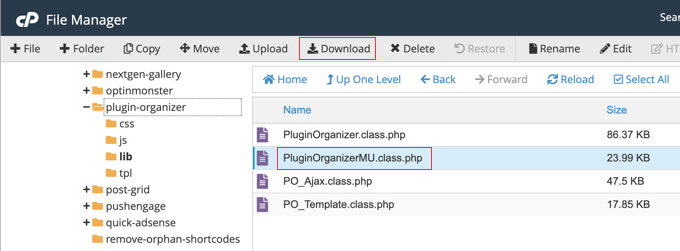
Next, you need to go to the /wp-content/mu-plugins/ folder. If you don’t have a mu-plugins folder in your /wp-content/ folder, then you need to create one.
Now, you should upload the PluginOrganizerMU.class.php file from your computer.

The Plugin Organizer can now use this file to properly manage your plugins on mobile as well as desktop.
Disable Specific WordPress Plugins in the Mobile Version
Plugin Organizer makes it very easy to disable WordPress plugins on mobile. Simply head over to the Plugin Organizer » Global Plugins page.
On this screen, you will see a list of all your installed plugins. To disable a plugin just for mobile users, simply click on it. The plugin will turn red, meaning it is now disabled for the mobile platform.
If you make a mistake, you can click the plugin again to cycle through the colors until it is set correctly.
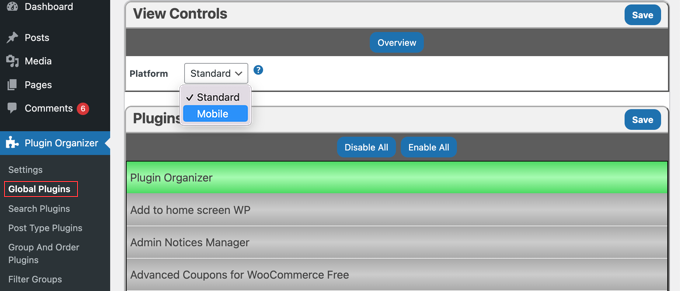
Above the list, you will see a drop-down menu labeled ‘Platform’. You need to select the ‘Mobile’ option. This will allow you to disable plugins on mobile devices.
Simply click the plugins you want to disable on mobile so that they turn red. If you make a mistake, then simply click the plugin multiple times until it is the right color.
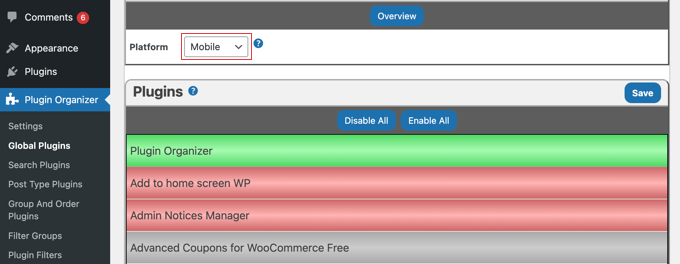
When you finish, don’t forget to click the ‘Save’ button to store your changes. The plugin organizer will now disable these plugins on your mobile site.
Plugin Organizer also makes it easy to disable individual WordPress plugins for specific posts, pages, user roles, and other parameters. To learn how, you can see our guide on how to use Plugin Organizer to speed up WordPress.
Frequently Asked Questions
Here are answers to some of the most common questions we receive about disabling plugins for mobile visitors.
1. What types of plugins are best to disable for mobile users?
Good candidates are plugins that add features primarily for desktop users or are very resource-heavy. This could include complex page builders, certain slider plugins, social media feed widgets, or other plugins that aren’t essential to the core mobile experience of your site.
2. Will disabling plugins for mobile users negatively affect my SEO?
On the contrary, it should help your SEO. Mobile page speed is a significant ranking factor for Google. By disabling unnecessary plugins on mobile, you improve load times and user experience, which are positive signals for search engines.
3. Is there a way to do this without using the Plugin Organizer plugin?
Yes, but this method is for advanced users and has significant drawbacks. While you can use the wp_is_mobile() conditional tag in custom code, it often fails on websites that use caching plugins. Because cached pages are often served to all visitors regardless of device, the check may not run correctly, making it an unreliable solution for many sites. For this reason, using a dedicated plugin like Plugin Organizer is the safest and most reliable method.
4. How can I verify that the plugins are actually disabled on mobile?
You can use your web browser’s developer tools. In Google Chrome, right-click on your site, choose ‘Inspect,’ and then click the ‘Toggle device toolbar’ icon to simulate a mobile phone. You can then use the ‘Network’ tab to see which plugin scripts and styles are loading (or not loading).
Additional Resources on Optimizing WordPress for Mobile
We hope this guide helped you learn how to easily disable specific WordPress plugins for mobile users. You may also want to see some other guides related to optimizing WordPress for mobile:
- Ways to Create a Mobile Friendly-WordPress Site (Expert Tips)
- How to Hide a WordPress Widget on Mobile (Easy for Beginners)
- How to Create a Mobile-Ready Responsive WordPress Menu
- How to Add a Fullscreen Responsive Menu in WordPress
- How to Easily Create a Responsive Slider in WordPress
- How to Create Mobile Popups That Convert (Without Hurting SEO)
- How to Change the Color of Address Bar in Mobile Browser to Match Your WordPress Site
- How to Add a Click-to-Call Button in WordPress (Step by Step)
- Best Responsive WordPress Themes
- How to View the Mobile Version of WordPress Sites From Desktop
If you liked this article, then please subscribe to our YouTube Channel for WordPress video tutorials. You can also find us on Twitter and Facebook.


Dennis Muthomi
This is exactly the solution I’ve been implementing across client sites with excellent results.
After using Plugin Organizer to disable heavy form builders and certain social sharing plugins on mobile, I’ve seen load times improve by up to 40% on several sites.
One practical tip I would LOVE to add is before disabling any plugins for mobile, create a spreadsheet to track mobile vs desktop speed tests for each plugin you plan to disable. This helps identify which plugins actually impact mobile performance the most and provides concrete data for client reporting.
Jiří Vaněk
This is a great tutorial. I have several plugins that display e.g. social icons on the desktop version and so on. They are not used at all on the mobile version of the site and I turn them off with CSS – so they still run in the background, they are just not visible. This will be a much more elegant solution and the website will be a bit faster. Thanks a lot for the detailed instructions.