Creating a pay-per-view site with WordPress allows you to monetize your content directly.
When you sell access to your content in this way, you get to keep more profits, so it can be a smart business move. We’ve seen many websites build a successful business using this strategy.
In this article, we will guide you through the steps to set up a pay-per-view site in WordPress.
You’ll learn how to sell your content directly to users, providing them with exclusive access while you earn maximum revenue from your hard work.
How Do Pay-Per-View Websites Work?
There are many ways to make money online, including showing advertisements and adding affiliate links to your blog.
However, many of these methods involve third parties, which means you often lose a cut of the profits. We have seen many businesses struggle because they are paying outrageous fees to third-party platforms.
The pay-per-view model allows you to sell content directly to users so you can keep more of the money you earn.
There are many different ways to create a pay-per-view website, so you can choose the pricing and delivery model that works best for you.
For example, you might:
- Sell digital downloads in WordPress.
- Create daily, weekly, or yearly passes that give members unrestricted access.
- Create plans that automatically drip content instead of releasing it all at once.
What Do You Need to Build a Pay Per View Website?
First, you’ll need a domain name and a web hosting account.
A domain name is what your users will type in their browsers to reach your website, such as www.wpbeginner.com. Web hosting is where all your website files will be stored.
Normally, a domain name costs $14.99 annually, and web hosting plans start at $7.99 per month (usually paid annually).
That’s a lot when you’re just starting or have a restricted budget.
Luckily, Bluehost is offering WPBeginner users a free domain name and up to 83% off their web hosting plans. You can get started with $1.99 per month.

Bluehost is one of the biggest hosting companies and an officially recommended WordPress hosting provider.
We also recommend Hostinger, which offers a generous discount and a free domain name to WPBeginner readers.
WordPress is the most popular website builder on the planet, so we’ll be using it to make your pay-per-view website. Even better, if you sign up with Bluehost, then they’ll automatically install WordPress for you.
If you are using a different hosting provider, then see our guide on how to install WordPress for step-by-step instructions.
Once you have a WordPress website, let’s look at how you can turn it into a pay-per-view site and make money online.
Creating A Pay-Per-View Site in WordPress With MemberPress
The easiest way to create a pay-per-view site is by using the MemberPress plugin. We have found it to be the best WordPress membership plugin that allows you to restrict content and sell pay-per-view subscriptions.
At WPBeginner, we’ve used it to create a free video membership site for our online courses. For more information, take a look at our detailed MemberPress review.
First, you need to install and activate the MemberPress plugin. For more details, see our step-by-step guide on how to install a WordPress plugin.
Upon activation, go to the MemberPress » Settings page and then enter your license key.
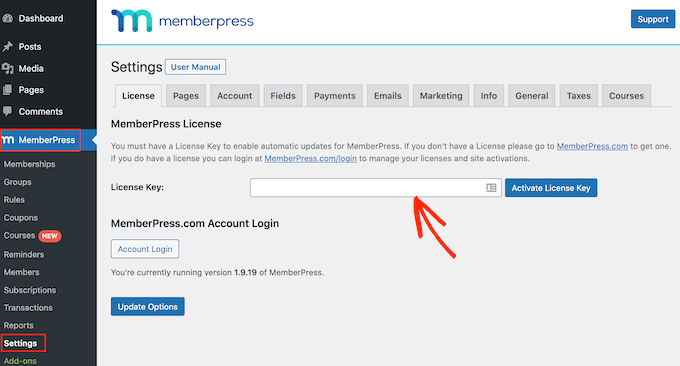
You’ll find this information in your account on the MemberPress website. It’s also in the email you got when you purchased MemberPress.
After entering this information, click on ‘Activate License Key.’
Next, you need to set up at least one payment gateway to accept credit card payments on the pay-per-view site easily.
MemberPress supports PayPal, Stripe, and Authorize.net. To add one of these payment gateways to your site, click the ‘Payments’ tab and then select ‘Add Payment Method.’
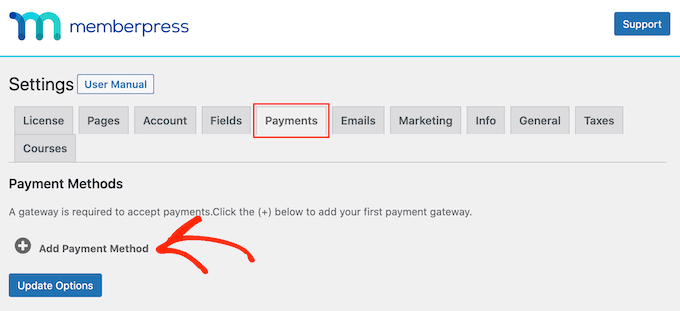
After that, open the ‘Gateway’ dropdown and select the gateway you want to use.
MemberPress will now show all the settings you need to configure before you can use this payment gateway. Each gateway has different settings. For example, in the following image, we are adding PayPal payments to WordPress.
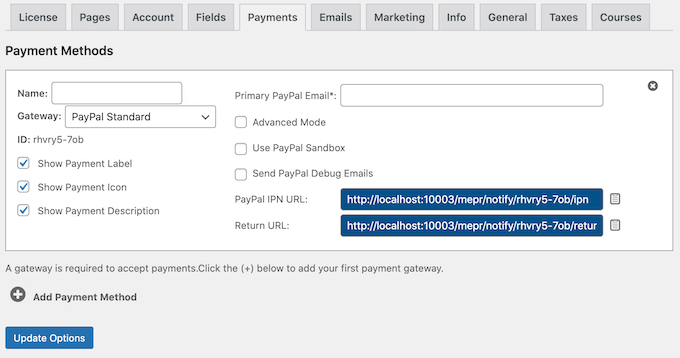
Once you’ve configured the gateway, click ‘Update Options’ to save your settings.
You can often get more customers by allowing users to choose a payment method. If you do want to add multiple gateways to your pay-per-view site, then simply click ‘Add Payment Method’ and repeat the process described above.
Creating Membership Levels
Now, you are ready to create membership levels for your pay-per-view site by going to MemberPress » Memberships.
Here, click on ‘Add New.’
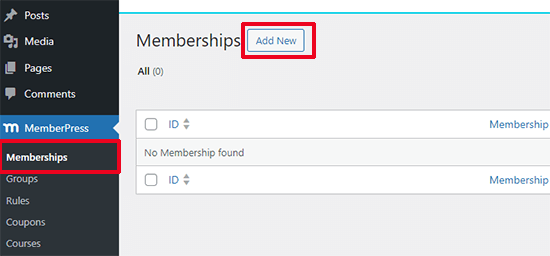
You can now type in a title for this membership plan and add an optional description in the post editor.
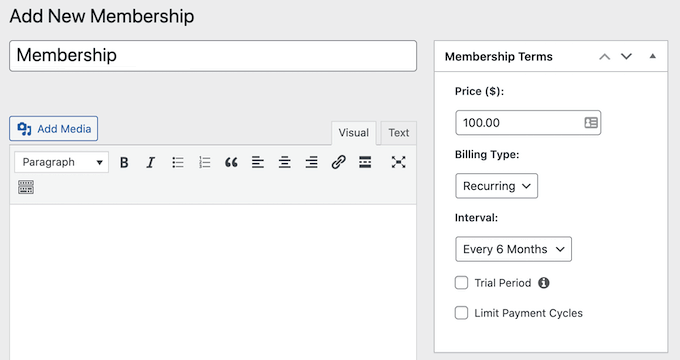
Next, you need to set the pricing and expiration in the ‘Membership Terms’ box.
For example, you might charge a one-time fee for lifetime access or set up a recurring monthly subscription. If you choose ‘Recurring,’ then you can use the settings to charge members on a weekly, monthly, quarterly, or annual basis.
In the following image, we are charging $100 every six months.
By accepting recurring payments in WordPress, you can automate the billing process. This can save you a ton of time and generally leads to fewer payment delays and errors. It also means you don’t have to send invoices manually.
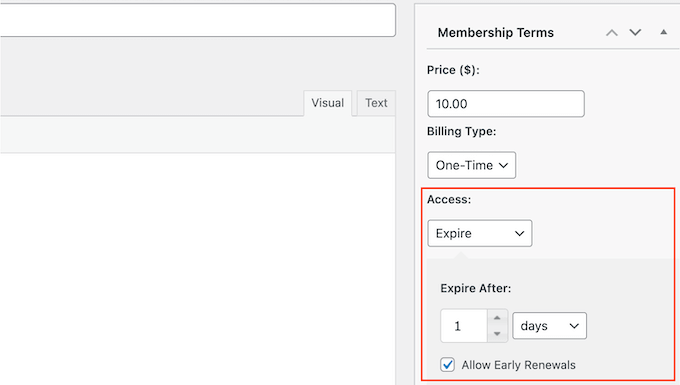
If you select ‘One-Time,’ then you can choose ‘Lifetime’ or set an expiration date, which can either be a calendar date or a length of time, such as one month since the person purchased their membership.
In the following image, we’re creating a plan that expires in 24 hours. We’ve also checked the ‘Allow early renewals’ option so users can renew their membership before it expires.
After choosing a billing type, you might need to configure some extra settings. Most of these settings are fairly straightforward, so you can look them over and make any changes you like.
When ready, scroll down to the ‘Membership Options’ box below the post editor. This is where you can set up different options for this membership plan.
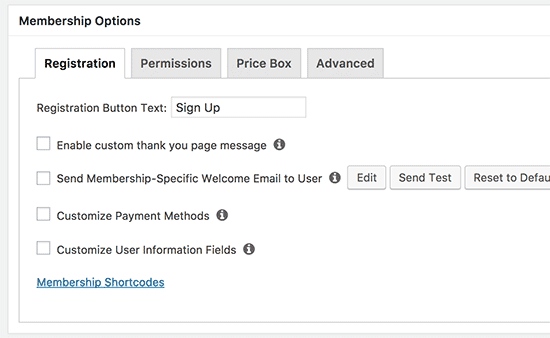
The default membership options will work for most pay-per-view WordPress websites, but you can make any changes.
With that done, click on the ‘Price Box’ tab and type in all the information you want to show on your website. This includes the plan’s benefits, which will help convince people to buy a pay-per-view subscription.
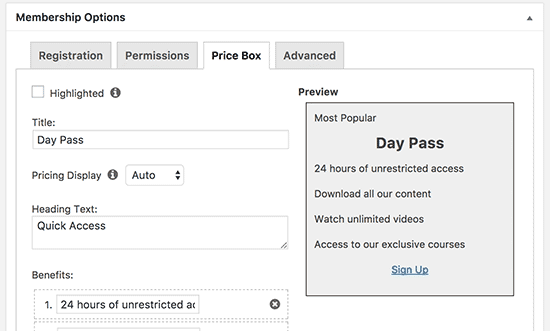
When you are happy with the plan’s configuration, click on ‘Publish’ to make it live.
You can create multiple membership plans with different settings, such as monthly or yearly passes. To create more membership levels, simply follow the same process described above.
Restricting Content to Membership Plans
Once you’ve done that, you’re ready to restrict content so that only people with a valid membership can access it.
You do this by creating membership rules, so go to the MemberPress » Rules page and click on the ‘Add New’ button.
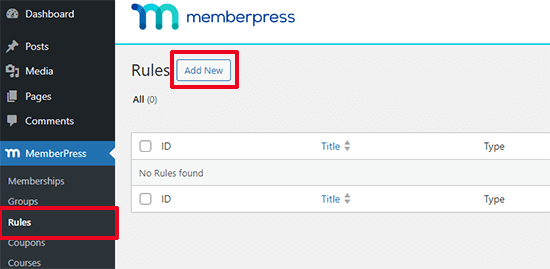
You can create generic rules that apply to all content or very specific rules for individual items on your website.
For example, you can restrict all content in a particular category, tag, or lock a specific post or URL.
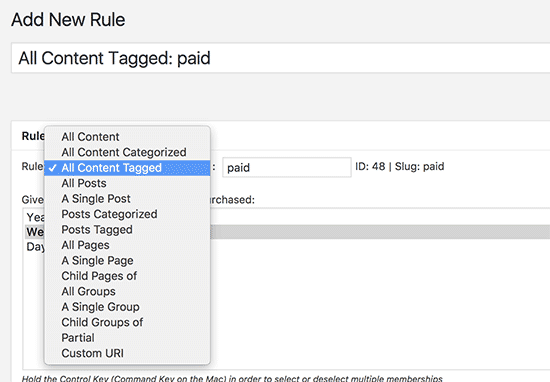
In this example, we are going to restrict access to all content with the ‘Premium’ tag. If you need help, please see our step-by-step guide on adding categories and tags for WordPress pages.
To restrict access to a specific tag, open the ‘Protected Content’ dropdown and choose ‘All Content Tagged.’ Then, type in the tag that you want to use.
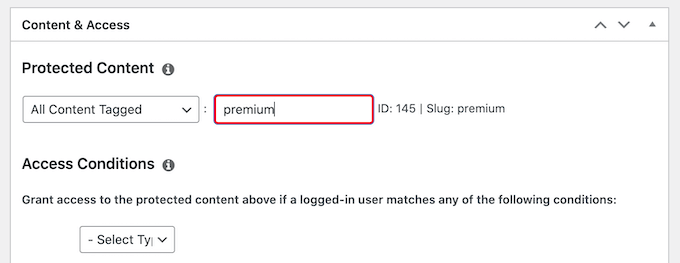
Below the rules editor, you’ll see the content drip and expiration options.
Drip content allows you to gradually release content to users.

For more information, please see our guide on how to add automatic drip content to your WordPress site.
Optionally, you can set an expiration date by checking the ‘Enable Expiration’ box.
In this way, you can use FOMO to increase conversions since the content is only available for a limited time. It can also encourage more people to buy memberships so they don’t miss out on the time-restricted content.

Once you are done, scroll to the top of the page and click on the ‘Save Rule’ button. You can repeat these steps to create as many rules as you want.
Creating a Pricing Page
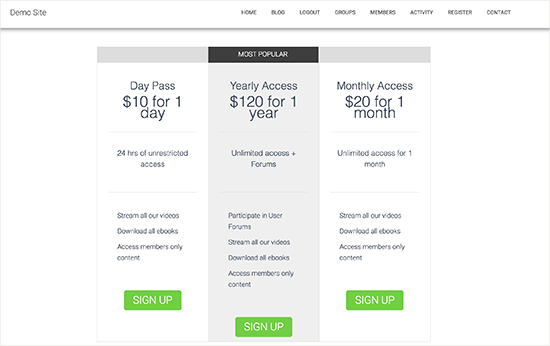
MemberPress makes it super easy to display information about all the plans visitors can buy.
To create a pricing page, go to the MemberPress » Groups page and click ‘Add New.’
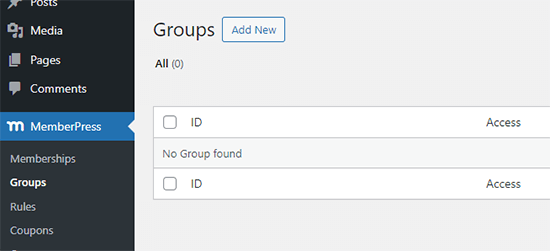
First, you need to type in a title for the group plan page, which will be visible to visitors.
After that, scroll down to the’ Group Options’ box. You can add the memberships you want to display on the pricing page.
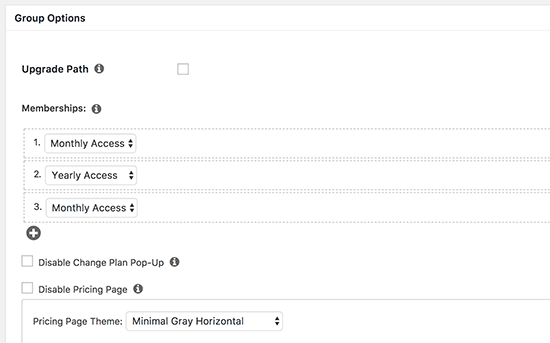
You can also select a theme for the pricing table. MemberPress comes with a few ready-made designs to choose from.
When you are happy with how the page is set up, click the ‘Publish’ button to make it live. If you click on the ‘View Group’ link after publishing it, you’ll see the pricing and plan page.
Redirecting Users to the Pricing and Plans Page
If an unauthorized user tries to access your premium content, then it’s a good idea to redirect them to the pricing page so they can learn more about your subscriptions.
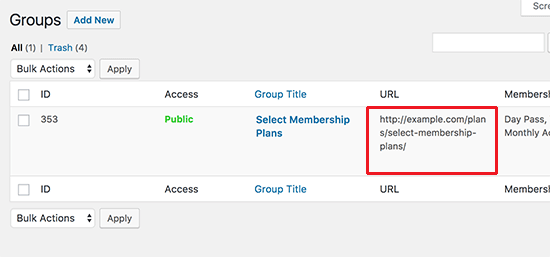
To create this redirect, go to the MemberPress » Groups page and copy the URL of the pricing page you created in the previous step.
Next, head over to the MemberPress » Settings page.
Here, select the ‘Pages’ tab.

You can now scroll to the ‘Unauthorized Access’ section and check the box next to ‘Redirect unauthorized visitors to a specific URL.’
You can paste the URL into the following field: ‘URL to redirect unauthorized visitors to.’
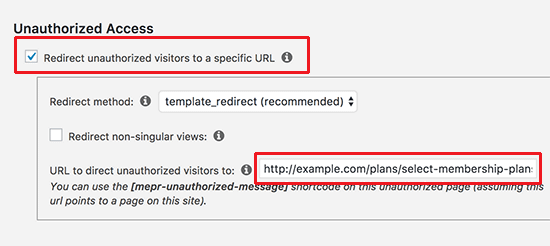
Don’t forget to click on the ‘Update Options’ button to save your changes.
Now, anyone who tries to access restricted content without a membership plan will get redirected to the pricing page.
Taking Your Pay-Per-View Website to the Next Level
MemberPress is a powerful plugin with tons of amazing features and lots of add-ons you can use to build a successful pay-per-view site.
You can also use it to create and sell online courses. This is a great choice if you have specialist knowledge or skills to share with your audience.
Another option is connecting MemberPress to an email marketing service like Constant Contact. In this way, you can keep subscribers updated on your pay-per-view content, which means they’ll be more likely to continue with their membership plan.
You can even integrate it into an existing online store using the WooCommerce addon.
We hope this article helped you learn how to create a pay-per-view site with WordPress. For more ideas, you may also want to see examples of these membership websites or the most popular digital products you can sell online.
If you liked this article, then please subscribe to our YouTube Channel for WordPress video tutorials. You can also find us on Twitter and Facebook.


Dayo Olobayo
The world of online commerce is indeed vast. Thanks for sharing this but how can pay-per-view site owners ensure the content they’re selling remains secure and protected from piracy? Are there specific plugins or tools recommended to mitigate these risks?
WPBeginner Support
It would depend on the content type, as an example for videos there are tools to limit where the video can be viewed as an embed while images can be watermarked.
Admin
Dayo Olobayo
Thanks for this response. The video and image right protection makes sense but what about the sales of softwares? Would you happen to have a tip for protecting my work from scavengers?
WPBeginner Support
That would heavily depend on the software and how it is set up. We do not have a specific recommendation for that as it would depend on the coding.
Mrteesurez
Please, how is this pay per view really works. Is user paying to view each article on a site, i.e to views any article he has to pay for that particular article Or he will pay to view some articles for a particular period of time.
WPBeginner Support
The method in this guide shows how to limit access based on time, the danger of using the number of times a post is viewed is if a user needs to refresh their page it could count that as an additional view.
Admin
Mrteesurez
Thanks for your reply and support, If I understand your words now, you mean it’s better to set the view based on time frame rather than view count ? isn’t it ?
Jeremy Roberts
Normally yes we would recommend time instead of the number of visits.
alex magno
I tried the plugins but it is not possible to buy the single article, it is necessary to make a temporary subscription, how can this be done?
M.a. shurbaji
Can you help with pay by click plugin tutorial for classified web site. Thank you