Recently, a user asked about the difference between a cover image and a featured image in WordPress.
With the WordPress block editor, you can add a Cover block. It lets you add cover images to your posts and pages. This feature has confused some users because it may seem similar to the Featured Image option.
In this article, we will explain the differences between a cover image vs. featured image in the WordPress block editor.
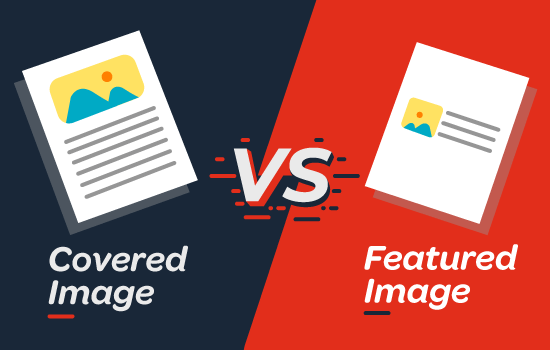
What Is a Cover Image?
A cover image is usually a wide image used as a cover photo for a new section in a blog post or page. It is part of the overall article. You can use a cover image when you’re starting a new section or a new story within your article.
With the Cover block in the WordPress website, you can add text and color overlay on your cover image.

By adding an appropriate color overlay that matches your theme color or content’s mood, you can make your article more engaging.
Similarly, adding text overlay helps your users easily identify where a new section starts in your article and what it’s about.
Traditionally, bloggers use heading text to separate sections in a blog post. With cover images, you now have options to separate sections in a more visually appealing way.
What Is a Featured Image?
A featured image (also known as a post thumbnail) is the main article image that represents the content. They’re prominently displayed on your website on single posts, blog archive pages, as well as on the homepage of news, magazine, and blog websites.
Aside from that, featured images are also displayed on social media feeds when an article is shared.
Featured images are designed carefully to make them look attractive. Such images give users a quick glimpse of your content and prompt them to read the entire article.
You’ll find a meta box in your post edit screen for adding a featured image because almost all WordPress themes support featured images by default.
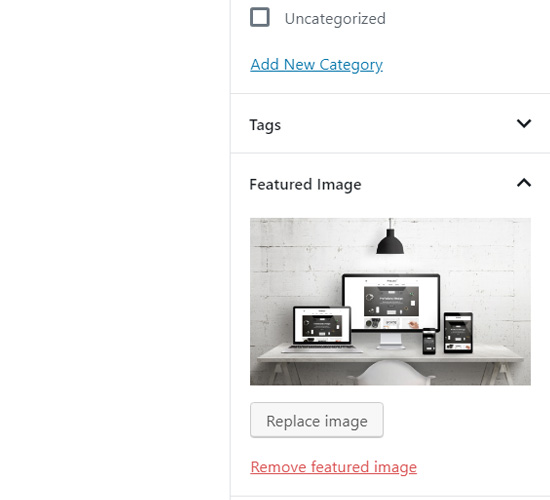
Where and how featured images are displayed is controlled entirely by your WordPress theme.
For advanced featured image options, you can check these best WordPress featured image plugins.
How to Add a Cover Image in WordPress
The WordPress block editor (Gutenberg) comes with a Cover block to allow you to add a cover image in WordPress.
First, you’ll need to create a new post or edit an existing one. On the post-edit screen, simply click on the ‘+’ button to add a new block and then choose the Cover block.
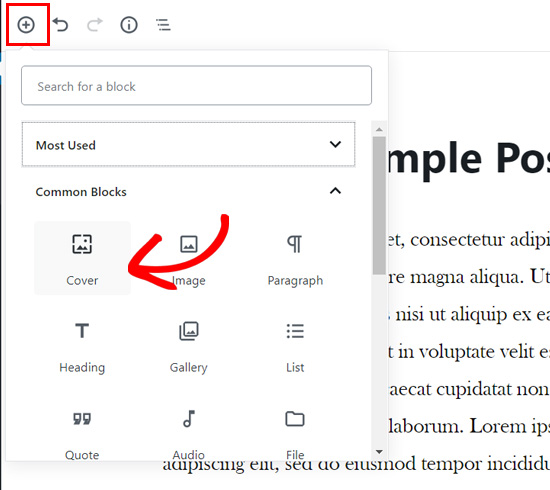
You can find the Cover block inside the Common Blocks tab.
Upon clicking on the block, you’ll see the Cover block added to your content editor with options to add your new cover image.

You can simply drag and drop an image or video in the block area to upload a new cover image. Alternatively, you can click the Upload button, choose an image on your computer, and open it to upload.
If you want to add an image that’s already uploaded to your media library, then you can click the Media Library button and select an image from your media gallery.
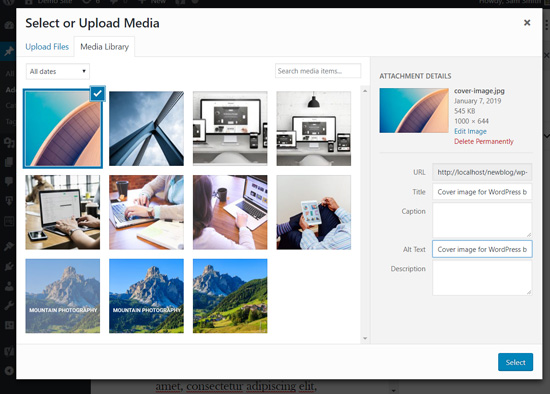
Once your cover image is added, you can easily customize it by clicking on the cover image.
This will show you a toolbar with customization options above the image, Write title… field in the center of the image, and block settings in the panel on the right side.

Next, you can add a title for your cover image. When you click on the cover image, you will see the ‘Write title…’ field in the center of your cover image.
Simply click on that area to add text. You can write your cover image title and format it using the formatting options that appear on top of the text or on top of the cover image.

Finally, there are cover block settings on the right-side panel.
For instance, you can enable the options to keep a Fixed background and a Repeated background.

Below that, there are color overlay options.
By default, it adds your theme’s color as an overlay color with 50% transparency. However, you can change the overlay color and also change the opacity by moving the point.

Lastly, you can add CSS code and add more styles to your cover image by clicking the Advanced option.
That’s it! You can repeat this step to add multiple cover images in a single article if needed.
How to Add a Featured Image in WordPress
The process of adding a featured image is the same as it was before. If you’ve had a WordPress blog for a while, then you already know how a featured image is added.
To add a featured image, you’ll need to open a post-edit screen first and then navigate to the Featured Image meta box on the right-hand side of the screen.
You will need to click the Set featured image option.

Next, you can upload a new image by either using the drag-and-drop uploader or selecting an image from your existing media library.
After that, you can add a title and alt text for your featured image, and then click the Select option.
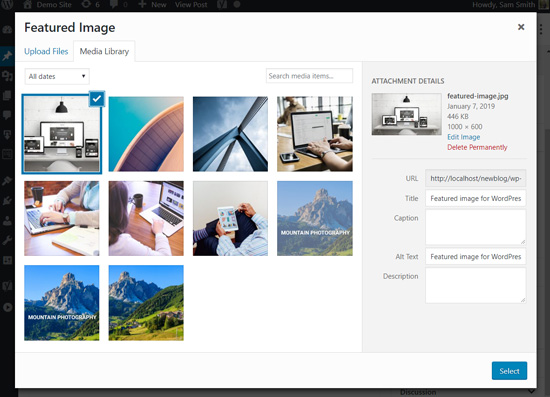
You have successfully added a featured image to your article.
If you want more detailed instructions, then you can read our beginner’s guide to adding featured images in WordPress.
Once you’ve added your featured image, you can preview your post and see how it looks.
If you’re using a default theme or other modern themes like Astra, then you may see a color overlay on your featured images as well.
You can remove it or change the color by going to the WordPress customizer.
Simply go to the Appearance » Customize page in your WordPress menu.
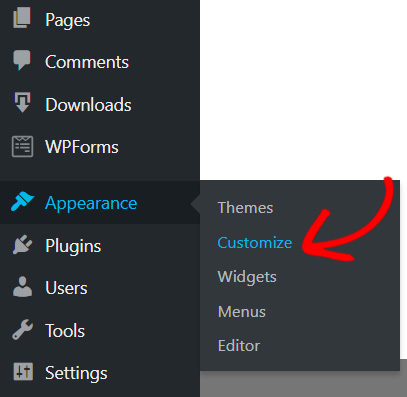
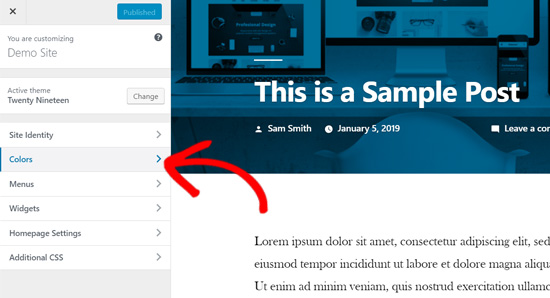
Once in the Customize panel, you will need to click the Colors option on the left.
This is where you can change the color of your featured images.
On this tab, you will see your theme’s primary color option and the option to enable or disable the image filter.
The theme will use the ‘Default’ option.
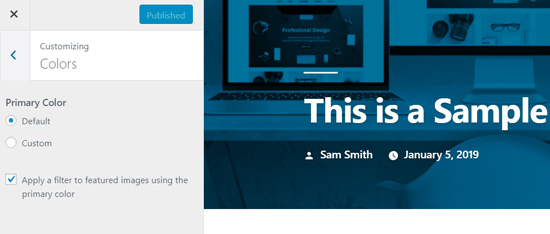
You can change your theme’s primary color by selecting the Custom option.
After that, simply choose a color overlay.
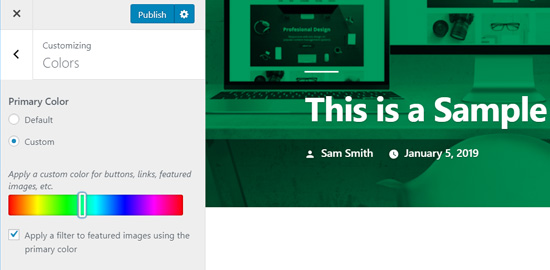
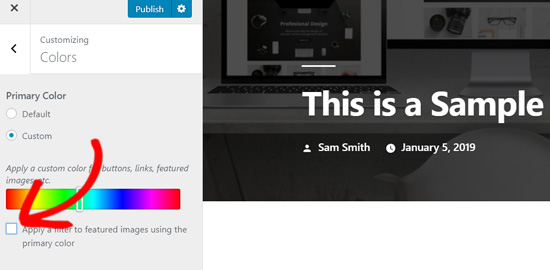
If you want to disable the color filter on your featured images, then you can simply remove the check next to the ‘Apply a filter to featured images using the primary color’ option.
Please note that featured images are managed by WordPress themes, so you may not find this option in your theme if it doesn’t support image filters.
If you are using a block-based theme, then please see our complete beginner’s guide to WordPress Full Site Editing.
Conclusion – Cover Image vs. Featured Image in WordPress
Now that you know how to add a cover image and a featured image, let’s take a look at some best practices.
Featured images have been popularly used by WordPress blogs, online magazines, news, and entertainment websites as post thumbnails or main article images.
Well-designed featured images help attract more users to open an article. They’re great for making your website look attractive and visually interactive.
Cover images are actually parts of your article. A user sees your cover image after they open your article to read. Thus, they make your articles more engaging and fun to read.
The best use of cover images is to add beautiful transitions between sections inside a long article.
Cover images are unique from regular post images because they have the full-width option, and you have the ability to add text overlay on them.
By properly adding cover images, you can improve user engagement on your posts.
We hope this article helped you to understand the difference between a cover image and a featured image in the WordPress block editor. You may also like to read our article on WordPress SEO and the best design software for small businesses.
If you liked this article, then please subscribe to our YouTube Channel for WordPress video tutorials. You can also find us on Twitter and Facebook.


Syed Balkhi says
Hey WPBeginner readers,
Did you know you can win exciting prizes by commenting on WPBeginner?
Every month, our top blog commenters will win HUGE rewards, including premium WordPress plugin licenses and cash prizes.
You can get more details about the contest from here.
Start sharing your thoughts below to stand a chance to win!
Dayo Olobayo says
I’ve been using WordPress for a long time and I’ve always been confused about the difference between cover images and featured images. This post has finally cleared up the confusion. The section on how to use cover images effectively was particularly helpful as I was struggling to find the right balance between the two. Thanks for the detailed explanation and the tips on how to use them effectively.
WPBeginner Support says
You’re welcome!
Admin
Mrteesurez says
Thanks. It’s well written and explanatory, it helped me understand what cover image and featured image are and the main differences between the two. Honestly it’s hard for beginners to identify the difference but this guide has explained it well.
WPBeginner Support says
Glad we could help clear up any confusion
Admin
Jiří Vaněk says
I’ve read the article twice and it’s still not entirely clear to me. So the cover image is the image on the background of the article and the featured image is the image that is classically displayed on the blog in the list of articles and after clicking on the top part? I understand it well?
WPBeginner Support says
You are correct.
Admin
Felix says
There seems to be a bug when using the featured image or cover image (containing a featured image) while creating a new Template in the Site Editor. Only the smallest resolution of the available image will be displayed. Can you confirm?
WPBeginner Support says
Unless we hear otherwise, it should default to the same featured image size as your theme currently.
Admin
Felix says
Shouldn’t it be context sensitive src-set instead?
WPBeginner Support says
It would depend on the specific theme and its settings. It would be best to check with the support for the current theme you are using and they should be able to assist!
Snehal says
Can we add alt tag to cover image?
if yes then how?
Meredith says
Great tutorial, except after following along I’m still seeing the shading on the Featured Image. Any ideas? When I went to Settings, Customize, Color and got rid of the clicked “Apply a Filter” button, I am now seeing black shading instead of my theme blue shading. Thanks!
WPBeginner Support says
You would need to reach out to your specific theme’s support for this issue.
Admin
Meredith says
Thanks! It’s a free theme (twenty nineteen), not sure if there is support for that?
WPBeginner Support says
You would go to the WordPress.org website to find your theme and it will have a link to the theme’s support forum
Joe says
I’ve been using featured images to act as thumbnails for the list-category-posts plugin. I just upgraded to WP 5.1 and upgraded the plugin. When I added the featured image, it changed the image for the header, but only on that post.
Any suggestions on how to fix that (I want the header to revert to what it is on every other page and post) and avoid it happening in the future?
Thanks!
WPBeginner Support says
For that, you would want to reach out to the support for your specific plugin and they would be able to assist.
Admin
Giselle Stafford says
Is there an idiots guide to making a nice looking blog post?
This new block system has completely stressed me out. On day 3 of getting ONE post out.
I can’t even find how to make paragraph headings!
If there is any way I can go back to the old and much easier way, I’m all ears!
WPBeginner Support says
You can revert to the classic editor using the method in our article here: https://www.wpbeginner.com/plugins/how-to-disable-gutenberg-and-keep-the-classic-editor-in-wordpress/
Admin
Al says
Great write-up on breaking down the differences. I’ve had a couple people confused and this goes a bit more in-depth than the answer I gave them.
WPBeginner Support says
Thank you
Admin