When managing a WordPress site, there are times when you need to make changes or updates without immediately publishing them. Whether you are working on new content, tweaking layouts, or testing new features, being able to save your progress without making it live is important for maintaining a polished and professional site.
At WPBeginner, we have been managing a blog for the past 16+ years and are always writing new posts and updating older content to create fresh and engaging articles. That means we have a lot of experience in this area.
Every day, we save posts without publishing them so that editors can review them first. This has streamlined our content management process and helped us improve our overall content quality, and we are happy to pass along this knowledge.
In this article, we will show you how to easily save your changes in WordPress without publishing.

Why Save Changes Without Publishing WordPress Posts and Pages?
WordPress makes it incredibly easy to add new blog posts and pages.
However, if you update a post or page that’s already live, then it will immediately overwrite the content that’s already there.
What if you want to draft an update and save that draft without publishing it? This can be useful if you need more time to edit your draft or if you are running a multi-author blog and want to approve any changes before they go live.
The only default way to do this is to switch it back to a draft and then republish the content again when the changes are ready. But when you switch a published post to a draft, it creates a 404 error, which can hurt your SEO.
An alternative is to simply create a new draft and copy and paste the content, but this doesn’t transfer over the categories and tags, your featured image, and more.
Luckily, you can use a WordPress plugin to create a cloned version of any page or post on your WordPress website and save the draft without making it live. Then, when you are ready, you can merge the changes and update the published post.
This is useful when you are redesigning a website, copying landing pages, rewriting old content, making edits, and more.
That being said, let’s show you how to save your changes in posts without publishing them on your WordPress site.
How to Save Changes Without Publishing in WordPress
The easiest way to save changes without publishing them live is by using the Duplicate Post plugin.
This plugin temporarily duplicates any page or post in WordPress with a single click, including all of the original settings. Then, when you’re ready, you can merge your changes and update the original post.
First, you need to install and activate the Duplicate Post plugin. For more details, see our step-by-step guide on how to install a WordPress plugin.
Upon activation, head over to the Posts » All Posts page in your WordPress dashboard.
Next, hover your mouse over a post, and you’ll notice the plugin adds three new options, ‘Clone’, ‘New Draft’, and ‘Rewrite & Republish’.

First, you can click the ‘Rewrite & Republish’ link under a post of your choice.
This will automatically create a duplicate version of that post and open it in the post editor screen.
You can now make as many changes as you want to this post and save it without publishing live. To save the post, simply click the ‘Save’ button in the top right corner of the page.
It will also automatically save drafts as you make changes.

You will now be able to access this WordPress post by visiting the Posts » All Posts page from the WordPress admin sidebar.
It will say, ‘Draft, Rewrite & Republish’ next to the post name.

When you are ready to publish, just click the ‘Republish’ button.
The plugin will then ask you if you are ready to republish the post and merge your new changes to the live post. If you are ready, then click the ‘Republish’ button again.
You can also check how your post looks before republishing it by clicking the ‘Preview’ button on the top right corner of the screen.
Similarly, you can also review the changes in each post by clicking on the ‘Save changes and compare’ button.

This brings up a side-by-side revision screen where you can see the changes made with the differences highlighted in green.
If you are happy with the changes, then click the ‘Return to editor’ link at the top of the screen.

You can also change the date when you want your edited post to go live. If you want the changes to publish instantly, then don’t change the date.
If you want to publish in the future, then simply click the ‘Republish:’ option and change the date to a time in the future.

Finally, click the ‘Republish’ button again.
You’ll now get a notification at the top of the page that says the original post has been replaced with the rewritten post.

Now, the changes you made to the cloned post will replace the original version of the post on that date.
Bonus: Schedule Your Posts in WordPress
If you are rewriting and republishing older posts constantly, then the process may be a bit overwhelming for you.
In that case, you can auto-schedule republishing articles on your WordPress blog. This way, you will be using an automatic system with a fixed time to publish all your scheduled posts.
To do this, you will need to install and activate the PublishPress Planner plugin. For details, see our beginner’s guide on how to install a WordPress plugin.
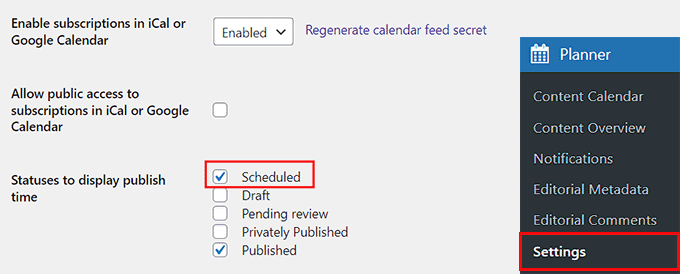
Upon activation, visit the Planner » Settings page and switch to the ‘Content Calendar’ tab. After that, check the ‘Scheduled’ box next to the ‘Statuses to display publish time’ option.

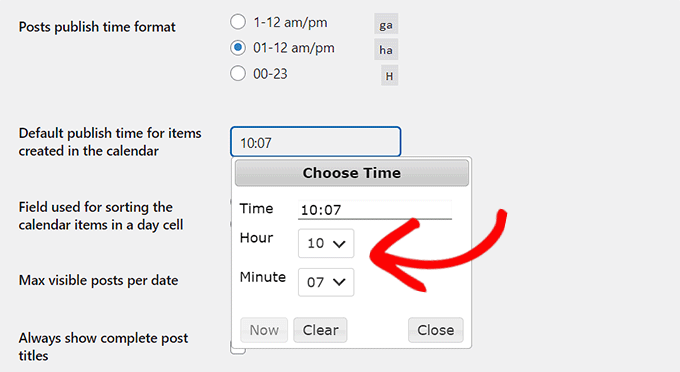
Next, you will have to select a time format for your scheduled posts by clicking on the ‘Default publish time for items created in the calendar’ option.
This will open a prompt on the screen where you must pick the exact time, hour, and minute for your scheduled posts to be published daily.

Finally, click the ‘Save Changes’ button to store your settings.
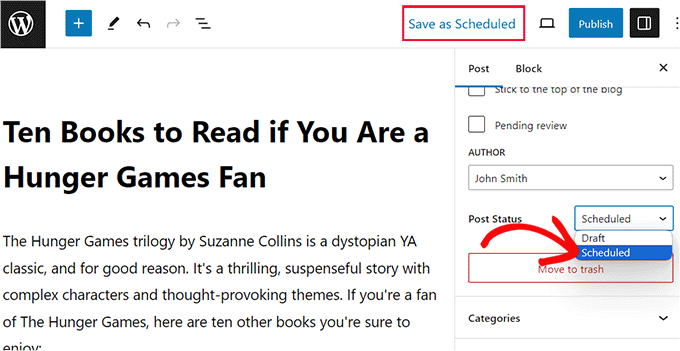
Now, when you visit your block editor, you can easily select the ‘Scheduled’ option from the block panel after reviewing the rewritten posts.
Then, click the ‘Save as Scheduled’ button to automatically republish your post at a specific time.

For detailed instructions, see our tutorial on how to auto-schedule your WordPress blog posts.
We hope this article helped you learn how to save changes without publishing in WordPress. You may also want to see our detailed guide on WordPress post revisions made simple and our list of essential tips for using shortcodes in WordPress.
If you liked this article, then please subscribe to our YouTube Channel for WordPress video tutorials. You can also find us on Twitter and Facebook.


Have a question or suggestion? Please leave a comment to start the discussion.