Regular backups are important for peace of mind. But what if you have only a database backup?
Restoring a WordPress site from a backup can seem daunting, but it’s easier than you might think.
At WPBeginner, we’ve seen many cases where users relied on a free plugin that didn’t back up their files. Without a full backup, restoring your site can be tricky.
If you’re currently struggling in this situation, don’t worry. In this guide, we will teach you how to restore your site using just a database backup. While it might not bring back everything, it will help you recover vital data.
What Is a WordPress Database?
A database is like a giant electronic storage room. It helps you keep a ton of information organized. You can also think of it as a digital version of a filing cabinet or library.
Now, a WordPress database keeps lots of important information that helps your website run smoothly. Here’s a simple overview of what kind of data it holds:
- Media Files: Information about the images, videos, and other files you upload, including where they are stored and their details.
- Post Information: This includes your blog posts, their content, titles, and extra details.
- User Information: Details about the people who use your site, like usernames, passwords (that are securely hidden), and their roles.
- Comments: Records of comments left by users, including what they said and their approval status.
- Settings: Data that controls how your site works and looks.
Overall, a WordPress database keeps everything neat and easy to handle. It also allows many people to use and update the site at the same time without causing conflicts.
That’s why we recommend backing up your WordPress website in case something goes wrong with your website. That way, you won’t lose your valuable data.
You may also wish to see our tutorial on how to manually back up your WordPress database.
Expert Tip: Losing website data can be a tough time. Your site may also start showing errors, negatively impacting user experience. But don’t let WordPress issues slow you down – we’re here to help you get back on track. Get emergency WordPress support now!
How to Restore a WordPress Site With Just a Database Backup
Now that we know how important databases are, let’s talk about something more practical.
So, what if your website breaks and you only have a database backup? It might sound tricky, but don’t worry – we’ve got your back!
In the next sections, we will show you how to restore your WordPress site using just a database backup. Whether you’re a pro or just starting out, this guide will help you get your site up and running again with all your important data.
Here’s a quick overview of all the methods we will cover in this guide:
Ready? Let’s get started!
Method 1: Restoring a WordPress Site With Just a Database Backup Using a Plugin
In this section, we will show you a beginner-friendly method for restoring a WordPress site using just a database backup.
Duplicator is the best WordPress backup and restore plugin on the market. It lets you restore any kind of backup, even cloud backups, with just a single click. Plus, it can help you roll back your site even if you can’t access your dashboard.
To get started, you can install and activate the Duplicator plugin. If you need help, then you can refer to our guide on how to install a WordPress plugin.
Upon activation, let’s first activate your license key.
Simply navigate to Duplicator Pro » Settings » General and paste your key into the right field. You can find your license key in your Duplicator Pro account.
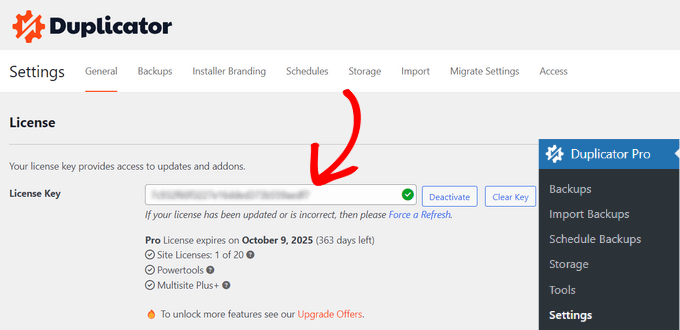
Note: There’s also a free version of Duplicator. But you’ll need the Pro version to create database backups.
Creating a Database Backup in Duplicator
To create a database backup, simply go to the ‘Backups’ panel from the WordPress dashboard.
From here, you can click the ‘Add New’ button.
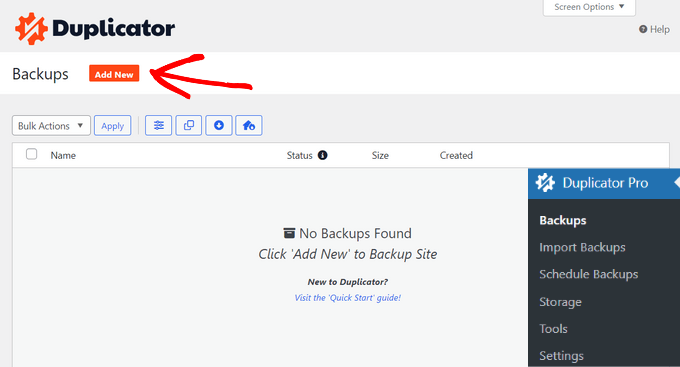
This will open the setup wizard.
First, you can enter a name for your database backup. You can also use the dynamic tags to automatically create a name, like the date, time, and your website title, for example.

Next, you need to navigate to the Backups » Filters section and then click the ‘Database Only’ button.
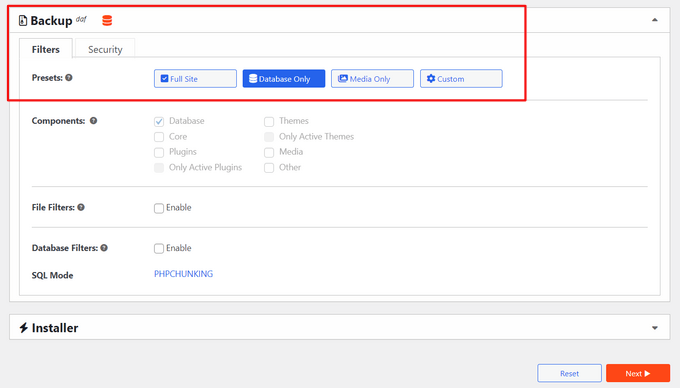
Then, you can scroll down the panel and click the ‘Next’ button to continue the process.
Duplicator will then run a scan of your WordPress site and share a review. Here’s what it looks like:
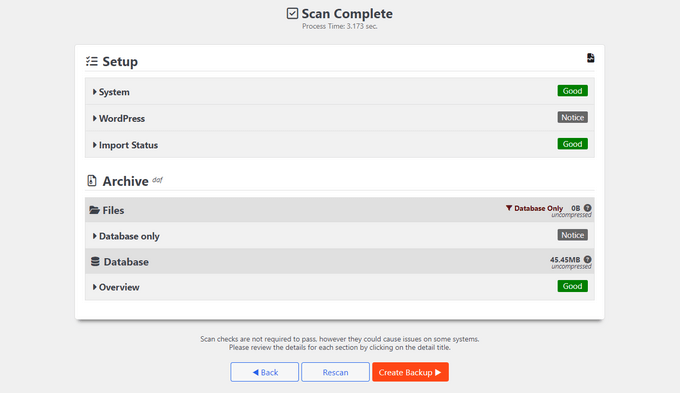
Go ahead and hit the ‘Create Backup’ button on the bottom of the panel.
Restoring the Database Backup
In your Duplicator’s ‘Backups’ panel, your database backup has a database icon like this:
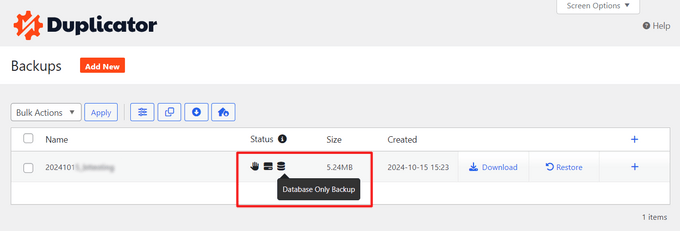
Now, if an error happens, you can quickly restore your WordPress website using the database backup.
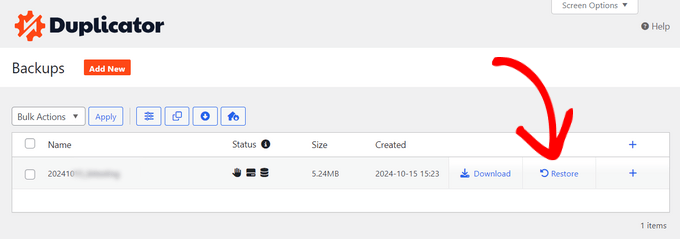
Simply click on ‘Restore,’ and the plugin will open a pop-up window for the process.
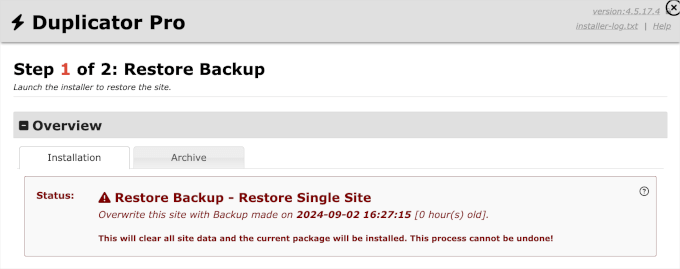
You might want to read the whole page.
When you’re done, you can check the terms and conditions box and click the ‘Restore Backup’ button.
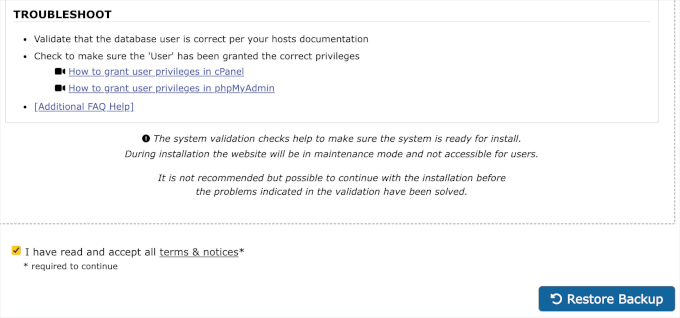
You’ll then need to click ‘OK’ on the confirmation popup.
And that’s all there is to it. You can now log in to your admin area as prompted.
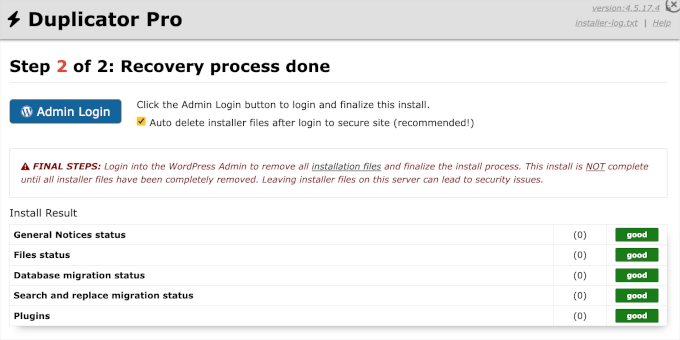
If you can’t access your WordPress admin dashboard because of an error, then you’ll need to download your Duplicator backup zip file and installer file from wherever you have them stored. This can be your local storage or a cloud service.
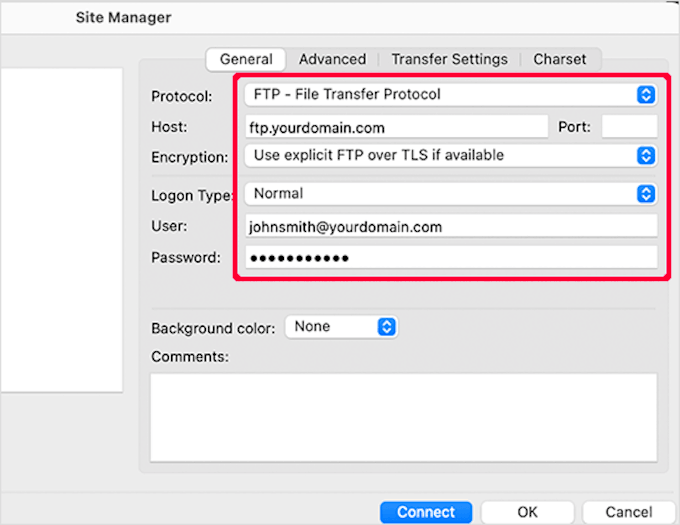
You’ll also want to make sure you have an FTP program like FileZilla installed on your computer.
To get started, you need to connect the FTP program to your website server.
After that, simply upload the backup zip file and the installer file to the public_html folder. This is the root directory where WordPress is installed.
If you need help, then you can see our guide on how to use FTP to upload files to WordPress for beginners. It covers everything from connecting your site to uploading files.
With that done, you can start the restoration process.
Let’s open your web browser and go to https://your-domain/installer.php. Make sure to replace your-domain with your actual site’s address.
From here, all that’s left to do is follow the on-screen instructions provided by the installer to complete the restoration process.
Method 2: Restoring a WordPress Site With Just a Database Backup Without Plugin
For this method, we will assume you have your WordPress database backup in a zip file. If you don’t have one yet, here’s how to make a WordPress database backup manually.
If you are recovering from a bad experience with your web hosting provider, then it’s probably time to find a better host.
We have hand-picked some of the best WordPress hosting providers. These are the companies that we have worked with and trusted with our own projects.
Related: Want to know if it’s time for a hosting change? The you might want to check out our guide to key Indicators you should switch your WordPress hosting.
Preparing to Restore WordPress Database Backup
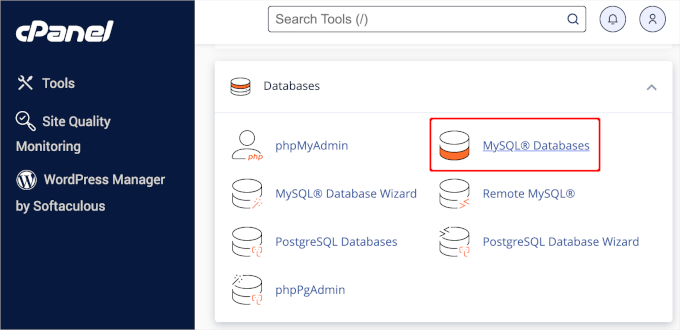
First, you will need to create a new database. Simply log in to your cPanel account and click on ‘MySQL Databases’ under the ‘Databases’ section.
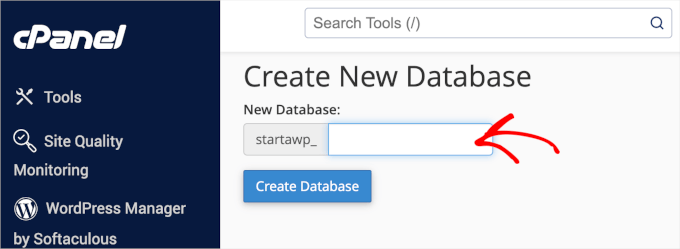
Next, you’ll want to create a new database.
To do this, you can provide a name for your database and then click the ‘Create Database’ button.
Now that you have created a database, you need a MySQL user who will be assigned all privileges to work on your newly created database.
On the same MySQL databases page, scroll down to the ‘MySQL Users Add New User’ section and fill out the fields.
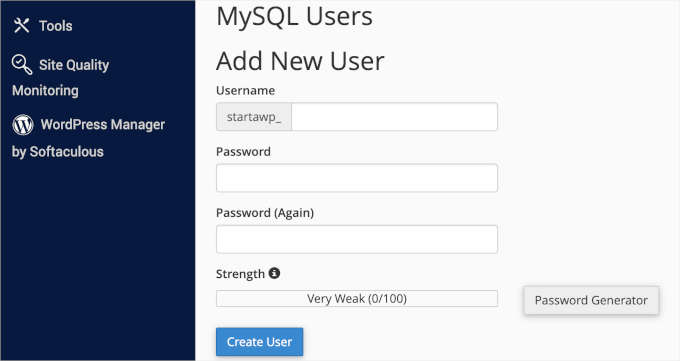
Let’s make sure you have a strong username and password combination for your database user. Then, go ahead and click on ‘Create User.’
Next up, you need to add this user to the MySQL database.
So, you’ll want to scroll down to the ‘Add User To Database’ section, select the user and database from the drop-down menus, and then click the ‘Add’ button.
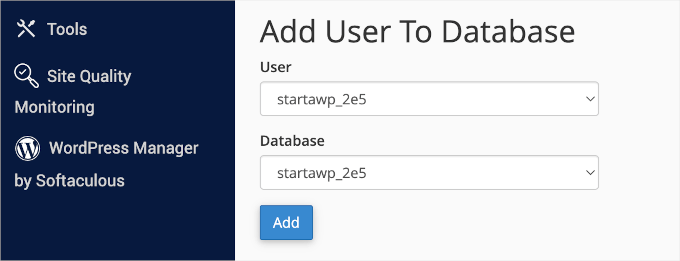
At this point, your new database should be ready.
Importing WordPress Database Backup
The next step is to import the new WordPress database.
To do this, you’ll need to go back to the cPanel dashboard. Then, under the ‘Databases’ section, you’ll want to click on ‘phpMyAdmin.’
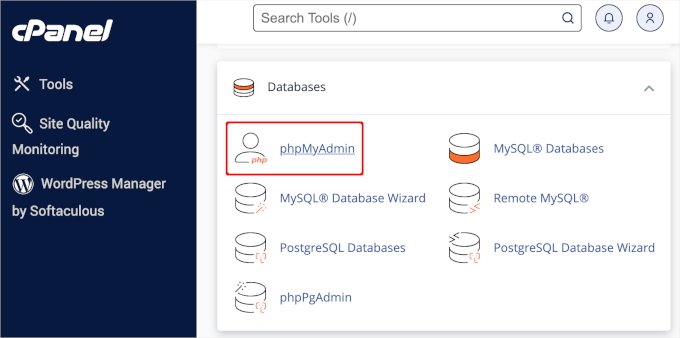
After that, you can select the database you created on the phpMyAdmin page and click the ‘Import’ button.
Next up, let’s click on ‘Choose File’ to upload your WordPress database backup file. Simply click on the go button at the bottom of the page to start importing.
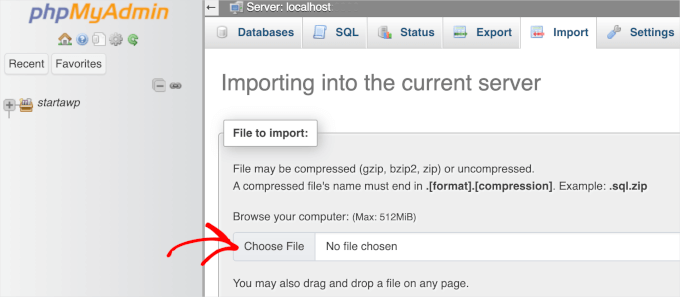
You will see a success message when the import job is finished.
Restoring Your WordPress Site
At this stage, you’ve successfully imported your WordPress database. The next step is to install WordPress using your new database.
To restore WordPress manually, you will need to install it manually on your server. If you need help, then you can see our step-by-step WordPress installation tutorial and jump to the section ‘How to install WordPress using FTP’ for detailed instructions.
During installation, when you reach the ‘Create a Configuration File’ step, simply enter the database name and user you created earlier.
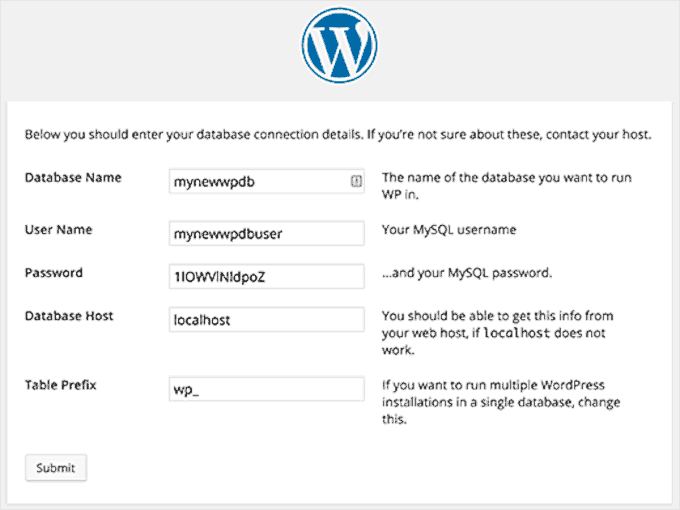
You should then see a message that WordPress can connect to your database, and you can run the installation.
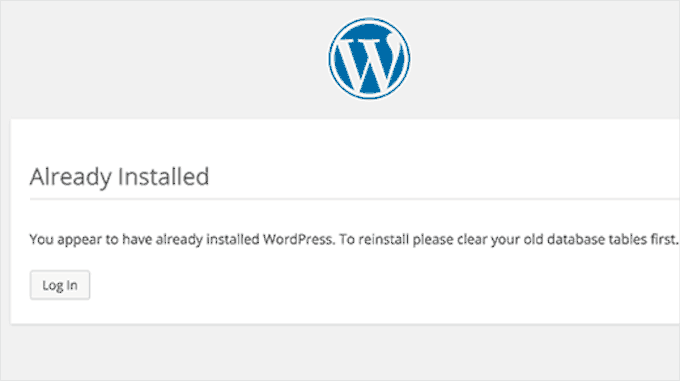
Clicking on the install button will now show you the ‘Already Installed’ message.
Go ahead and click the ‘Log In’ button to access your WordPress admin area.
Restoration Troubleshooting
Since you do not have your old WordPress files, several things might be missing. Some can be easily restored, while others will be a bit difficult. We will go through each one one by one.
1. Theme
Simply install a fresh copy of your WordPress theme. If you made direct changes to your theme files, then all those changes will be gone.
You will have to go through theme options to set it up like before.
2. Widgets
If you use a classic theme, such as Astra ir Inspiro, then you know that widgets play an important role. Luckily, they are stored in your WordPress database, and switching to your old theme will restore some of your widgets.
You can always go to Appearance » Widgets to add and rearrange widgets in your sidebars.

Some WordPress plugins come with their own widgets. To use those widgets, you will first need to install and activate those plugins.
3. Permalinks
Your site’s permalink structure is also stored in the database, and it will be automatically restored. However, if you are seeing 404 errors on the front end of your site, then you need to refresh the permalink settings.
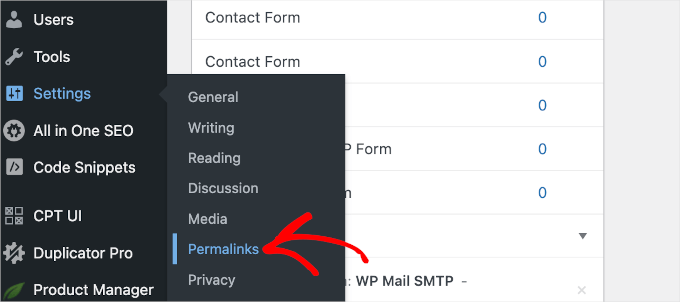
Simply go to Settings » Permalinks and click on the ‘Save changes’ button without changing anything. This will refresh your WordPress URL structure.
4. Plugins
WordPress stores a record of your site’s active plugins.
When you visit the plugins page for the first time, WordPress will show you a list of errors for each plugin that was in the database but is no longer installed.
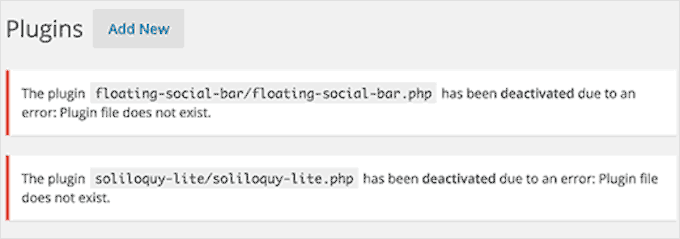
All you need to do is copy all the plugin names and start installing and activating them one by one.
Recovering Lost Images for Your WordPress Site
Finding and replacing lost images on your website might be the trickiest part of the recovery. Depending on how much content and images you have, this can take a long time.
Unfortunately, there is no easy way around it. You will have to use a variety of tools to extract your images from different sources, and your chances of recovering all images are fairly low.
1. Look in Your Browser Caches
If you recently lost your website, then you can look into your browser cache.
Google Chrome users on Windows can try Chrome Cache Viewer.
Google Chrome users on Mac will be out of luck. We weren’t able to find any reasonable solution to browse, preview, and save images from the Google Chrome cache on Mac.
2. Look for Your Images in Web Caches
There are several web services that keep cached versions of websites.
You can start by looking for your images in Google’s image search. Simply enter your site’s URL, and you will be able to see images Google found on your website.

You can click on an image to see a larger preview and save the image.
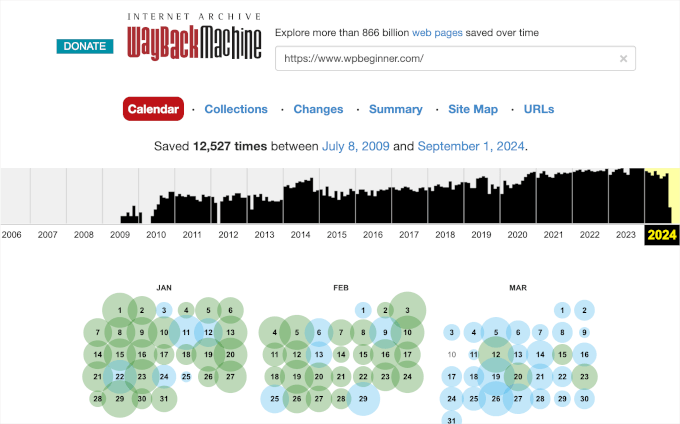
If you are restoring a much older site and can’t find images on Google or Bing, then you can try Archive.org. It is a non-profit organization that stores snapshots of websites for historical purposes.
3. Replacing Images on Your Website
If your old site did not have much content, you can manually replace images in your posts. However, if you have a lot of content, finding and replacing images manually will be a bit more difficult.
But don’t worry. We will show you how to easily replace them.
To do this, we recommend using Search & Replace Everything by WPCode. This free plugin can help you quickly replace broken images anywhere on your site with just a click.
So, let’s install and activate the Search & Replace Everything plugin. If you need help, then you can read our guide on how to install a WordPress plugin.
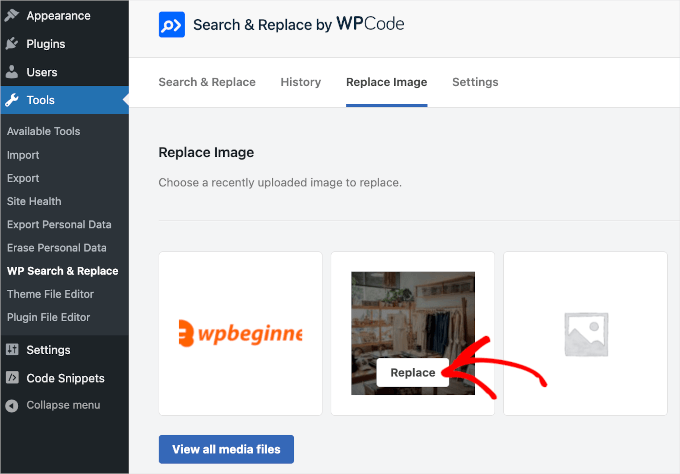
Upon activating the plugin, you can navigate to Tools » WP Search & Replace » Replace Image. In this area, you’ll see all your existing images.
Simply hover over the image you want to replace and click the ‘Replace’ button.
In the ‘Replace Image’ panel, you can click ‘Choose a file’ or ‘Choose a new image to see a preview here’ to select your new file from your computer.
The new file will then appear next to the old one.
If everything looks good, click the ‘Replace Source File’ button. The Search & Replace Everything plugin will then process the replacement.
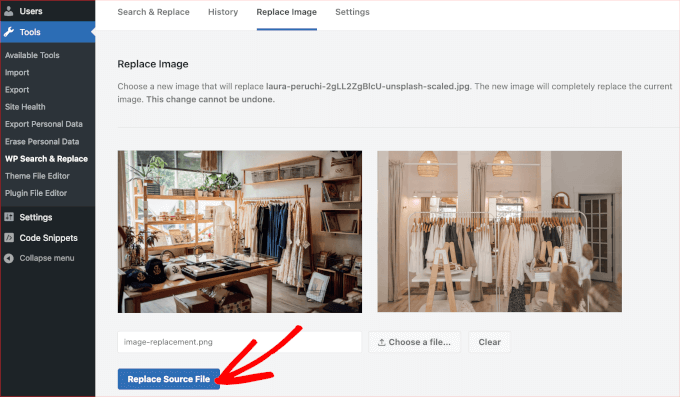
For detailed instructions, you can refer to our guide on how to easily replace image and media files in WordPress.
Finding and Fixing Broken Links
You may also have problems with broken links after restoring your database backup.
To make sure everything is in place, you can use Broken Link Checker by AIOSEO. This plugin can help you regularly check for broken links on your website, both internal and external, that lead to a 404 error.
To get started, you’ll need to install and activate the Broken Link Checker plugin. For more details, you can see our step-by-step guide on how to install a WordPress plugin.
Upon activation, simply follow the setup wizard to set up your account.
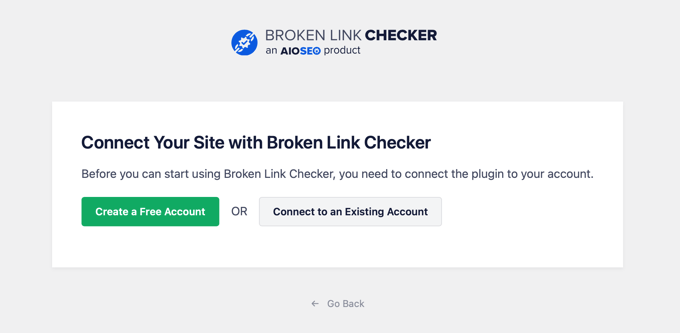
If you already purchased the Pro version, simply click on the ‘Connect to an Existing Account’ button. You will be asked to sign in to your account.
After finishing the setup process, the plugin will then work in the background to find links in your posts, pages, and custom post types.
You can navigate to Broken Links from your WordPress dashboard, and the plugin will show you a list of all broken links on your site.
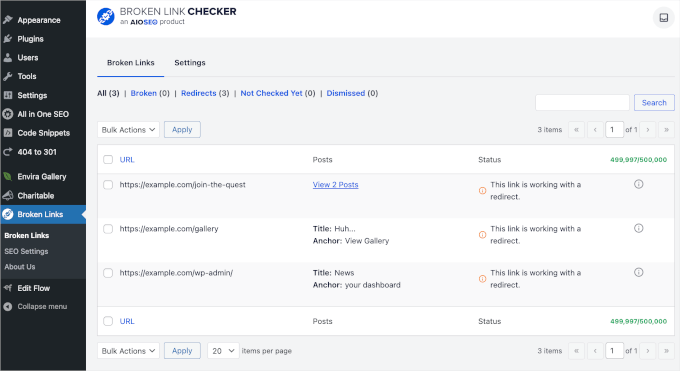
For more details, please see our guide on how to find and fix broken links in WordPress.
Expert Tip: Remember, our reliable WordPress support is just a click away. Get back online quickly – contact our emergency WordPress support team today!
We hope this article helped you restore your WordPress site from database backup. Next, you might also want to see our expert tips and hacks to protect your WordPress admin area and our picks of the best WordPress backup plugins.
If you liked this article, then please subscribe to our YouTube Channel for WordPress video tutorials. You can also find us on Twitter and Facebook.


Moinuddin Waheed
Thanks for this guide.
I have a backup from 2016 of one of my blogs and I have tried multiple times not able to restore them back.
I will try these steps and see if I would be able to successfully restore my database.
the thing that I am missing are the posts that I had written on my blog.
hope this will work.
Ruby Yeo
Hi, please help, the ‘create a configuration file’ part didn’t pop up after successful installation
WPBeginner Support
You would want to ensure you are using the FTP installation method from our guide below as if you use the built-in methods from hosting providers, they handle that step for you which is why you would not see that page.
https://www.wpbeginner.com/how-to-install-wordpress/#installftp
Admin
Mallory
Thanks for this article! I restored my site from the database file. But when I visited the plugins page for the first time, I didn’t immediately copy the list of plugin errors from the plugin files that don’t exist any more. Now the notification is gone. Is there any way to find this list again? There were several plugins that I don’t remember but need to be reinstalled.
WPBeginner Support
Sadly, we do not have a specific location we would recommend for finding the errors again.
Admin
Emmanuelkwofie
Hi, I was noticed by my hosting company that hackers have back door to my website so I should clean it and didn’t know what to do, so I did a backup of my theme, plugins, and upload and downloaded it to my local pc. I did not also remove the database. so in all, I have my database and the other files I backed up. Please, can I still get my website back and how? i don’t have the htc.access file and the wp.config file. How do i get my website back as it was?
WPBeginner Support
If the method in this article does not help, you could take a look at our other article here: https://www.wpbeginner.com/beginners-guide/beginners-guide-how-to-restore-wordpress-from-backup/
Admin
Dean
I ran restore database and let it run for HOURS. All the time it said “loading”. When I went back into cPanel the dbase size is 0.00.
Is there some voodoo magic I can use to restore my database?
WPBeginner Support
You would want to first reach out to your hosting provider to see if they’re having any issues on their end that could be preventing the restore.
Admin
LibertySky
Instead of “Already Installed” I have a new clean installation and nothing is restored
WPBeginner Support
Hello,
Please retry the steps and make sure your database settings are correct.
Admin
eswaran
i have installed wordpress on server and took backup using this i have created same copy of wordpress in my local machine. I have installed some of plugin on server and restored the plugin physical file via FTP to my locai machine. Then i took DB backup from server and restored in my local machine.
The problem is i have activated the plugin’s on server but after restore database the plugin not active automatically in my locai machine. Every time i need to activate manually.
To achieve this do i need update any sql script on database?
Ronny P.
Thanks. Site was throwing 404 on all posts, got fixed after updating the permalink setting.
Richard Adarkwah
This article is great and enabled us to have our website back!
Lisander
I have an old site I wanted to recover, but my old laptop crashed.
Had an older back up lying around (not the latest). i followed these steps, now I have about 70% restored.
Thanks for the guide.
Mustapha
Thank you very much,
Restored 90% of my lost template, I worked hard for 2 months to create it.
Many thanx!
zhul
so what happen with my old article if i restored the new backup from another site?
is it replace all data?
Ahmed LAHMAR
Thank you WPBeginner,
I went through the same bad experience but luckily my images were stored in the free cdn offered by WordPress.com
Ewan Yates
Thanks for this great guide. Quick question though,…
When creating a new database and user, do they need to be the same as the ones in the backup?
WPBeginner Support
No, you can create a new database under a different user.
Admin
Dusty
This is a great guide for those instances where a full backup isn’t available. Full backups are so important! Thanks!