The news that Google is shuttering Google Business Profile websites has made many users ask us how to migrate their site to WordPress before the service shuts down for good.
In March 2024, Google will be shutting down more than 21.7 million websites created with Google Business Profiles. This is the latest in a history of Google removing products and services.
If you’re one of the users who will be affected by this change, then now is the perfect time to relocate your website.
In this article, we will show you how to migrate a Google Business Profile website to WordPress.
Here’s an overview of what we will cover in this guide. You can click the links below to jump ahead to your preferred section:
- Why Migrate a Google Business Profile Site to WordPress?
- Why Choose WordPress as a Platform for Your Website?
- Step 1: Create a Backup of Google Business Profile Site
- Step 2: Choosing a Web Hosting Platform for Your Site
- Step 3: Install and Set Up WordPress
- Step 4: Add Content From Business Profile Site to WordPress
- Step 5: Optimizing Your Business Site for Local SEO
- Step 6: Update Website URL in Google Business Profile
- Bonus: Install WordPress Plugins to Get the Most of Your Site
Why Migrate a Google Business Profile Site to WordPress?
When you create a Google Business Profile, you get an option to add a website. Previously, if you didn’t have a website, Google would allow you to create a free single-page site instantly.
This way, users looking up your brand on a local search will see a detailed business profile, including a business site, working hours, store locations, directions, phone numbers, and more.
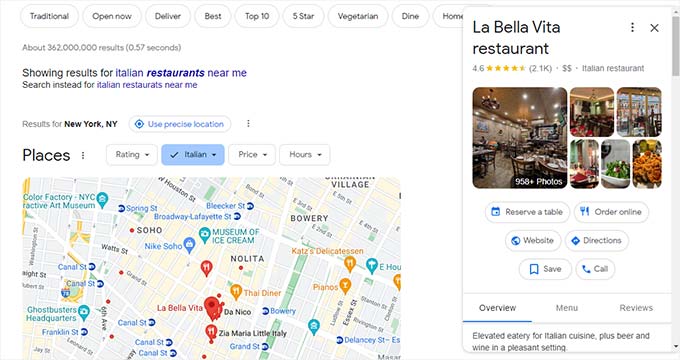
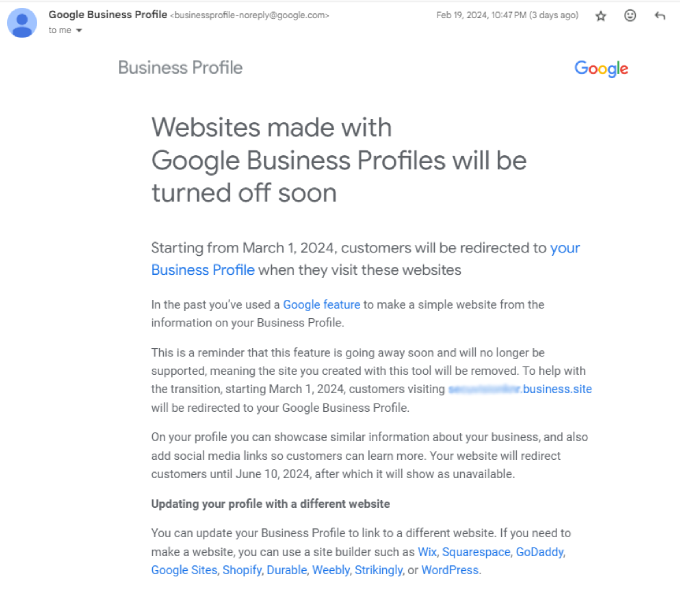
However, Google is shutting down Business Profile sites in March 2024. Once the service closes, users will be automatically redirected to your Business Profile page.
Unfortunately, that redirection will only work until June 10, 2024. People visiting your site after this date will see a ‘page not found’ error.
This can have a negative effect on your business, as it will look less professional. Not to mention, customers won’t be able to view detailed information about your company, products, and services.
As a result, your conversions may drop, and you could end up losing customers to your competitors.
That’s why it’s important to migrate your Google Business Profile site to WordPress.
Note: Google is only shutting down the service that hosts sites through Google Business Profiles. The profile for your business itself will still be available in search results. Later in this post, we will show you how to link your new WordPress site with your business profile.
Why Choose WordPress as a Platform for Your Website?
WordPress is the most popular website builder in the world, as it powers more than 43% of websites on the internet.
The best part is that WordPress is free to use and open-source. By migrating your Google Business Profile site to WordPress, you get more control and flexibility.
For instance, you get to own all your content and don’t have to rely on a third-party platform. All you need is a web hosting service and a domain name to get started.
With WordPress, you get multiple themes. This makes it very flexible, as you can create a simple 1-page WordPress website or a complete online store. It also offers thousands of plugins which help add more features and functionality.
Besides that, WordPress is SEO-friendly. What this means is that you can easily optimize it for search engines like Google. This helps attract users to your website and boost conversion.
For all of these reasons and more, WordPress is the best alternative to Google Business Profile websites.
Note: Remember that WordPress.com and WordPress.org are different platforms. WordPress.com is a hosted solution that offers limited features, whereas WordPress.org is the famous platform that everyone has come to love and use. You can see our complete comparison of WordPress.com vs. WordPress.org.
That said, let’s look at how you can easily migrate your Business Profile site to WordPress.
Step 1: Create a Backup of Google Business Profile Site
Before you can migrate your website to WordPress, the first step is to backup data from your Google My Business site.
Note that Google Business Profile doesn’t offer an export option, so you’ll need to download all the images, videos, and other media files manually.
To do that, simply open your Google Business Profile website and then right-click on the image you want to save.
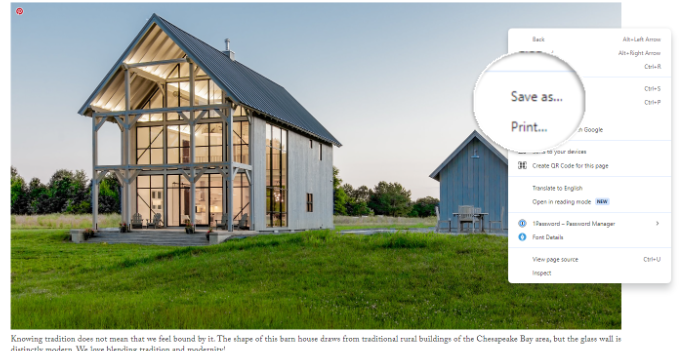
After that, simply click the ‘Save as’ option and save the image anywhere on your computer.
Similarly, you can simply copy the text on your website and paste it into a document.
To start, first highlight the text on your website and then hit the right-click button on your mouse. From here, select the ‘Copy’ button.
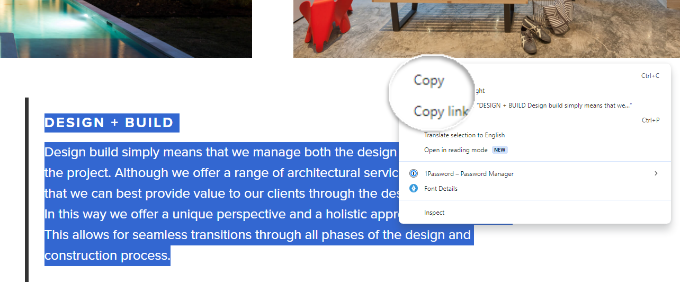
You can also use keyboard shortcuts to copy the text. For instance, you’ll need to hit ‘Ctrl + C’ on Windows and ‘Command + C’ on Mac.
Next, open a Notepad file, Google Docs, or a Microsoft Word document and simply paste the content from your website. If you have links in the text, it’s a good idea to use Google Docs or Microsoft Word because they will keep those in the pasted text.
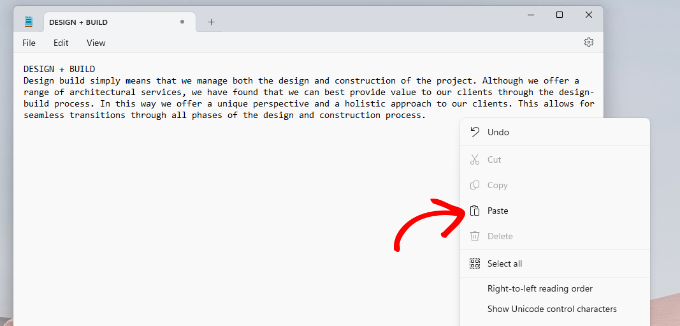
You can right-click anywhere on the document and select the ‘Paste’ option. Or use the ‘Ctrl + V’ keyboard shortcut on Windows and ‘Command + V’ on Mac to paste the text.
Since Business Profile sites are small and single-page, downloading and copying your data should be a quick process.
Step 2: Choosing a Web Hosting Platform for Your Site
Next, you will need a web hosting service to run a website using WordPress. Web hosting is where all your website files are stored. You can think of it as a house where your site’s content lives.
While WordPress is free to download, you’ll need to subscribe to a platform like Bluehost to host the site
Usually, web hosting costs around $7.99 per month (paid annually), and domain name prices start from $16.99 per year, depending on the domain extension. The cost to build a WordPress site can go even higher if you want a custom theme and more features.
This can be a significant investment, considering it was free to create a website using Google Business Profile.
Luckily, Bluehost is offering an exclusive discount for WPBeginner users. You can get started for as low as $1.99 per month and get a free domain + SSL certificate.
Bluehost is one of the best hosting companies in the industry. It is an officially recommended WordPress hosting provider.
WPBeginner users can enjoy up to 61% off and get a 1-click WordPress install. To start, simply visit the Bluehost website and click the ‘Get Started Now’ button.

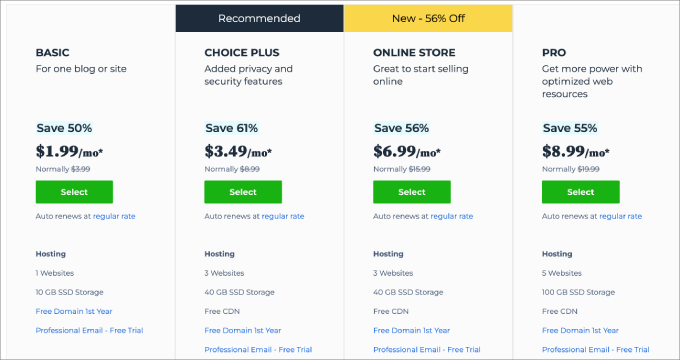
After that, you will need to select a hosting plan.
Simply click the ‘Select’ button to choose a pricing plan. You can select the Basic or Choice Plus plans to get started, as they should be suitable for small business websites.
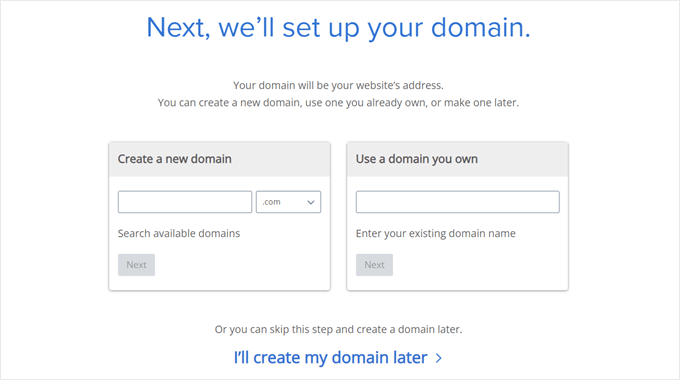
On the next screen, you will need to pick a domain name for your website. A domain name is your site’s name that users will enter in their browsers (like wpbeginner.com or google.com).
Bluehost lets you create a new domain name, or you can use an existing domain that you own.
Pro Tip: If you need help picking the right name, then try our free business name generator tool. Simply enter words related to your business, and the tool will generate lots of ideas for your domain name.
After choosing a name for your website, you’ll need to fill in your account details and finalize the Bluehost package.
Bluehost will add extra options to your package. We recommend unchecking all the additional options as you’ll save money. Plus, you can always add them later on if needed.
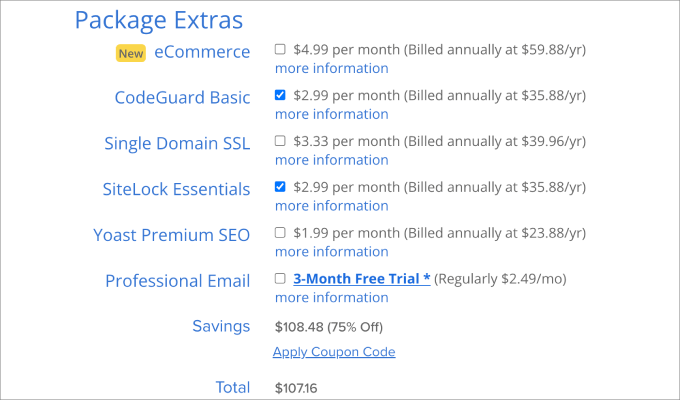
Next, you can add your payment details and complete the purchase.
Once that’s done, Bluehost will create your hosting account and email you the login details.
Step 3: Install and Set Up WordPress
Next, you can log in to the Bluehost account to view the dashboard. From here, you’ll be able to manage your website, get support, and install WordPress.
The best part about using Bluehost is that it automatically installs WordPress for you.
You just need to head to the ‘Websites’ tab from the menu on the left. After that, simply click the ‘Edit Site’ button.
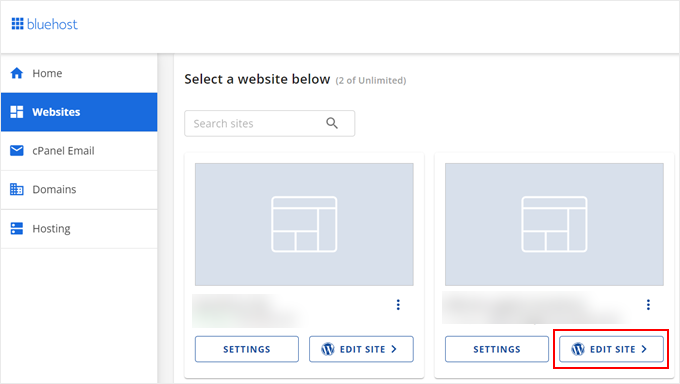
This will open the WordPress dashboard, where you can log in and start adding content, customizing the design, and creating new pages.
Bluehost offers an AI-powered setup wizard that will guide you through the initial configuration. You can simply follow the on-screen instructions to create a WordPress website. You can also opt-out of the AI assistant.
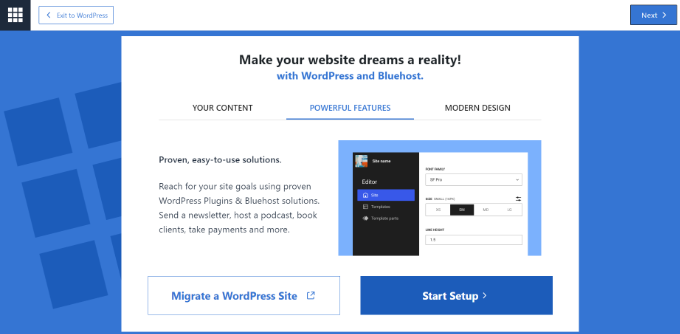
You can learn more by following our complete guide on how to install WordPress.
Step 4: Add Content From Business Profile Site to WordPress
Now that your WordPress site is ready, the next step is to import content from the Google Business Profile site.
Since there is no way to directly import data from your Google My Business site into WordPress, you’ll need to add content manually.
You can start by creating different pages for your website, like an about us page, a contact page, and more. Simply head to Pages in the WordPress dashboard and click the ‘Add New Page’ button.

Next, you will need to enter content that you copied from the Google Business Profile site in the content editor.
To start, enter a title for your page at the top. After that, you can type the text or simply copy it from the file you created earlier and paste it into the content editor.
Simply use the keyboard shortcut keys to copy and paste the text. For Windows, you’ll need to press ‘Ctrl + C’ to copy and ‘Ctrl + V’ to paste. If you’re using Mac, then simply press ‘Command + V’ to copy and ‘Command + V’ to paste.
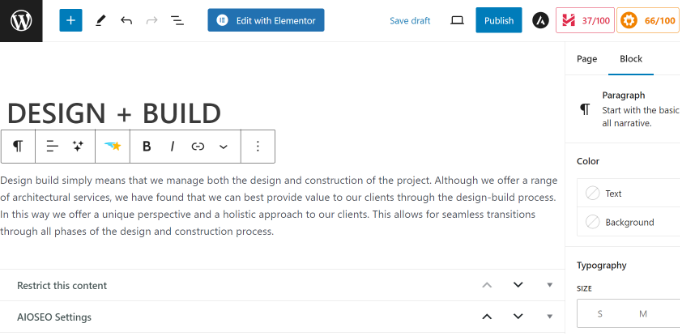
WordPress also lets you add images, videos, and other media files to your content.
To add a picture, you can click the ‘+’ sign and add an Image block in your content. From here, you’ll need to click the ‘Media Library’ button.
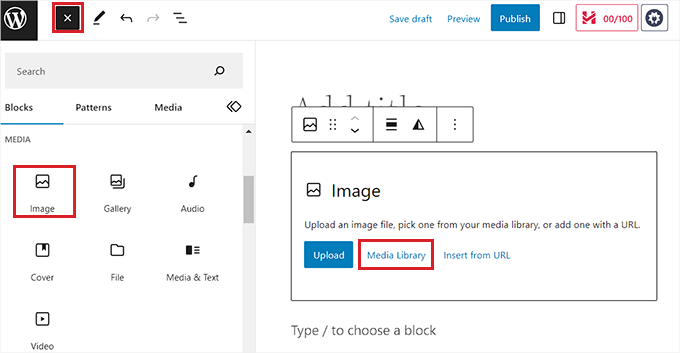
A new popup window will open with the WordPress Media Library.
Next, you can switch to the ‘Upload files’ tab and then click the ‘Select Files’ button.
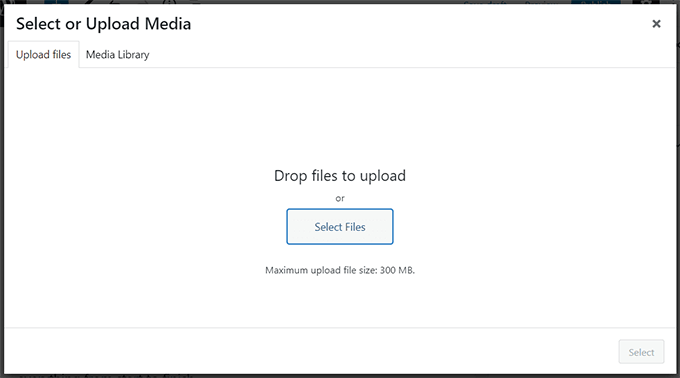
Now, navaigate to the Google Business Profile website images you saved earlier and select them.
Once they’re uploaded, you will see them in the Media Library. Go ahead and select the image you want to add to your content.
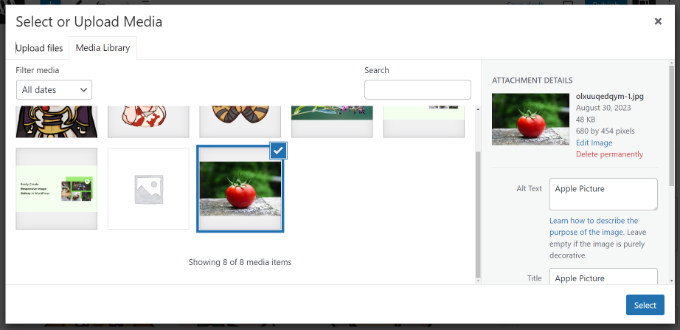
To learn more, please see our guide on how to properly add images in WordPress.
Once you’re done, go ahead and click ‘Publish’ at the top of the page. Simply repeat this step to create as many pages as you want for your website.
Next, you can add the content to each of these pages that you saved and copied from your Google Business Profile site.
Pro Tip: We highly recommend checking out our guide to the important pages that every WordPress site should have. This will take you through the pages that ensure your migration from Google Business Profile to WordPress is as complete as possible.
We recommend that you create a custom landing page for your website using the block editor or a plugin like SeedProd.
SeedProd is the best WordPress theme and landing page builder. It offers a drag-and-drop builder, pre-built templates, and lots of customization options.
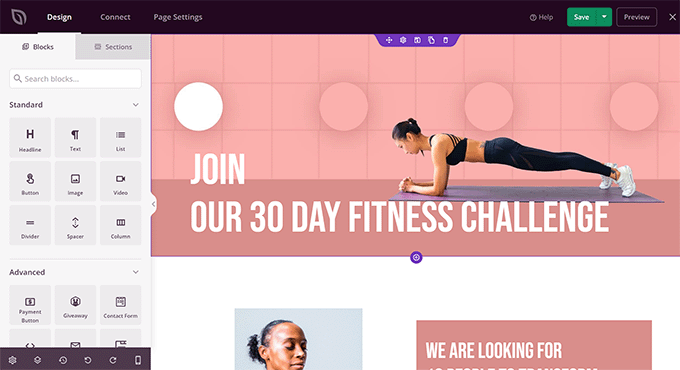
You can easily edit and control the appearance of your site using the plugin. Plus, there are different blocks to add to the design.
After creating pages, you can also add new blog posts to your business website. For more details, please see our guide on how to add a new post in WordPress.
There are various topics you can write about related to your business. These can be helpful guides, list articles, how-to tutorials that help explain how to use different features of your products and services, and more.
Step 5: Optimizing Your Business Site for Local SEO
After adding content from your Google My Business site to WordPress, you will need to optimize your site for local search results. This way, people searching for your business can easily find it on search engines like Google.
A simple way of doing that is by using All in One SEO (AIOSEO). It is the best WordPress SEO plugin that helps optimize your website for search engines. It automatically adds schema markup and helps configure local SEO settings without any technical knowledge.
Schema markup is a special code format that’s used on your site, and it tells search engines extra information about your business. For instance, schema markup helps you show details like address, opening hours, map location, and more on Google search results.
Note: To use the Local SEO feature in AIOSEO, you will need at least the Plus plan.
First, you will need to install and activate the All in One SEO (AIOSEO) plugin. If you need help, then please see our guide on how to install a WordPress plugin.
Upon activation, you will see the AIOSEO setup wizard. Simply click the ‘Let’s Get Started’ button and follow the on-screen instructions.
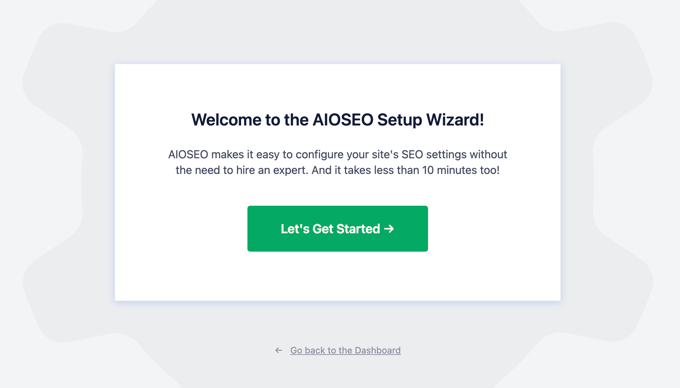
To learn more, please see our guide on how to properly set up All in One SEO in WordPress.
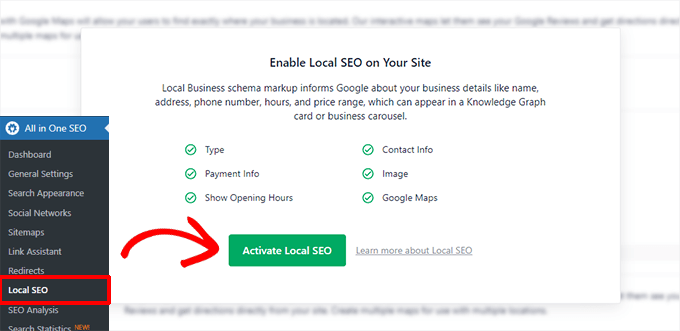
Next, you can go to All in One SEO » Local SEO from the WordPress dashboard and click the ‘Activate Local SEO’ button.
Add Location and Business Information
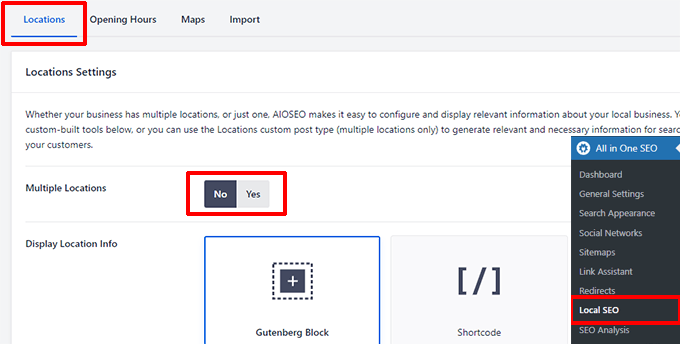
Once the Local SEO addon is active, you can head to the ‘Location’ tab.
Here, AIOSEO will ask if you have multiple business locations. If so, then simply click the ‘Multiple Location’ toggle to Yes.
To learn more, please see our guide on how to add multiple locations schema for local business in WordPress.
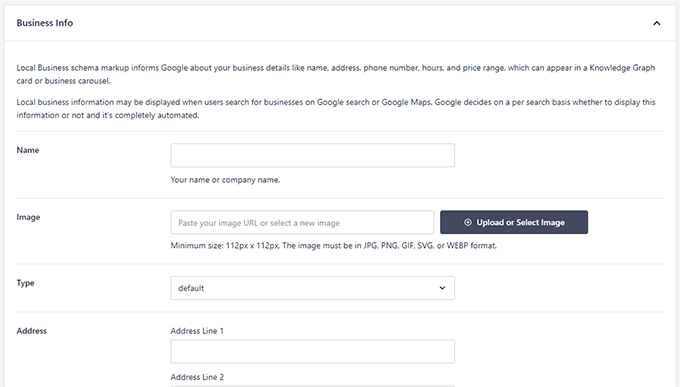
Next, you can scroll down and enter your business information. For instance, you can provide a name, logo, image, address, select type of business, phone number, and more.
Add Opening Hours for Your Business
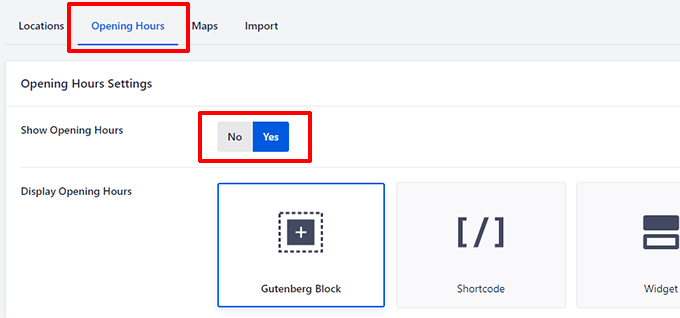
After that, head to the ‘Opening Hours’ tab and enable the option.
Simply click the ‘Show Opening Hours’ toggle to Yes.
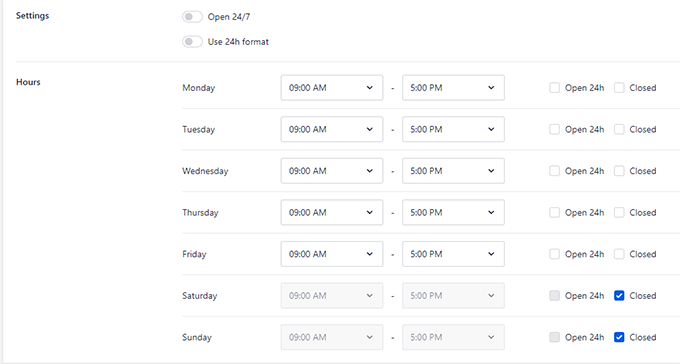
Next, you can scroll down and add your business hours.
There is also an option where you can show your business is open 24/7.
Show Business Location on Google Maps
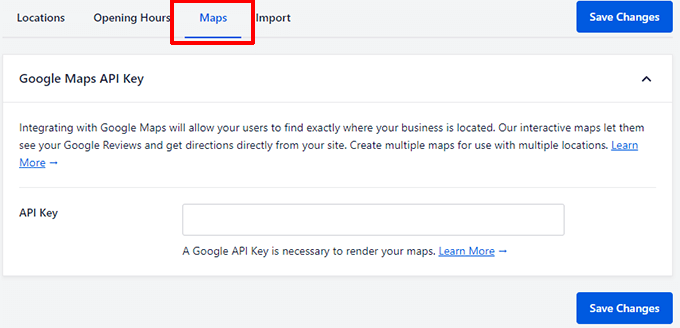
AIOSEO also lets you integrate Google Maps and help users find where your business is located.
You can do that by going to the ‘Maps’ tab and entering the Google Maps API key.
For more details, please see our guide on how to add Google Maps in WordPress.
Step 6: Update Website URL in Google Business Profile
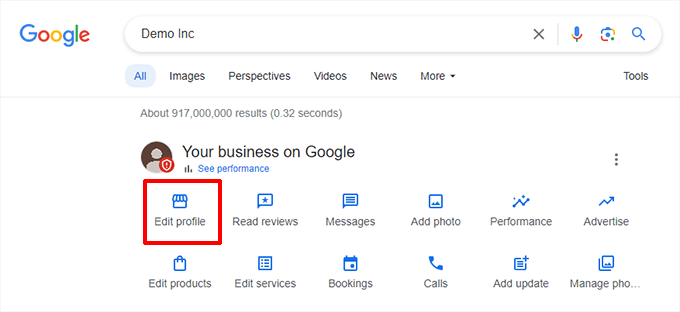
Now that your new WordPress website is ready, the next step is to update the link in Google Business Profile.
You can do that by visiting your Business Profile on Google. From here, simply click the ‘Edit Profile’ option.
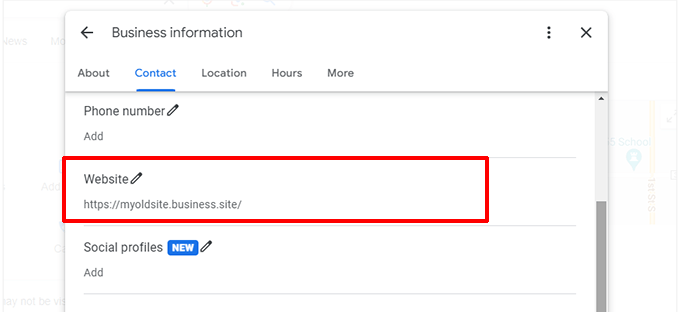
You should now see a new popup window open with your business information.
Next, you can navigate to the ‘Website’ section and replace the URL with your new WordPress website.
That’s it! You’ve successfully migrated your Google Business Profile website to WordPress.
Now, users who click the ‘Website’ link on your Business Profile will land on your new WordPress website.
Bonus: Install WordPress Plugins to Get the Most of Your Site
The best part about using WordPress is the plugins. You can think of them as apps, and they help add additional features and functionality to your site.
For instance, there are plugins for creating backups, improving security, boosting speed and performance, starting an online store, and more.
That said, there are over 59,000 free and paid plugins that you can use. This can get overwhelming for new users who don’t know which plugin to pick and install.
To help you out, here are some of the top plugins we recommend using on your WordPress site:
- WPForms – It is the best form builder for WordPress. You can easily create different types of forms and add them to your site. For example, it lets you create simple contact forms, payment forms, surveys, registration forms, and more.
- MonsterInsights – It is the best Analytics plugin for WordPress. You can connect Google Analytics to WordPress without editing code using MonsterInsights. Plus, it helps you find out how people behave on your site, where they come from, which links they click, and uncover other useful insights.
- OptinMonster – A powerful conversion optimization and lead generation toolkit for WordPress. You can create different campaigns to grow your email list, get more leads, and increase sales.
- Duplicator – It is the best WordPress backup plugin. You can create backups of your WordPress site and store them on the cloud. This way, you’ll have a fresh copy to restore your site in case there’s a security breach, or something goes wrong.
For more plugin recommendations, please see our complete list of must-have WordPress plugins for business sites.
We hope this article helped you learn how to migrate a Google Business Profile website to WordPress. You may also want to see our guide on how to create a free business email address and easy ways to increase your blog traffic.
If you liked this article, then please subscribe to our YouTube Channel for WordPress video tutorials. You can also find us on Twitter and Facebook.


Syed Balkhi says
Hey WPBeginner readers,
Did you know you can win exciting prizes by commenting on WPBeginner?
Every month, our top blog commenters will win HUGE rewards, including premium WordPress plugin licenses and cash prizes.
You can get more details about the contest from here.
Start sharing your thoughts below to stand a chance to win!