
When we first started looking at Snapchat advertising for WooCommerce stores, we were amazed by how many businesses were running ads without proper pixel tracking.
In fact, stores with correctly added Snapchat pixels typically see up to 30% better ad performance.
The challenge isn’t just copying and pasting some code – it’s ensuring your pixel tracks the right events and provides accurate data for your campaigns.
After helping many store owners, we’ve developed a foolproof method for setting up Snapchat pixel correctly.
In this guide, we’ll walk you through the entire process of adding Snapchat pixel to your WooCommerce store.
⚡ Quick Summary: Adding Snapchat Pixel to WooCommerce
A Snapchat pixel is a tracking tool that helps you measure the success of your ad campaigns. In this guide, we will show you two easy ways to install it:
- Method 1: Using WPCode (Recommended). This is the safest way to add code snippets to WordPress without breaking your site.
- Method 2: Using FunnelKit Automation. This is a great choice if you want to create automated marketing workflows for your store.
What Is a Snapchat Pixel, and Why Use It?
A Snapchat pixel is a piece of JavaScript code that you add to your website to track how visitors interact with your content. It connects your WordPress site to Snapchat’s advertising platform so you can measure the success of your ad campaigns.
When a Snapchat user clicks on your ad and visits your store, the pixel reports their actions back to you. This allows you to see exactly which ads are driving sales so you can optimize your marketing budget.
Here are the main benefits of using a Snapchat pixel:
- Track Store Conversions: You can monitor specific actions like purchases and sign-ups. This helps you see which ad campaigns are actually making money.
- Reach the Right Audience: The pixel lets you build custom audiences based on visitor behavior. You can show new ads specifically to people who viewed a product but left without buying.
- Improve Marketing Across Channels: You can combine Snapchat data with your other analytics tools. This gives you a clear view of the entire customer journey.
- Optimize for Better Results: Since the pixel tracks real-time data, you can quickly adjust your strategy. You can stop spending money on low-performing ads and scale up the ones that work.
Events That You Can Track With WooCommerce Snapchat Pixel
Adding a Snapchat pixel to your WooCommerce store is a smart move for keeping tabs on how users interact with your site. Here are some key events you can track:
- Page view: When a user views a specific page on your website.
- Add to cart: When a user adds an item to their shopping cart.
- Initiate checkout: When a user starts processing their checkout.
- Purchase: When a user who completes a purchase or transaction on your website goes to the thank you page.
- Search: When a visitor uses the search bar to find a product in your store.
- View content: When someone views specific content like blog posts or product details.
- Sign-up: When a user registers for an account or subscribes to your newsletter.
Beyond tracking events, the Snapchat pixel lets you collect detailed user information. This includes event variables like the product ID, which identifies the product involved, and the product price at the time of the event.
Each transaction has a unique ID, and you can also track the currency used and the category of the product or page viewed.
Plus, the Snapchat pixel gathers user data. This includes email addresses for marketing and retargeting purposes, phone numbers for personalized marketing, and IP addresses to help identify the user’s location.
Expert Tip: Looking for even more data about what visitors are doing on your website? MonsterInsights can help you see all kinds of eCommerce analytics, including your conversion rate, profits, and revenue. For more details, see our guide on how to set up eCommerce tracking in WordPress.
With that in mind, we will show you 2 methods for how to add a Snapchat pixel for WooCommerce in WordPress. You can use the quick links below to jump to the method you want to use:
- How to Create a Snapchat Pixel
- Method 1: Adding Snapchat Pixel for WooCommerce in WordPress Using WPCode
- Method 2: Adding Snapchat Pixel for WooCommerce in WordPress Using FunnelKit Automation
- Testing the Snapchat Pixel on Your WordPress Site
- Bonus Tip: Optimize Your WooCommerce Store and Boost Sales
- Frequently Asked Questions About Snapchat Pixels
Before we get to the 2 methods, let’s first prepare your Snapchat Pixel.
How to Create a Snapchat Pixel
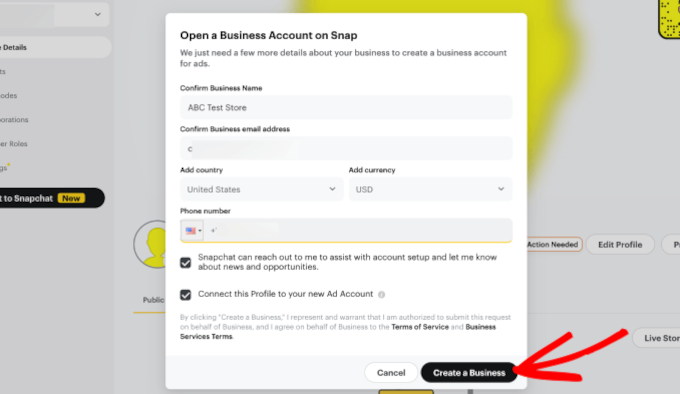
To create a Snapchat Pixel, you must log in to your Snapchat Ad Manager account.

If you don’t have an account yet, you will need to set one up.
Simply enter your business details, including your name, email, and country, to access the dashboard.
After entering the details, go ahead and click ‘Create a Business.’
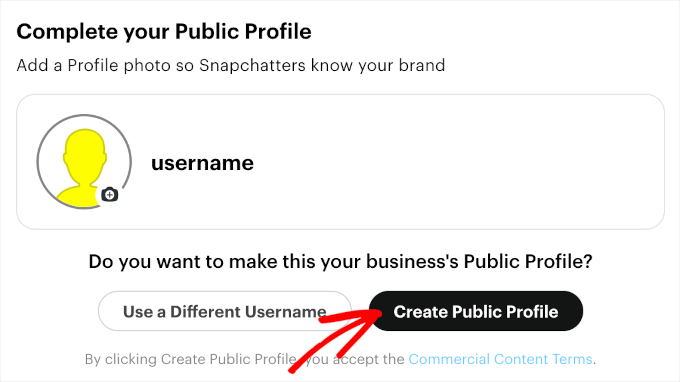
Then, you’ll arrive at the ‘Complete your Public Profile’ section.
Be sure to check your username and profile picture. And if everything is correctly set up, simply click on the ‘Create Public Profile’ button.
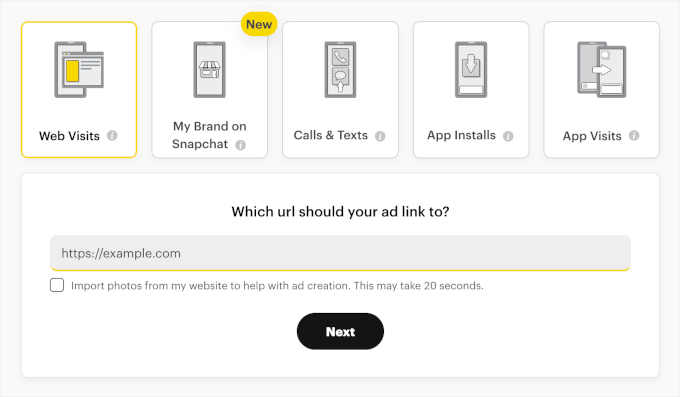
The next step is choosing an advertising goal. Snapchat offers five of them:
- Web visits: When users click on your ad and visit your website.
- My brand on Snapchat: User interactions with your brand’s Snapchat profile, such as viewing your public profile or subscribing to it.
- Calls & texts: When users click on your ad to call or text your business directly from their device.
- App installs: When users click on your ad and install your mobile app.
- App visits: When users click on your ad and open your mobile app.
Since we are going to use the Snapchat pixel to track your WooCommerce store’s performance metrics, let’s choose ‘Web Visits.’
Once you’ve selected the option, you’ll need to enter your site’s URL into the text field that appears.
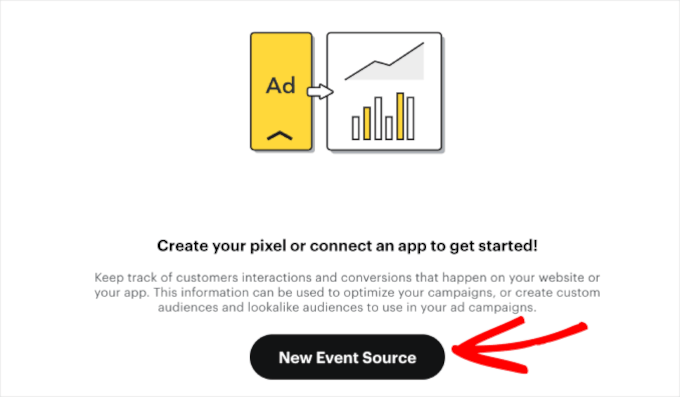
Once you’ve done that, let’s head over to the dropdown menu in the top left corner and select ‘Events Manager’ under the ‘Assets’ section.
This will open the pixel management area, where you can create your Snapchat pixel.

On the next screen, you’ll be asked to create your pixel or connect an app to get started.
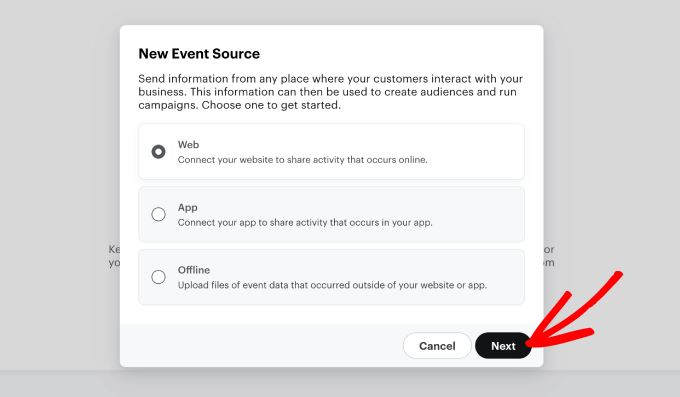
Go ahead and click the ‘New Event Source’ button.
When the pop-up window appears, you can choose the event source for your pixels.
Since you want to track user interactions for your WooCommerce site, select ‘Web.’ Then click ‘Next.’
You will be asked to give your pixel a name. We recommend using your store’s name, so it is easy to identify later.
Then click the ‘Confirm’ button.
Now, simply enter your website URL so Snapchat can optimize your setup experience.
Click the ‘Check’ button. Then, you can wait for the verification process to complete.
Once done, you’ll want to select how you’d like to connect the Snapchat Pixel to your WooCommerce website.
Go ahead and choose the ‘Pixel Setup Tool’, and then click ‘Next.’
On the next screen, you’ll choose the funnel events to track.
The Snapchat pixel can help you track many funnel events. It’s a good idea to start with the metrics with the ‘Recommended’ label. Scroll down the page to learn the recommended event for each funnel: ‘Awareness,’ ‘Consideration,’ and ‘Conversion.’
You can also check all of these funnel events to get 360-degree insights into your WooCommerce user journey.
Once you’ve decided on the funnel events, go ahead and click ‘Next.’
You should now be able to see your Snapchat pixel base code.
If you scroll down this page, you can see step-by-step instructions on how to add the base code to your WordPress website. All you have to do is follow them.
Now, you will want to copy the Snapchat pixel base code. So, go ahead and click the ‘Copy Code’ button.
And done! You are now ready to add this code to your WooCommerce store using either method 1 or 2.
Important: Do not close this browser tab yet. You will need to return to this exact screen to verify the pixel after you paste the code into WordPress.
Method 1: Adding Snapchat Pixel for WooCommerce in WordPress Using WPCode
The easiest way to add a Snapchat pixel to WordPress WooCommerce is by using WPCode.
WPCode lets you add custom PHP, HTML, CSS, and much more without having to edit your site’s theme files. So, you can customize and extend your site’s functionality without putting it at risk.
Plus, we use WPCode to add custom snippets and extend functionality across our brands. So, we know it’s the best code snippet plugin for any WordPress site. For more information about it, you can read our WPCode review.
To get started, you’ll want to install the WPCode plugin. If you need help, then please see our guide to installing a WordPress plugin.
Note: You can use WPCode’s free version to add the Snapchat pixel to your WooCommerce website.
However, upgrading to the premium version will unlock access to the full library of more than 100 expert-approved code snippets. Plus, you’ll get the Conversions Pixel add-on, which allows you to track pixels and run retargeting campaigns on popular social media platforms.
Once activated, let’s go to Code Snippets » Header & Footer. Now, you can paste the base code you’ve copied from your Snapchat Ads Manager into the ‘Header’ field.
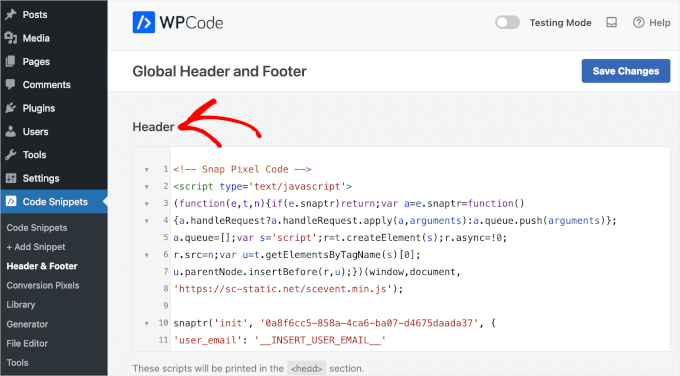
Then, go ahead and click ‘Save Changes.’
Once you have done that, go back to the Snapchat Ads Manager tab you left open.
Find the ‘Check Pixel Implementation’ section. Enter your website URL and click ‘Check.’ You should see a success message indicating the pixel is active.
Go ahead and click ‘Next.’
This tool will open your actual website in a new window with a Snapchat overlay. It allows you to define events by clicking on specific buttons on your site.
For example, navigate to a product page and click the “Add to Cart” button. The Snapchat overlay will ask if you want to track this button click as an “Add to Cart” event. Confirm the selection to save it.
Note: This visual method is great for tracking simple button clicks. However, it may not accurately track dynamic data, such as the specific price or product ID of the item being purchased.
If you need detailed data for Return on Ad Spend (ROAS) reports, we recommend using Method 2 below.
Then, you might want to set parameters.
Parameters are extra details you can add to your pixel events. They are optional but can be useful for tracking and understanding how users behave on your website. Some parameter examples include product IDs and transaction amounts.
For example, here, we set parameters for Content ID on the page. By choosing the ‘Start Now’ button, we can track if users take the desired action and see if the call-to-action button works.
After setting up one event and its parameter, you can go ahead and create more if needed. Simply repeat the process, and once everything is ready, you can click Submit » Finish Setup » Confirm Setup.
And that’s it. Your WooCommerce website should now track Snapchat Pixel.
To access the pixel overview, you’ll want to navigate to Event Managers » View Pixel Details.
In the ‘Overview’ section, you can view more detailed statistics for all of your recorded events and the date the last event was made.
Simply hover over the touchpoints on the graph to see your event distribution.
Method 2: Adding Snapchat Pixel for WooCommerce in WordPress Using FunnelKit Automation
In this method, we will be using FunnelKit (formerly WooFunnels). It is one of the best sales funnel builders for WooCommerce.
FunnelKit offers a built-in pixel integration that automatically tracks complex data like cart totals and order IDs. This gives you more accurate reporting than the manual method.
For more information about the plugin, see our extensive FunnelKit review.
If you haven’t already done so, you’ll need to install the FunnelKit plugin. For more details, follow our tutorial on how to install a WordPress plugin.
Before checking the plugin settings, you need your Snapchat Pixel ID. Go back to your Snapchat Events Manager. You will see your Pixel ID listed directly under your pixel’s name in the top left corner. Copy this string of numbers.
Now, let’s head over to your WordPress dashboard.
From here, you’ll want to go to FunnelKit » Settings » Pixel Tracking and open the ‘Snapchat’ tab.
Then, you can paste the pixel ID into the ‘Pixel ID’ field.
Expert tip: With FunnelKit, you can track other social media campaigns, too. Popular social media platforms that integrate with this plugin include Facebook, Instagram, Pinterest, and TikTok.
Below, you can also choose which events you’d like your pixel to start tracking.
For example, FunnelKit allows you to track the following events:
- Site-wide events. Track user interactions across the entire website, such as page views or clicks.
- Sales page events. Track actions on sales pages, like viewing the page or clicking the ‘Add to Wishlist’ buttons.
- Optin page events. Track activities on optin pages, such as form submissions, social contest sign-ups, or other button clicks.
- Order bump events. Track interactions with additional offers during checkout.
- Checkout events. Track user actions during the checkout process, like entering payment details.
- Purchase events. Track completed transactions and the details of purchases.
To maximize your tracking, it’s a good idea to track all of your events. That way, you can collect the most data possible.
For example, it’s useful to track every step in the customer journey so you can optimize and tweak your campaigns accordingly.
Once you decide on the events to track, you can click ‘Save.’
There you have it! You’ve added a Snapchat pixel to your WooCommerce store.
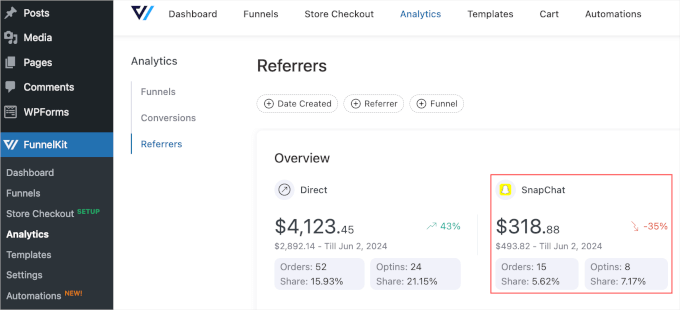
To see how the Snapchat pixel performs, you can navigate to FunnelKit » Analytics » Referrers. Then, simply locate the Snapchat section from the list of available campaigns.
Testing the Snapchat Pixel on Your WordPress Site
After you have set up the Snapchat pixel in your store, it’s a good idea to make sure it works.
The easiest way to see if your pixel is working is to use a Chrome extension like Snap Pixel Helper.
Make sure you are using Google Chrome, and then add it as an extension.
You’ll now need to visit your WooCommerce store. It’s a good idea to test all the different events you’ve listed to track in the previous steps.
For example, it’s a good idea to add products to the cart or make a dummy purchase to see that the pixels are working for every user event type.
Once you see that a pixel ID is detected and all of the events were tracked, then you are good to go!
Bonus Tip: Optimize Your WooCommerce Store and Boost Sales
Now that you’ve set up the Snapchat pixel to track your WooCommerce performance, you’re already on the right track to optimizing your store and boosting sales.
WooCommerce is a popular, beginner-friendly platform with plenty of tools, but there’s more you can do to grow your business. Here are some simple ways to improve your store:
- Speed up your website for better performance.
- Improve the shopping experience to keep customers engaged.
- Fine-tune your sales funnels to increase conversions.
- Simplify the checkout process for a smoother transaction.
The good news? These changes are easy to apply and don’t require coding knowledge. For details, check out our expert tips for increasing WooCommerce sales.
Frequently Asked Questions About Snapchat Pixels
In this section, we will answer some of the most frequently asked questions about adding Snapchat pixels to WooCommerce websites.
How Do I Get Pixels on Snapchat?
Start by logging into Snapchat Ads Manager. Then, you’ll want to navigate to Asset » Pixels » Create Pixel.
Follow the prompts to name your pixel and generate the code. Once you have the code, you can add it to your website using a plugin like WPCode or FunnelKit. This will help you track user interactions on your site and optimize your ad campaigns.
Where Do I Add the Pixel Code in WooCommerce?
Adding the Snapchat pixel to the header of your WooCommerce site is important for effective tracking.
Placing the pixel code in the header ensures it loads on every page from the start, capturing user interactions across your site. This improves accuracy by recording all relevant activities as they happen.
Are tracking pixels illegal?
No, tracking pixels are not illegal. However, privacy laws like GDPR and CCPA require you to inform visitors that you are collecting their data.
You must disclose the pixel in your privacy policy and usually need to obtain user consent via a cookie banner before the tracking code activates.
How do I link a pixel to a website?
You link a pixel by placing a specific code snippet into the header section of your website’s HTML. For WordPress users, the safest way to do this is by using a plugin like WPCode.
This allows you to insert the code globally without risking errors by editing your theme files directly.
Does the Snapchat Pixel slow down my website?
The Snapchat Pixel generally has a negligible impact on site speed because it loads asynchronously, meaning it runs in the background while your page content loads.
However, adding too many third-party tracking scripts can eventually affect performance, so it is best to only use the pixels you strictly need for your marketing.
We hope this article helped you learn how to add a Snapchat pixel in WooCommerce. Next, you may also want to see our guide on how to upsell products in WooCommerce and our tutorial on how to add customer notes to WooCommerce orders.
If you liked this article, then please subscribe to our YouTube Channel for WordPress video tutorials. You can also find us on Twitter and Facebook.

")


Have a question or suggestion? Please leave a comment to start the discussion.