Ever found yourself staring at the blank WordPress editor, struggling to come up with a new blog idea? To combat writer’s block, many bloggers and website owners keep a CSV spreadsheet of potential post ideas.
In that case, at some point you’ll want to add these ideas into WordPress, so you can start writing and turn them into great blog posts. Rather than manually creating each draft and then adding the title, categories, tags, and other content, you can simply import those ideas directly from the CSV spreadsheet into WordPress.
In this article, we’ll show you how to import post ideas from a CSV spreadsheet in WordPress. It’s a fantastic way to stay organized and transform your brainstorming sessions and ideas into published content in no time.
Why Import Post Ideas From CSV Spreadsheets in WordPress?
Many WordPress website owners plan their content in spreadsheets, where they add each post as a new row. You can even use a spreadsheet to record other information such as the tags the post will have, or who should write it.
A spreadsheet can be particularly useful if you’ve added other WordPress users or authors to your website and want to plan your upcoming content as a team. It’s also a way to make sure everyone knows exactly what they should be working on.
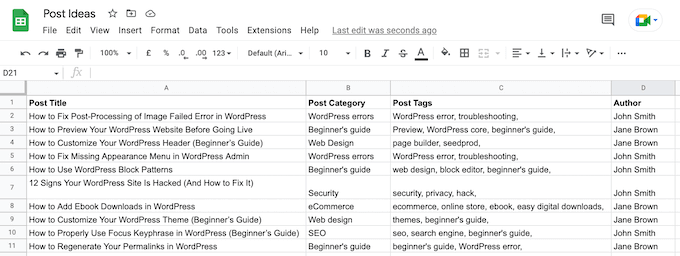
At some point ,you will want to turn these ideas into drafts in your WordPress blog, ready for you to start writing.
One option is to go into the Posts » Add New area of your WordPress dashboard, type in the post title, and then add more information from your spreadsheet, such as the post’s tags.
However this can take a lot of time, especially if your spreadsheet contains lots of post ideas.
Another option is to import post ideas from a CSV spreadsheet using a WordPress plugin. By automating the import process, you can save time and improve the editorial workflow, while making sure all the information is added to WordPress without errors.
With that in mind, let’s see how you can quickly and easily import post ideas from CSV spreadsheets in WordPress.
How to Import Post Ideas from CSV Spreadsheet in WordPress
The easiest way to import post ideas from CSV spreadsheets in WordPress is by using WP All Import. This plugin can automatically create a new draft for every post in your spreadsheet.
It also has a simple drag and drop interface that lets you map the different columns in your CSV spreadsheet to different content in WordPress. This means you don’t have to use any special labels for the columns in your spreadsheet, such as post_type or post_status.
But before we get started, it’s still a good idea to review your spreadsheet. If the CSV file has any wrong data, then this can cause problems with the import.
You should also think about whether there’s any more information you can add to the spreadsheet. For example, you might add a suggested guest blogger for each post.
This can save you time, as you won’t have to manually add this information to each post after it’s imported into the WordPress dashboard.
When you’re happy with the information in your spreadsheet, the next step is installing and activating the WP All Import plugin. For more details, please see our guide on how to install a WordPress plugin.
Upon activation, go to All Import » New Import.
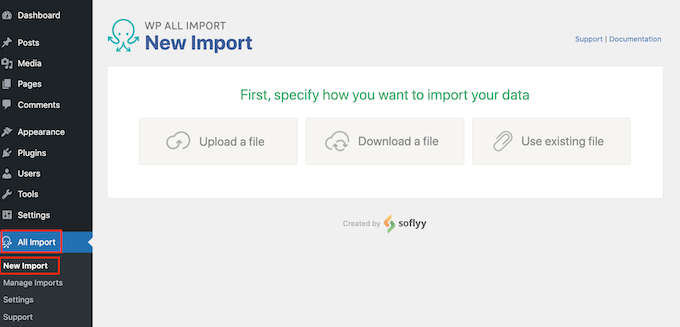
There is a WP All Import Pro plugin that can import CSV files in a few different ways, including using the file’s URL or importing the information via FTP. If you haven’t heard about FTP before, then you can see our complete guide on how to connect to your site using FTP for more information.
However, the free version of WP All Import just lets you import a CSV file from your computer. With that in mind, click on the ‘Upload a file’ button and then choose the CSV spreadsheet that you want to import.
WP All Import can create a new post for every row in your spreadsheet, or it can add the spreadsheet’s data to posts that already exist in your WordPress website.
We want to create a new draft for every post idea, so go ahead and click on ‘New Items.’
After that, simply open the ‘Create new’ dropdown and click on ‘Posts.’
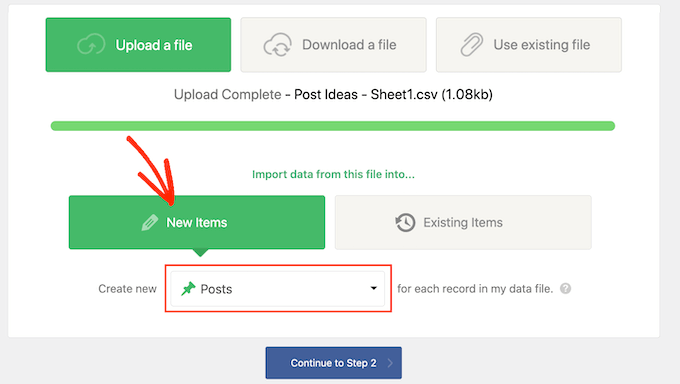
Once you’ve done that, go ahead and click on the ‘Continue to step 2’ button.
WP All Import will now show how many new posts it will create, and the data it will add to each post. You can scroll through these posts by clicking on the arrows.
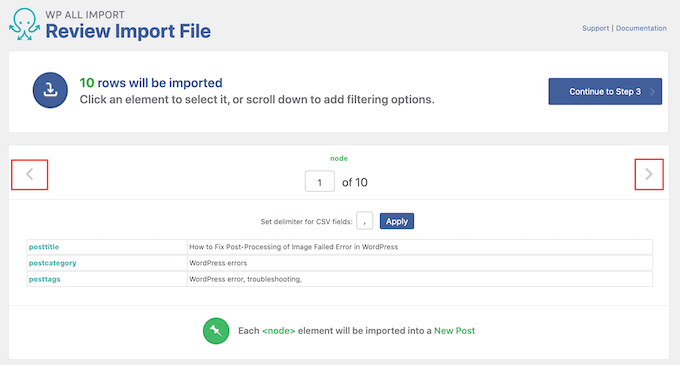
By default, WP All Import will import all the information from your CSV spreadsheet.
If you don’t want to import every idea in the spreadsheet, then you can create filters. For example, you might use a filter to only import post ideas that have a specific tag or belong to a certain post series.
To create a filter, go ahead and click to expand the Add Filtering Options section.
You will now see some dropdowns and fields that you can use to create a filter. In the following image, we’re only importing post ideas that have the tag ‘Beginner’s guide.’
You may see different options depending on how you’ve organized your spreadsheet.

When you’re happy with your filter, go ahead and click on the ‘Add Rule’ button.
WP All Import will now create a filter. To apply this filter to your import, make sure you click on the ‘Apply Filters to XPath’ button.
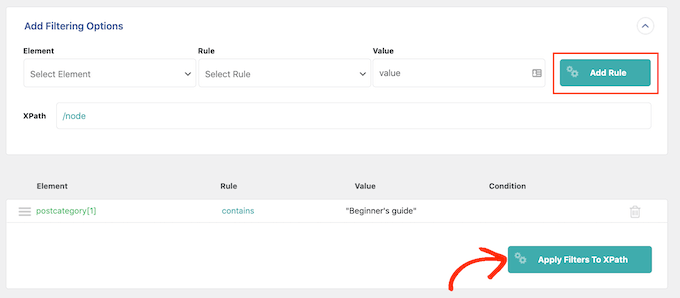
The post preview at the top of the screen will now update to show only the posts that pass your filter.
Want to add more filters to your import? Then simply follow the process described above.
If you do create multiple filters, then you can tell WP All Import to only import content that passes all your filters by clicking on ‘AND.’

Another option is to import any post ideas that pass one or more of your filters by clicking on the ‘OR’ radio button.
After selecting one of these options, go ahead and click on ‘Apply Filters To XPath.’ As before, you can use the preview to see exactly what posts WP All Import will create based on your spreadsheet and filters.
When you’re happy with the preview, scroll to the bottom of the screen and click on ‘Continue to Step 3.’
This will take you to a screen where you can map each column in your spreadsheet to an area of a WordPress post.
On the right-hand side, there is a box showing the different ‘categories’ of data that WP All Import will import for each post.
On the left are all the different areas where you can show this data, such as the post’s title, SEO title, content, and the author byline if you’re running a WordPress multi-author blog.
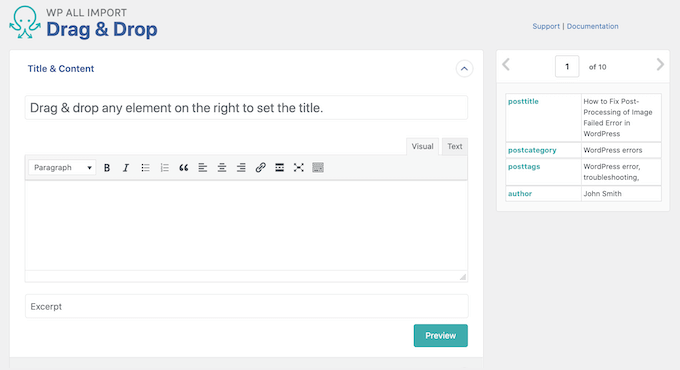
To create the mapping, simply find a category of data in the right-hand box. Then, drag it to the area where you want to show this information in WordPress, and drop it into place.
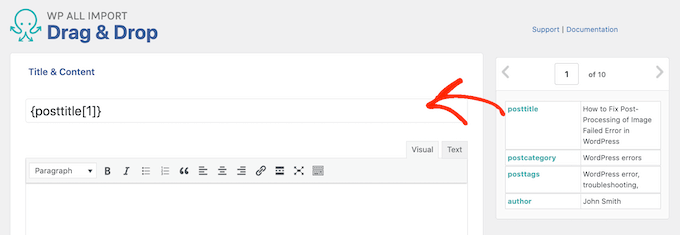
In the following image, you can see that we’ve dragged ‘posttitle’ to the Title field. This means that this information will be used for the post’s title.
Sometimes you may need to take some extra steps to create the mapping. For example, to import category and tag information from a spreadsheet, you’ll need to click to expand the ‘Taxonomies, Categories, Tags’ section.
You can then check either the ‘Categories’ or ‘Tags’ box.
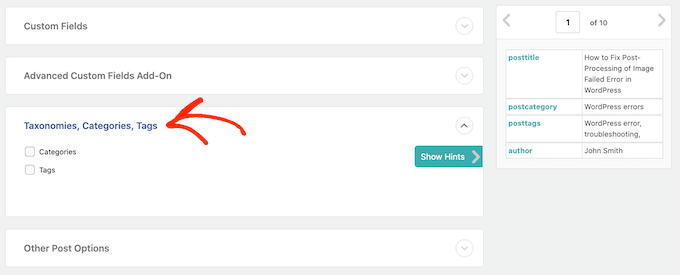
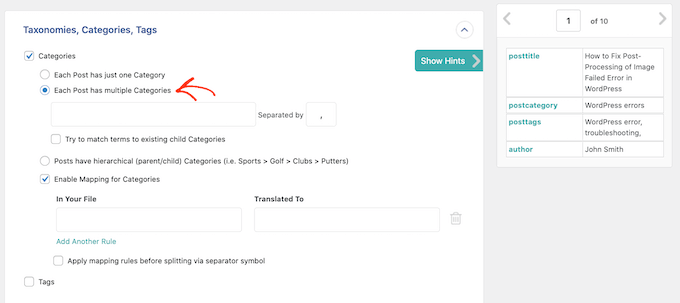
This adds some new settings where you can set up how WordPress will import the categories or tags from your spreadsheet. For example, you tell WP All Import to enforce one category per post in WordPress.
In the following screenshot, we’re telling WP All Import to import all the categories from the spreadsheet, even if it means a single post will have multiple categories.
You’ll typically want to map the tags and categories in your spreadsheet, to any categories and tags that already exist in your WordPress dashboard. This stops WP All Import from creating duplicate tags and categories, which may change where your site appears in the search engine results.
To learn more about how categories and tags affect your search engine optimization, please see our guide on SEO best practices for sorting your content.
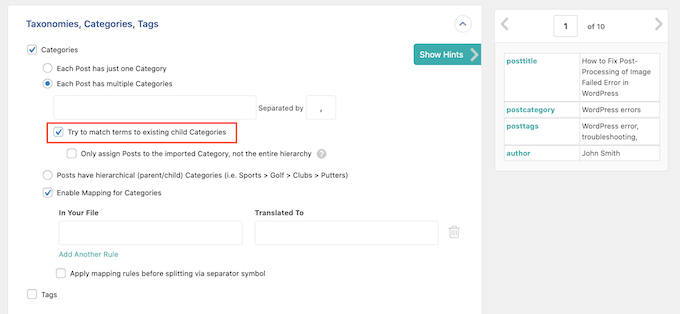
If you want the plugin to try and map the values in your spreadsheet to the existing categories & tags in WordPress, then please check the ‘Try to match terms to existing child Categories / Tags’ box.
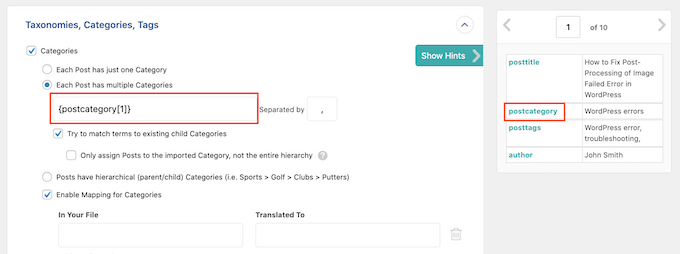
After that, simply find your spreadsheet’s category or tag value in the right-hand box.
Then, create the mapping using drag and drop.
Next, click to expand the ‘Other post options’ section.
WP All Import can either create the new posts as drafts, or go ahead and publish them. Typically, you’ll want to turn each post idea into a draft, so click on the ‘Draft’ radio button.
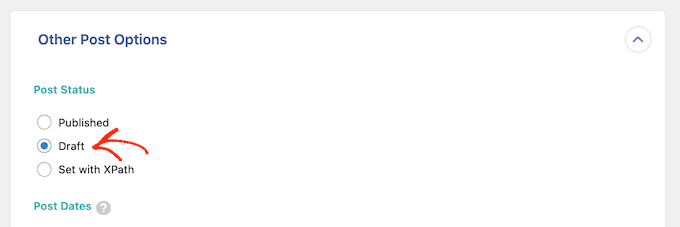
Once you’ve done that, you can choose whether to allow comments, and trackbacks and pingbacks on the posts.
For example, if you want to completely disable comments for your new posts, then simply click to select the ‘Closed’ radio button in the ‘Comments’ section.

If your spreadsheet has values that you’d like to use as the post’s author or the post’s URL slug, then this is your chance to create the mapping using drag and drop.
For example, if your spreadsheet has an author for each post idea, then you would drag and drop this value into the ‘Post Author’ field.

There are lots more settings that you can try. However, this should be enough for most post idea spreadsheets.
Once you’ve finished mapping the values in your spreadsheet to the WordPress dashboard, scroll to the bottom of the screen and click on ‘Continue to Step 4.’
WP All Import will now ask you to set a unique identifier for each record. In this instance, the record is each new post that you create.
At some point, you may want to re-import the same spreadsheet. For example, you might add some new blog post ideas to the spreadsheet after a brainstorming session, and want to import these ideas into WordPress.
The unique identifier allows WP All Import to identify the records that it’s already imported, and the records that are new. In this way, you can avoid duplicate content.
WP All Import will also use the unique identifier to check whether a record has been updated since the last time you imported the spreadsheet. WP All Import can then update the previously-imported posts with any new or changed information.
The easiest way to set a unique identifier is to click on the ‘Auto-detect’ button. WP All Import will then choose the unique identifier that it wants to use.
For post ideas, this will typically be the post title.
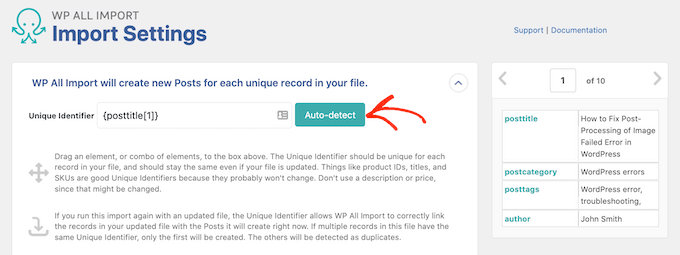
Another option is to use a value from the right-hand box by dragging and dropping it onto the ‘Unique identifier’ field.
The next step is configuring how WP All Import will handle any new or changed data.
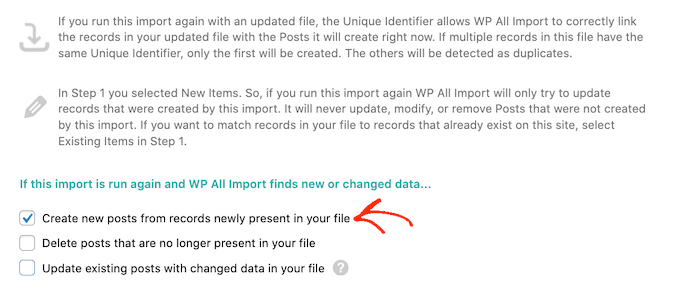
Here, you’ll typically want to create posts for any new post ideas in the CSV spreadsheet. To do this, simply check the ‘Create new posts from records newly present in your file’ box.
You can also use the spreadsheet to make changes to post ideas that you previously imported. For example, you might create a new tag that you want to apply to your earlier WordPress posts.
Adding the tag to every post in your CSV spreadsheet and then re-importing the updated file is much easier than opening each post in your WordPress dashboard, and then typing in the tag manually.
The first step is telling WP All Import how it should handle new or changed data for existing posts. To start, check the ‘Update existing posts with changed data in your file’ box and then click on ‘Choose which data to update.’
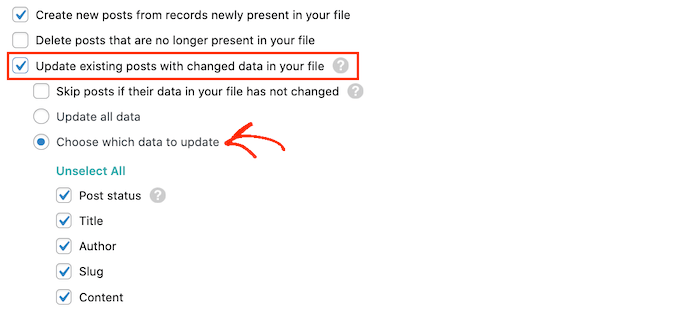
You’ll now see a list of all the different kinds of WordPress data such as author, post type, and post tile. You can go ahead and check the box for each piece of data that WP All Import should update when new or changed information is available.
When it comes to updating tags and categories, the plugin handles things slightly differently.
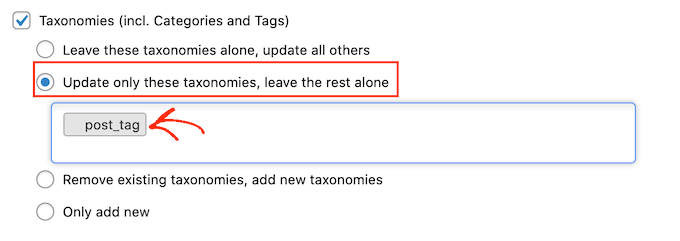
To configure how WP All Import will update tags and categories, check the ‘Taxonomies (incl. Categories and Tags)’ box.
Here, you have a few choices.
The simplest option is to add any new tags and categories without ever updating or removing the post’s existing tags and categories. To do this, go ahead and click on the ‘Only add new’ radio button.

Another option is to add any new tags or categories, but also delete the tags or categories that are no longer in your spreadsheet.
To do this, click on either of these radio buttons:
- Leave these taxonomies alone, update all others
- Remove existing taxonomies, add new taxonomies.
You can then go ahead and click on the new field that appears. To apply this setting to tags, click on post_tag.
If you want to apply this setting to categories, simply select post_category.
When you’re happy with how your import is set up, you’re ready to click on the ‘Continue’ button at the bottom of the screen.
WP All Import will now show an overview of all the information you’re about to import, and the posts that it will create.
If you’re happy to go ahead, then click on the ‘Confirm & Run Import’ button.
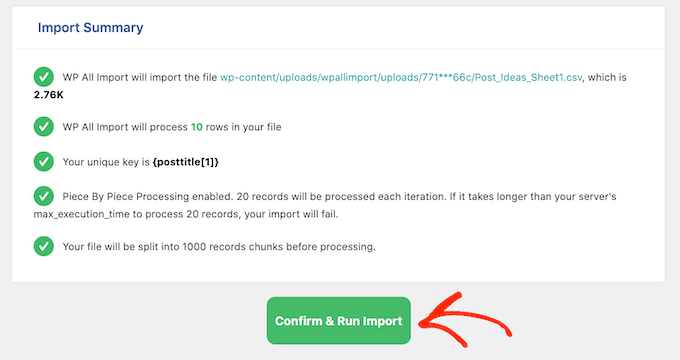
WP All Import will now import your post ideas from the CSV spreadsheet, and create a draft for each row in that spreadsheet. With that done, all that’s left is to write your posts and schedule them in WordPress.
We hope this article helped you learn how to import post ideas from CSV spreadsheets in WordPress. You can also see our expert pick of the best writing assistant software for WordPress, or our guide on how to improve readability score in your posts.
If you liked this article, then please subscribe to our YouTube Channel for WordPress video tutorials. You can also find us on Twitter and Facebook.


Syed Balkhi says
Hey WPBeginner readers,
Did you know you can win exciting prizes by commenting on WPBeginner?
Every month, our top blog commenters will win HUGE rewards, including premium WordPress plugin licenses and cash prizes.
You can get more details about the contest from here.
Start sharing your thoughts below to stand a chance to win!
Chris Daly says
Really Simple CSB has not been updated in over 3 years. It’s not deprecated but it is not compatible with any current version of WordPress. I attempted to get it to work in WP 4.8 and it said it imported the posts but I could not find them in the wp_post table.
Rob Braddock says
Do you know if there is any way to schedule the publish date of posts through the CSV import? I know there are plugins to set up a routine schedule for publishing, but I can’t find an easy way to bulk edit the individual publish date for individual posts
Mia says
Rob,
You can use Import/Update tool like WP Ultimate CSV Importer. It helps you schedule your future posts to be published in a routine basis. At the same time, you can also update the previously published data by updating your existing Post. You can update the published date either with Post ID, Title or slug.
Heidi Pungartnik says
Great tip, very helpful, especially for large imports! Thanks