


Changing your WordPress domain doesn’t have to mean starting over with your Google rankings.
The key is making sure visitors and search engines can follow your old URLs to the new ones. A full site redirect does this by sending each page on your old domain to the same path on your new domain. For example, `https://oldsite.com/about` automatically sends visitors to `https://newsite.com/about`.
In this guide, we’ll show you three free ways to set up a full site redirect and move your domain without losing the SEO value you’ve built up.
What Is a Full Site Redirect (and When Do You Need One)?
A full site redirect automatically forwards every page from your old domain to the exact matching page on your new domain. It preserves your permalink structure, meaning oldsite.com/about routes directly to newsite.com/about.
It is crucial to preserve these paths rather than sending all old pages to your new homepage. If you route everything to the homepage, search engines like Google will flag the links as “soft 404” errors because the specific content no longer matches. When this happens, those pages lose their ranking power (link equity) and are treated as broken links.
You need a full site redirect when rebranding to a new domain, merging two sites into one, or moving to a new CMS. Using a path-preserving 301 redirect ensures visitors land on the correct content while seamlessly transferring your existing search engine rankings.
Before You Start (Full Site Redirection Checklist)
Before you set up any redirect, run through this short checklist to make sure the transfer is smooth and error-free:
- Move your content first – Make sure your pages, posts, and media are already published on your new domain. If you redirect traffic before your content is live, visitors will land on missing pages.
- Keep the old domain registered – Keep renewing the old domain indefinitely, because if it ever lapses, every redirect dies with it.
- Confirm DNS still resolves – Ensure your old domain name has active Domain Name System (DNS) records pointing at your old web server, or proxied through Cloudflare if you redirect at the DNS level. If the domain doesn’t resolve properly, the redirect cannot run.
- Keep your SSL certificate – Keep an active SSL certificate installed on your old domain name. If the old domain’s certificate expires, HTTPS visitors will hit a browser security warning before the redirect can even run.
- Do not delete your old site yet – The plugin and
.htaccessmethods we cover in this guide require your old site to remain active, while the Cloudflare method allows you to shut down the old host later. For a full walkthrough of the move itself, see our guide on how to move WordPress to a new domain without losing SEO.
Below, we will cover the quickest plugin option first, followed by two methods that keep every page on its matching URL, which is what a standard domain move needs.
Method 1: Use a Free WordPress Plugin (404 to 301)
If you want the quickest setup and prefer not to edit server files, you can redirect your site using the free 404 to 301 plugin. This is the best method if you’re shutting a site down and want to redirect it to an existing site or forwarding an old domain to a single landing page.
Keep in mind that the plugin sends every old URL to the single destination you enter, so it does not keep each page on its own path. For a standard site move where every old page needs to point to its exact new equivalent, use Method 2 or Method 3 instead.
First, install and activate the plugin on your old website. If you need help, see our step-by-step guide on how to install a WordPress plugin.
Next, go to 404 to 301 » Redirects and click the ‘Add redirect’ button to open the rule editor.
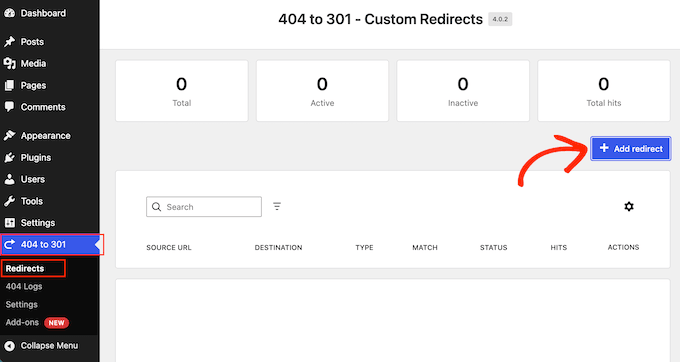
Then, create a single rule with these settings:
- Source – Enter a single forward slash (
/). This symbol represents the root path of your website. - Match type – Choose ‘Prefix’, which matches every URL on your domain using this single rule.
- Target type – Choose ‘Custom URL’, because you are sending visitors to an address on another domain.
- Target URL – Enter the full web address where you want all visitors to land, for example https://newsite.com.
- Redirect status – Select ‘301 – Moved Permanently.’ This option sets up a permanent redirect that transfers ranking authority to your new domain.
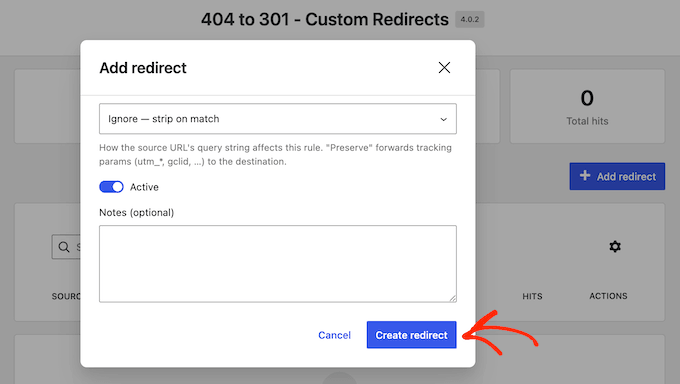
- Query string – Leave this setting as ‘Ignore – strip on match’ to clear tracking strings, or select ‘Preserve – forward to destination’ if you want parameters like
utm_sourcecarried over to the new URL.
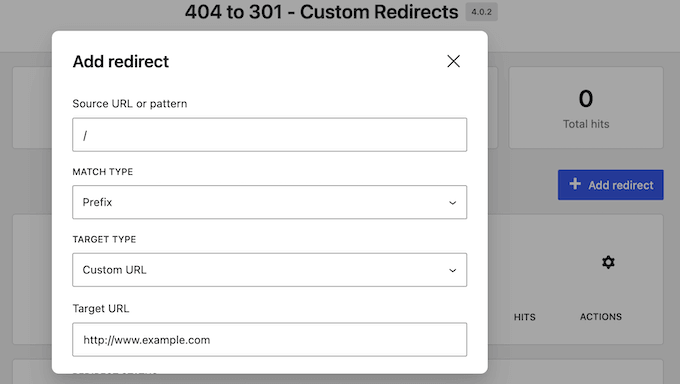
Finally, click the ‘Create redirect’ button at the bottom of the popup.
After completing the setup, test your redirect rule in an incognito or private browser window. Try visiting several URLs on your old site, including deep post links, to confirm they all redirect to your new target destination.
If you already use an all-in-one SEO plugin, you might not need a separate plugin. For example, AIOSEO includes a Redirection Manager in its premium versions.
Method 2: Redirect via .htaccess (Free, Built Into Your Hosting)
If your old website runs on an Apache web server, you can create a path-preserving full site redirect by editing a single configuration file. The .htaccess file sits in your root directory and controls how your server handles site requests.
To access the file, connect to your old server using an FTP client or open your hosting account’s File Manager.
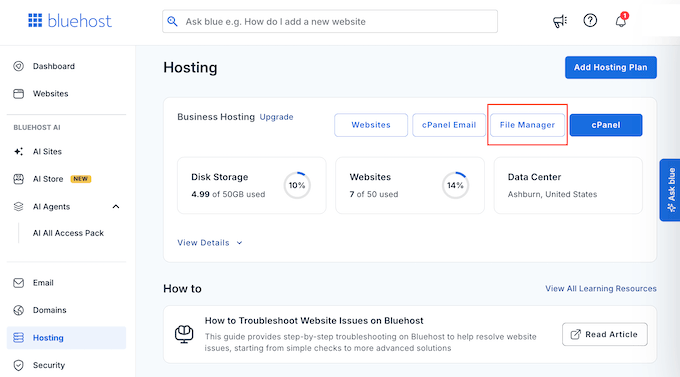
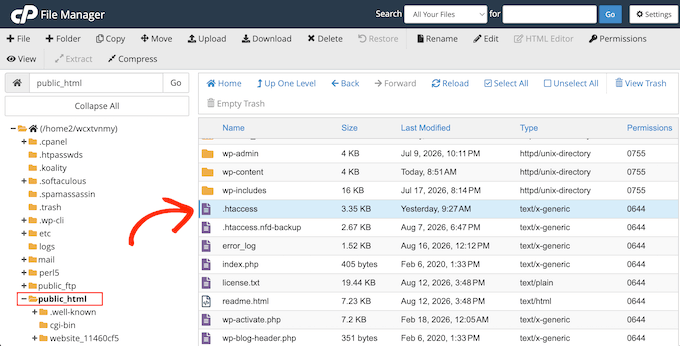
Then, find the .htaccess file inside your public_html or site root folder, and open this file for editing.
If you don’t see this file, see our guide on why you can’t find the .htaccess file.
Next, add the following lines at the very top of the file, above the line that reads # BEGIN WordPress.
<IfModule mod_rewrite.c>
RewriteEngine On
RewriteCond %{HTTP_HOST} ^(www.)?oldsite.com$ [NC]
RewriteRule ^(.*)$ https://newsite.com/$1 [R=301,L]
</IfModule>
Make sure to replace oldsite.com and newsite.com with your actual domain names.
This rule triggers a 301 permanent redirect for every incoming request. The $1 parameter passes the full URL path along to the new domain, automatically changing https://oldsite.com/contact to https://newsite.com/contact. It also preserves original query parameters like tracking strings.
After adding the snippet, save the file and re-upload it to your server.
To check the redirect works, open a private browser window and visit a deep page like https://oldsite.com/contact. The page should send you directly to https://newsite.com/contact.
For additional tips on managing this file, read our complete guide on useful .htaccess tricks for WordPress.
If your hosting account includes cPanel, you can skip editing this file manually. Simply open the Redirects tool under the Domains section to generate this rule automatically.
Method 3: Redirect at the DNS Level with Cloudflare
If you use the plugin or .htaccess method, then you’ll need to keep your old site online. If you want to cancel your old hosting plan you can manage the redirect at the DNS level using Cloudflare instead.
Because Cloudflare processes the redirect at the network level before a request reaches a web server, your redirect will continue working even after your old site is gone.
To set this up, add your old domain name to a free Cloudflare account and update your domain registrar’s nameservers to point to Cloudflare.
Cloudflare’s Redirect Rules only fire on hostnames whose DNS records are proxied through Cloudflare, so make sure the record for your old domain is showing the orange cloud. This is also what lets the redirect keep running after the old host is switched off.
Once your domain is active in Cloudflare, go to Rules » Redirect Rules in your dashboard. Here, create a new rule using a wildcard pattern so that incoming URL paths automatically map to the matching path on your new domain.
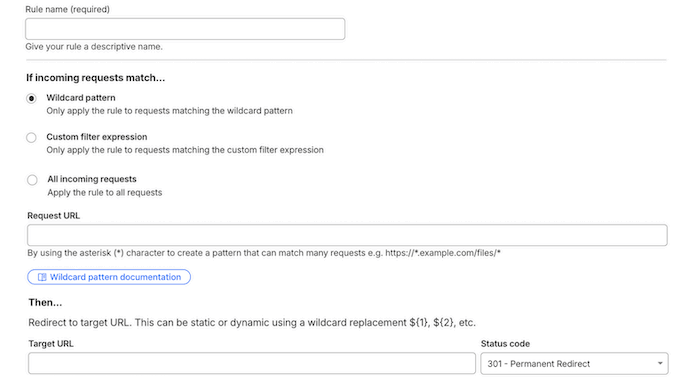
Cloudflare includes these Single Redirect rules in its free plan.
If you’re new to Cloudflare, then our guide on how to set up Cloudflare in WordPress covers creating the account and updating your nameservers.
Important Warning: Avoid using basic ‘domain forwarding’ or ‘URL masking’ offered by domain registrars.
Basic registrar forwarding often strips individual page paths, uses temporary 302 redirects instead of permanent 301s, and frequently breaks HTTPS connections. Creating a proper Redirect Rule in Cloudflare is the safest way to preserve your page paths and protect your SEO authority.
Tell Google You Moved: Change of Address in Search Console
Once your 301 redirects are live, you can speed up the re-indexing process by notifying Google directly through the Change of Address tool in Google Search Console.
This tool officially requests that Google transfer your old domain’s indexing signals to your new website.
Before using the tool, make sure you meet Google’s requirements:
- Active 301 Redirects: Your domain-wide 301 redirects must already be fully functional.
- Property Ownership: You must be a verified owner of both the old and new domain properties inside the same Google account.
- Domain-Level Properties: The tool only works for domain-level properties (subdomains must be submitted separately).
To start the process, open Google Search Console and select your OLD domain’s property.
Next, click on Settings in the left-hand menu. Under the General settings section, click on ‘Change of address.’
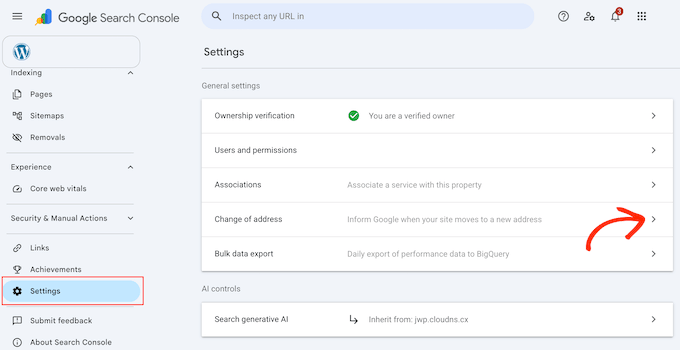
In the ‘Select new site’ dropdown menu, choose your new domain property from the list.
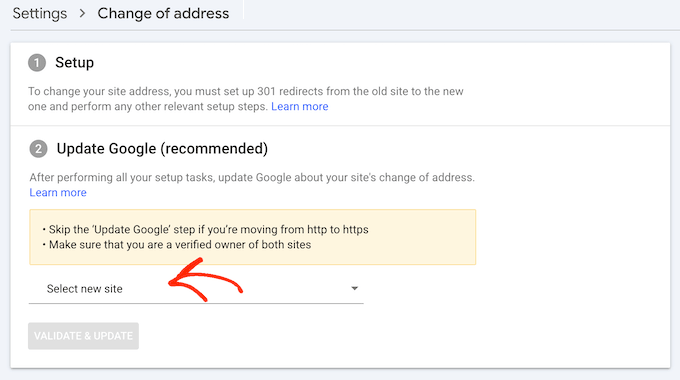
Once selected, click the ‘Validate & Update’ button. Google will run a quick check on your 301 redirects before confirming the request.
Just be aware that the Change of Address tool does not create and submit a new sitemap for you, so you’ll need to do this as a separate step.
What Happens to Your Rankings (Timeline)
A full site redirect starts working immediately for website visitors, but search engines need time to catch up. You should expect some temporary ranking fluctuations during the first few weeks as Google recrawls your pages and registers the domain change.
For a small-to-medium website, most pages typically settle at their new domain within a few weeks. Larger sites with thousands of pages may take longer. To give search engines enough time to process the move, keep your redirects active for at least one year before you change anything.
If your search rankings do not recover or your old URLs continue showing up in search results, see our guide on how to fix WordPress redirecting to the old domain after migration.
Video Tutorial
Frequently Asked Questions
Will a full site redirect hurt my SEO rankings?
When you use 301 redirects that preserve each page’s path, a full site redirect passes most of your link equity to the new domain. This protects your long-term rankings.
However, you may see temporary fluctuations for a few weeks while Google recrawls and reindexes your pages. Keeping your redirects active for at least one year gives search engines enough time to process the entire move.
What is the difference between a 301 and a 302 redirect?
A 301 redirect is permanent. It tells search engines to transfer your ranking value to the new URL, making it the correct choice for a domain move.
A 302 redirect is temporary and signals that the original page will return, so search engines do not pass ranking value. For a full site redirect, always choose a 301. To learn more, see our beginner’s guide on creating redirects in WordPress.
We hope this guide helped you set up a full site redirect in WordPress without losing your SEO. You may also want to see our guides on the best WordPress redirect plugins compared or how to move WordPress to a new host or server with no downtime.
If you liked this article, then please subscribe to our YouTube Channel for WordPress video tutorials. You can also find us on Twitter and Facebook.





Shah
As you mentioned the plugin will redirect everything except the WordPress login page, is that means the login page will use previous domain name or what? I didn’t understand that. Do we need to keep the old domain with us and keep renewing it every year.
I will really appreciate your helpful reply.
WPBeginner Support
Correct, this would mean that you could log in to cancel the redirect if you needed to. You do not need to continually renew the domain, it is mainly recommended to renew the old domain as long as your users are still using the old domain.
Admin
Jiří Vaněk
I have about 1300 articles on the website. If I wanted to change the domain, how should I proceed? Migrate the website to a new hosting and a new domain and leave the original one where it is set to redirect each url to the new one? Does this mean I have to set up 1300 redirects? Or does it work so that I set this redirect in AIO SEO and it only replaces the domain name in the url and redirects to the appropriate URL? I’m a little confused.
WPBeginner Support
You would want to set up the new site and ensure the content is imported properly on the new host first. After that you could manually create the redirects or use AIOSEO to handle the redirect process for you. As long as your permalinks have not changed you can use far fewer redirect rules for the site to go to the new domain.
Admin
Jiří Vaněk
Permanent links will be the same, only the main domain will change. Thank you for the advice. I will try to solve it over time using AIO SEO PRO and possibly their support can help me with it. Thanks for the reply.
THANKGOD JONATHAN
THank you for the tutorial. However in case of a website that all\ready have a lot of content I think fixing 404 error individually can be challenging and also time consuming. How do I deal with that?
WPBeginner Support
The first method from the article is designed to help you migrate a larger site without needing to worry about the 404s
Admin