Moving your WordPress site can be challenging, especially for beginners. Whether you’re switching to a new hosting provider, creating a staging site for development, or simply wanting a backup, exporting your site is the first crucial step.
However, exporting your WordPress site is easier than you might think. There are plenty of tools that you can use to safely export a WordPress website.
Over the years, we’ve helped thousands of users migrate and export their sites. Today, we will walk you through the process of exporting your WordPress site clearly and concisely, ensuring you have everything you need to rebuild your online presence.
In this step-by-step guide, we’ll share everything you need to know on how to easily export a WordPress site.

Why Export Your WordPress Site?
There are a number of reasons to export a WordPress site. For instance, you might be moving your site to a new domain or web host, or you may simply want to save your blog posts to your computer.
You could also be moving from WordPress.com to WordPress.org. If you’re not sure what the difference between those is, check out our guide on WordPress.com vs WordPress.org.
There are a lot of WordPress exporter tools that let you completely export your website files, WordPress database, themes, plugins, and media.
Since it’s a very common use case, many top WordPress hosting companies have built their own WordPress exporter tools as well.
Whether you want to export a WooCommerce store, a WordPress membership site, or a simple WordPress blog, here are the best ways. Simply click on the quick links to go straight to a specific method.
- How to Export a WordPress Site Using the Built-in Export Tool
- How to Export a WordPress Site Using Bluehost Site Migrator
- How to Export a WordPress Site Using SiteGround Migrator
- How to Export a WordPress Site Using Duplicator
- How to Export a WordPress Site From WordPress.com
- How to Export a WordPress Site Manually Using SFTP + phpMyAdmin
- Options for Exporting a Non-WordPress Site
How to Export a WordPress Site Using the Built-in Export Tool
WordPress has a built-in export tool that lets you export your website. To use this, simply go to Tools » Export in your WordPress admin.
Next, you need to select the ‘All Content’ option. This will export all your posts, pages, comments, custom fields, categories, tags, navigation menus, and custom posts.
Note: This method only exports the WordPress database options for you. It will not include your plugins or theme files.
Go ahead and click the ‘Download Export File’ option. This will not affect your website. It simply creates a copy of your site.
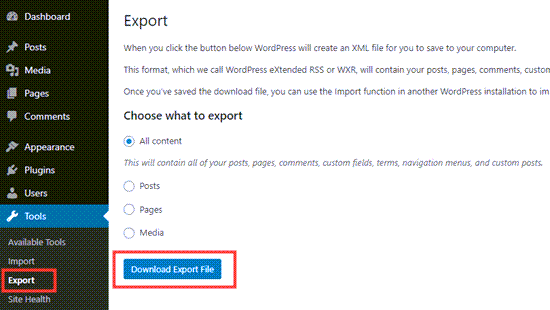
You will need to download the .xml file to your computer.
If you want to upload this export to a new site, go ahead and login to your new website’s WordPress admin.
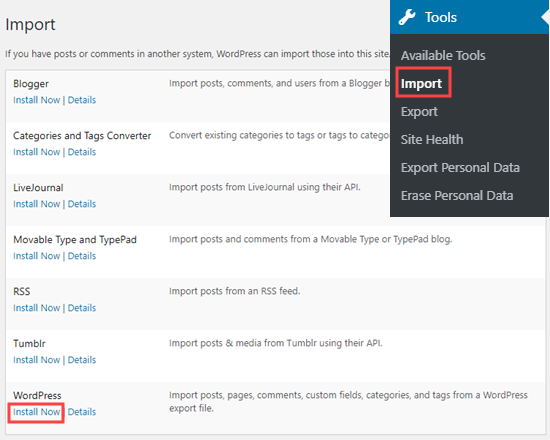
After that, you can go to Tools » Import and install the WordPress importer.
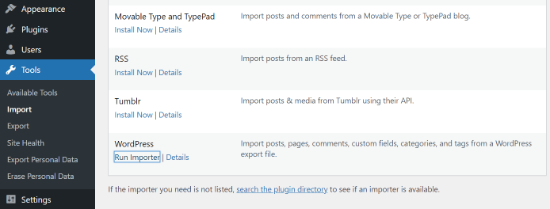
Once it is installed, you will see a new option under WordPress called Run Importer.
Simply click the ‘Run Importer’ link.
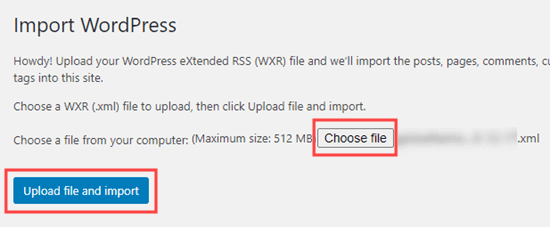
This will take you to a page where you need to select your exported file.
Go ahead and click the ‘Upload file and import’.
As long as the original website stays online, WordPress will be able to import your media files such as blog post images.
Tip: We also have guides on how to export navigation menus in WordPress and how to export users in WordPress.
The downside of the default export tool is that it requires users to jump through many steps.
For example, you manually have to backup your plugin files, theme files, and in some cases media files too.
This is why all the best WordPress hosting companies have started to build out full WordPress site migration tools. There are also WordPress backup plugins that have built-in site export and import features.
Let’s take a look at them next.
How to Export a WordPress Site Using Bluehost Site Migrator
This method only works if you’re using Bluehost for your website hosting.
The easiest way to move your WordPress site from your existing web hosting company to Bluehost is to use the Bluehost Site Migrator plugin.
Before you begin, you would need to sign up for Bluehost’s web hosting. They’re offering WPBeginner readers a great deal with 73% off hosting, plus a free domain name and SSL certificate.

For help creating your Bluehost account, check out our step-by-step instructions on our Bluehost coupon page.
After signing up for hosting, Bluehost will automatically install WordPress for you. You can log in to the new site from your hosting dashboard.
Next, you need to install and activate the Bluehost Site Migrator plugin. For more details, see our step-by-step guide on how to install a WordPress plugin.
Upon activation, click the Site Migrator link in your WordPress admin. Then, click the ‘Check Compatibility’ button.
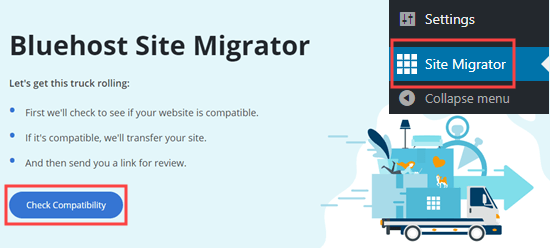
It will take a few moments for Bluehost to check if your site is compatible.
If it is, you will see the message ‘Looks like we’re compatible!’ Simply click the ‘Start Transfer’ button on this screen.

Your website will now be packaged up for migration.
Don’t worry, nothing about your site itself will change yet. All your content will still be there.
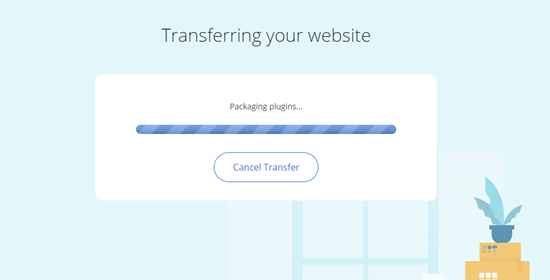
It may take a few minutes for your site to be exported.
After this, you will see a ‘Welcome to the Bluehost family’ screen.
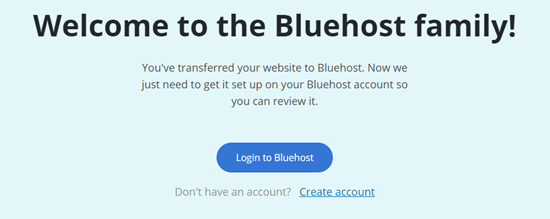
Now, click the ‘Login to Bluehost’ button to sign in to your Bluehost account.
You will see a note that the migration is in progress.
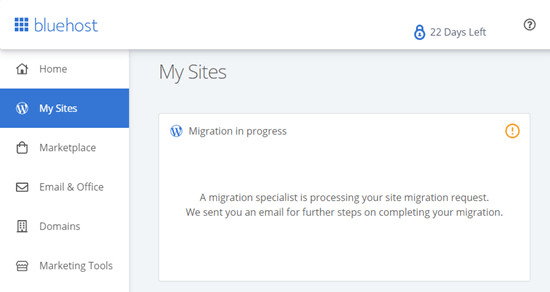
Logging into your Bluehost account will link your website to it.
You will get an email from Bluehost to let you know that they have started your transfer.
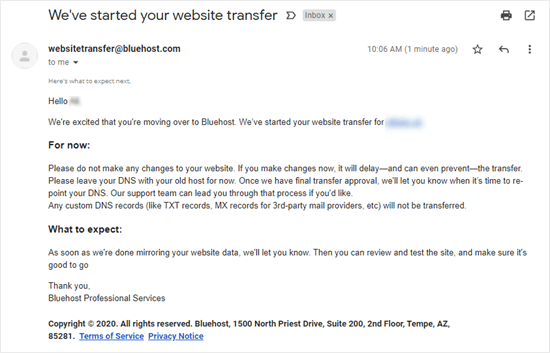
Simply wait until you hear from Bluehost again. Then, you will be able to follow their instructions to finish setting up your site.
Tip: Depending on the size of your website, the migration can take several hours. You should avoid making any changes to your site until you hear from them, as this can delay the export process.
If you want to move your site in a hurry, then we recommend using one of the other methods like Updraft and the manual FTP process below.
How to Export a WordPress Site Using SiteGround Migrator
The best way to move your WordPress site from another host to SiteGround is to use the SiteGround Migrator plugin.
First, you need to sign up for a SiteGround hosting account. For help creating your account, check out the step-by-step instructions on our SiteGround coupon page.
In your SiteGround dashboard, you need to go to the WordPress » Migrator page.
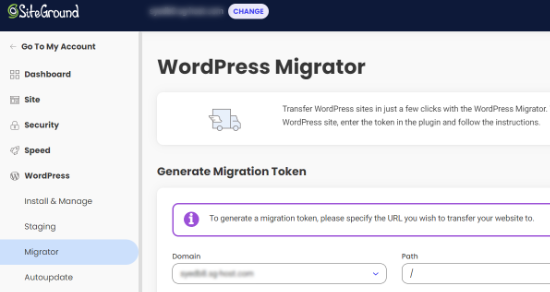
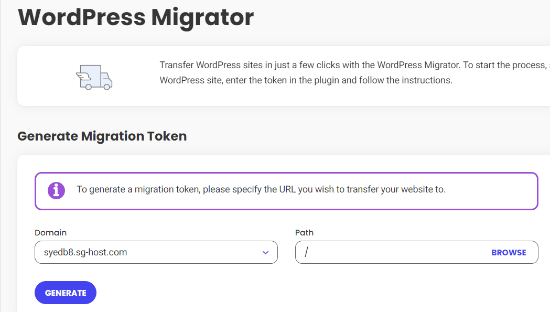
Then, go ahead and select your domain from the dropdown list. If you want to create your WordPress website in a subfolder on your domain, then you can add this as the Path.
Once you’ve selected your domain, click the Generate button.
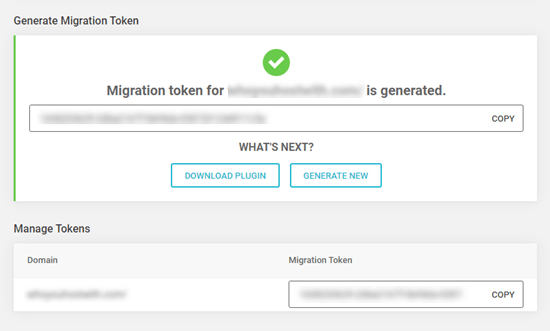
You will then see your token on the screen.
Simply leave this tab open or copy it into a safe place as you will need it in the next step.
Next, go ahead and install and activate the SiteGround Migrator plugin on your website. For more details, see our step-by-step guide on how to install a WordPress plugin.
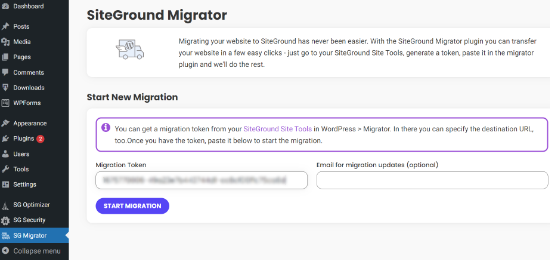
Upon activation, click on the SG Migrator link in your WordPress admin. On this page, enter your migration token and click the Initiate Transfer button.
You can also enter your email address if you want to receive an email when the transfer is complete.
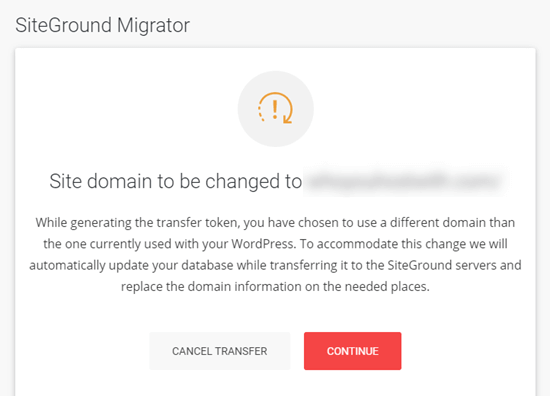
If you are moving your site to a new domain, then SiteGround will show a warning message.
You need to click continue, so the transfer process can keep going on.
You will see the progress on the screen as well.
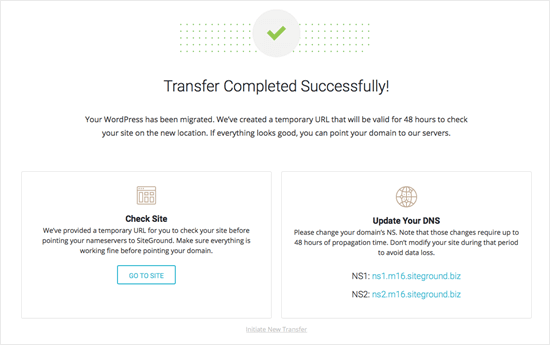
Once it’s done, you should see a message to let you know that the transfer has been completed successfully. Then, you can go ahead and check your site before changing your domain’s nameservers to SiteGround.
How to Export a WordPress Site Using Duplicator
Duplicator is one of the best WordPress backup plugins on the market. It’s easy to use to export and import your WordPress sites.
First, you need to install and activate the Duplicator plugin. For more details, see our step-by-step guide on how to install a WordPress plugin.
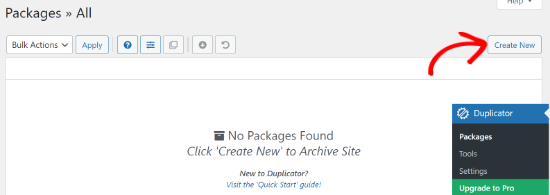
Upon activation, you can head to Duplicator » Packages from the WordPress dashboard. From here, click the ‘Create New’ button in the corner.
After that, you will need to enter a name for your package.
When you’re done, click the ‘Next’ button.
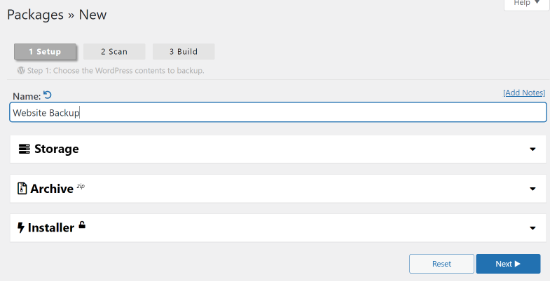
The plugin will now scan your website.
Once the scan is complete, simply scroll down and click the ‘Build’ button.
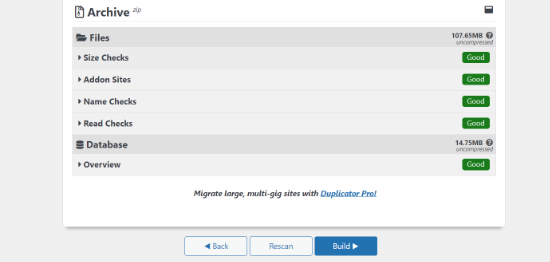
The Duplicator plugin will now build a backup package of your website.
You show see options to download the package files. Go ahead and click the ‘Download Both Files’ button.
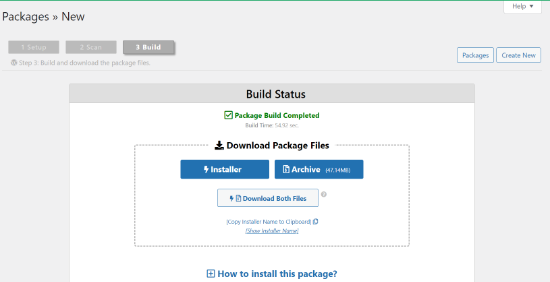
You can now save the package file on your computer.
After that, you can easily restore this backup in your new WordPress site by following our detailed guide on how to move WordPress to a new domain.
How to Export a WordPress Site From WordPress.com
A lot of our readers are often looking to switch from WordPress.com to WordPress.org to unlock more features and have full control over their site.
If you’re using WordPress.com, then it’s quite easy to export your site.
First, you need to log in to your WordPress.com account and go to the Tools » Export page in your admin area.
Here, you need to click the ‘Export all’ button to export your text content. This includes pages, posts, and feedback (such as survey results).
You can also download all your media files, such as images that you have included in your posts.
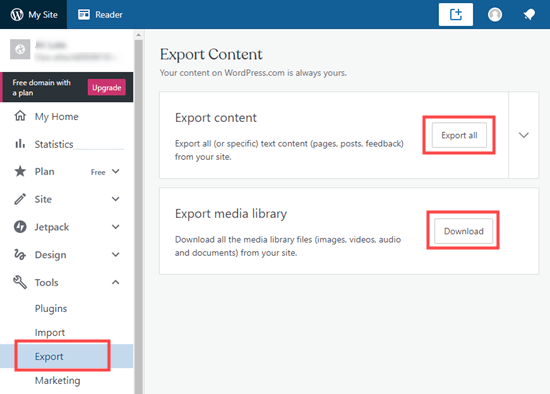
WordPress will show a download link for your export.
Simply click this to download the exported files to your computer.
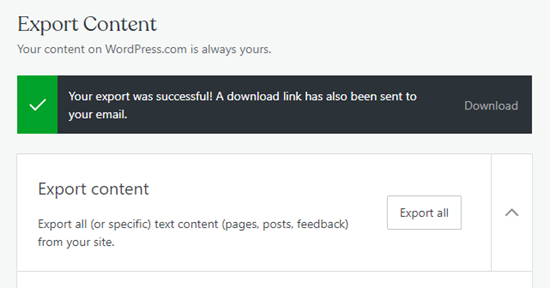
You can then upload this file to another WordPress.com site that you own, using the Tools » Import feature for that site.
Tip: If you are moving your site to WordPress.org, then you will need to create a website and install the WordPress.org software.
We can also help you move your site from WordPress.com to WordPress.org with our free blog setup service. Follow the instructions on that page, and our friendly team will take care of everything for you.
How to Export a WordPress Site Manually Using SFTP + phpMyAdmin
The final option for exporting your WordPress site is to do it manually. We only recommend this for tech-savvy users. If you’re a beginner, then you should try one of the above methods instead.
First, you need to connect to your existing website hosting account using SFTP (secure FTP). For help on this, check out our guide on using FTP to upload files to WordPress.
Next, locate the root folder of your website and download it to your computer. This may take a long time if you have a large WordPress website.
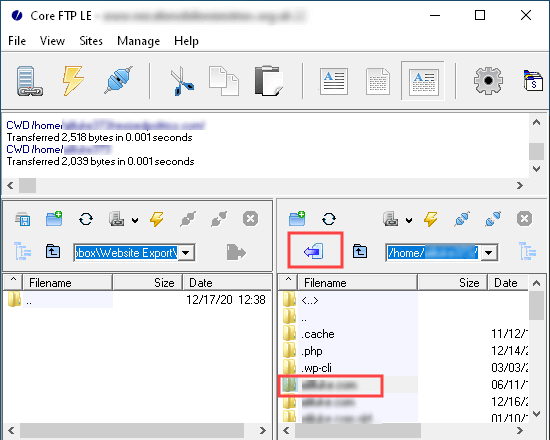
Doing this exports all your website files, such as media uploads, plugins, and themes. However, it does not export content that is stored in your WordPress database, such as posts and pages, comments, and contact form entries.
To export your WordPress database, you need to log in to your web hosting’s control panel and look for phpMyAdmin. In Bluehost, you can find it by going to the cPanel and scrolling down to the Database section.
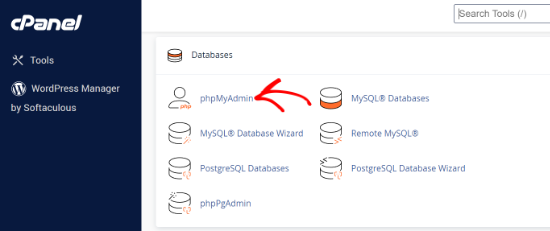
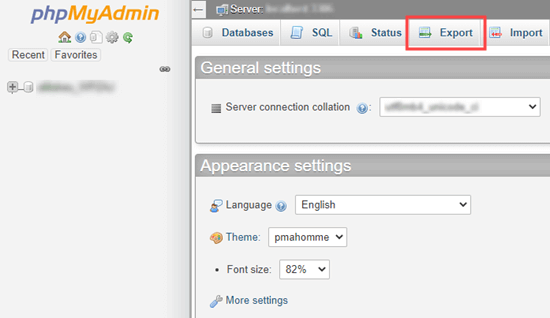
Once you’re inside phpMyAdmin, you need to click the Export button at the top of your screen.
This will show different export methods and formats.
If you just want to export all your database tables, then simply click the Go button on the next screen.
This will download an .sql file to your computer.
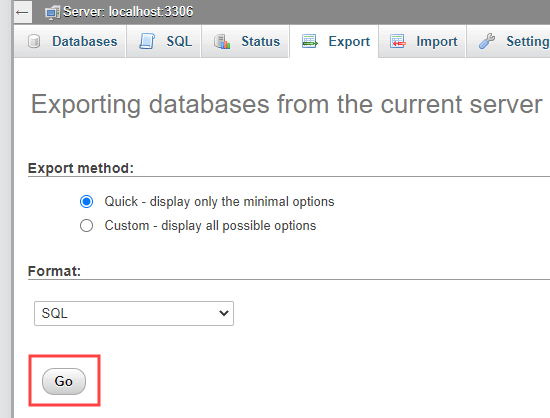
You can upload this file to a fresh installation of WordPress.
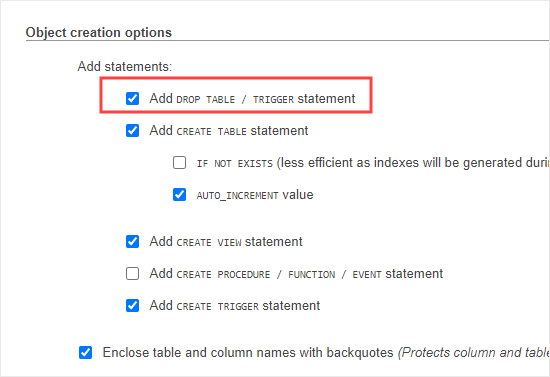
If you’re trying to export your database to a pre-existing WordPress site, then you need to select the Custom option and then scroll down to check the box for ‘Add DROP TABLE / TRIGGER statement’.
When the database file is imported, the pre-existing databases with the same name will be deleted and overwritten with the new data. You can leave all the other settings as their default, then click the Go button.
Options for Exporting a Non-WordPress Site
If you’re moving your site from a different website builder platform to WordPress, then you cannot export it using the above methods.
The options we shared above are only for WordPress to WordPress migration.
However, we do have step by step guide for other platforms too:
- How to Move From Weebly to WordPress
- How to Move From Wix to WordPress
- How to Move from Joomla to WordPress
- How to Move from Medium to WordPress
- How to Move from Tumblr to WordPress
- How to Move from GoDaddy Website Builder to WordPress
We hope this article helped you learn how to export a WordPress site. You may also want to see our list of the best WordPress plugins for all websites and our comparison of the best email marketing services to grow your traffic.
If you liked this article, then please subscribe to our YouTube Channel for WordPress video tutorials. You can also find us on Twitter and Facebook.


Syed Balkhi says
Hey WPBeginner readers,
Did you know you can win exciting prizes by commenting on WPBeginner?
Every month, our top blog commenters will win HUGE rewards, including premium WordPress plugin licenses and cash prizes.
You can get more details about the contest from here.
Start sharing your thoughts below to stand a chance to win!