Do you want to import and export navigation menus in WordPress?
The default WordPress import/export feature allows you to move menus from one website to another as part of a full site transfer. However, it doesn’t allow you to import and export menus by themselves.
In this article, we will show you how to easily import and export navigation menus in WordPress without doing a full site transfer.
Why Import and Export Navigation Menus in WordPress?
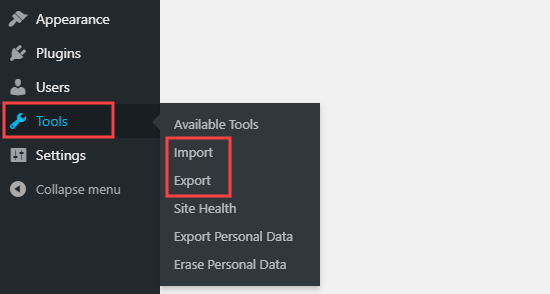
Every WordPress website has built-in import and export features. You can find them by going to Tools » Import and Tools » Export in your WordPress dashboard.
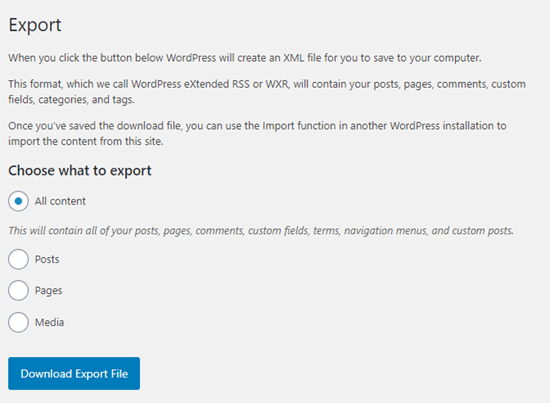
Here, you can choose to export all content or export only your posts, pages, or media.
If you select ‘All content,’ then WordPress will export all your pages and posts, plus your comments, custom fields, terms, custom post types, and navigation menus.
However, sometimes, you may only want to export the navigation menu. For example, you might be creating a sister website for a new product and want to keep the same menu layout and design.
With that in mind, let’s see how you can copy a navigation menu to a new WordPress blog without exporting the rest of your content.
How to Export and Import Navigation Menus in WordPress
Before going any further, make sure you are happy with the menu you plan to export. For example, you might change the menu’s styling, highlight important menu items, or make other changes.
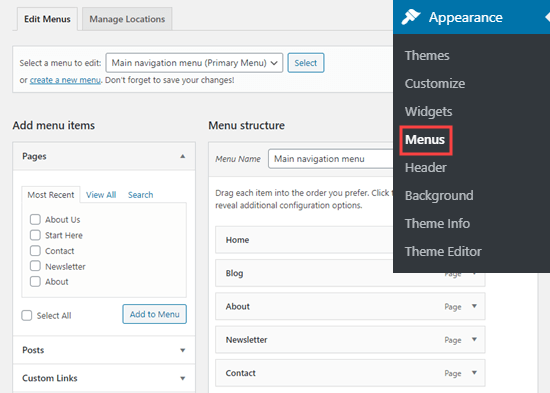
You can find your site’s menu by going to Appearance » Menus in the WordPress dashboard.
For more information on how to change the menu, please see our detailed guide on how to add a navigation menu in WordPress.
Next, you need to install and activate the WPS Menu Exporter plugin. For more details, see our step-by-step guide on how to install a WordPress plugin.
Upon activation, you need to go to Tools » Export in your WordPress admin dashboard.
You will see a new option to export navigation menu items. This will include the menu itself and all the content linked to it. The plugin will also export any comments left on the linked posts.

To export this content, simply select the ‘Navigation Menu Items’ radio button and then click the ‘Download Export File’ button.
This downloads the navigation menu, plus all its linked pages and comments.
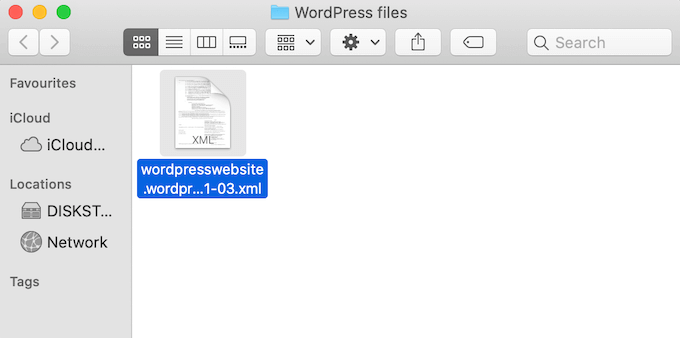
All this content is stored in an .xml file with the name site.wordpress.yyyy-mm-dd, where “site” is the name of your website, and “yyyy-mm-dd” is the date you created the download.
Importing Your WordPress Menu to Your New Site
Now, you can import the .xml file using WordPress’s standard Import feature.
Before you begin, check that the destination website doesn’t have any pages with the same name as the new menu, including any pages in the trash. If you skip this step, then WordPress may not import those pages correctly.
After that, log into the website where you want to import the navigation menu. Then, head over to Tools » Import.
If you haven’t already, then you may need to install the WordPress importer tool. In that case, find the ‘WordPress’ heading and click on ‘Install Now.’
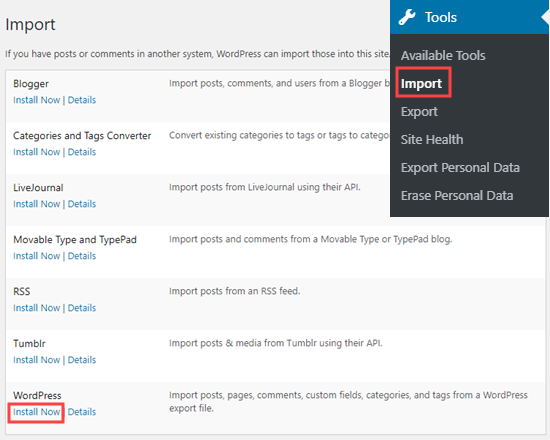
After installing the WordPress importer, you should see a new ‘Run Importer’ link.
You can go ahead and click on this link.

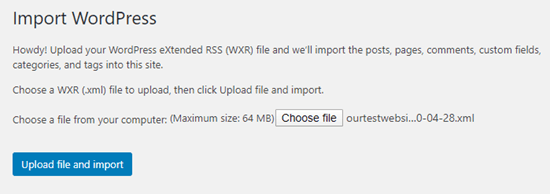
On the Import WordPress screen, click the ‘Choose file’ button and select the .xml file you downloaded earlier.
After that, go ahead and click the ‘Upload file and import’ button.
On the next screen, WordPress will ask you to assign the imported content to an author.
If you run a multi-author WordPress blog, then you can open the ‘assign posts to an existing user’ dropdown and choose a username from the list.
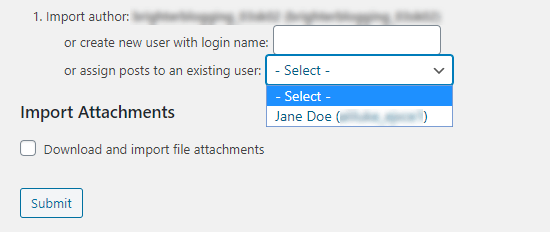
Another option is to add a new user or author for this content by typing a login name into the ‘create new user…’ field.
If you are importing pages along with the menu, then you will also want to check the ‘Download and import file attachments’ box to make sure any images are included in the import.
When you are happy with how the import is set up, click on the ‘Submit’ button.
After a few moments, you should see a message saying that the import was a success.

Viewing Your Imported Menu and Pages
To take a look at the imported menu, just go to Appearance » Menus. Here, you can make sure that everything is set up correctly.
You may also want to make some changes to the imported menu, such as adding a search bar or social media icons.
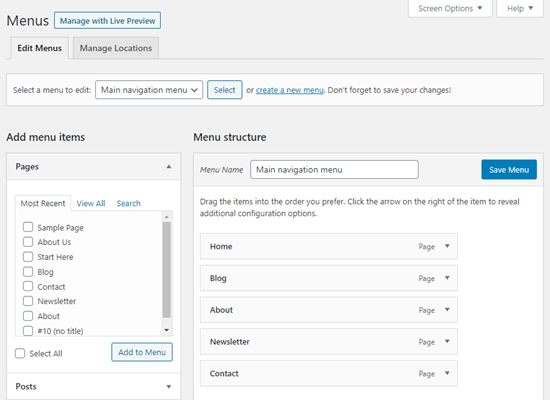
You can also click on the Pages tab in your WordPress dashboard to check that any linked pages, comments, and images were imported along with the menu.
We hope this article helped you learn how to import and export navigation menus in WordPress. You might also like to see our guide on how to add topics in navigation menus, or see our expert pick of the best tutorials to master WordPress navigation menus.
If you liked this article, then please subscribe to our YouTube Channel for WordPress video tutorials. You can also find us on Twitter and Facebook.


Syed Balkhi says
Hey WPBeginner readers,
Did you know you can win exciting prizes by commenting on WPBeginner?
Every month, our top blog commenters will win HUGE rewards, including premium WordPress plugin licenses and cash prizes.
You can get more details about the contest from here.
Start sharing your thoughts below to stand a chance to win!
kzain says
This is exactly what I’ve been looking for!
Trying to migrate my menus to a new site, and the WPS Menu Exporter plugin sounds like a game-changer. Much easier than a full export.
Thanks for the heads-up about the built-in tool too. Good to know for future backups!
Dennis Muthomi says
I have a site that uses mega menus, and was wondering if it’s also possible to export and import mega menus.
Or are there any limitations when it comes to mega menus?
WPBeginner Support says
It would heavily depend on what tool is used to create the mega menu.
Admin
Dayo Olobayo says
This is a great resource but I’m curious… can one import and export navigation menus that have submenus as well? Or does this process only work for basic menus?
WPBeginner Comments says
Typically yes, basic submenus should also transfer.
Jiří Vaněk says
Export could be helpfull, but may I ask you, if does exist option for duplicate menu?
WPBeginner Support says
Not at the moment but you could import the menu on the same site for a method to achieve that.
Admin
Val Archer says
Hi – you left out the last step. After importing you must go into Appearance / Menus then select each menu individually, and check the box under “Menu Settings” that it applies to, then Save Menu — and only then do the menus display correctly on the new site
Tilak Conrad says
Hi
Would this be a tool to use to migrate an entire site from one domain & host to another domain at a different host?
WPBeginner Support says
For that, you would want to take a look at our article below:
https://www.wpbeginner.com/wp-tutorials/how-to-move-wordpress-to-a-new-host-or-server-with-no-downtime/
Admin