Do you want to highlight a menu item on your WordPress site?
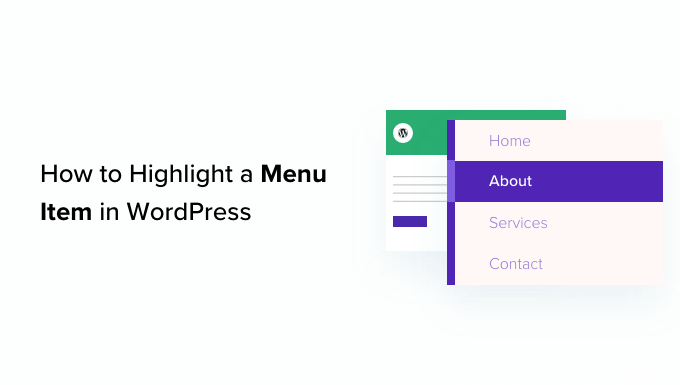
Highlighting a menu item can help you point the user’s attention to a specific area on your menu. This can be great if you want to highlight the Pricing or Contact Us page on your website.
In this article, we will show you how to easily highlight a menu item in WordPress using CSS code.
Why Highlight a Menu Item in WordPress?
A navigation menu is a list of links pointing to important areas of your site. They are usually presented as a horizontal bar in the header of every page on a WordPress website.
By highlighting a menu item in your navigation menu, you can easily direct the user’s attention to your most prominent call to action.
For example, if you want users to visit the pricing page or a specific post on your WordPress blog, then you can highlight that item in your navigation menu. This can increase traffic on that page and boost sales.
That being said, let’s see how you can highlight a menu item in WordPress using CSS:
Method 1: Highlighting a Menu Item Using Full Site Editor
If you are using a block-enabled theme, then you’ll have the Full Site Editor instead of the older Theme Customizer. You can easily highlight a current menu item in it as well.
First, head over to the Appearance » Editor page from the WordPress admin dashboard. This will direct you to the full site editor.
Here, simply double-click the menu item you want to highlight, and then click the ‘Settings’ icon at the top. This will immediately open up that specific menu item’s settings in the block panel.
Now, simply scroll down to the ‘Advanced’ tab and click the arrow icon next to it to expand it.
This will open up an ‘Additional CSS Class’ field where you have to write highlighted-menu.
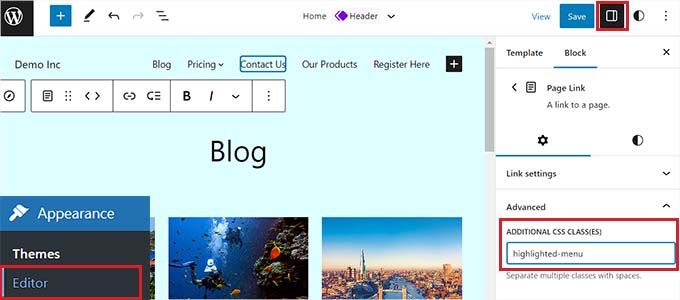
Next, click the ‘Save’ button at the top of the page to store your changes.
After that, you will need to add a small bit of CSS to your theme for the highlight effect. You can either fix the missing Theme Customizer, or you can use a code snippet plugin to add CSS code.
How to Add CSS Snippets Using WPCode
For adding CSS to WordPress, we recommend using WPCode because it is the best WordPress code snippets plugin on the market that makes it safe and easy to add custom code.
First, you need to install and activate the WPCode plugin. For more instructions, check out our step-by-step guide on how to install a WordPress plugin.
Note: WPCode also has a free version. However, you will need the premium plan of the plugin to unlock the ‘CSS Snippet’ option.
Upon activation, navigate to the Code Snippets » + Add Snippet page from your WordPress admin panel.
Here, hover your mouse over the ‘Add Your Custom Code (New Snippet)’ option and click the ‘Use Snippet’ button under it.

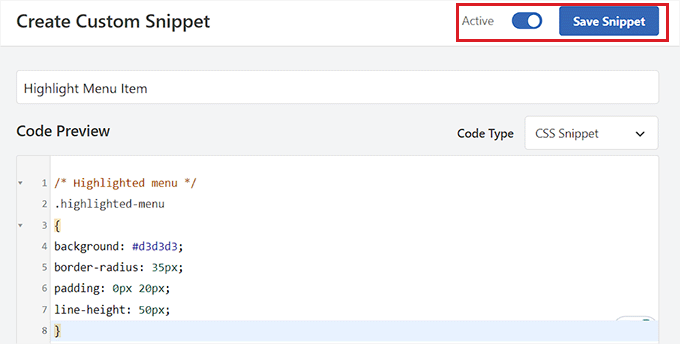
This will take you to the ‘Create Custom Snippet’ page, where you can start by choosing a name for your snippet.
After that, select ‘CSS Snippet’ as the code type from the dropdown menu in the right corner of the screen.
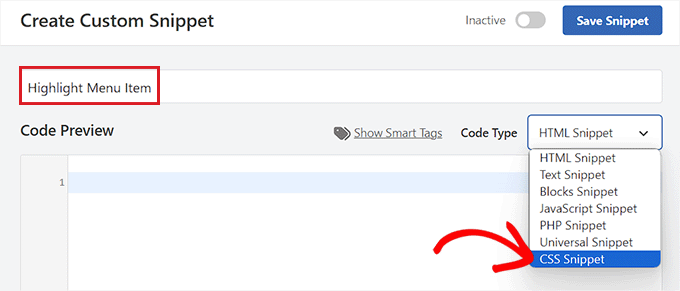
Next, copy and paste the following CSS code into the ‘Code Preview’ box:
/* Highlighted menu */
.highlighted-menu
{
background: #d3d3d3;
border-radius: 35px;
padding: 0px 20px;
line-height: 50px;
}
Once you’ve done that, scroll down to the ‘Insertion’ section.
Here, simply choose the ‘Auto Insert’ mode so that the code can be automatically executed on your entire website.

Now, go to the top of the page and toggle the switch from ‘Inactive’ to ‘Active’.
Then, simply click the ‘Save Snippet’ button to store your settings.
You have now successfully highlighted a menu item in WordPress using a full site editor.
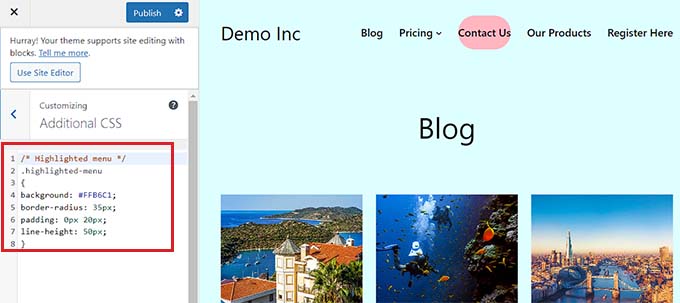
This is how your menu item will look after you add the CSS code.

How to Access the Theme Customizer Using a Block Theme
If you want to use the Theme Customizer and use an FSE theme, then simply copy and paste the URL below into your browser. Make sure to replace ‘example.com’ with your own site’s domain name:
https://example.com/wp-admin/customize.php
This will open the theme customizer for your block theme, where you have to expand the ‘Additional CSS’ tab.
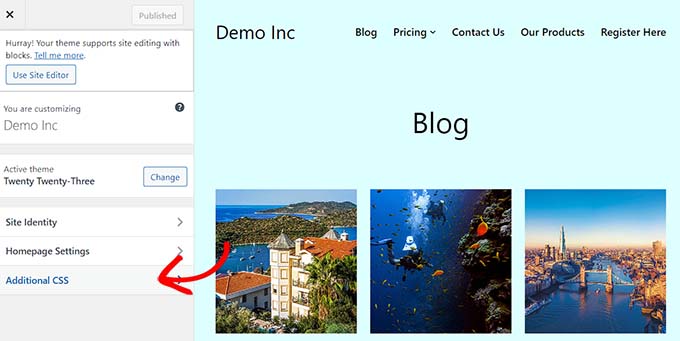
From here, copy and paste the CSS snippet into the ‘Additional CSS’ box:
/* Highlighted menu */
.highlighted-menu
{
background: #FFB6C1;
border-radius: 35px;
padding: 0px 20px;
line-height: 50px;
}
After that, simply click the ‘Publish’ button at the top to store your settings.
Method 2: Highlighting a Menu Item Using a Theme Customizer
If you are using an older WordPress theme, then you will probably have a theme customizer enabled by default. Highlighting a menu item in a theme customizer is a fairly simple process.
First, simply go to Appearance » Customize in your WordPress dashboard to launch the theme customizer. Once it opens up, simply click on the ‘Menus’ tab on the left sidebar.
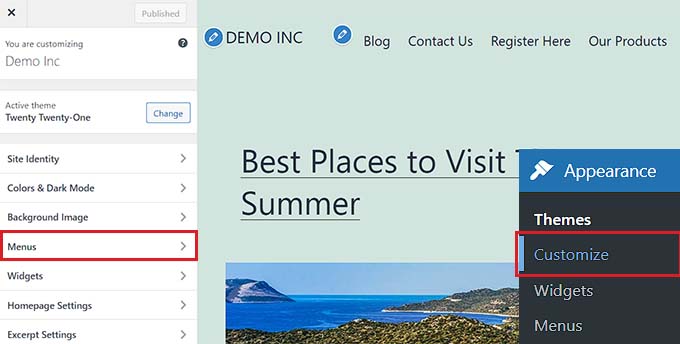
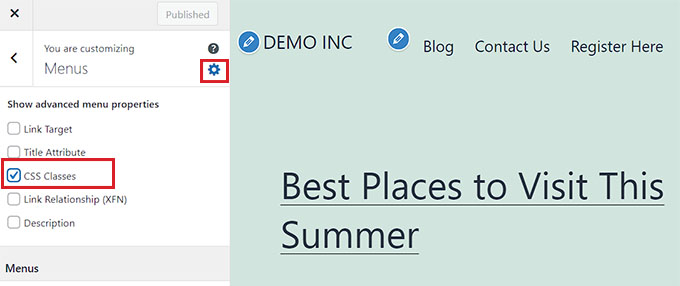
From here, click on the gear icon at the top right to display advanced properties.
Now, go ahead and check the ‘CSS Classes’ box.
After that, scroll down to the ‘Menus’ section.
If you have multiple WordPress menus, simply click on the menu with the menu items you want to highlight.
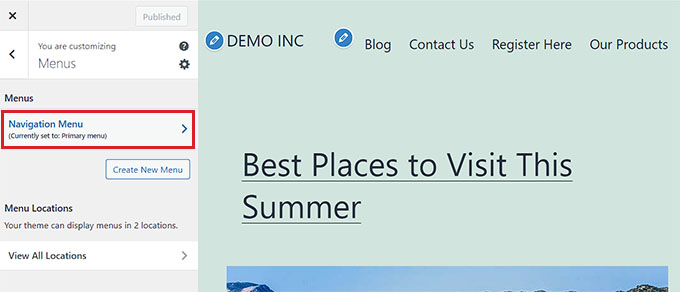
This will open up a new tab where you can select the menu item that you want to highlight. It could be ‘Contact Us’ like in our example, or it might be your pricing page or the link to your online store.
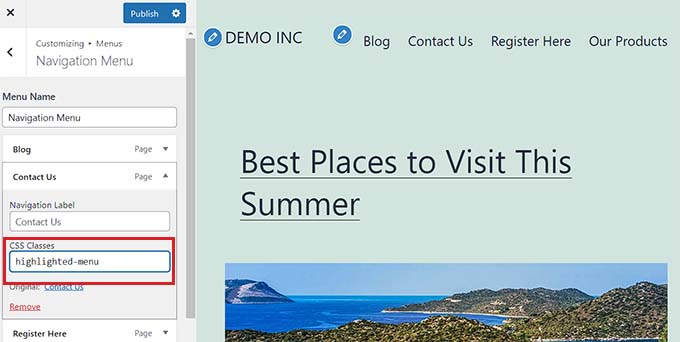
Simply click on the menu item of your choice to expand some settings. Here, click on the ‘CSS Classes’ field.
All you have to do is write 'highlighted-menu' in the field. You can add this CSS Class to multiple menu items, and they will all be highlighted.
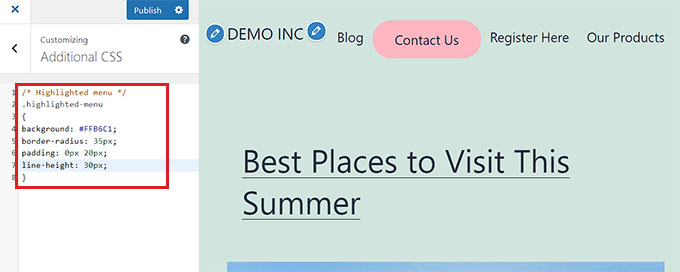
Next, simply go to the ‘Additional CSS’ tab in the theme customizer.
After that, copy and paste the following CSS code:
/* Highlighted menu */
.highlighted-menu
{
background: #FFB6C1;
border-radius: 35px;
padding: 0px 20px;
line-height: 50px;
}
Congratulations! You’ve successfully highlighted a menu item.
Note: Your theme might not have an ‘Additional CSS’ field in the theme customizer. If not, check the theme settings to find out how to add custom CSS. If you can’t find it, you might want to contact the developer or add it using WPCode.
Finally, don’t forget to click the ‘Publish’ button at the top to store your settings.
Customizing Your Menu Item Highlight
Now that you have highlighted the menu item, you can tweak the CSS code to customize your menu item the way you like it.
For example, you can change the background color of your menu item.

Simply look for the following code in the CSS snippet you just pasted:
background: #FFB6C1
After locating it, you can simply replace the pink color code number with the hex code of any color of your choice:
background: #7FFFD4;
Above is the hex code for aquamarine.

You can check out our guide to easily add custom CSS for other ideas on how to customize the highlighted menu item.
After you are satisfied with your choices, simply click on the ‘Publish’ button in the theme customizer or ‘Save Snippet’ in WPCode to save your changes.
We hope this article helped you learn how to highlight a menu icon in WordPress. You may also want to check out our beginner’s guide on how to style WordPress navigation menus or our expert picks of the must-have WordPress plugins to grow your site.
If you liked this article, then please subscribe to our YouTube Channel for WordPress video tutorials. You can also find us on Twitter and Facebook.


Syed Balkhi says
Hey WPBeginner readers,
Did you know you can win exciting prizes by commenting on WPBeginner?
Every month, our top blog commenters will win HUGE rewards, including premium WordPress plugin licenses and cash prizes.
You can get more details about the contest from here.
Start sharing your thoughts below to stand a chance to win!
Jiří Vaněk says
Thank you for the CSS code. It made my search much easier. It works perfectly with WPCode.