


Whenever you delete a page, merge content, or switch domains, old URLs can remain in links across your site and the web. Those links lead to pages that no longer exist.
Redirecting those old URLs keeps your traffic and rankings intact and makes sure people can still find your content, rather than hitting a dead end.
In this guide, we’ll show you four ways to redirect a page or URL in WordPress, starting with a free plugin you can set up in a couple of minutes.

Why Redirect a URL in WordPress (+ Redirect Types)
A broken link happens when a link no longer points to a real page, usually because you deleted the page, merged posts, or moved your site to a new domain.
If you leave broken links unresolved, visitors and search engines will end up on a 404 error page. Over time, Google may remove the missing page from its index, along with any rankings and link equity it had accumulated.
The good news is that you can often avoid this by redirecting the broken URL to a relevant page on your site. A redirect automatically sends visitors and search engines to the new page, helping you preserve your traffic and rankings instead of starting over.
There are three types of redirects, and picking the right one matters:
| Type | What it means | When to use it |
| 301 | Permanent move: passes the old URL’s full SEO value to the new one | Almost always your default choice for permanent changes |
| 302 | Temporary move: search engines keep the original URL indexed | Seasonal promotions, A/B tests, anything you’ll undo later |
| 307 | Also temporary, but preserves the original request method (e.g., a form submission) | Rare, mostly used in server-level configs and you’ll rarely set this manually |
For most WordPress site changes, a 301 redirect is what you need.
WordPress Redirects Changed Slugs Automatically
When you change a published post’s URL slug (the part of the URL after your domain, like /best-coffee-makers/), WordPress core automatically stores the old slug (in a meta field called _wp_old_slug) and issues a 301 redirect from it to the new URL. No plugin required.
There’s an important limit, though: this only works for posts (and other non-hierarchical post types, like WooCommerce products). It does not cover pages, because pages are hierarchical and WordPress excludes them from this behavior.
So you still need to set up a manual redirect when you:
- Rename a page’s slug
- Delete a page or post entirely
- Merge two pieces of content into one
- Move to a new domain or restructure your site’s URLs
- Redirect a page to an affiliate link or other external website
Now let’s look at how to redirect a page or URL in WordPress. We’ll cover four methods, and you can use the quick links below to jump straight to the one you want:
- Method 1: Creating Redirects Using a Free Redirect Plugin
- Method 2: Creating Redirects Using a WordPress SEO Plugin
- Method 3: Creating Redirects Manually by Editing .htaccess (Advanced)
- Method 4: Creating Redirects With a PHP Snippet
- Bonus Tip: How to Test Your Redirect
- Frequently Asked Questions About WordPress Redirects
Method 1: Creating Redirects Using a Free Redirect Plugin
The easiest way to redirect a page or URL in WordPress is by using the 404 to 301 plugin. It’s free and lets you create redirects right from the WordPress dashboard, no coding required.
To get started, first install and activate the free 404 to 301 plugin. If you need help, see our guide on how to install a WordPress plugin.
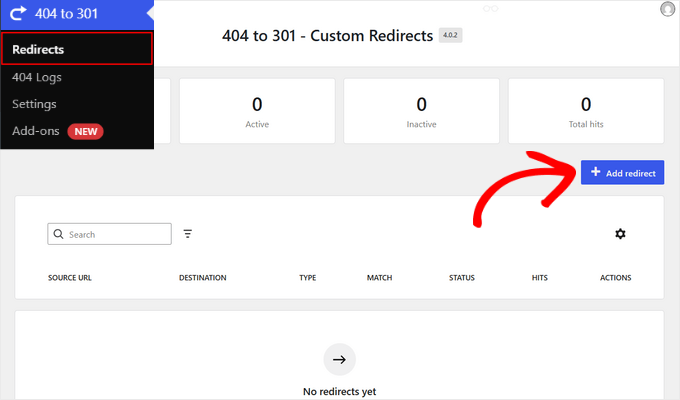
Once it’s active, go to 404 to 301 » Redirects in the WordPress admin sidebar. Then, click the ‘+ Add redirect’ button to add a new redirect.
In the popup window that appears, you need to enter the path of the broken or old URL under the ‘Source URL or pattern’ field (for example, /best-coffee-makers/, not the full https://example.com/best-coffee-makers/).
Leave ‘Match Type’ set to ‘Exact’ so it only catches that one URL. You can switch to Prefix or Regex if you need a single redirect to catch a whole group of URLs at once.
Next, you need to select the ‘Target Type’. You can choose ‘Existing Page’ to pick a page on your own WordPress site from the dropdown list.
Or, choose ‘Custom URL’ if you’re redirecting to a blog post, a specific post/page not listed, or an external site, and enter the complete address, including https://, in the ‘Target URL’ field.
After that, go to the ‘Redirect Status’ field and choose the redirect type you want. For this tutorial, we’ll choose the ‘301 — Moved Permanently (SEO)’ option.
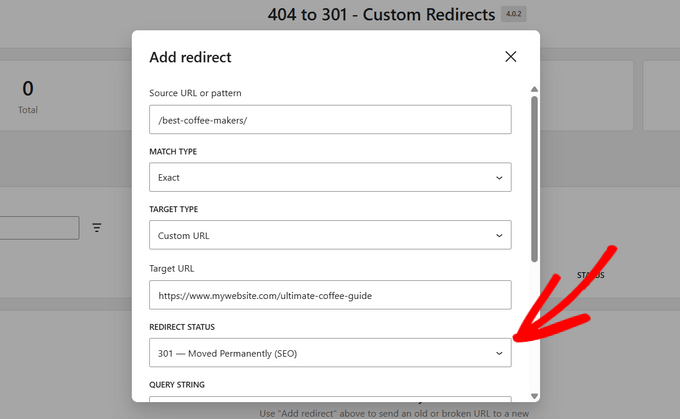
When you scroll down in the window, there’s a ‘Query String’ field, but you can leave it on its default setting. This is just for URLs with a tracking code on the end, like ?ref=newsletter.
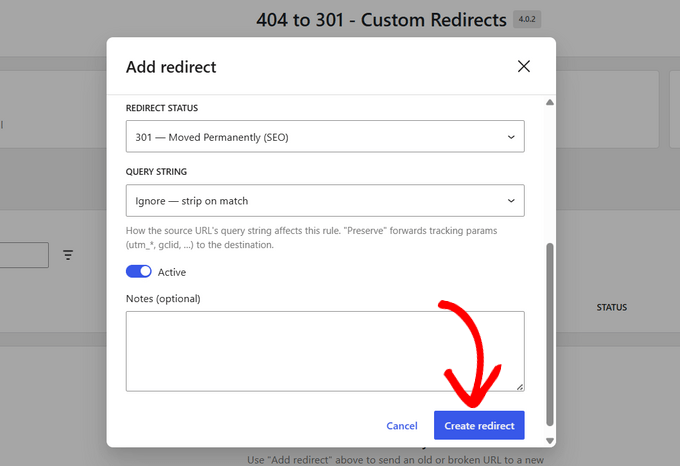
There’s also an ‘Active/Inactive’ toggle (new redirects are active by default) and an optional ‘Notes’ field if you want to leave yourself a reminder of why you set it up.
Once you’re happy with everything, click the ‘Create redirect’ button, and your redirect is live.
That’s it! We’ll show you how to test that your new redirect is working later in this guide.
Method 2: Creating Redirects Using a WordPress SEO Plugin
Most WordPress SEO plugins (AIOSEO, Yoast SEO, Rank Math, SEOPress) include a built-in redirect manager in their premium versions, so if you’re already running one of these for on-page SEO, you likely don’t need a separate redirect plugin.
We use AIOSEO here at WPBeginner, so we’ll walk through its Redirection Manager, but the general steps (enter old path, enter new URL, pick 301) are similar across all popular SEO plugins.
ℹ️ Note: You will need a paid AIOSEO plan (Basic or above) to use the Redirection Manager. There is a free version of AIOSEO, but it doesn’t include 301 redirects.
The first thing you need to do is install and configure the AIOSEO Pro plugin on your website. For step-by-step directions, see our guide on how to set up All in One SEO correctly.
Once the plugin is set up, simply go to the All in One SEO » Redirects page.
To add a new redirect, you need to type or paste the post slug of the broken link in the ‘Source URL’ field like this:
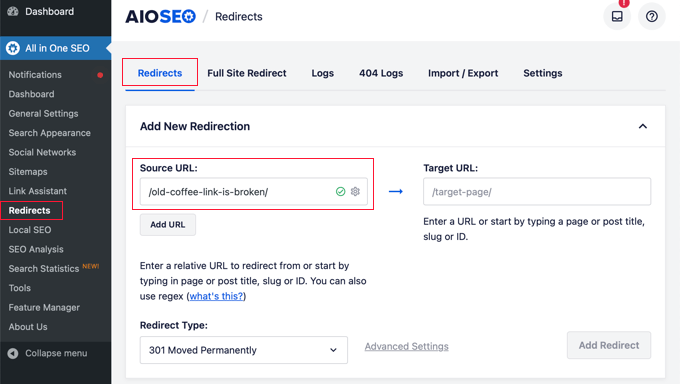
If you want to redirect multiple source URLs to the same target URL, then click the ‘Add URL’ button to add an extra ‘Source URL’ field.
Next, you need to enter the URL of the existing page that you wish to redirect the URL to. You need to type or paste this into the ’Target URL’ field.
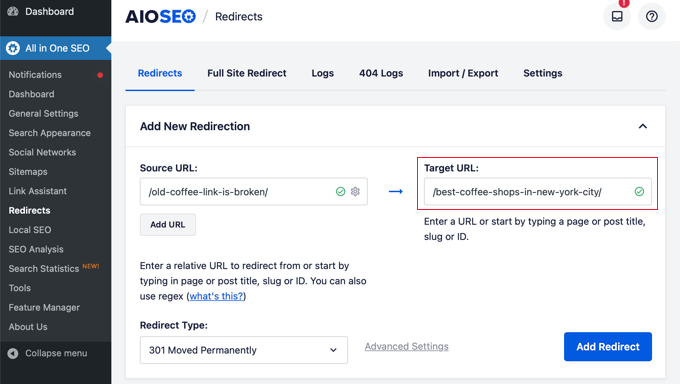
Make sure that the ‘301 Moved Permanently’ redirect type is selected and then click the ‘Add Redirect’ button.
Now, you can scroll down to view a log of the redirects you have created.
The ‘Hits’ column shows the number of people who visited the redirected link, and there is a toggle option to enable or disable individual 301 redirects.
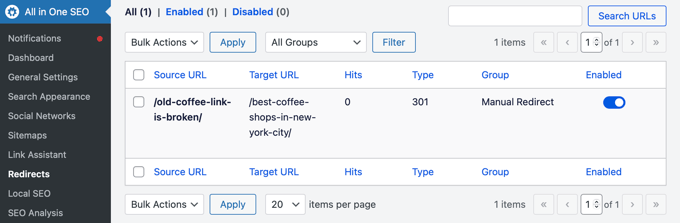
The redirect type dropdown also supports 302 (temporary) and 307 (temporary) redirects, so you can choose the right option for seasonal promotions or content you plan to restore later.
You can hover over any redirect in the list and click ‘Check Redirect’ to test it directly from the dashboard without opening a new browser tab.
Another advantage of AIOSEO is its automatic 404 detection. The Redirection Manager logs 404 errors as they happen and flags the broken URLs, so you are not waiting for a visitor to report a dead link before you discover it.
Creating a Redirect From the WordPress Content Editor
You can also use All in One SEO to redirect a published post or page while you are editing it.
When you scroll to the bottom of the WordPress editor, you will find an AIOSEO Settings section. You need to click the ‘Redirects’ tab.
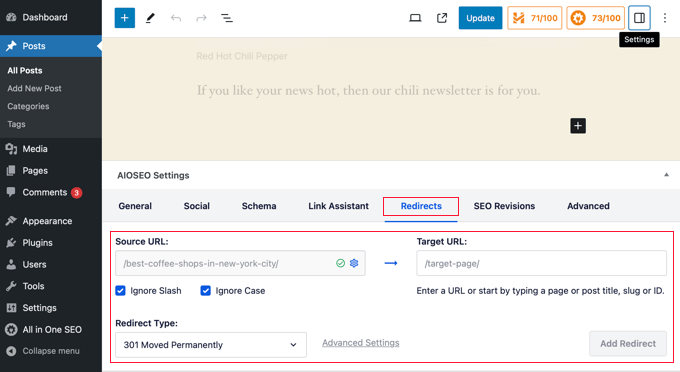
Here you will find the same redirection options that we covered above. The source URL has been filled in for you, and you need to add the target URL.
After that, make sure the ‘301 Moved Permanently’ redirect type is selected, and then click the ‘Add Redirect’ button.
Method 3: Creating Redirects Manually by Editing .htaccess (Advanced)
You can also redirect a page or URL without using a redirect plugin. To do that, you need to manually add code to your website’s .htaccess file. This method is not suitable for beginners because a small mistake can break your website.
Also, this method only works if your site runs on Apache or LiteSpeed servers. If your host runs Nginx (common with managed WordPress hosts), editing .htaccess won’t do anything. Use your host’s redirect tool or control panel instead.
We strongly recommend making a backup of your .htaccess file before using this method.
After that, you can edit your .htaccess file by connecting to your website using an FTP client or your hosting provider’s file manager.
You will find the .htaccess file in your website’s root directory. If you don’t see it there, then refer to our guide on why you can’t find .htaccess file on your WordPress site.
You may be able to edit the file using the file manager’s Edit feature. Otherwise, you can download .htaccess to your computer and edit it using a text editor like Notepad.
You should paste the following redirect code at the end of your .htaccess file after the ‘# END WordPress’ line.
Redirect 301 /thisistheoldurl/ https://yoursite.com/thisisthenewurl/
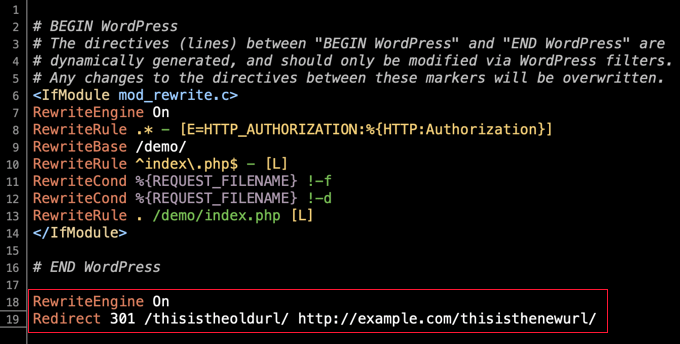
Be sure to replace the placeholder URLs with your own. Here’s what each part means:
- /thisistheoldurl/ — This is the path of your old URL that you want to redirect from. It’s the part that comes after your domain name, and it must start with a
/. - https://yoursite.com/thisisthenewurl/ — This is the complete, full URL of the new page you want to send visitors to. Make sure to include the
https://part.
Make sure you save your changes, and if necessary, upload the edited .htaccess file back to the server.
Now, you can test your redirect to make sure it is redirecting properly as intended.
Method 4: Creating Redirects With a PHP Snippet
If you don’t want to edit your .htaccess file, then you can add redirects programmatically with a PHP snippet.
Most WordPress beginners paste code snippets directly into their theme’s functions.php file. The problem with this approach is that a single typo can break your site, and your changes could be lost when the theme is updated.
That’s why we use and recommend WPCode, a free code snippets plugin that lets you add custom code to your site safely, without touching your theme files.
Because your snippet lives in WPCode instead of your theme, it survives theme updates and even a full theme switch. And if a snippet does cause a problem, WPCode catches it and switches it off automatically, so your site doesn’t go down with it.
First, you need to install and activate the free WPCode plugin. For step-by-step instructions, see our guide on how to install a WordPress plugin.
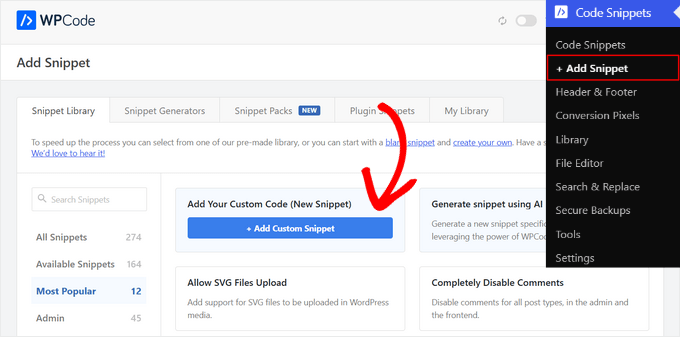
Once the plugin is activated, go to the Code Snippets » + Add Snippet page. From there, find the ‘Add Your Custom Code (New Snippet)’ option in the snippet library, hover over it, and click the ‘+ Add Custom Snippet’ button.
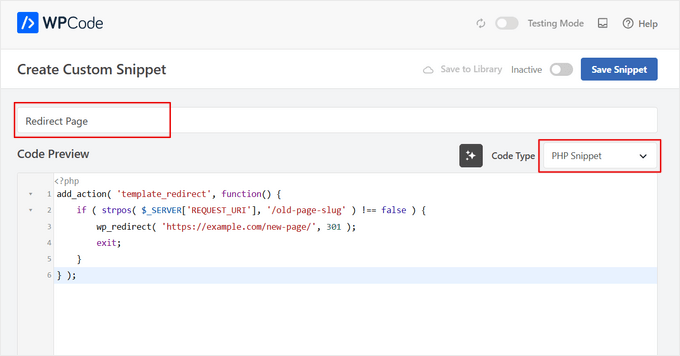
On the next page, enter a name for your snippet at the top of the page, and select ‘PHP Snippet’ as the code type.
Then, copy and paste the following code in the ‘Code Preview’ box:
add_action( 'template_redirect', function() {
    if ( untrailingslashit( wp_parse_url( $_SERVER['REQUEST_URI'], PHP_URL_PATH ) ) === '/old-page-slug' ) {
        wp_redirect( 'https://example.com/new-page/', 301 );
        exit;
    }
} );
Remember to swap old-page-slug for the slug of the page you’re redirecting from, and the example URL for your actual destination.
After copying and pasting the code, here’s what it should look like in WPCode:
When that’s done, scroll down the page to the ‘Insertion’ section.
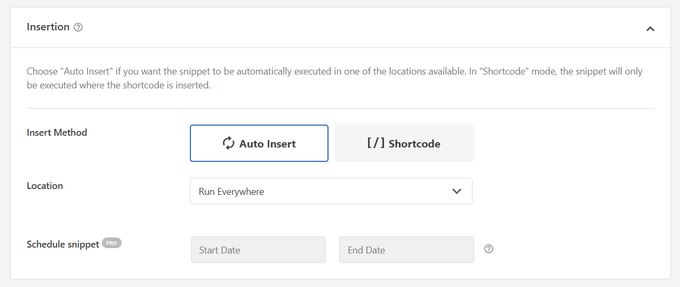
From here, be sure to choose ‘Auto Insert’ and then set the location to ‘Run Everywhere’, so the redirect check runs on every page load.
Lastly, go back up to the top of the page and toggle the snippet from ‘Inactive’ to ‘Active’. Finally, click the ‘Save Snippet’ button.
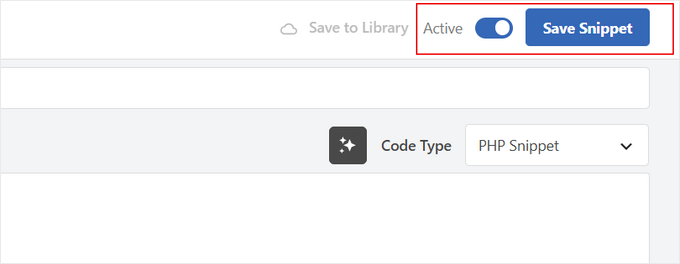
That’s it. Now, you can test your redirect to make sure it’s working correctly.
Bonus Tip: How to Test Your Redirect
The easiest way to check is to type the old URL into your browser. It should immediately take you to the new page.
We recommend testing the redirect in your browser’s ‘Incognito’ or ‘Private’ mode. This prevents your browser’s cache from showing you an old version of the page and confirms that the redirect is working for all visitors.
You can also use a free online redirect checker tool, like Redirect Checker, to verify the 301 status code. The tool will also show how many ‘hops’ the redirect takes, and ideally there should be just one.
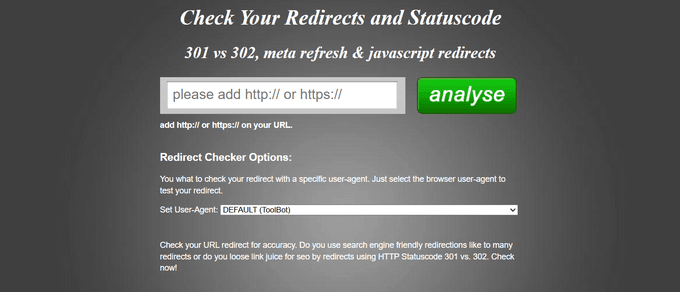
Multiple hops mean you have a redirect chain, where URL A redirects to URL B, which then redirects to URL C. Chains slow your site and dilute SEO value, so fix them by pointing the original URL directly to the final destination.
Frequently Asked Questions About WordPress Redirects
Over the years, we’ve helped thousands of users with their WordPress sites, and a lot of the same questions about redirects come up. Here are the answers to some of the most common ones.
1. Do redirects slow down a WordPress site?
A few well-managed redirects won’t have a noticeable impact on your site’s speed. However, a large number of redirects or ‘redirect chains’ (where one URL redirects to another, which redirects again) can add loading time.
2. How do I redirect a WordPress page to an external URL?
To redirect to an external URL, enter the complete address, including https://, in the target field instead of just the page’s slug.
This works the same way across all four methods in this guide, whether you’re using a plugin, editing .htaccess, or adding a code snippet.
3. What are the best practices for managing WordPress redirects?
Always use a 301 redirect for permanent moves, and only use 302 or 307 when you genuinely plan to restore the original URL later. After creating a redirect, update any internal links on your site to point directly to the new URL.
This way, visitors and search engines reach the destination in one step instead of going through a redirect.
We recommend periodically auditing your redirect list, especially before a domain move or permalink structure change, to catch and remove chains or loops.
We hope this tutorial helped you learn how to redirect a page or URL in WordPress. You may also want to see our guide on creating 301 redirects in WordPress, or our expert pick of the best WordPress redirect plugins.
If you liked this article, then please subscribe to our YouTube Channel for WordPress video tutorials. You can also find us on Twitter and Facebook.





Moinuddin Waheed
This is very common error in wordpress websites.
it becomes very difficult and creates very bad user experience.
thanks for making step by step guide to deal with it and redirect pages to a custom page which gives good user experience.
I have a query regarding the 403 error.
I mean is there any difference technically between the two?
how can we distinguish and how does the Google algorithms differentiate amongst these errors?
WPBeginner Comments
403 means that the page can’t be accessed by the visitor, whereas 404 means the page doesn’t exist at that URL.
Unless we here otherwise, they would likely be treated similarly from Google.
Moinuddin Waheed
Thank you for the clear guidance.
It means there exists the page and it is not accessible i.e 403 error.
This makes sense when we change the url and the page is still there but since the url is changed, it is not accessible.
This is where we use redirect.
Alex
I have redirected my first site to another site using a 301 redirect. If I remove the 301, will the second site still rank, or will the first site regain its rankings?
WPBeginner Support
The second site would rank based off of it’s content while the first site would rank off of it’s content after the url was recrawled.
Admin
uzoma ichetaonye
IF you remove the 301 redirect , i do not think it will affect the second URL in terms of rankings.
The 2nd site will keep on enjoying rankings on its own provided it favors google search engine in terms of backlinks, content etc.
On the first URL, you will need to request re-indexing of the URL before google can recognize and crawl it again.
Jiří Vaněk
I would like to ask about redirection and the Google search engine. If I have an indexed page that no longer exists and I perform a redirection according to your instructions, do I need to notify Google that the page no longer exists using some tool within the Search Console? Or will Google adjust it over time thanks to the 301 redirect?
WPBeginner Comments
Yes, the redirect is pretty much all you will need.
You could choose also to submit a sitemap again, but the redirect is the most important thing.
Jiří Vaněk
Thank you for the information and response. Your second answer reassured me that I’m doing it correctly, but your first answer regarding the sitemap provided an interesting fact that I wasn’t doing and which could be beneficial to do when such an issue arises. Thank you for the interesting tip on how to do it even better.