Do you want to be able to accept donations on your nonprofit website?
WordPress makes it easy for nonprofits to create a donation form and accept donations from their website.
In this article, we’ll show you how to create a donate form for nonprofit organizations using WordPress.
Why Create a Donation Form in WordPress?
The simplest way to solicit donations on your website is by adding a PayPal donate button, but it’s not the right solution for everyone.
Creating a custom donation form on your website instead of using a donation button allows you to:
- Customize the form fields to gather the information you need
- Keep donors on your own website for a more professional experience
- Ask donors if they want to subscribe to your email newsletter in the same form
- Use other payment processors besides PayPal, such as credit cards (Stripe)
- Integrate with other third-party software such as a CRM or cloud storage
As you can see, there are plenty of benefits to keeping donors on your own website instead of redirecting them to PayPal.
You might think setting up a donation form on your website would be a tricky process, but there are WordPress plugins for non-profits that makes it easy.
Having said that, let’s take a look at how to create a custom donation form in WordPress.
Video Tutorial
If you’d prefer written instructions, just keep reading.
We’ll show you how to create a nonprofit donation form in WordPress with WPForms and WP Simple Pay. You can click on the links below to go to the method you prefer:
Creating a Custom Donation Form in WordPress with WPForms
WPForms is the best drag and drop form builder for WordPress. It has a beginner-friendly interface and includes 1300+ pre-built form templates, including donation form templates to make the process even faster.
WPForms is a premium WordPress plugin created by WPBeginner’s founder, Syed Balkhi.
To create a donation form that can process payments, you can use the free version of WPForms, which allows you to collect one-time donations via Stripe. However, you have to pay 3% plus Stripe fees on payments made through your forms.
For this tutorial, we’ll be using the premium version of WPForms. It comes with pro addons for PayPal, Stripe, Square, and Authorize.net and includes powerful features like recurring payments. Plus, there are no additional transaction fees.
WPForms is used by over 6 million websites, and they do offer special non-profit pricing, which allows you to get a significant discount.
Step 1: Install and Activate WPForms
The first thing you’ll need to do is download the WPForms plugin on your website. For more details, you can follow our step-by-step guide on how to install a WordPress plugin.
Once the plugin is active, you’ll need to go to WPForms » Settings and enter your license key. You can find this information in your WPForms account area.
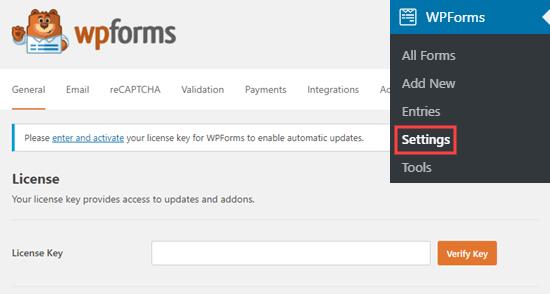
WPForms easily integrates with different payment services to collect donations, such as PayPal, Stripe, Square, and Authorize.net.
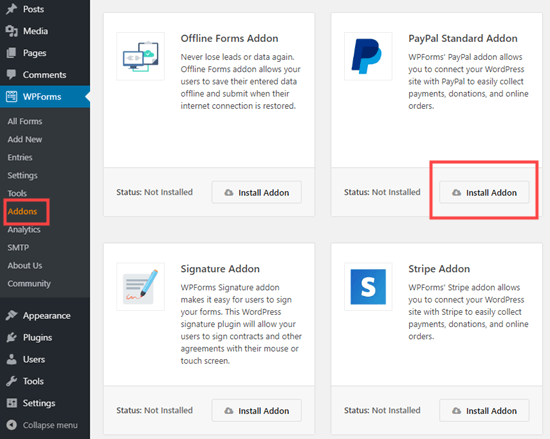
Next, you’ll need to activate the payment addons of your choice in WPForms by heading over to WPForms » Addons and clicking the ‘Install Addon’ button.
Step 2: Create Your Donation Form
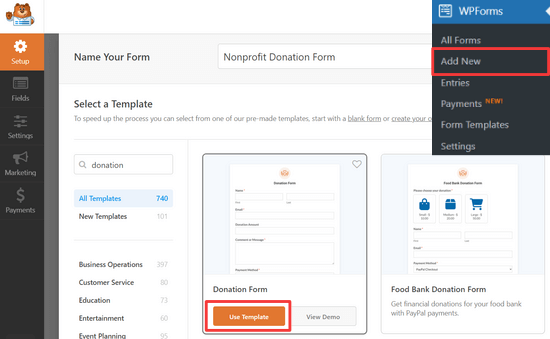
Now that WPForms has been installed and activated, you can go ahead and click on WPForms » Add New to get started.
You’ll now see a library of pre-built form templates you can choose from. Give a name to your form and hover over the Donation Form template to click the ‘Use Template’ button.
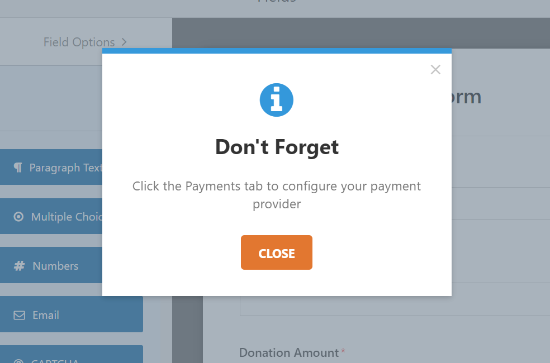
You’ll see a popup reminder that says ‘Don’t Forget: Click the Payments tab to configure your payment provider.’ Go ahead and click the ‘Close’ button.
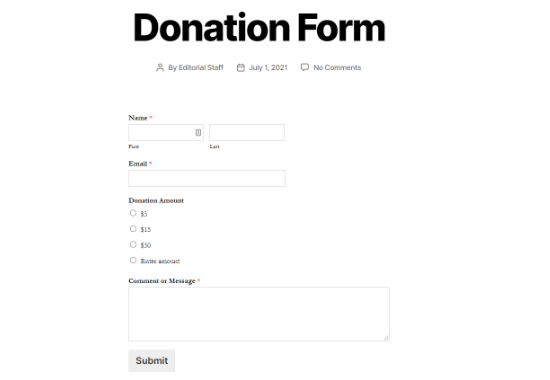
The donation form template includes fields for:
- Name
- Donation Amount
- Comment or Message
The Donation Amount field is a Single Item field where users can type in any amount they want to donate. You can also use multiple choice or dropdown fields instead.
In this tutorial, we’ll show you how to add a multiple-choice payment field with several donation amounts to choose from and an option to enter a different amount.
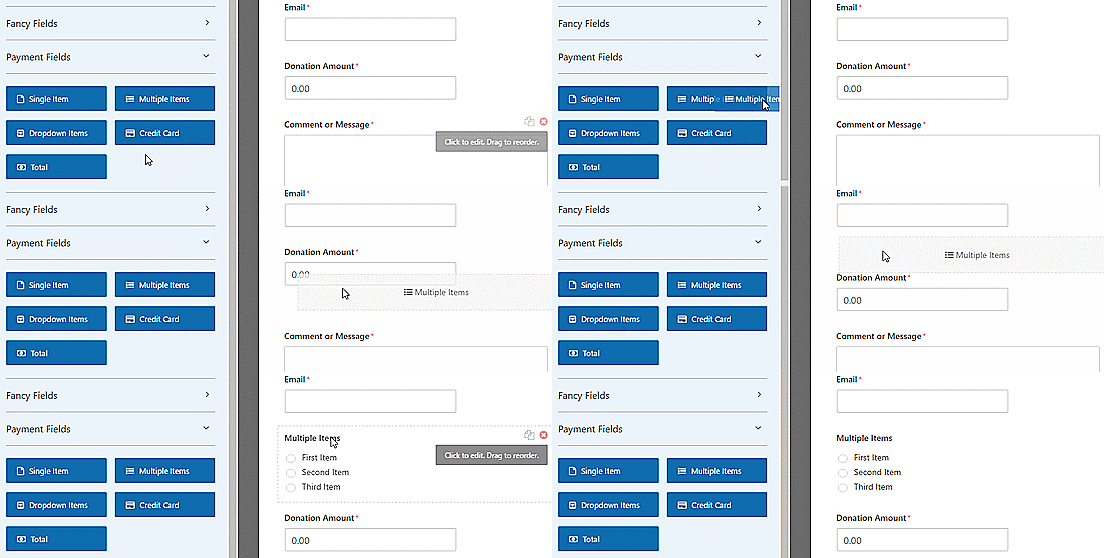
To add the multiple-choice payment field, click the ‘Multiple Items’ button under Payment Fields. You can drag and reorder the fields so that the Multiple Items field is directly above the Donation Amount field.
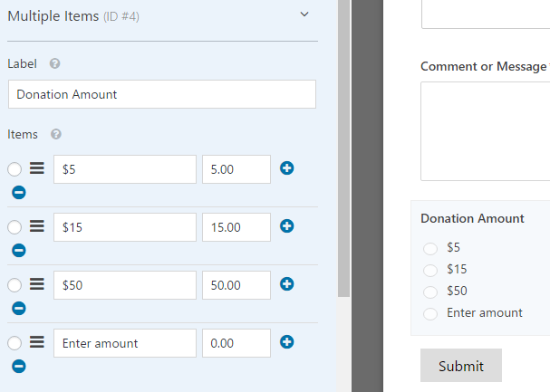
Next, you can click on the Multiple Items field in the form builder to change the options.
Go ahead and change the label to say ‘Donation Amount.’ Then you can enter whatever amounts you want and an ‘Enter amount’ option.
Now, you can change the Single Item field to only display when the ‘Enter Amount’ option is selected.
To do that, simply click the Single Item field to edit the options.
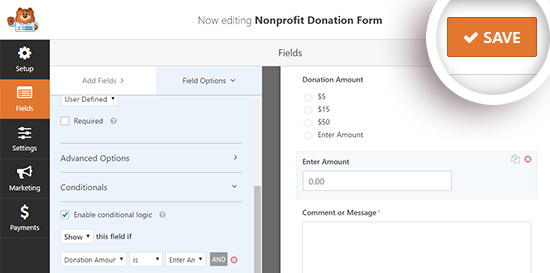
Make sure the ‘Required’ checkbox is not checked, or it will prevent users from submitting the form if they selected a donation amount in the multiple-choice field above.

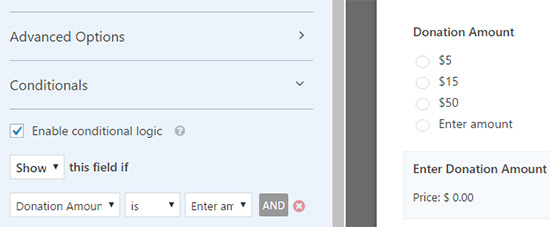
After that, you can select the Enter Donation Amount field and scroll down a bit to go to the ‘Conditionals’ tab to enter the display settings for this field.
Next, check the ‘Enable conditional logic’ checkbox. Then select the option to Show this field if ‘Donation Amount’ is ‘Enter amount.’
Make sure to click the Save button at the top right to save your changes.
Step 3: Set Up Payment Integration
Next, you’ll need to set up the payment processor for your donations.
In this tutorial, we’ll walk you through setting up an integration with Paypal.
Setting up credit card payments with Stripe is very similar. For more details, you can check out this tutorial on how to use the WPForms Stripe addon.
From here, you can click on the Payments tab on the left and then click the ‘Paypal Standard’ option.
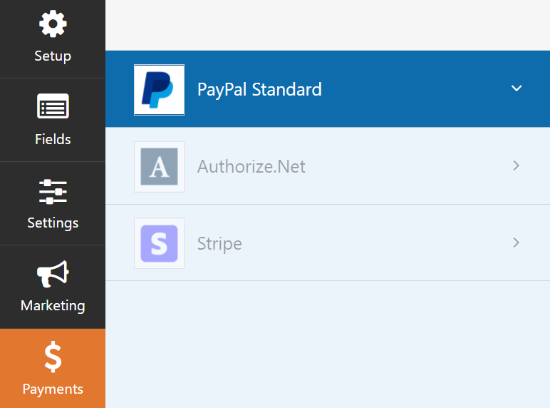
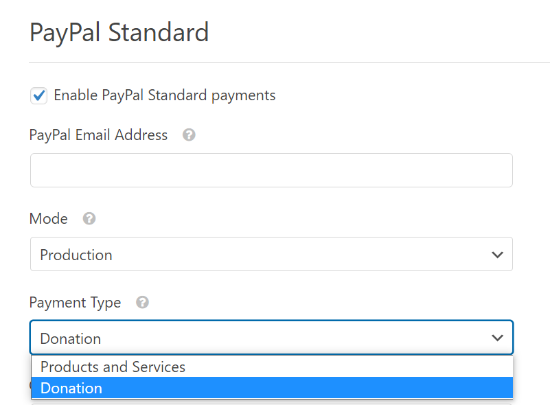
Now, you can input your settings on the right side of the screen. First, check the ‘Enable PayPal Standard payments’ checkbox and enter your Paypal email address.
Then make sure to select ‘Donation’ in the Payment Type dropdown.
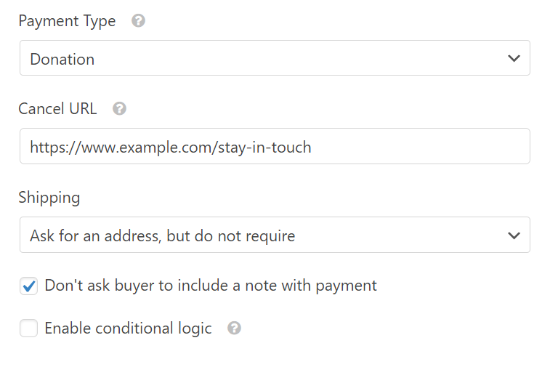
Below that, you can enter a URL to send visitors if they cancel the checkout process.
This might be a good opportunity to try to re-engage with users by sending them to a relevant blog post or asking them to follow you on social media to stay in touch.
You can also customize the shipping address options and choose whether to ask donors to include a note during the Paypal checkout.
For this donation form, you don’t need to use conditional logic. But you could do this if you wanted to add a donation option to another form, such as a survey. Then the payment would only process if the user selected the donation option.
Be sure to click the ‘Save’ button after you’ve configured all your options.
Step 4: Customize Your Notifications
Next, you’ll need to make sure that donors are receiving a confirmation email after they donate.
To customize the email notifications for your form, you can go to the Settings » Notifications tab.
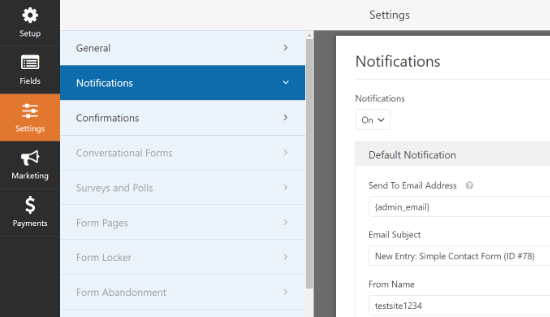
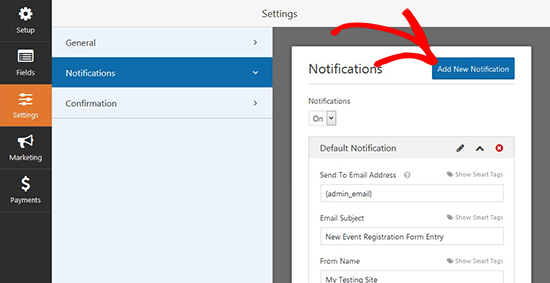
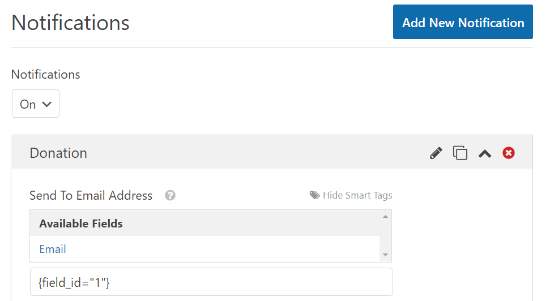
You’ll see there’s a default notification that will be sent to the site administrator. You can click the ‘Add New Notification’ button to create a separate notification for the donor.
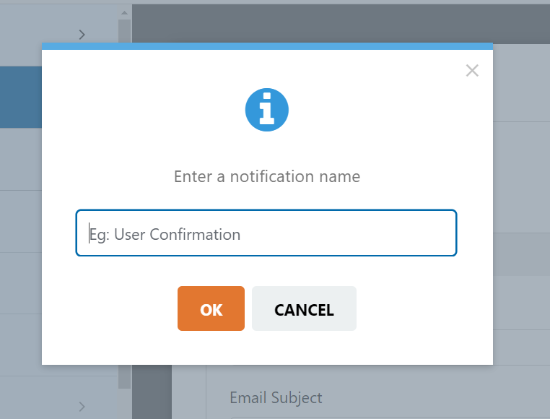
Now, name your new notification in the popup window and click the ‘Ok’ button.
After that, you’ll need to make sure this notification gets sent to the donor’s email address that they entered into the form.
To do that, click the ‘Show Smart Tags’ option next to Send To Email Address.
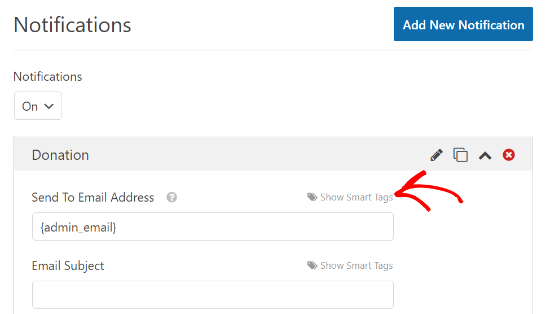
In the list that appears, click Email. You’ll see a smart tag such as {field_id="1"} appear.
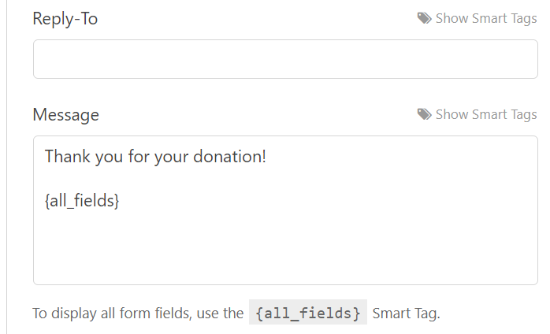
Now you can scroll down to customize the message the donor will receive.
Don’t forget to click the ‘Save’ button when you’re finished setting up your notifications.
Step 5: Place Your Donation Form on Your Site
Now that your donation form is complete, you’ll need to place it on your website.
You can easily add a WPForms block or embed your form in any post or page using a shortcode. The plugin even lets you place a donation widget in your sidebar or footer.
To add your form, simply edit an existing page or post. You can also create a new post or page for your donation form.
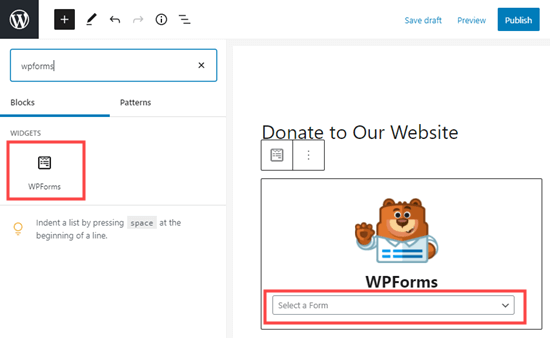
Once you’re in the WordPress editor, click the plus (+) sign at the top left corner and then add a WPForms block.

After that, you can select your donation form from the dropdown menu in the WPForms block.
Now publish your post or page to see the donation form in action.
Creating a Custom Donation Form in WordPress with WP Simple Pay
WP Simple Pay is one of the best Stripe payment plugins for WordPress. It comes with an easy payment form builder and ready-made form templates including a donate button form.
WP Simple Pay offers a free version of the plugin with basic features which is sufficient for non-profit organizations. The Pro version comes with additional features like on-site payment forms, custom form fields, user-entered credit card amounts, which are great for donations, and more.
For the sake of demonstration, we’ll be using WP Simple Pay Pro for this tutorial, but the free version process is exactly the same.
Step 1: Install and Activate WP Simple Pay
First, you need to install and activate the WP Simple Pay plugin on your WordPress site. For instructions, you can follow our step-by-step guide on how to install a WordPress plugin.
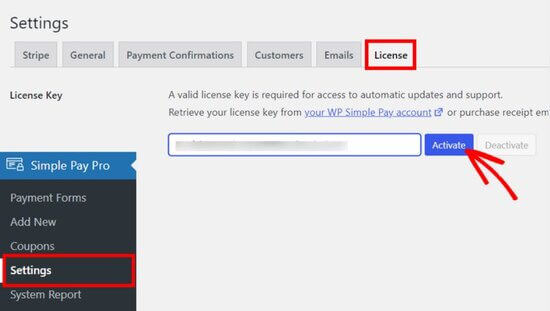
Once the plugin is activated, you need to go to the WP Simple Pay » Settings page, click on the License tab, and enter your license key. You can find the license key in your account area on the WP Simple Pay website.
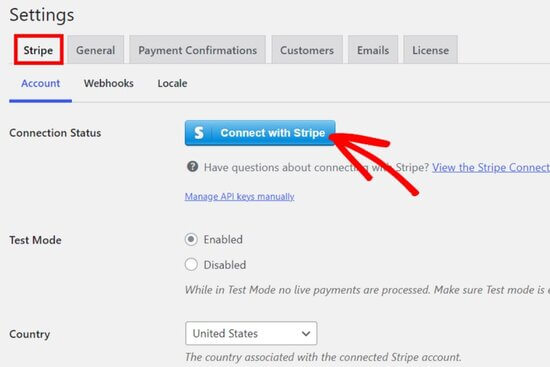
Next, you need to connect your Stripe account in order to accept donation payments online.
On the Settings page, click the Stripe tab and then click on the ‘Connect with Stripe’ button.
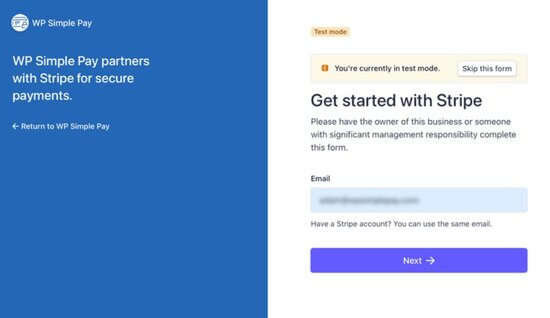
You’ll then see the Stripe website where you can log in to your account. If you don’t have a Stripe account, you can create a new one.
After connecting your Stripe account, you’ll be taken back to the settings page on your admin dashboard.
Don’t forget to click on the Save Changes button to save your Stripe account connection.
Step 2: Create a New Donation Form
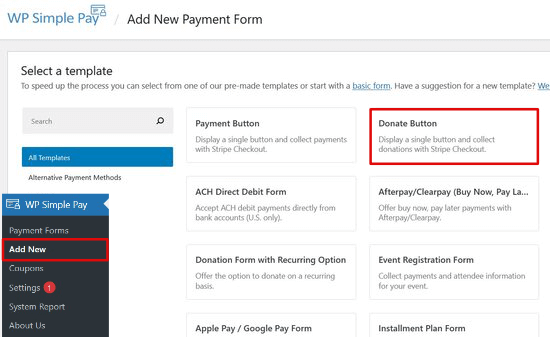
Now that the plugin is activated and your Stripe account is connected, go to the WP Simple Pay » Add New page to create a donation form.
To get started, you can pick a form template from the list. Hover over the Donate Button template option and click the ‘Use Template’ button.
Next, you’ll be taken to the form builder where you can customize your donation form.
On the ‘General’ settings tab, you can enter a form title and description, and select the form type.
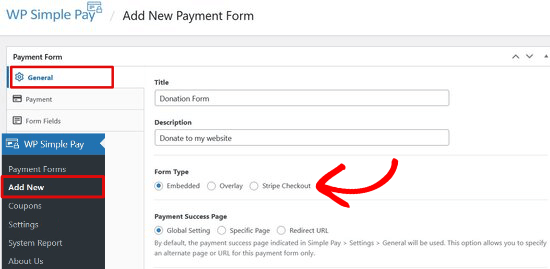
There are three form types to choose from:
- Embedded – Add a form directly to your WordPress site and keep users on-site for the payment process.
- Overlay – Display an overlay payment form, similar to a popup, and keep users on-site for payments.
- Stripe Checkout – Use an off-site payment flow that’s optimized for conversions.
For this tutorial, we’ll choose the Embedded form to embed a donation form directly on any page or post in WordPress.
Next, click on the ‘Payments’ tab to add custom donation options.
WP Simple Pay allows you to add multiple donation prices so that donors can choose the amount they want to give. For example, you can create donation options for $1, $5, and $10.
Simply click the ‘Add Price’ button and enter the amount. Repeat this process to add as many donation options as you want.
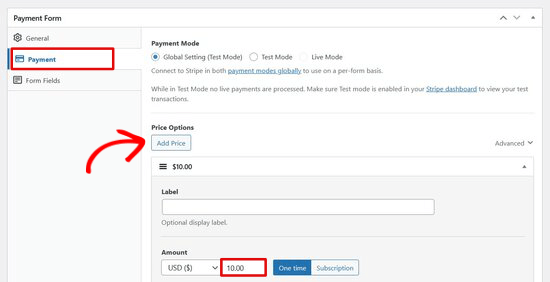
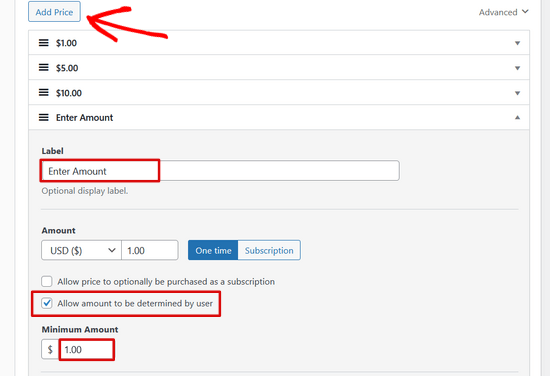
You can also give users an option to donate whatever amount they want.
Click the ‘Add Price’ button and then check the ‘Allow amount to be determined by user’ option. Then, change the label to say ‘Enter Amount’ and set a minimum amount.
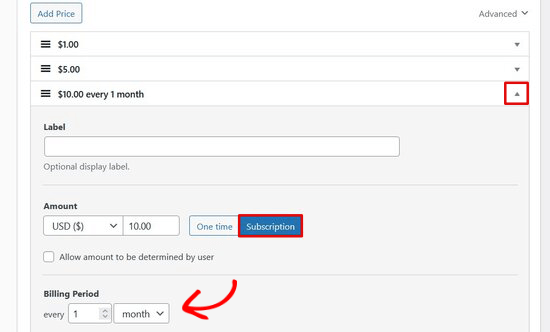
In addition, by clicking the dropdown arrow next to each pricing option, you can choose whether you want to accept one-time or subscription (recurring) donations.
Next, click on the ‘Form Fields’ tab. The Donate Button template already includes the pricing options, checkout button, and payment button form fields.
If you want to add more form fields like name and email address, simply choose it from the dropdown menu and click the ‘Add Field’ button.
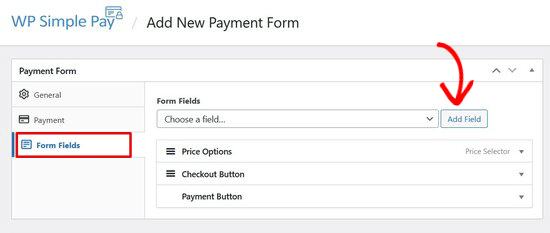
You can rearrange the form fields by dragging and dropping them into place.
Step 3: Add the Donation Form to Your Site
Now it’s time to publish your donation form and add it to your website.
First, click the Publish button on the right side of the screen.
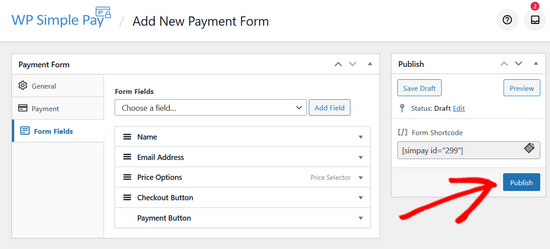
Next, copy the simple shortcode above the Publish button. It looks like this:[simpay id="299"]
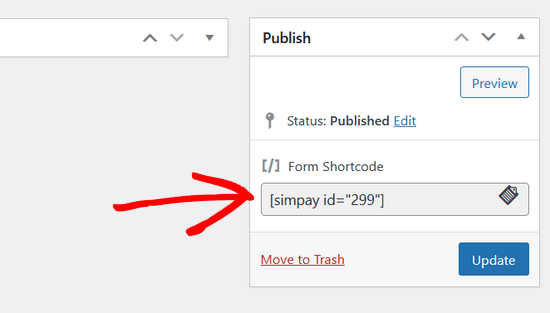
Then, you can paste the shortcode into any WordPress post or page.
When you paste the shortcode into the WordPress editor, the shortcode widget will be automatically added. Then, publish the post or page.
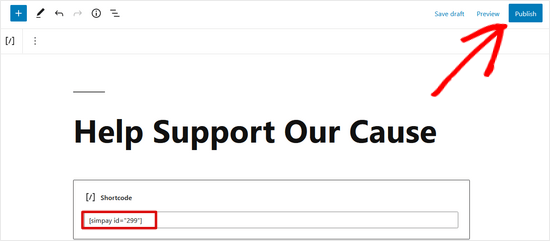
That’s it! Now you can visit your website to see how your donation form looks on the frontend.
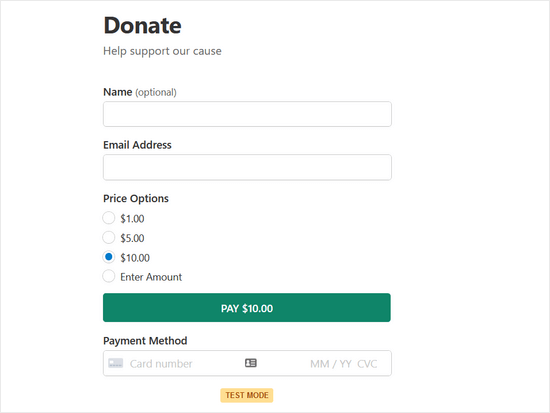
Note: WP Simple Pay is set to test mode by default. This is to ensure no live transactions are processed on your site before the form is ready. Read this guide to learn how to take your payment form from test mode to live mode.
Bonus: Create Advanced Fundraising Campaigns
Although you can create donation forms with WPForms and WP Simple Pay, they don’t offer the advanced fundraising features that many nonprofits need.
If you need a full-featured donation plugin, then we recommend using WP Charitable. It’s used by over 10,000+ nonprofits to raise more donations online.

Charitable allows you to create unlimited fundraising campaigns with fully customizable donation forms. It also comes with powerful features like recurring donations, crowdfunding, peer-to-peer fundraising, a donation management dashboard, annual donor receipts, and much more.
There’s also a free version of Charitable to get you started.
We hope this article helped you learn how to create a nonprofit donation form in WordPress. You may also want to see our detailed tutorial on how to start an online store or this guide on donation form best practices.
If you liked this article, then please subscribe to our YouTube Channel for WordPress video tutorials. You can also find us on Twitter and Facebook.


Syed Balkhi says
Hey WPBeginner readers,
Did you know you can win exciting prizes by commenting on WPBeginner?
Every month, our top blog commenters will win HUGE rewards, including premium WordPress plugin licenses and cash prizes.
You can get more details about the contest from here.
Start sharing your thoughts below to stand a chance to win!
Mrteesurez says
Thanks for the guide. Yes, I also see it beneficial to keep donors on site instead of just redirecting them especially to be able to customize the form to attract donors and sometimes subscribe them for follow-up email depending on the motive of the campaign.
The post is beneficial, thanks.
Karin Mainwaring says
This was really helpful thank you.
WPBeginner Support says
You’re welcome
Admin
Atiq Ur Rehman says
Can you please publish article on gravity forms? I’ve their developer license also. I need it for my website
Zaoul Qamar says
Can it be integrated with any payment gateway ? Will love your answer
Susan says
Is it possible to add the option to make the donation repeat monthly on this form?
Emmanuel says
Most nonprofits use a button on the header that leads to a donation form rather than creating a page for it, isn’t that better.
Jide says
Can it integrate with any payment gateway?
Adrienne says
ask donors if they want to subscribe to your email newsletter in the same form
—
You can now do this with the new PayPal process.