When it comes to raising money, many people spend a lot of time planning, pitching to investors, and facing potential rejections. Meanwhile, others turn to crowdfunding platforms like Kickstarter or Indiegogo to ease the process.
But there are easier ways to do it, and you don’t need to depend on those third-party platforms.
With WordPress, you can manage your own crowdfunding campaigns. Doing it yourself means more control and fewer fees. Plus, it’s easier than you might think with the help of WordPress plugins.
In this article, we will show you how to easily set up crowdfunding on your WordPress site.

What Is Crowdfunding, and Why Do It?
Crowdfunding is a way that people raise money for projects, charities, or personal needs.
Entrepreneurs often use crowdfunding to get startup money without giving up shares to investors. Instead of getting a piece of the company, donors will receive rewards.
These rewards can be anything from shirts and stickers to the actual product you’re selling. The bigger their donation, the cooler the reward they get.
Now, crowdfunding isn’t just for businesses. Individuals and nonprofits can also use it to raise money for causes they care about, like medical expenses, disaster relief, or community projects.
Most people use sites like Kickstarter or Indiegogo to crowdfund. But these sites have some downsides.
For example, Kickstarter takes 5% of the money you raise, plus processing fees. And if you don’t hit your goal, you don’t get any money.
That’s why using a WordPress website is a better option. It gives you complete control and flexibility over your campaign.
So, let’s dive in and see how you can raise money with crowdfunding in WordPress.
How to Start Crowdfunding With WordPress
The easiest way to start crowdfunding is to use a WordPress plugin. Many donation and fundraising plugins help you collect online payments from investors and crowdfund your project.
In this guide, we will show you 2 plugins that you can use to start your crowdfunding in WordPress. If you’re interested in a particular method, you can click the following link to skip ahead in the article:
Ready? Let’s get started.
Method 1: Raise Money with Crowdfunding Using Charitable
Charitable is one of the top-rated WordPress crowdfunding plugins. Over 10,000 nonprofit organizations use Charitable to raise money through crowdfunding and donations.
The plugin offers numerous extensions and features that help you kickstart your crowdfunding campaign. For instance, you can set up peer-to-peer fundraising in WordPress and use word-of-mouth marketing to raise funds.
We will use Charitable Pro for this tutorial because it includes the ‘Ambassador’ extension for peer-to-peer fundraising and additional payment gateways. So, let’s make sure to make an account.
Once done, you can install and activate the core Charitable plugin. If you need help, then please see our guide on how to install a WordPress plugin.
Upon activation, you’ll see the Charitable welcome screen in your WordPress dashboard. You can now head to Charitable » Settings » General from the admin panel.
From here, you’ll see a ‘License’ section. Simply enter your license key and click the ‘Verify Key’ button.
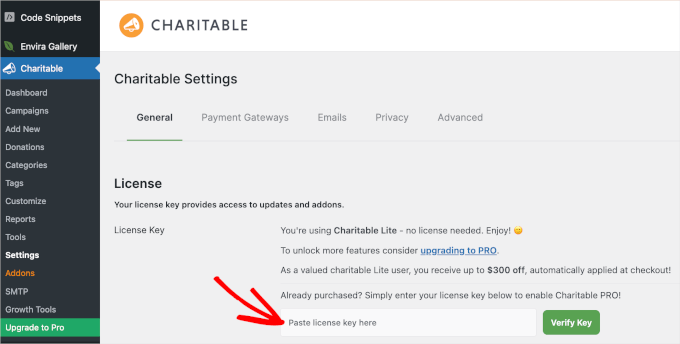
You can find your key in your Charitable account.
After that, you can head to the ‘Payment Gateways’ tab. Go ahead and click the ‘Enable Gateway’ button to use your preferred payment method.
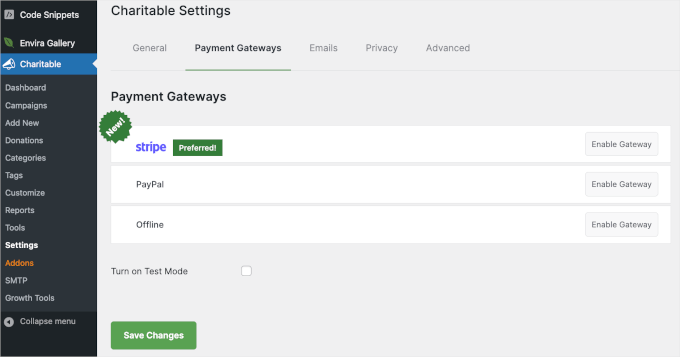
The recommended payment gateways offered by Charitable will be Stripe, PayPal, and offline payments.
However, you can add more payment methods, such as Mollie, Paystack, Braintree, Authorize.net, and more.
After enabling the payment option, you’ll be redirected to a page where you can fill out your payment gateway’s details.
For example, we will set up PayPal as the payment gateway.
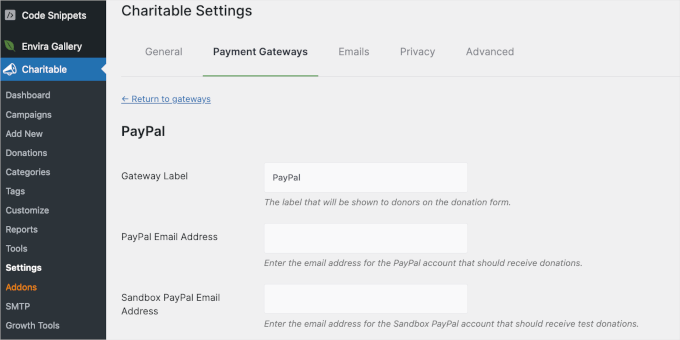
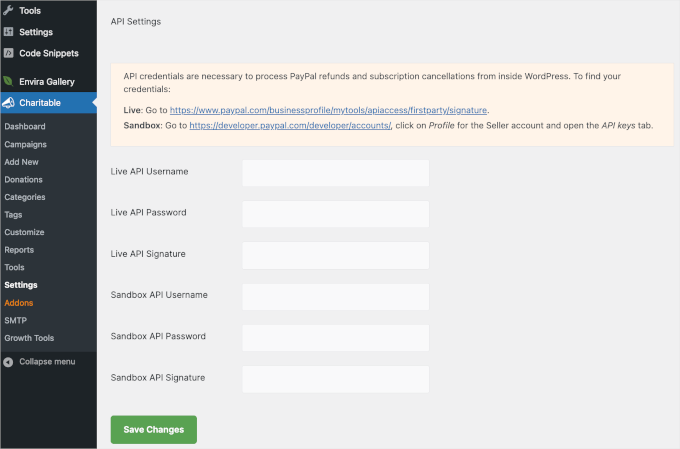
In the PayPal gateway settings, you’ll need to enter your PayPal email address and the API credentials. You can find the credentials by logging in to your PayPal business profile.
When you’re done, don’t forget to click the ‘Save Changes’ button down the page.
The next step is to create a fundraising campaign in Charitable.
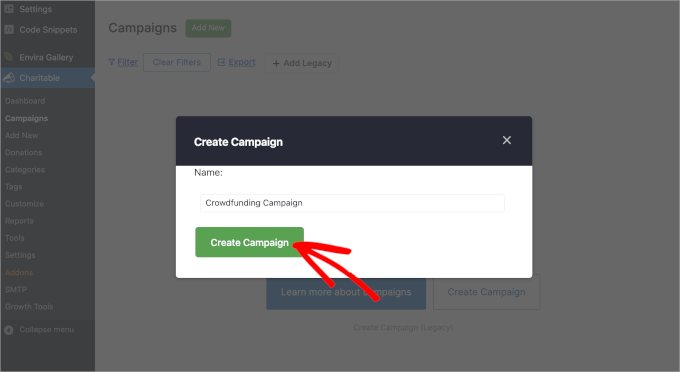
Simply go to Charitable » Campaigns » Add New from your WordPress dashboard. Then, you can enter a name for your campaign into the popup that appears.
Once you’ve decided on the name, go ahead and click the ‘Create Campaign’ button.
The next step is to choose a template.
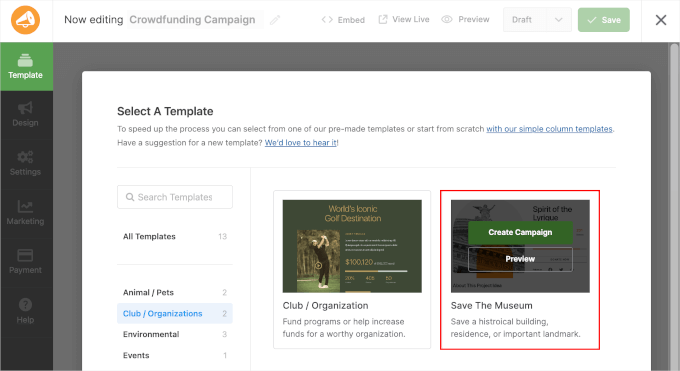
Charitable offers 10+ ready-made templates to streamline your campaign-building process. You can explore the categories, such as ‘Environmental,’ ‘Events,’ ‘Medical,’ and more to find the perfect template for your cause.
For this tutorial, we will choose the ‘Save The Museum’ template from the ‘Club / Organization’ category.
To use the template, just hover over it and click the ‘Create Campaign’ button.
Charitable will then take you to the campaign builder. In this area, you can drag and drop elements from the left to the right panel.
You can also customize existing elements by clicking on them on the live preview. The tool will then open the element’s customization options in the left panel.
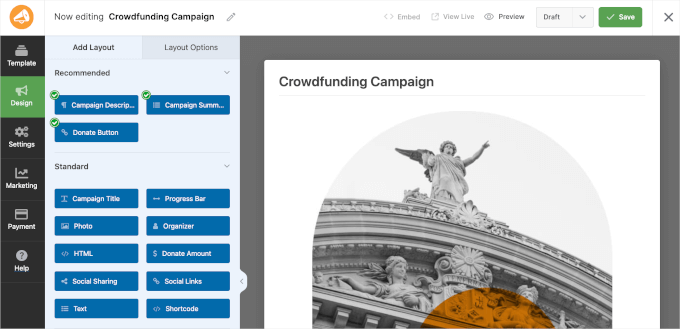
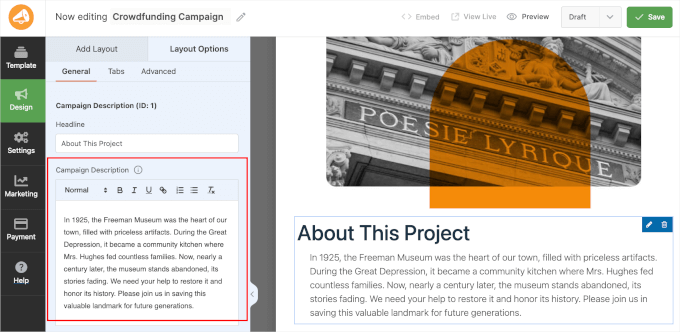
For example, here, we changed the campaign description to match our intent.
Simply click on the ‘About This Project’ element and edit the text in the ‘Campaign Description’ field from the left panel.
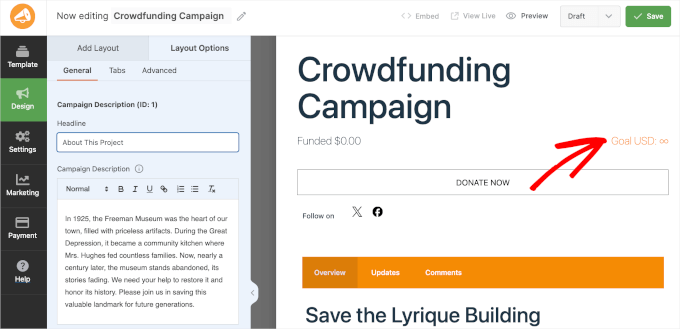
If you scroll down the live preview, you’ll see a progress bar that displays both the donations received and the donation goal.
By default, Charitable will show the infinite icon to your crowdfunding campaign.
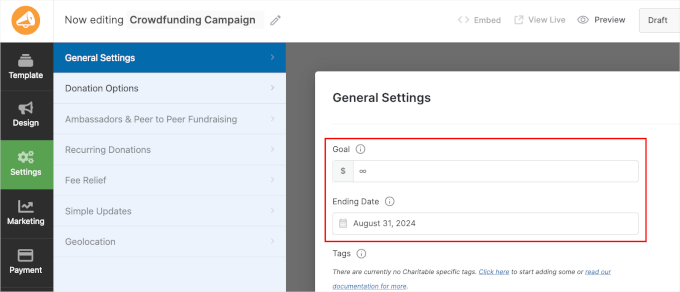
Now, let’s move to the ‘Settings’ section.
In ‘General,’ you can set the campaign goal and end date. You can leave the ‘Goal’ field blank if you don’t have a set target amount you’d like to collect. But you might want to set up an expiry date to create a sense of urgency.
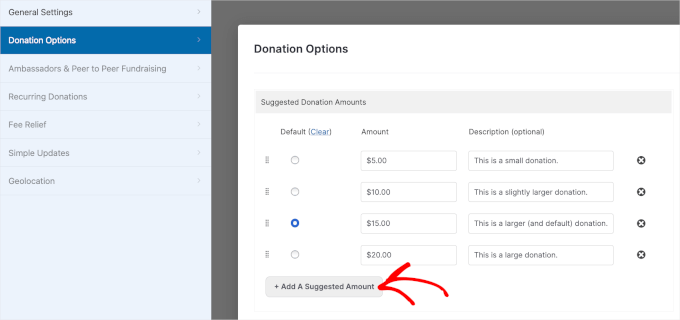
Next, you’ll also want to check the ‘Donation Options’ section.
Here, you can see the customizable 4 pre-made suggestions with descriptions.
If you want to add suggested donation amounts for your campaign, simply click the ‘+ Add a Suggested Amount’ button and enter the amount.
When you’re done, don’t forget to click ‘Save’ to keep your progress.
Then, you can expand the ‘Draft’ dropdown and choose ‘Publish’ to make it live on your website.
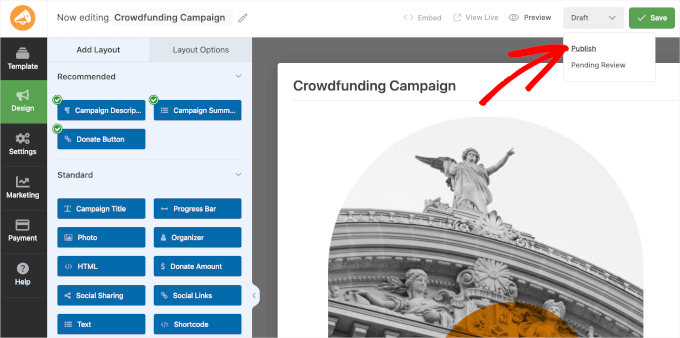
That’s it – you’ve successfully created and published your first Charitable crowdfunding campaign!
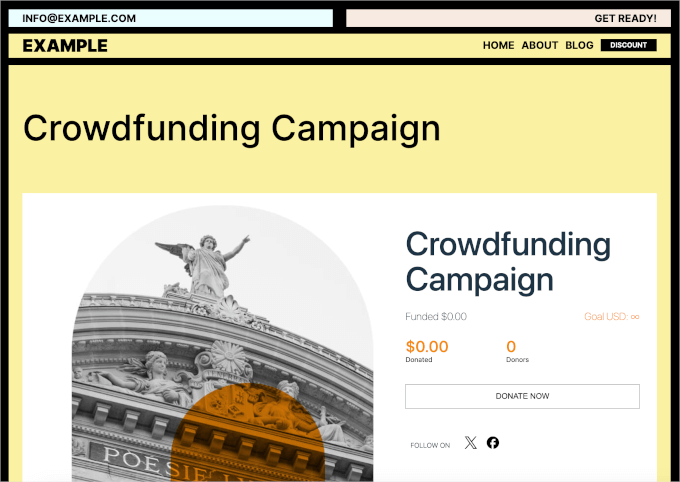
Now, you can visit your website to see your crowdfunding campaign in action. Here’s what it might look like:
Setting Up Peer-to-Peer Fundraising in WP Charitable
WP Charitable also lets you set up peer-to-peer fundraising in WordPress. This allows your team members and individuals to create their own campaigns and help achieve your overall crowdfunding goal.
To do this, you’ll need to install and activate the ‘Ambassadors’ extension on your website.
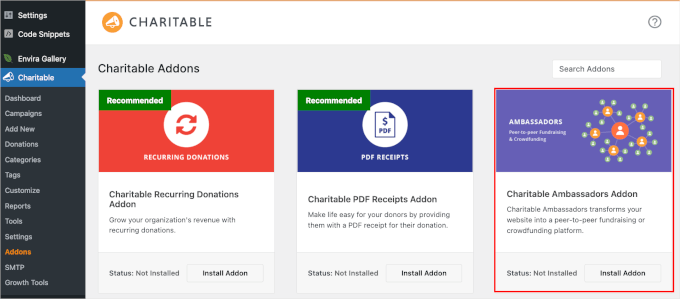
So, let’s navigate to Charitable » Addons from your WordPress admin area. Then, you can click on the ‘Install Addon’ button in the ‘Charitable Ambassadors Addon’ box.
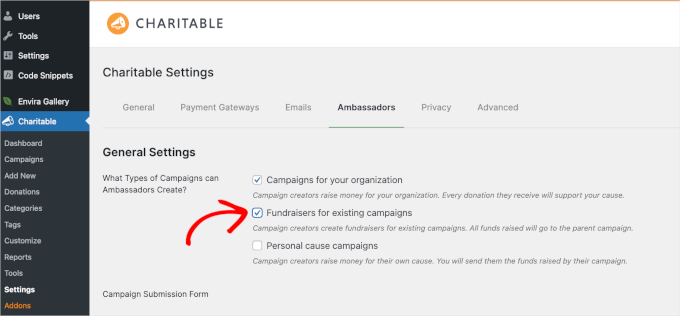
Upon activation, you can go to Charitable » Settings and then switch to the ‘Ambassadors’ tab.
From here, let’s check the ‘Fundraisers for existing campaigns’ box.
If you scroll down the page, you’ll also find an option to disable the requirement that users register an account before submission. Remember to save your changes when you’re done.
Next up, you’ll be creating a fundraising page with the block editor. This is the page people will be redirected to when they want to start their own peer-to-peer fundraising campaign.
Simply navigate to Pages » Add New from your WordPress dashboard. Then, you’ll want to click the ‘+’ button and search for the Shortcode block.
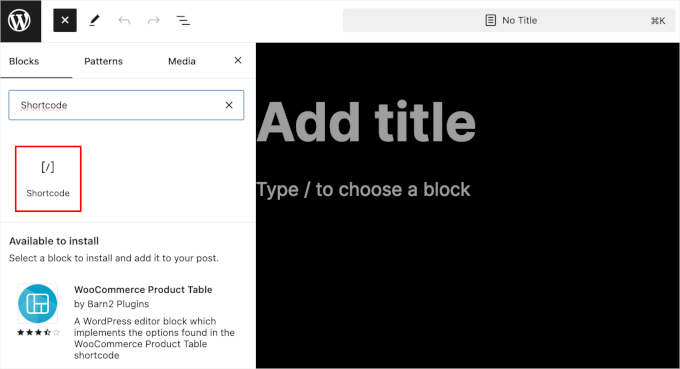
Once found, you can add it to the page and copy-paste the following shortcode:
[charitable_submit_campaign]
Here is what it might look like in the page editor:
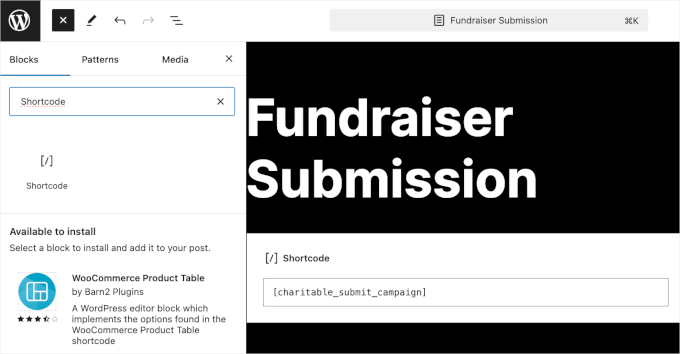
Don’t forget to click the ‘Publish’ button to store your settings.
Now, let’s head over to Charitable » Settings and then scroll down to the ‘Pages’ section.
In the ‘Campaign Submission Page’ dropdown field, you’ll want to choose ‘Fundraiser Submission’ from the list of available pages.
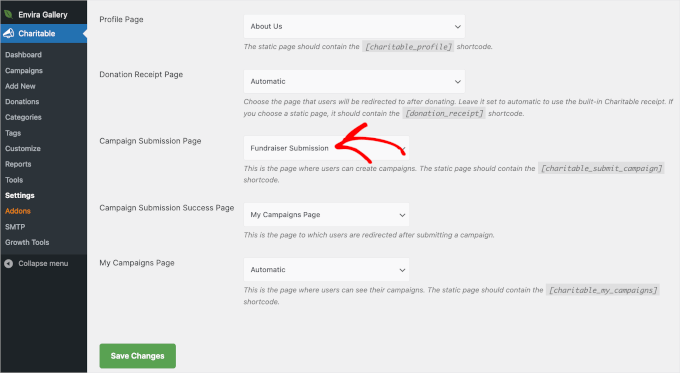
Once again, don’t forget to click the ‘Save Changes’ button.
After that, you can edit an existing campaign in Charitable or add a new one.
Simply navigate to Charitable » Campaigns and click ‘Edit with Builder’ or ‘Add New.’ For this tutorial, we’re going to use the crowdfunding campaign we just created.
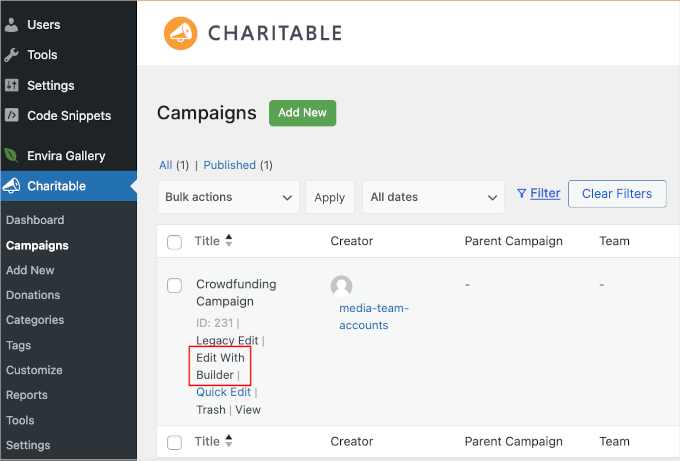
This will take you to the Charitable’s builder interface. From here, go to Settings and click the ‘Ambassadors and Peer to Peer Fundraising’ section.
In the ‘Peer to Peer Fundraising’ section, you’ll want to toggle on the ‘Allow peer to peer fundraisers for this campaign’ option.
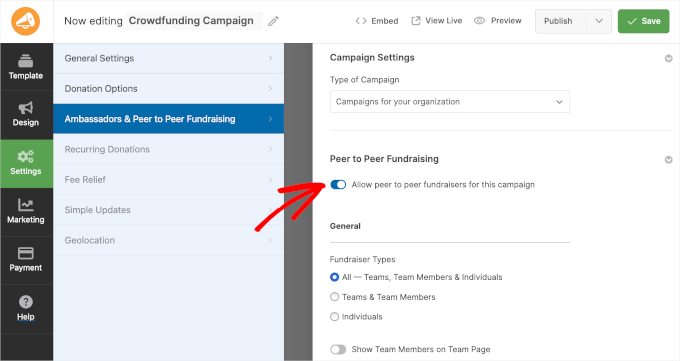
Under Peer-to-Peer Fundraising, you should now see different settings. You can select who can participate in the fundraiser, customize fundraiser fields, set a goal, add a photo, and more.
Simply click the ‘Save’ button when you’re done.
Now, let’s go back to the ‘Design’ section to add the fundraising button. From here, you’ll want to drag the ‘Shortcode’ field to the live preview.
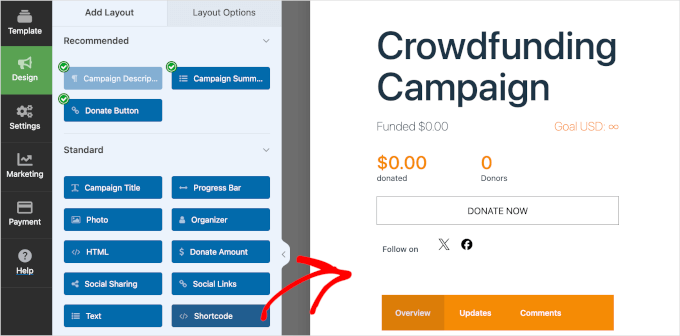
In the field’s settings, you can create the field’s headline. For example, our headline is ‘Create Your Fundraiser.’
Then, you’ll want to add [charitable_fundraise_button]to the ‘Shortcode’ field.
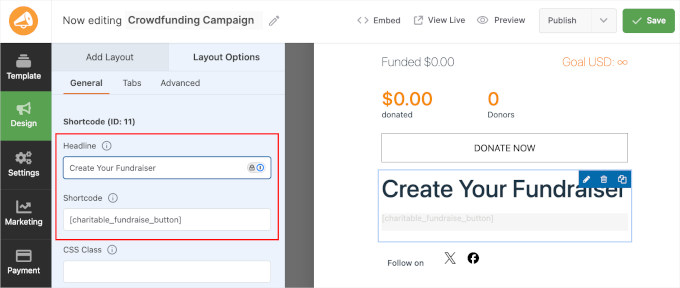
Once you’ve done that, go ahead and click ‘Save.’
A fundraiser option should now appear in your campaign. When users click the fundraiser button, they can choose what type of fundraiser they want to create.
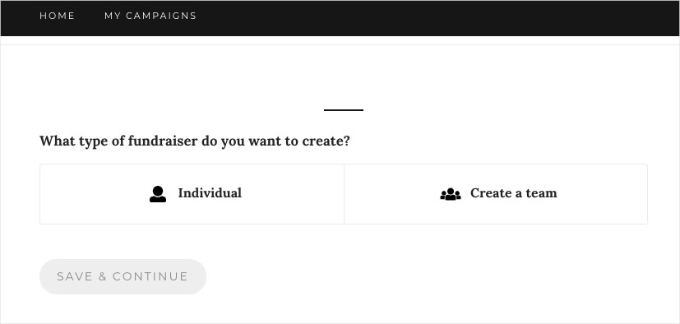
After that, users can simply enter details about the fundraiser and confirm their email addresses. Once that’s done, they can help raise money for your crowdfunding project.
For more details, see our guide on how to set up peer-to-peer fundraising in WordPress.
Method 2: Create a Crowdfunding Form Using WPForms
Another way to raise money with crowdfunding in WordPress is by using WPForms. It’s the best form plugin for WordPress and is super easy to use.
With WPForms, you can use its drag-and-drop form builder to create any type of form in minutes without editing code. It also integrates seamlessly with payment services like PayPal and Stripe, allowing you to collect online payments from investors.
We’ll use the WPForms Pro version for this tutorial because it includes a nonprofit crowdfunding form template and payment gateway integrations. But there is also a WPForms Lite version you can try for free.
First, let’s install and activate the WPForms plugin on your website. If you need help, then please see our guide on how to install a WordPress plugin.
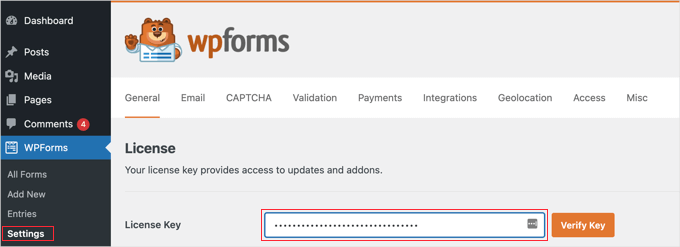
Upon installation, you can head over to WPForms » Settings from your WordPress dashboard and enter your license key. You can easily find the license key in your account.
After that, you’ll need to integrate different payment services to raise money through crowdfunding. WPForms supports payment providers like Stripe, PayPal, Square, and Authorize.net.
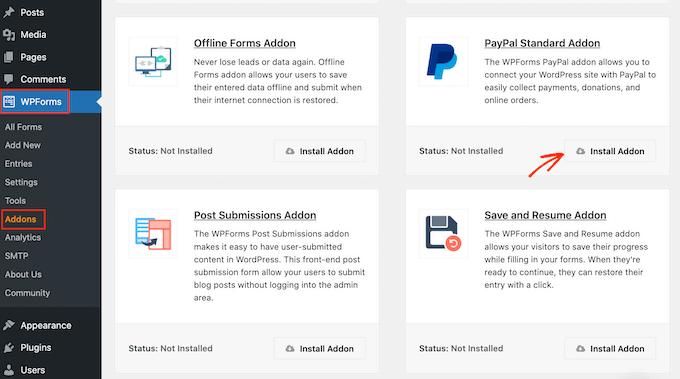
Simply go to WPForms » Addons from the WordPress admin panel and click the ‘Install Addon’ button for your preferred payment addon.
Once the add-on is active, you can create a crowdfunding form for your WordPress website.
To start, you can go to WPForms » Add New from the WordPress dashboard. This will launch the WPForms drag-and-drop form builder.
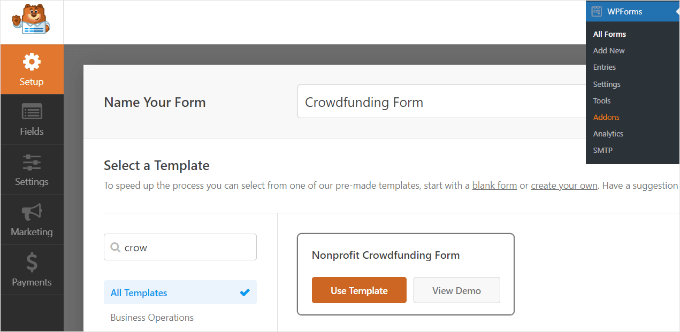
In the ‘Setup’ section, you’ll want to enter a name for your form at the top screen. This name is for your reference only, so you can use anything you want.
The next step is to search for the ‘Nonprofit Crowdfunding Form’ template from the menu on your left. Then, you can hover over the form template and click the ‘Use Template’ button.
From here, you’ll use the drag-and-drop form builder to customize the template.
WPForms will already have form fields added to the template. However, you can add more fields by dragging them from the menu on your left or rearranging the existing fields.
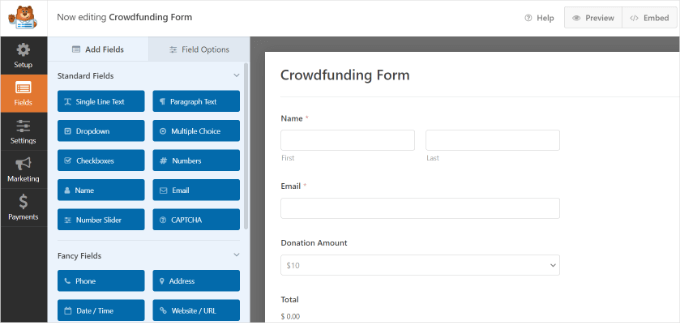
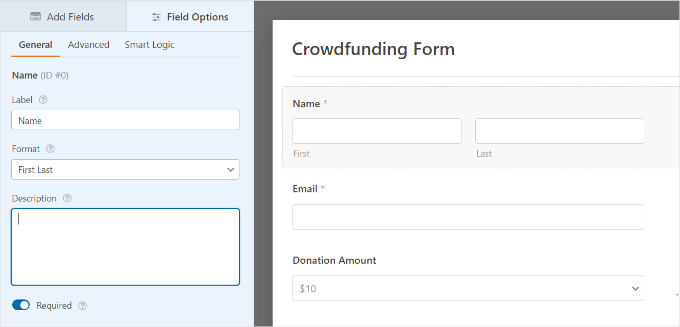
You can also customize each individual form field further.
Simply select a form field, and you’ll see more options in the menu on your left. For instance, you can change a field’s label and format, make it a required field, and more.
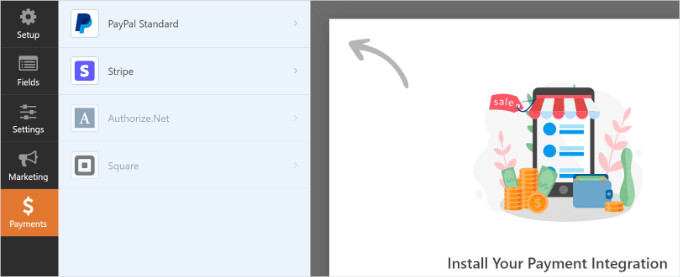
Next, you can go to the ‘Payment’ tab in the WPForms form builder.
In this section, go ahead and select a payment gateway you want to connect to your crowdfunding form.
For this tutorial, we will select PayPal. So, we’ll check the ‘Enable PayPal Standard payments’ box in the settings.
You can then provide a PayPal email address and select ‘Donation’ from the ‘Payment Type’ dropdown menu.
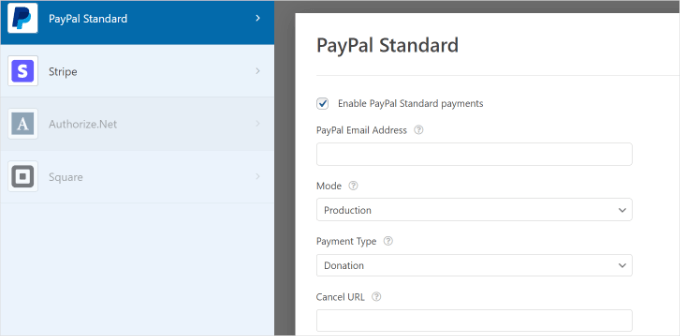
Below that, you’ll find more options for entering the ‘Cancel URL.’ This is a great opportunity to stay connected with your users if they decide the cancel the checkout process.
You can also customize the shipping address options and ask buyers to include a note with payment.
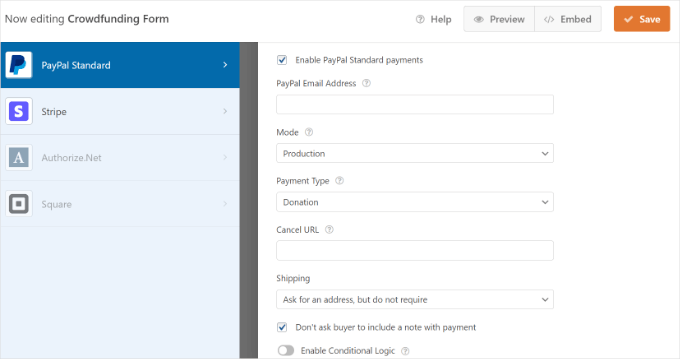
When you’re done customizing, don’t forget to click the ‘Save’ button at the top.
The next step is to set up form submission notifications. To do this, go to the ‘Settings’ tab in the form builder and click ‘Notifications.’
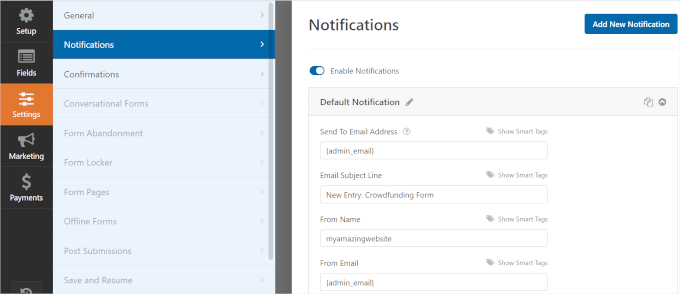
Here, you can customize the email notification settings sent to the site administrator. For example, you can change the email the notifications are sent to, edit the email subject line and message, and more.
Next, you can move on to the ‘Confirmations’ section.
Here, you can ensure your donors receive a confirmation for funding your project. You can show a message when someone submits the crowdfunding form or take the user to another page or URL on your site.
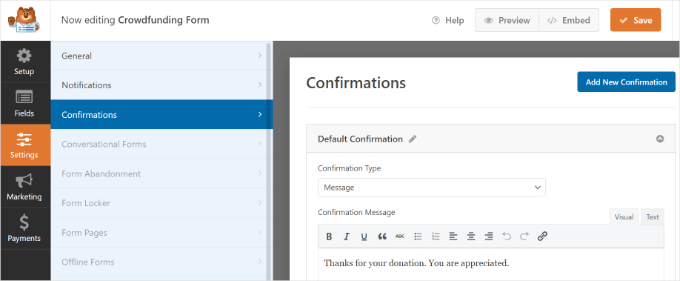
When you’re done, don’t forget to click the ‘Save’ button at the top.
Now, you’re ready to add your crowdfunding form to your WordPress blog.
You can simply click the ‘Embed’ button at the top of the form builder and choose whether to select an existing page or create a new page for your form.

Let’s select the ‘Create New Page’ option for this tutorial.
You can then name your new page and click the ‘Let’s Go!’ button.
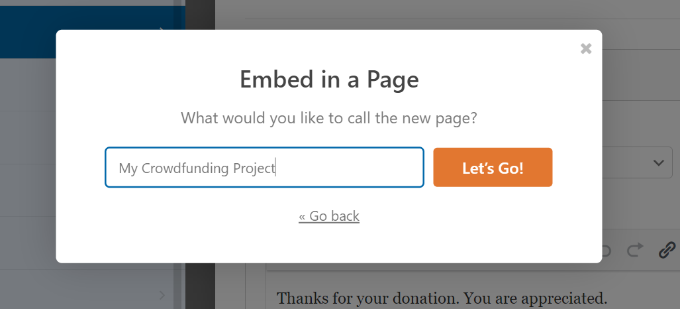
WPForms will automatically embed your crowdfunding form into the new page you just created.
Alternatively, you can add a WPForms block in the WordPress content editor and select your form from the dropdown menu.
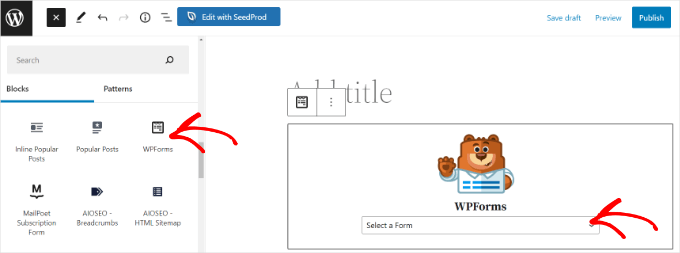
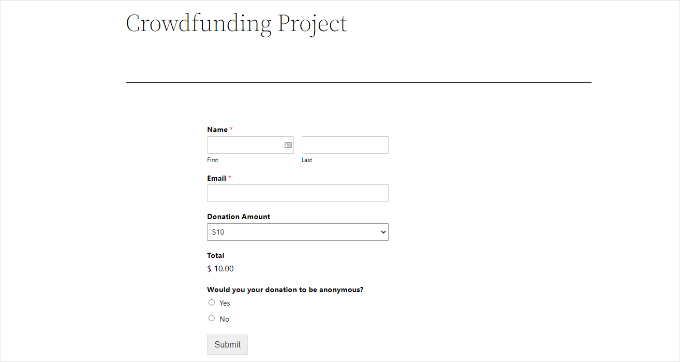
It’s a good idea to check out your crowdfunding form and see how it looks on your new page. So, go ahead and click the ‘Preview’ button.
When you’re happy with everything, you can then click the ‘Publish’ button and visit your website to see the form in action.
Expert Tip: Want to create a donation form instead? Using WordPress, you can easily set up a custom donation form on your nonprofit website. To get started, you can check out our article on how to create a donation form for a nonprofit organization.
We hope this article helped you learn how to raise money with crowdfunding in WordPress. You may also want to see our guide on how to accept recurring payments in WordPress or our expert picks of the best WordPress plugins for nonprofits.
If you liked this article, then please subscribe to our YouTube Channel for WordPress video tutorials. You can also find us on Twitter and Facebook.


Dennis Muthomi
Love this guide! It’s exactly what I needed when I first started working with WordPress crowdfunding. I just helped a nonprofit switch from Kickstarter to WordPress using the Charitable plugin. The results were amazing! They ended up saving about 8% on fees, and their donations went up by 17%. The best part was being able to customize everything about their donation process.
One feature that really made a difference was the peer-to-peer fundraising tool. Their volunteers could create their own campaign pages, which was super helpful. Wish I’d had this article when I first set everything up – it would’ve made the whole process so much smoother!
Jiří Vaněk
I was asked to find a solution for a project where funds were being raised for a wheelchair for a boy. After researching various options and system solutions, I ultimately recommended the Charitable plugin that you mentioned. The website was successfully completed using this plugin, and it now serves its purpose and works very well. It’s a great plugin for these kinds of projects, even if it’s not strictly crowdfunding.
WPBeginner Support
Glad to hear the plugin was able to help you with setting up a site like that
Admin
Prince
Great work and advice.
We are building a website via wordpress theme.
The purpose of building this sit, is to help people through the world raise funds through our site.
With Crowdfunding plugin on our site , its possible that individual, groups, organisations can create an account on our site to raise fund for their cause.
Z.N. Singer
We’re looking at self-hosted crowdfunding platforms in my company, and the big worry about the Wordpress angle is security. Some of our people think Wordpress is too easily hacked and we’ll just lose all the money and be culpable. But I can’t seem to google up any horror stories to support this. Can you tell me why this would or would not be an issue?
WPBeginner Support
WordPress is the most popular content management platform in the world. This means millions of people all over the world are using it. Many of these users are not very careful about passwords, backups, file permissions or even keep updating their WordPress software or plugins and themes. This provides every wanna be hacker a large number of websites that can be exploited. Not because WordPress is insecure but because the probability of finding an insecure site is relatively high. WordPress on the other hand is used by many fortune 500 companies with great success.
Admin
HCCanada
I’ve installed IgnitionDeck in the current WordPress, 3.8.1.
First of all, it is unfriendly in design, being split between two control panels on the left, one on the top, one on the bottom. NEITHER control panel offers any option whatsoever to set the PAYMENT method.
In addition, the default widget is too wide for my sidebar!
My guess is this is a non-functioning DEMO pure and simple, intended to require me to PAY IgnitionDeck for an upgrade so I can add a payment method.
As the widget won’t fit my site, I won’t be using it anyway.
I’m gonna delete that waste-of-time plugin right now.
Have a great day.
Adam Harrison
Very helpful, actually more helpful to me than Ignition deck’s own website!
Hans
By far the best module out there! And the support is great! I had a minor issue with how one add-on worked and Nathan worked with me and got it solved within the hour. Great job guys! You got a fan here!
Susan McHugh
Use both. Promote both through separate social media identities.
Donald Goodearl
What are the tax ramifications for all this money that comes in from donors. My business, my site, savehislife.com is NOT a 501c3. Has anyone addressed this issue? I am filed as an LLC.
Thanks,
Don
Nathan Hangen
Hey guys, thanks for such a great writeup on the pro’s and con’s of using IgnitionDeck. The getting started tips are also extremely useful for new IgnitionDeck users.
Your assessment is spot on. We encourage people to raise money in as many ways as they can. Some of our most successful customers are raising money on Kickstarter and their own websites (using IgnitionDeck) at the same time.
Donald Goodearl
First, I would like to say that I save all of your articles. Certainly the best out of the barrage of offers I get. Great work!
Does an organization need to be a non-profit, such as a 501c3 before rolling out a Crowdfunding campaign? I have http://www.savehislife.com to minister to men and families facing prostate cancer (PCa). In case you read the news, there is a lot of flap going on regarding 501c3 &4 filings.
Thank you for your assistance. Regards, Don
Editorial Staff
No. You can use crowdfunding for any type of organization. Can be non-profit or for profit.
Admin
Darryl
Start A Cure at http://startacure.com is a cancer research crowdfunding site using ignition deck. I built this for our cancer survivor nonprofit organization, Malecare Cancer Support. ignition deck support Is excellent. Well worth the effort, but everyone should know that building the site is a small part of crowdfunding. Marketing the site is 99% of the work in making a crowdfunding site a success.
Editorial Staff
Thanks for sharing it with us Darryl.
Admin
Bill
Fascinating! I did not know about this plugin. Maybe I would find it useful esp. For helping with charity events.
On the other hand, why not use *both* Kickstart and the plugin, to cover all the bases?
Editorial Staff
You can do that, but the issue would be promotion. Which one do you want to send people to?
Admin
DAvutor
Did not even know of this crowdfunding possibility. already checked out the plug in and looks great.
Thanks for posting this.