Do you want to add an interactive map in WordPress?
User-friendly interactive maps can help visitors find your location and plan their journey. You can even use maps to highlight tourist attractions, points of interest, routes, and other interesting places that can improve the visitor experience.
In this article, we will show you how to easily add an interactive map in WordPress.
Why Add an Interactive Map in WordPress?
If you have a physical business, such as a store or cafe, then an interactive map can help potential visitors find your location. This can get you more customers, sales, and even in-person appointments and bookings.
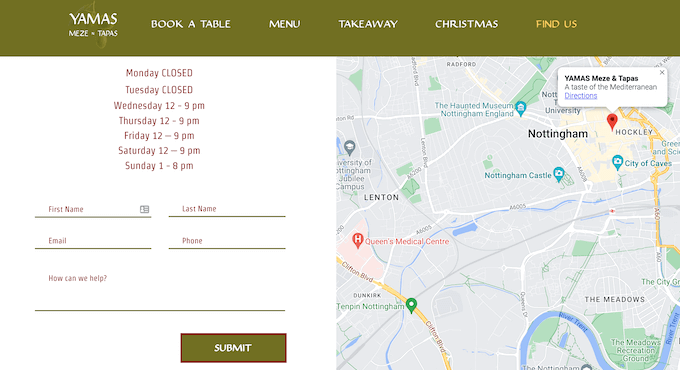
It can also improve user experience since visitors can plan their journey without having to use a separate map app or website.
Depending on your website, an interactive map might even provide useful content. For example, if you have a fitness blog, then you might show recommended running routes or hikes to your readers.
Similarly, if you have a family blog, then you could highlight all the child-friendly attractions where your audience can take their families.
With that being said, let’s see two beginner-friendly ways to add an interactive map in WordPress. Simply use the quick links below to jump straight to the method you want to use:
Method 1. Add an Interactive World Map Using a Page Builder (Customizable)
The easiest way to add a simple interactive map in WordPress is by using Google Maps and the SeedProd plugin.
This advanced page builder plugin lets you create professionally-designed pages without having to write a single line of code.
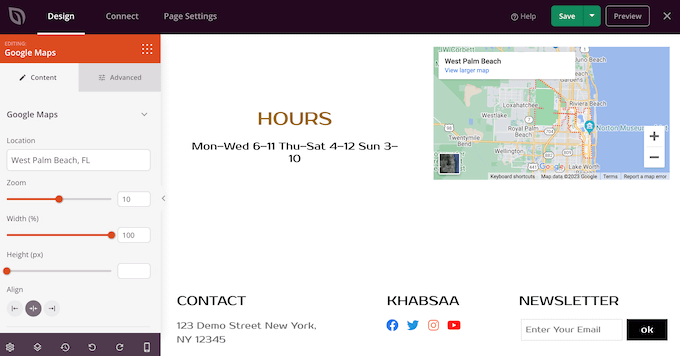
It also comes with a ready-made Google Maps block that you can simply drag and drop onto your layout. Visitors can interact with your map using the zoom buttons, or they can drag to explore other areas.
SeedProd makes it easy to design standalone pages that have a unique design, so this is also a great choice if you want to add an interactive map to a custom home page or landing page.
Note: For this tutorial, you will need a premium SeedProd plan to add the Google Maps block to your WordPress site. We recommend getting the Pro version as it comes with 300+ page templates, email marketing integration, and priority support.
The first thing you need to do is install and activate SeedProd. For more details, see our step-by-step guide on how to install a WordPress plugin.
Upon activation, you need to enter a license key.
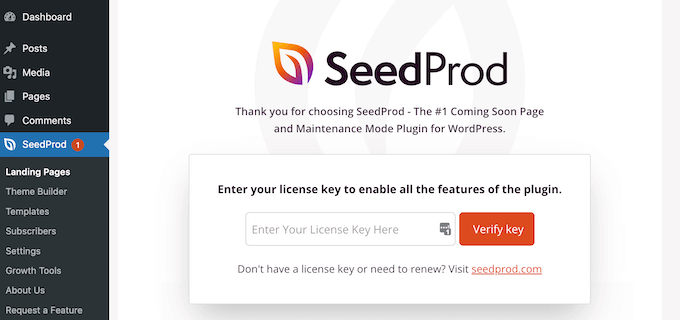
You can find this information in your account on the SeedProd website. After adding the license key, click on ‘Verify Key.’
With that done, go to SeedProd » Landing Pages and click on ‘Add New Landing Page.’
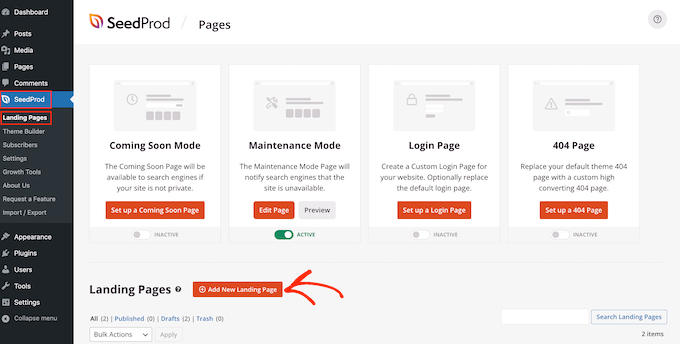
SeedProd will now show all the templates you can use to create beautiful landing pages, sales pages, and more. To help you find the right template for your website, SeedProd’s templates are divided into categories such as maintenance mode, coming soon, webinar, and more.
To take a closer look at any design, simply hover your mouse over that template. Then, click on the magnifying glass icon.
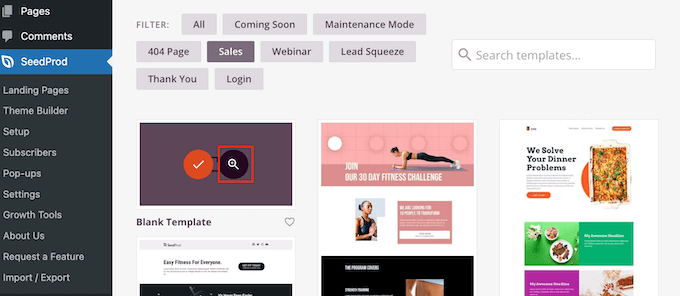
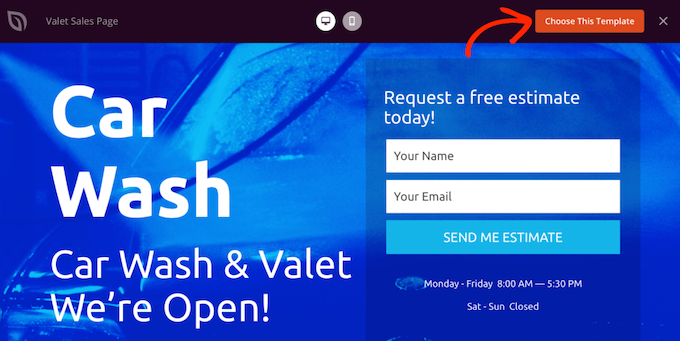
This will open the template in a new tab.
When you find a design that you want to use on your WordPress website, simply click on ‘Choose This Template.’
You can now type in a name for your landing page into the ‘Page Name’ field. This is just for your reference so you can use anything you want.
SeedProd will automatically create a ‘Page URL’ using the page name, but you can change this automatically generated URL.
For example, you may want to include some relevant keywords, as this can help search engines understand what the page is about. In this way, you can improve your WordPress SEO.
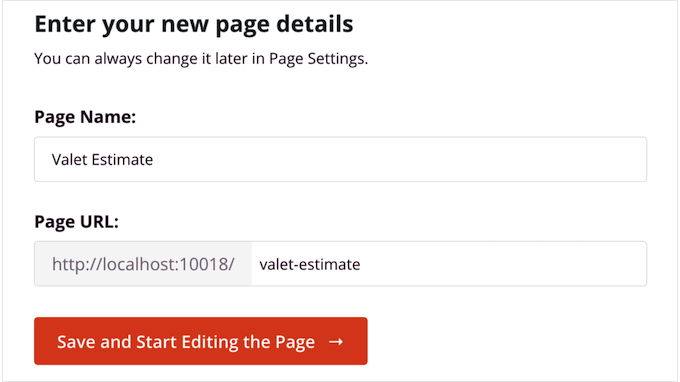
When you’re happy with the information you’ve typed in, click on ‘Save and Start Editing the Page.’ This will load the SeedProd page builder interface.
This simple drag-and-drop builder shows a live preview of the page on the right. On the left is a menu that shows the different blocks and sections that you can add to your WordPress blog or website.
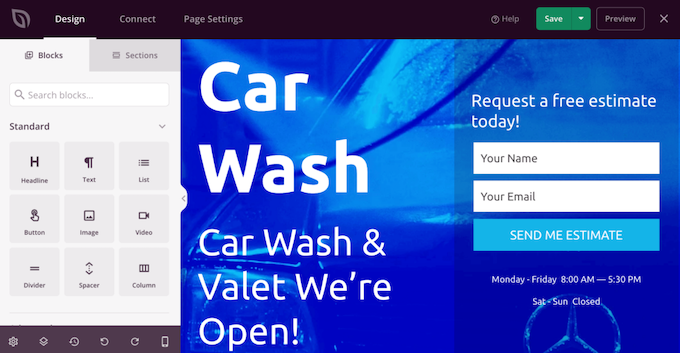
SeedProd comes with over 90 ready-made blocks that can help you build a beautiful page design, fast. This includes advanced blocks such as pricing tables, countdown timers, and customer testimonials.
You can also use SeedProd blocks like spacers, columns, and dividers to structure the page. This can help visitors navigate the page and find the information they want.
When you find a block that you want to add to the page layout, simply drag and drop it onto the template. As you build your landing page, you can move these blocks around your layout by dragging and dropping them.
To add an interactive map, simply find the Google Maps block in the left-hand menu and drag it onto your layout.
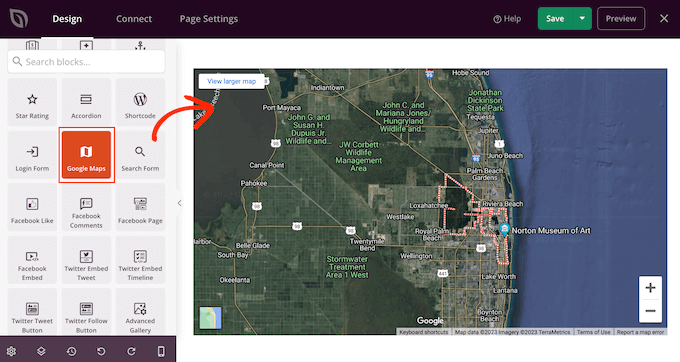
The Google Maps block will show a default location, but you’ll typically want to change this.
Simply click to select the Google Maps block and then click on the small gear icon that appears in the toolbar.
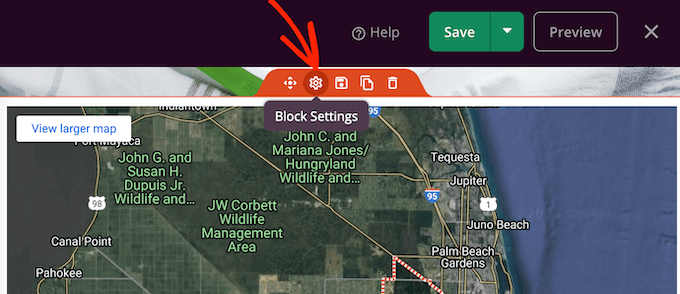
This opens the block’s settings in the left-hand menu.
Here, type a different address into the ‘Location’ field.
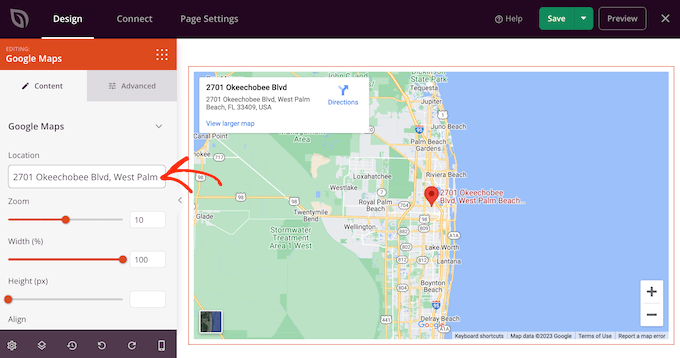
The block will now update to show this address.
Visitors can zoom in and out of this location manually using the ‘+’ and ‘-’ zoom level buttons in the map’s right-hand corner. However, you can change the default zoom by dragging the ‘Zoom’ slider or typing an exact number into the text box.
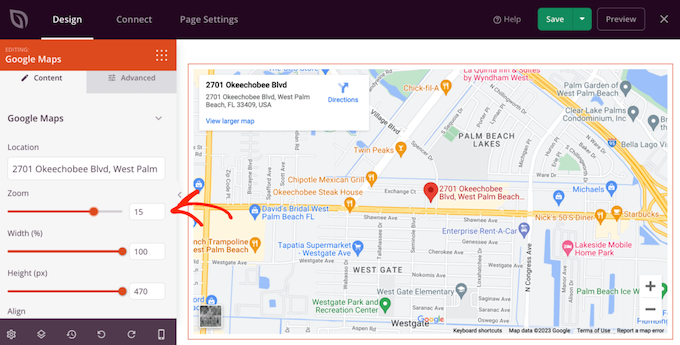
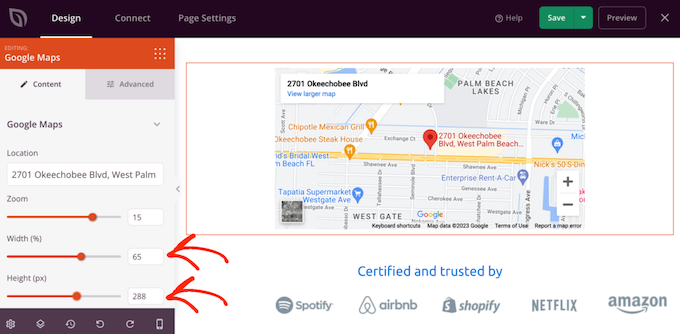
After that, you may want to resize the block using the ‘Width’ and ‘Height’ sliders. The ‘Height’ is shown in pixels, but ‘Width’ is the total available percentage. For example, ‘100’ means the Google Maps block takes up 100% of the available width.
To change either of these values, simply drag the sliders or type a number into the text box. As you make changes, the Google Maps block will update automatically so you can try different settings to see what looks the best.
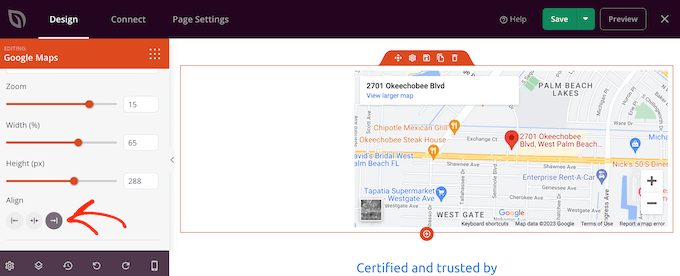
If you set the width to less than 100, then you may want to change the block’s alignment. For example, you might show the interactive map in the center of the page.
To make this change, simply click on the different buttons in the ‘Alignment’ section.
You can now continue working on the design by dragging new blocks onto the page layout and then making changes in the left-hand menu. For more information, please see our guide on how to create a landing page in WordPress.
When you’re happy with how the page is set up, click on the arrow next to the ‘Save’ button and then select ‘Publish.’
Now, if you visit your website, then you’ll see the interactive map in action.
Method 2. Create Interactive Custom Maps Using Google My Maps (Free)
If you want to add a Google Map with basic interactions, then SeedProd is a great choice.
However, if you need to provide more advanced interactions, then we recommend using Google My Maps instead.
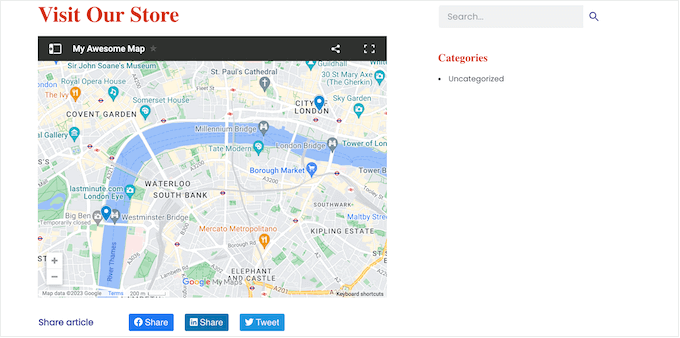
This free online service allows you to customize a Google Map with unique markers, points of interest, driving directions, and more. You can then add it to your website using code, so you won’t need to install a separate WordPress plugin.
Step 1: Create an Interactive Map Using Google My Maps
First, you need to visit the Google My Maps website and click on ‘Create a new map.’

You will now see the map editor.
Here, you can select a base map, and add points of interest, layers, and more.
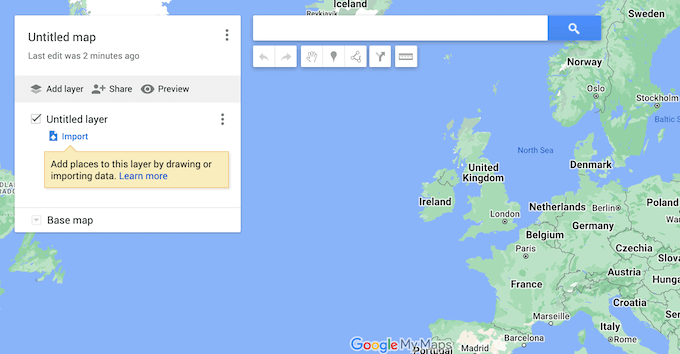
To help keep your work organized, it’s a good idea to give the layer a name.
To do this, click on the three dots next to ‘Untitled layer’ and then select ‘Rename this layer.’
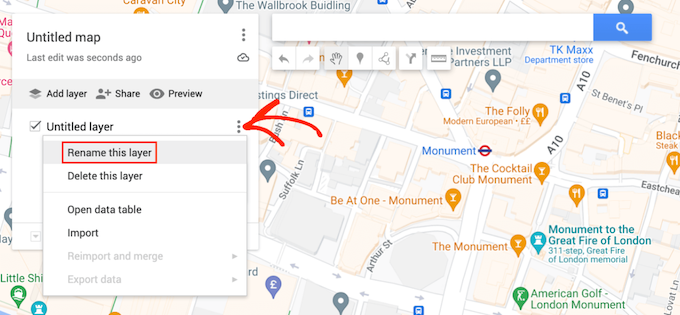
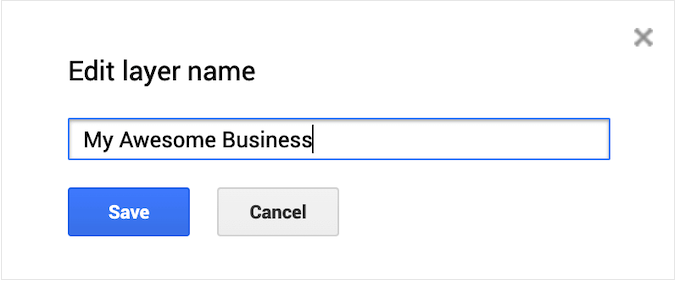
You can now type in the name you want to use. This is just for your reference so you can use anything you want.
With that done, click on ‘Save.’
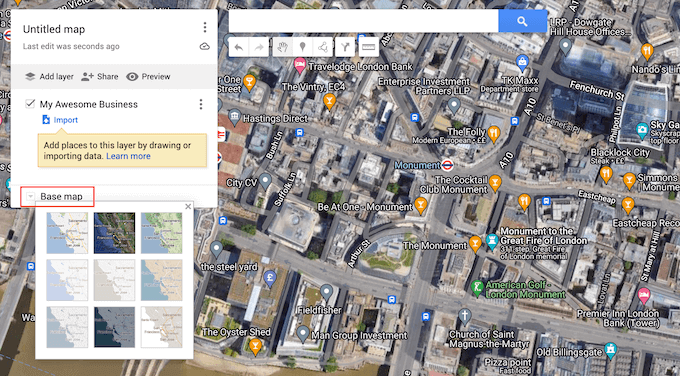
Next, you can change how the map looks by choosing one of the ready-made styles. To see the available options, click on the arrow next to ‘Base Map.’
You can then click on any of the thumbnails, to apply that style to the map.
Step 2: Add Points of Interest to the Interactive Map
If you just want to create a simple map, then you can skip to step 4. However, you may want to customize the map by adding points of interest.
When a visitor clicks on any of these points, a tooltip will open showing the location’s name, plus a description, photos, and videos where available.
There are a few different ways to add clickable points of interest, but the easiest is to type the address into the search bar and then click on the ‘Search’ icon.
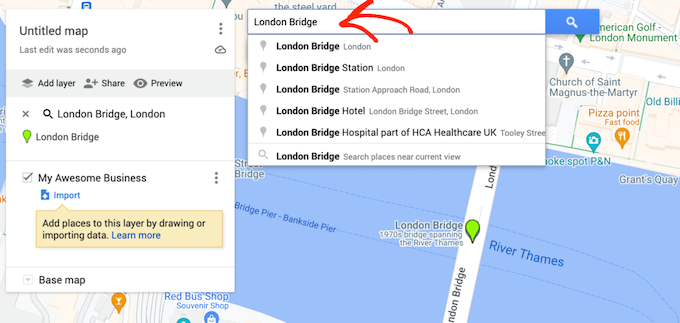
Google My Maps will now zoom into the area.
Sometimes, the location may already be added as a point of interest, especially if the place is a big tourist attraction or famous building. If this is the case, then you can simply click the location and then select ‘Add to map.’
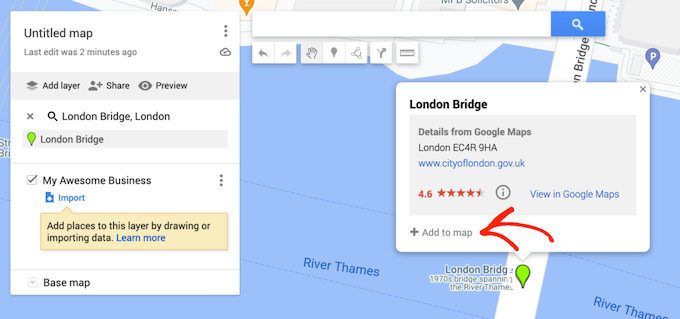
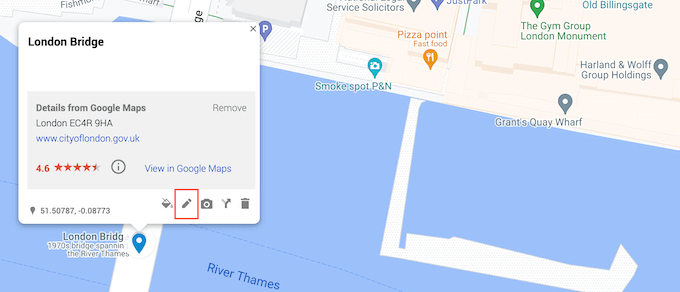
If the point of interest already exists, then Google My Maps will automatically show some information about this location in a popup. However, you may want to customize this default information or add your own photos and videos.
To do this, click on the ‘Edit’ icon, which looks like a small pencil.
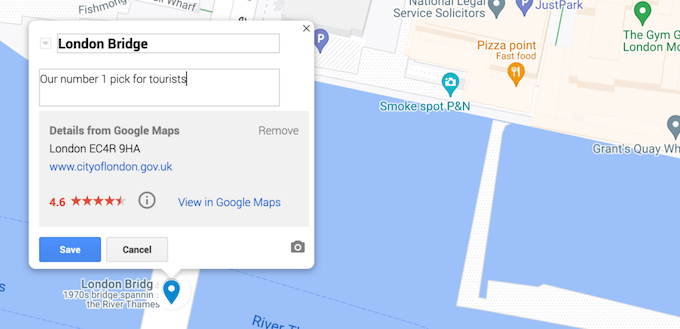
You can now type in the title and description you want to show to anyone who clicks on this place of interest.
When you’re happy with the information you’ve entered, click on ‘Save.’
Another option is to add your own images and videos to the popup.
For example, if you’re creating an interactive map for your restaurant website, then you might add photos of the venue’s exterior to help customers find it.
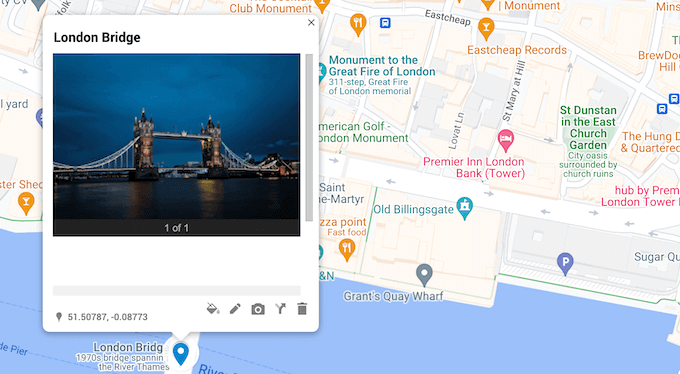
You might even use this popup to get more customers. For example, if you’re adding your photography studio as a point of interest, then you might upload your photography portfolio.
To add media, simply click on the small camera icon.
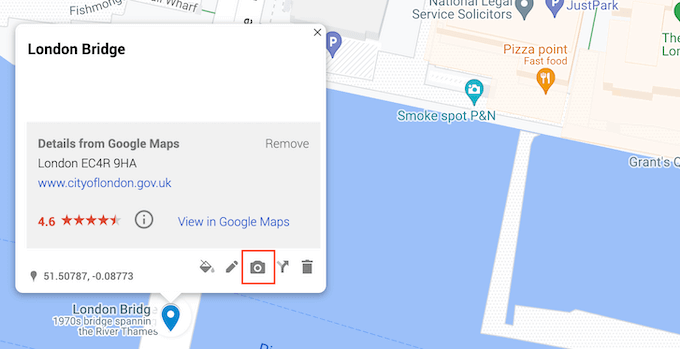
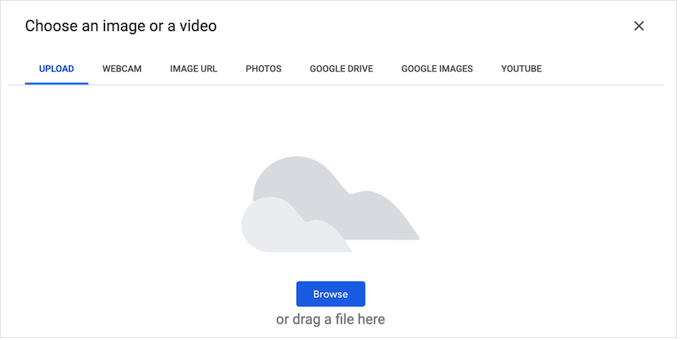
You can now choose an image or video in the popup that appears.
After making your selection, click on ‘Insert.’
When you’re done, don’t forget to click on ‘Save’ to store your changes.
Sometimes, you may want to show a location that hasn’t been added to Google Maps. This might be your own office, a store locator, a brand-new tourist attraction, or the meeting point for your event or conference.
To add a marker, go ahead and click on the ‘Add a marker’ icon below the search bar.
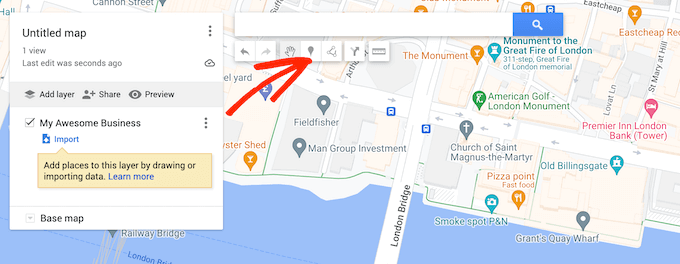
You can now click on the exact spot where you want to create a marker.
This will open an empty popup where you can type in a title and description. You can also add images and videos by clicking on the small camera icon.
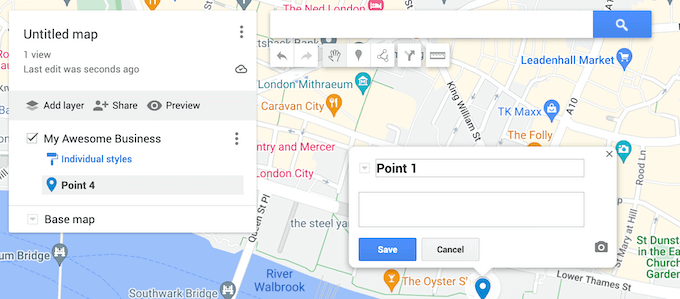
When you’re happy with how the popup is set up, click on the ‘Save’ button.
To create more points of interest, simply follow the same process described above.
Step 3: Add Travel Directions to an Interactive Map
You may also want to add some directions, which will be shown as a blue line on the map.
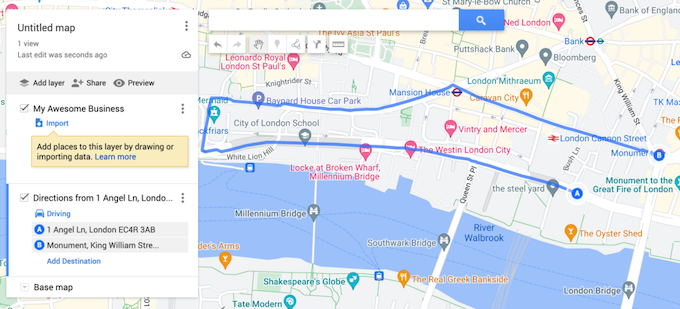
This map feature can be useful if you want to help attendees find your event or a venue such as your bar or pub. If you run a travel blog, then you might even recommend some sightseeing routes to your readers.
There are a few different ways to add directions, but the easiest method is to click on the ‘Add directions’ icon below the search bar.
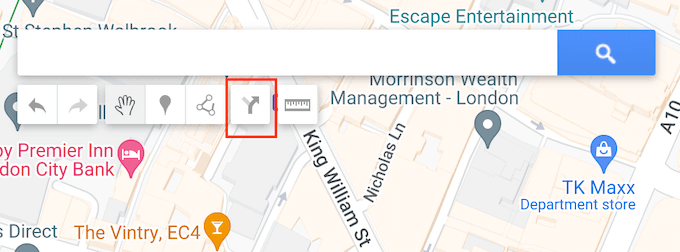
This adds a new section to the left of the screen, where you can type in the starting and ending addresses you want to use.
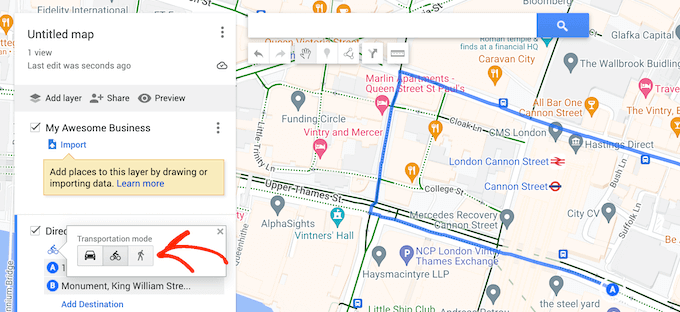
By default, Google Maps will show driving directions, but you can switch to walking or cycling directions instead. Simply click on the text that shows ‘Driving’ by default and then select the Cycling or Walking icon.
Another option is to draw a line on the map. This is useful if you want to show a very particular route between two or more locations, rather than the quickest route.
To do this, click on the ‘Draw a line’ icon beneath the search bar. You can now choose whether you want to add a driving, walking, or cycling route.
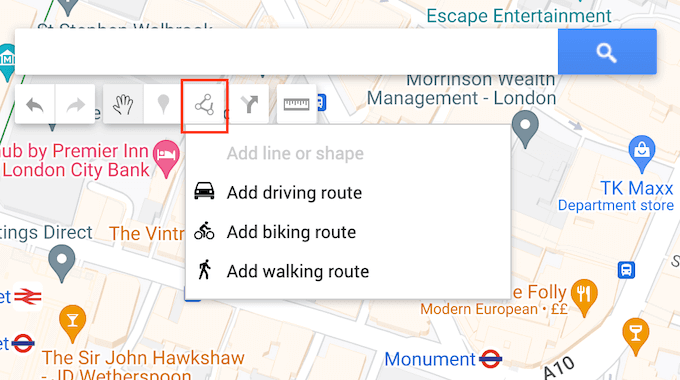
After that, click on the starting point and draw a line by moving your mouse along the route you want to take.
When you reach the destination, simply click to place a marker at that spot. At this point, you can stop drawing or continue moving the mouse to add more markers to the route.
Step 4: Publish the Interactive Map in WordPress
When you’re happy with how the map is set up, you can add it to your website using an embed iFrame code.
To start, you’ll need to make the map public by clicking on the ‘Share’ button. This opens a popup where you can type in a map title and an optional description.
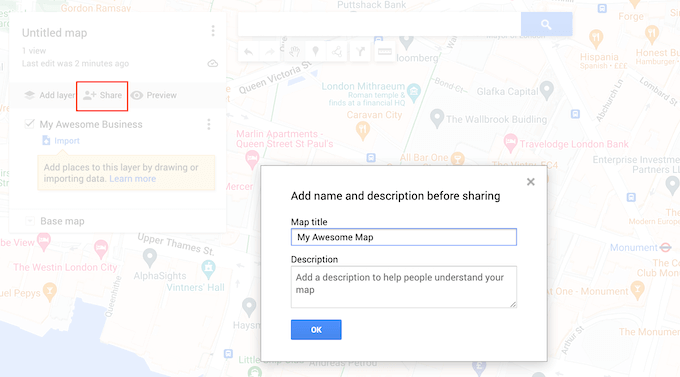
When you’re happy with the information you’ve entered, click on ‘OK.’
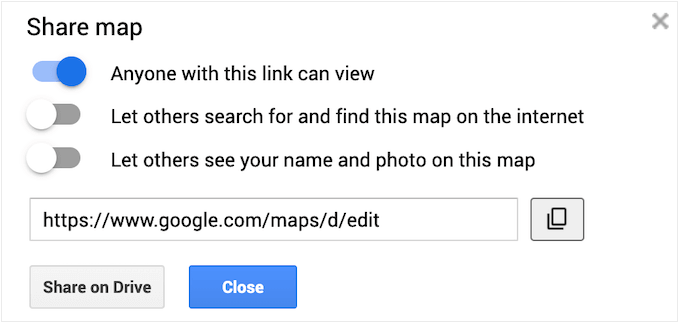
Next, you’ll want to enable the ‘Anyone with this link can view’ toggle. The other settings are optional, so you can decide whether to let people search for the map, or show your name and profile picture.
When you’re happy with the configuration, click on ‘Share on Drive.’
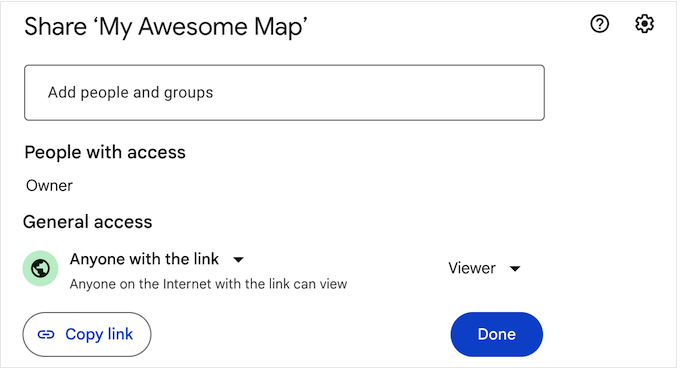
In the next popup, open the dropdown menu underneath ‘General Access’ and select ‘Anyone with the link.’
Since we don’t want other people to edit the map, click on the ‘Viewer/Editor’ dropdown and select ‘Viewer.’ Finally, click on ‘Done.’
After that, click on the three-dotted icon in the left-hand menu.
Then, choose ‘Embed on my site.’
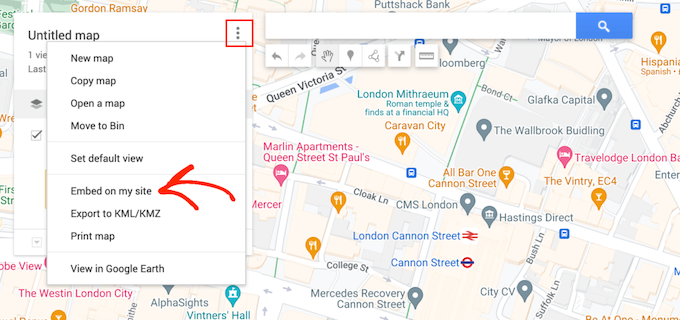
Google Maps will now show an embed code that allows you to add the map to your online store, blog, or website.
You can go ahead and copy this iframe code.
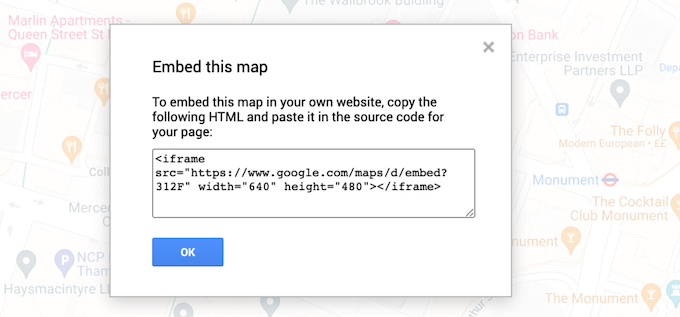
You’re now ready to paste the code into your site. In your WordPress dashboard, head over to the post or page where you want to add an interactive map and open the Gutenberg editor.
Then, click on the ‘+’ button and start typing ‘HTML’ to find the custom HTML block. When the right block appears, click to add it to the post or page.
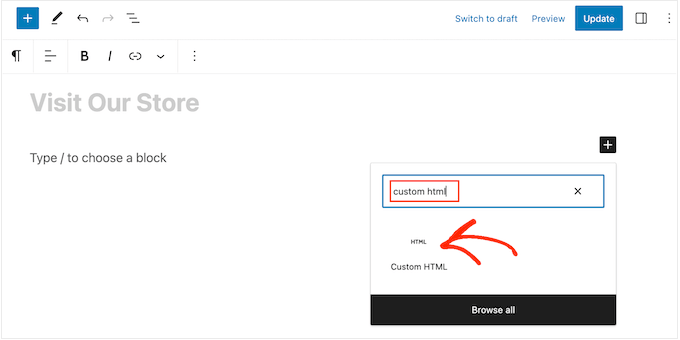
You can now paste the Google Map code into the Custom HTML block.
When you’re ready to go live, click on either the Update or Publish button.
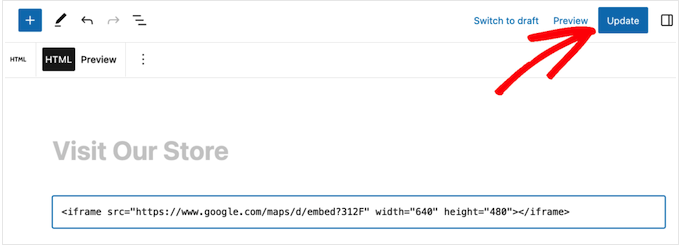
Now, if you visit your website, you’ll see the interactive map live.
Want to learn more about adding maps to WordPress? Check out the articles below:
- How to Add Google Maps in WordPress (The RIGHT Way)
- Best Google Maps Plugins for WordPress (Most Are Free)
- How to Embed a Google Map in Contact Forms (With Map Pin)
- How to Add Google Maps Store Locator in WordPress
We hope this tutorial helped you learn how to add an interactive map in WordPress. You may also want to learn how to increase your blog traffic or check out our list of the best contact form plugins.
If you liked this article, then please subscribe to our YouTube Channel for WordPress video tutorials. You can also find us on Twitter and Facebook.


Syed Balkhi says
Hey WPBeginner readers,
Did you know you can win exciting prizes by commenting on WPBeginner?
Every month, our top blog commenters will win HUGE rewards, including premium WordPress plugin licenses and cash prizes.
You can get more details about the contest from here.
Start sharing your thoughts below to stand a chance to win!
Stewart M says
Is it possible to embed a link for a google my maps in a button on a page of my blog?
“Click Here” to follow my route or places I visit
WPBeginner Support says
You can create a sharing link for the map and follow our guide below for adding a button:
https://www.wpbeginner.com/beginners-guide/beginners-guide-on-how-to-add-a-link-in-wordpress/#linkbutton
Admin
Lisa Green says
Thank you for giving wide information about updating maps and for also information about it. Map are generally used in now days for making your way better. Your blog contains all those facts who needs to update your maps. Keep sharing more information about updating maps.
Elle says
Thanks for a very good article about embedding maps. I will use it in a few days to add interactive maps to my website. A few questions, though. Is there a cost to use this plugin, Maps Maker Pro? can it be used to create itineraries by foot and bike or just driving? how can I ensure once I publish the maps no one else will add my maps to their websites? how can I copyright my maps?