
Facebook ist eine der größten Social-Media-Seiten der Welt mit fast 3 Milliarden aktiven Nutzern. Indem Sie Ihre Blogbeiträge auf Facebook teilen, können Sie mehr Besucher auf Ihre Website locken und mehr Seitenaufrufe erzielen.
Bei WPBeginner verstehen wir die Macht der sozialen Medien und bewerben konsequent unsere Produkte, Dienstleistungen und neuen Artikel auf Facebook. Dies hilft uns, Traffic zu generieren, das Engagement zu steigern und das Wachstum unseres Geschäfts zu unterstützen.
In diesem Artikel zeigen wir Ihnen, wie Sie jedes Mal automatisch auf Facebook posten, wenn Sie einen neuen WordPress-Blogbeitrag veröffentlichen.
Warum WordPress-Beiträge automatisch auf Facebook teilen?
Es gibt viele Möglichkeiten, mit Ihrem Publikum in Kontakt zu bleiben, z. B. den Aufbau einer E-Mail-Liste und den Versand eines regelmäßigen E-Mail-Newsletters. Dennoch können Sie die riesige Nutzerbasis von Social-Media-Websites wie Facebook nicht ignorieren.
Als größte Social-Media-Website kann Facebook eine große Traffic-Quelle für Ihre WordPress-Website sein.
Um eine starke Fangemeinde aufzubauen, ist es wichtig, mit Ihrem Facebook-Publikum zu interagieren. Das bedeutet, Kommentare zu beantworten, Inhalte zu teilen und regelmäßige Updates auf Facebook zu posten.
Das kann überwältigend sein, daher haben wir einen kompletten Social-Media-Spickzettel für WordPress zusammengestellt, der Ihnen den Einstieg erleichtert. Sie können auch Zeit und Mühe sparen, indem Sie Ihre Social-Media-Aktivitäten automatisieren.
Nichtsdestotrotz wollen wir sehen, wie Sie jedes Mal automatisch auf Facebook posten können, wenn Sie einen neuen WordPress-Beitrag veröffentlichen.
Automatisch von WordPress mit Uncanny Automator auf Facebook posten
Der beste Weg, automatisch auf Facebook zu posten, ist die Verwendung von Uncanny Automator. Es ist das beste WordPress-Automatisierungs-Plugin auf dem Markt und ermöglicht es Ihnen, leistungsstarke Workflows zu erstellen, die Ihnen Zeit sparen, eine bessere Benutzererfahrung bieten und Ihr Geschäft ausbauen.
Noch besser, es lässt sich mit über 185 Plugins, Apps und Diensten integrieren, darunter Google Drive, Slack, Asana, Facebook und mehr.

In dieser Anleitung verwenden wir die Pro-Version von Uncanny Automator.
Hinweis: Es gibt auch ein kostenloses Uncanny Automator-Plugin, das Ihnen 1.000 Credits für die Nutzung mit Facebook zur Verfügung stellt, sodass Sie das Plugin ausprobieren können, bevor Sie es kaufen. Sobald Sie diese Credits aufgebraucht haben, müssen Sie auf ein Pro-Konto oder höher upgraden, um weiterhin automatisch auf Facebook posten zu können.
Die Schritte sind weitgehend dieselben, wenn Sie das kostenlose Plugin verwenden.
Zuerst müssen Sie das Uncanny Automator-Plugin installieren und aktivieren. Weitere Details finden Sie in unserer Schritt-für-Schritt-Anleitung zur Installation eines WordPress-Plugins.
Nach der Aktivierung werden Sie auch aufgefordert, die kostenlose Version von Uncanny Automator zu installieren. Diese Light-Version des Plugins dient als Basis für den Pro-Plan.
Besuchen Sie nach der Aktivierung die Seite Automator » Einstellungen und geben Sie Ihren Lizenzschlüssel in das Feld „Uncanny Automator Pro Lizenzschlüssel“ ein.

Diese Informationen finden Sie in Ihrem Konto auf der Website von Uncanny Automator.
Wenn Sie damit fertig sind, klicken Sie auf die Schaltfläche "Lizenz aktivieren".
Ihre Facebook-Seite mit Uncanny Automator verbinden
Bevor Sie einen automatisierten Workflow für Facebook erstellen können, müssen Sie Ihre Facebook-Seite mit Uncanny Automator verbinden.
Um diese Verbindung herzustellen, besuchen Sie die Seite Automator » App-Integrationen und wechseln Sie in der linken Spalte zum Tab „Facebook-Seiten“.
Wählen Sie hier 'Facebook-Konto verbinden'.

Nachdem Sie auf diese Schaltfläche geklickt haben, erscheint ein Popup, in dem Sie sich bei Ihrem Facebook-Konto anmelden können. Wenn Sie die Zwei-Faktor-Authentifizierung aktiviert haben, müssen Sie auch diese zusätzliche Überprüfung bestehen, um Facebook mit Uncanny Automator zu verbinden.
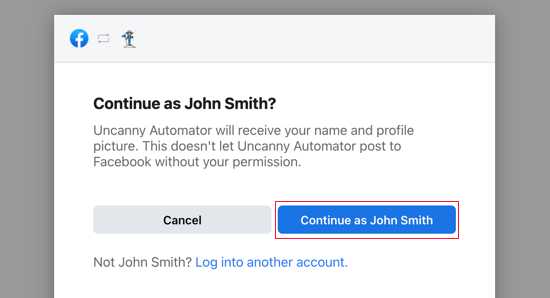
Sobald Sie angemeldet sind, wird Facebook Sie fragen, ob Sie Uncanny Automator Zugriff auf Ihren Namen und Ihr Profilbild gewähren möchten. Wenn Sie damit einverstanden sind, klicken Sie auf die Schaltfläche 'Weiter als'.
Als Nächstes werden Sie gefragt, ob Sie Uncanny Automator auf Facebook posten lassen möchten.
Sie können auf „Fortfahren“ klicken.

Sobald Sie das getan haben, werden Sie zurück zum Uncanny Automator-Dashboard weitergeleitet.
Sie sehen nun alle Seiten, die mit Ihrem Facebook-Konto verknüpft sind. Dies sind die Seiten, auf die Uncanny Automator automatisch posten kann.

Automatisches Posten auf Facebook von Uncanny Automator
Nun sind Sie bereit, ein Rezept zu erstellen, das jedes Mal automatisch einen Facebook-Status postet, wenn Sie einen neuen WordPress-Blogbeitrag veröffentlichen.
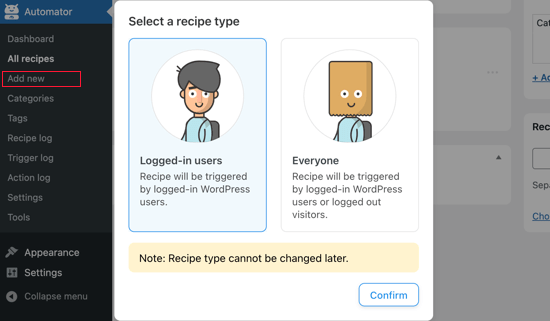
Gehen Sie einfach in Ihrem WordPress-Dashboard zu Automator » Neu hinzufügen
Sie können nun wählen, ob Sie ein 'Eingeloggt'-Rezept oder ein 'Jeder'-Rezept erstellen möchten. Wählen Sie für dieses Rezept 'Eingeloggte Benutzer' und klicken Sie dann auf die Schaltfläche 'Bestätigen'.
Als Nächstes können Sie dem Rezept einen Namen geben, indem Sie ihn in das Feld „Titel“ eingeben.
Dies dient nur zu Ihrer Information, sodass Sie alles verwenden können, was Sie möchten.

Danach müssen Sie die Bedingung definieren, die die Aktion auslöst.
Wir möchten jedes Mal auf Facebook posten, wenn wir einen WordPress-Blog veröffentlichen. Klicken Sie also unter "Eine Integration auswählen" auf "WordPress".

Sie sehen nun alle Trigger, die Sie auf Ihrer WordPress-Website verwenden können.
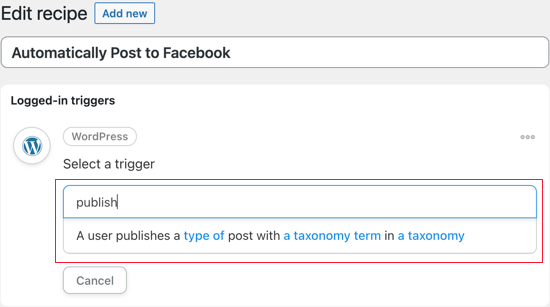
Sie sollten nach „publish“ suchen und den Trigger namens „Ein Benutzer veröffentlicht einen Beitragstyp mit einem Taxonomiebegriff in einer Taxonomie“ auswählen.
In diesem Beispiel möchten wir Facebook nur aktualisieren, wenn wir einen Beitrag veröffentlichen und keine Seite. Denken Sie daran, öffnen Sie das Dropdown-Menü „Beitragsart“ und wählen Sie „Beitrag“ aus.
Sie können dann entscheiden, ob Sie Beiträge aus einer bestimmten Kategorie oder einem Tag teilen möchten, indem Sie die Einstellungen für „Taxonomie“ ändern.
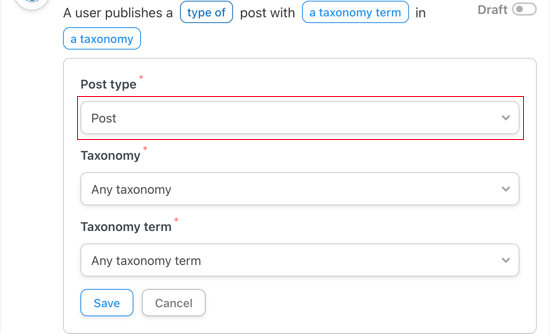
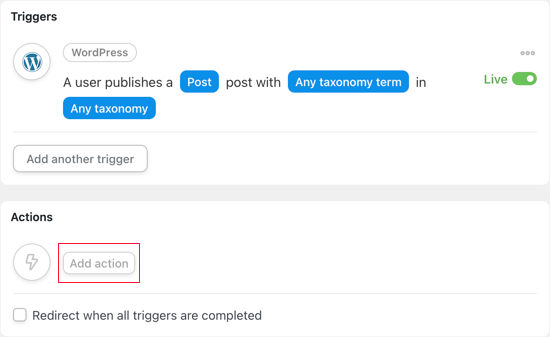
Vergessen Sie nicht, auf „Speichern“ zu klicken, um Ihre Änderungen zu speichern.
Als Nächstes müssen Sie die Aktion auswählen, die Uncanny Automator jedes Mal ausführt, wenn Sie einen Beitrag veröffentlichen. Klicken Sie zunächst auf die Schaltfläche „Aktion hinzufügen“.
Uncanny Automator zeigt Ihnen nun alle Integrationen, die Sie verwenden können. Zum Beispiel gibt es eine Integration, mit der Sie automatisch twittern können, wenn Sie einen neuen Beitrag in WordPress veröffentlichen.
Da wir auf Facebook posten möchten, klicken Sie einfach auf die Schaltfläche „Facebook-Seiten“.

Sie sehen nun alle verschiedenen Facebook-Aktionen.
Wenn Ihre Beiträge ein Beitragsbild haben, ist es eine gute Idee, „Einen Beitrag mit einem Bild veröffentlichen“ auszuwählen. Wenn Sie jedoch keine Bilder zu Ihren Facebook-Posts hinzufügen möchten, können Sie stattdessen „Einen Beitrag auf einer Facebook-Seite veröffentlichen“ auswählen.

Wenn Sie mehr als eine Facebook-Seite besitzen, wählen Sie diejenige aus, auf die Sie posten möchten, über das Dropdown-Menü „Facebook-Seite“.
Danach können Sie den Status erstellen, den Sie posten möchten, indem Sie ihn in das Feld 'Nachricht' eingeben.
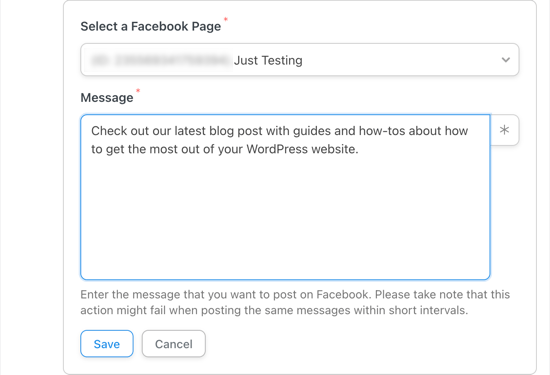
Beim Verfassen des Status müssen Sie den Beitragstitel und die URL mithilfe von Tokens zur Nachricht hinzufügen. Wenn Uncanny Automator Ihren Status veröffentlicht, ersetzt es diese Tokens durch reale Informationen aus dem Beitrag.
Um ein Token hinzuzufügen, klicken Sie auf die Schaltfläche '*'.

Klicken Sie dann auf den Pfeil neben „Ein Benutzer veröffentlicht einen Beitrag…“
Dies zeigt Ihnen alle verschiedenen Tokens für den Beitrag.

Sie können Ihrer Facebook-Statusmeldung ein beliebiges Token hinzufügen.
Sie möchten jedoch normalerweise 'Beitragstitel' und 'Beitrags-URL' auswählen, damit die Leute den Blogbeitrag besuchen können.

Wenn Sie 'Einen Beitrag mit einem Bild veröffentlichen' als Aktion ausgewählt haben, müssen Sie Uncanny Automator mitteilen, wo es dieses Bild finden kann.
Suchen Sie das Feld "Bild-URL oder Medienbibliothek-ID" und klicken Sie auf dessen "*"-Schaltfläche.

Klicken Sie dann, um den Trigger „Ein Benutzer veröffentlicht einen Beitrag…“ zu erweitern.
Klicken Sie hier auf „Beitragsbild-URL veröffentlichen“.

Wenn Sie mit der Einrichtung der Aktion zufrieden sind, vergessen Sie nicht, auf „Speichern“ zu klicken.
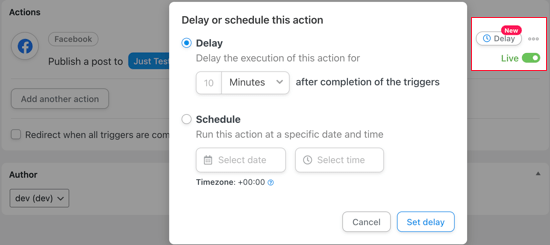
An diesem Punkt möchten Sie vielleicht eine Verzögerung hinzufügen, damit Uncanny Automator nicht sofort nach der Veröffentlichung des Blogs auf Facebook postet.
Um dies zu tun, bewegen Sie den Mauszeiger über die Aktion 'Einen Beitrag veröffentlichen an...' und klicken Sie auf 'Verzögerung', wenn sie erscheint.

Jetzt können Sie wählen, ob die Uncanny Automator-Aktion nach einer Verzögerung oder zu einem bestimmten Datum oder einer bestimmten Uhrzeit ausgelöst werden soll.
Dies ermöglicht es Ihnen, auf Facebook zu posten, wenn Ihr Publikum am wahrscheinlichsten online ist.
Jetzt, da Sie den Auslöser und die Aktion festgelegt haben, ist es an der Zeit, das Rezept zu veröffentlichen.
Klicken Sie dazu auf den Schalter „Entwurf“, sodass stattdessen „Live“ angezeigt wird.
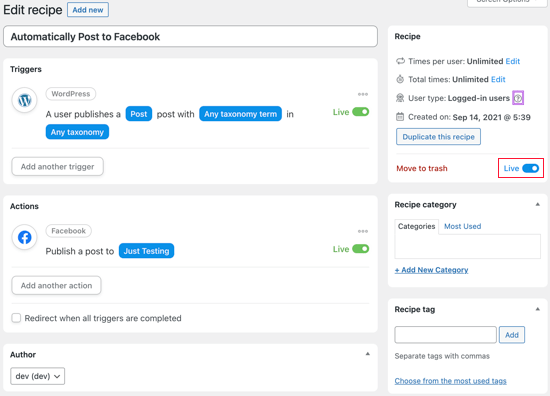
Sobald das Rezept live ist, veröffentlicht Uncanny Automator jedes Mal einen neuen Facebook-Status, wenn Sie einen Beitrag veröffentlichen.
Wir haben einen neuen Blogbeitrag auf unserer Testseite veröffentlicht, und so erschien der Beitrag auf unserer Facebook-Seite.

Wenn das richtige Vorschaubild nicht im Facebook-Status angezeigt wird, finden Sie in unserer Anleitung, wie Sie das Problem mit dem falschen Facebook-Vorschaubild in WordPress beheben.
Video-Tutorial
Wenn Sie eher ein visueller Lerner sind, dann sollten Sie sich unser YouTube-Tutorial ansehen, wie Sie automatisch von WordPress nach Facebook posten:
Bonus: Erstellen Sie einen benutzerdefinierten Facebook-Feed in WordPress
Abgesehen vom Posten auf Facebook von WordPress aus können Sie auch Ihren gesamten Facebook-Feed auf Ihrer Website einbetten. Dies ermöglicht es Besuchern, Ihre Facebook-Beiträge anzuzeigen, ohne Ihre Website verlassen zu müssen, und kann die Benutzererfahrung verbessern.
Außerdem kann es Benutzer ermutigen, Ihre Facebook-Seite zu besuchen, und zu mehr Followern führen.
Um Ihren Facebook-Feed einzubetten, müssen Sie das Plugin Smash Balloon Facebook Feed installieren und aktivieren. Gehen Sie nach der Aktivierung einfach zu Facebook Feed » Alle Feeds und klicken Sie dann auf „Neu hinzufügen“.

Dies führt Sie zu einem weiteren Bildschirm, auf dem Sie 'Timeline' als Feed-Typ auswählen und auf die Schaltfläche 'Weiter' klicken müssen.
Sie müssen dann Ihr Facebook-Konto mit Smash Balloon verbinden. Weitere Details hierzu finden Sie in unserem Tutorial zur Einbettung eines Facebook-Gruppenfeeds in WordPress.

Sobald dies erledigt ist, können Sie Ihren Facebook-Feed ganz einfach im visuellen Editor von Smash Balloon anpassen. Hier können Sie die Hintergrundfarbe ändern, ein Layout auswählen, verschiedene Schaltflächen hinzufügen und vieles mehr.
Klicken Sie dann oben auf die Schaltfläche „Speichern“, um Ihre Einstellungen zu speichern.

Öffnen Sie nun den Block-Editor und fügen Sie den Block 'Facebook Feed' aus dem Menü hinzu. Wählen Sie dann den gerade erstellten Facebook-Feed aus dem Dropdown-Menü im Block aus.
Klicken Sie abschließend auf die Schaltfläche „Aktualisieren“ oder „Veröffentlichen“, um Ihre Einstellungen zu speichern. Weitere Informationen finden Sie in unserem Tutorial zur Erstellung eines benutzerdefinierten Facebook-Feeds in WordPress.

Wir hoffen, dieses Tutorial hat Ihnen geholfen zu lernen, wie Sie automatisch von WordPress nach Facebook posten. Möglicherweise möchten Sie auch lernen, wie Sie ein Facebook-Video in WordPress einbetten und unsere Expertenauswahl der besten WordPress-Facebook-Plugins zum Wachstum Ihres Blogs ansehen.
Wenn Ihnen dieser Artikel gefallen hat, abonnieren Sie bitte unseren YouTube-Kanal für WordPress-Video-Tutorials. Sie finden uns auch auf Twitter und Facebook.


")

Jiří Vaněk
Das wird mir bei der Anzahl der Artikel relativ viel Zeit sparen. Ich habe Artikel nach der Veröffentlichung manuell auf Facebook gepostet.
WPBeginner-Support
Schön, dass wir den Prozess für Sie vereinfachen konnten
Administrator
Terje Pettersen
Hallo. Ich möchte, dass alle meine Benutzer auf einfache Weise neue WordPress-Blogs automatisch auf ihrer eigenen privaten Facebook-Wall posten können. Ist das möglich?
WPBeginner-Support
Wir haben derzeit keine Methode, die wir dafür empfehlen würden, da es keine einfache Möglichkeit für Ihre Benutzer gäbe, das automatisierte Teilen zu deaktivieren. Vorerst sollten Sie sich Plugins ansehen, um Ihren Beiträgen eine Share-Schaltfläche hinzuzufügen.
Administrator
G
Danke fürs Teilen. Das war hilfreich.
WPBeginner-Support
Schön, dass der Leitfaden hilfreich war
Administrator
Beth Younker
Danke für die Info, aber Sie erwähnen nicht, dass einige dieser Optionen mit Kosten verbunden sein können. Zum Beispiel können Sie mit WordPress keine Plugins mehr verwenden, es sei denn, Sie upgraden auf ein Business-Konto. Das finde ich wirklich frustrierend, da ich früher problemlos auf meine FB-Seite verlinken konnte, aber jetzt kann ich das nicht mehr, es sei denn, ich zahle mehr Geld? Vielen Dank.
WPBeginner-Support
Was die Kosten für WordPress betrifft, so beziehen sich unsere Anleitungen auf WordPress.org, nicht auf WordPress.com, was zu der Verwirrung beitragen könnte. Sie können sich unsere Anleitung unten ansehen, die die Unterschiede zwischen den beiden erläutert:
https://www.wpbeginner.com/beginners-guide/self-hosted-wordpress-org-vs-free-wordpress-com-infograph/
Administrator
morgan kane
Postet eine dieser Methoden automatisch in Facebook-GRUPPEN?
WPBeginner-Support
Diese sind für Facebook-Seiten, Facebook schränkt die Automatisierung für seine Gruppen derzeit ein.
Administrator
Eduardo Rivera
Hallo Leute, wie immer tolle Infos! Sie sollten wirklich die dritte Option aktualisieren, die Graph-API wurde veraltet und Facebook verwendet jetzt eine andere Methode, sehr intuitiv und selbsterklärend.
WPBeginner-Support
Vielen Dank für die Benachrichtigung, wir werden unseren Artikel so schnell wie möglich aktualisieren.
Administrator
ebenezer
Ich kann kein neues Applet im Dropdown-Menü finden, als ich auf meinen Benutzernamen geklickt habe
WPBeginner-Support
Sie haben möglicherweise ihre Benutzeroberfläche geändert, seit dieser Artikel zuletzt aktualisiert wurde. Sie sollten ihre Suchfunktion oben auf der Seite immer noch verwenden können, um eine Applet zu finden.
Administrator
Darlington
Bitte, ich kann Ihre Facebook-Gruppe nicht mehr finden. Oder wurde sie geschlossen?
WPBeginner-Support
Unsere Facebook-Gruppe ist immer noch aktiv. Wenn Sie unsere Facebook-Seite besuchen und auf der Seite zum Reiter „Gruppen“ gehen, sollten Sie die Gruppe dort sehen können
Administrator
Amanda
Ich fand den Prozess für Buffer viel einfacher als in diesem Beitrag beschrieben. Sie müssen sich nur für Buffer anmelden und Ihre Social-Media-Konten dort verbinden, dann das WP to Buffer-Plugin installieren und auf die Schaltfläche „Autorisieren“ in den Plugin-Einstellungen klicken. Das war's. Kein Zugriffstoken, keine Callback-URL, keine Erstellung einer App. Das wird jetzt alles mit der Schaltfläche „Autorisieren“ automatisiert, nehme ich an.
WPBeginner-Support
Vielen Dank für die Benachrichtigung. Die Autoren des Plugins haben wahrscheinlich ihre Autorisierungsmethode seit dem letzten Update dieses Artikels geändert
Administrator
Mose
Ich möchte nur lernen, postet diese Methode automatisch unsere WordPress-Beiträge, sobald wir sie veröffentlichen?
WPBeginner-Support
Ja
Administrator
Anthony
Vielen Dank für die Tipps
Marius
Dieser Beitrag ist veraltet, nachdem FB das Veröffentlichen auf der Profil-Timeline aus seiner API entfernt hat.
WPBeginner-Support
Vielen Dank für die Benachrichtigung. Wir werden uns diesen Artikel ansehen
Administrator
Daniel
Hallo,
Ich habe versucht, IFTTT zu verwenden, aber es sagte mir immer wieder ungültige WordPress-URL. Nach zahlreichen Gegenprüfungen konnte ich sehen, dass die URL korrekt ist.
Bitte, was kann ich dagegen tun?
WPBeginner-Support
Hallo Daniel,
Stellen Sie sicher, dass XML-RPC auf Ihrer Website aktiviert ist. Es ist eine WordPress-Funktion, die es Drittanbieterdiensten wie IFTTT ermöglicht, eine Verbindung herzustellen. Einige WordPress-Sicherheits-Plugins deaktivieren es möglicherweise. Sehen Sie sich die Einstellungen Ihres Sicherheit-Plugins an.
Administrator
Charlie
Kann ich die ITTT-Methode verwenden, um WordPress mit mehr als einer meiner Facebook-Seiten zu verknüpfen?
WPBeginner-Support
Hallo Charlie,
Ja, das können Sie tun.
Administrator
Mariano
Wie kann ich die Post-Updates in IFTTT einbeziehen? Denn wenn ein neuer Beitrag erscheint, wird die Benachrichtigung normal gesendet. Aber wenn ein Beitrag aktualisiert wird, sendet es nichts.
waynedpj
Ich suche auch nach einer Möglichkeit, den entsprechenden Facebook-Post zu aktualisieren, wenn eine Änderung am Original-Post in WordPress vorgenommen wird. Leider scheinen die meisten Optionen nur neue Posts als Auslöser zuzulassen. Haben Sie jemals eine Lösung gefunden?
Danke.
Kylie
Wenn ich die Schritte für AccessPress Facebook Autopost (die ich erfolgreich verwendet habe) befolge und das Kästchen „Öffentlich“ anklicke, um die Überprüfung öffentlich zu machen, erhalte ich jetzt ein Dialogfeld, das nach einer URL für die Datenschutzerklärung fragt. Ich habe nur Websites für die Entwicklung von URLs für Datenschutzerklärungen gefunden, die etwas kosten. Gibt es etwas Allgemeines, das kostenlos hinzugefügt werden kann?
Stefan
In WordPress gibt es jetzt eine Option für „Datenschutzerklärung“. Sie finden diese im Administrator-Panel im Untermenü „Einstellungen“ und dann „Datenschutz“.
Joe
Ich konnte IFTTT verwenden, um meinen Beitrag auf Facebook zu teilen. Das neue Problem dabei ist jedoch, dass Facebook die Beschreibung der Website anzeigt und nicht die Beschreibung des Beitrags.
Facebook hat auch ein anderes Bild-Thumbnail verwendet, anstelle des Bildes, das ich für den Beitrag verwendet habe. Wie kann ich das bitte lösen??
Francois
Das hat nicht funktioniert. Wenn ich auf "Autorisieren" klicke, erhalte ich die folgende Fehlermeldung, selbst nachdem ich meine Domain und die Seite, auf der ich meine Beiträge veröffentliche, zur App-Domain hinzugefügt habe.
URL kann nicht geladen werden: Die Domain dieser URL ist nicht in den Domains der App enthalten. Um diese URL laden zu können, fügen Sie alle Domains und Subdomains Ihrer App zum Feld 'App-Domains' in Ihren App-Einstellungen hinzu.
Samuel
Gibt es eine Möglichkeit, dass, wenn jemand auf unseren Beitrag kommentiert, den wir auf Facebook teilen, dieser auf unserer Website angezeigt wird?
Ich weiß, dass wir ein Facebook-Kommentar-Plugin haben können, das es Benutzern ermöglicht, Beiträge mit ihrem Facebook-Konto zu kommentieren.
Was ich nicht weiß ist, wenn wir unseren Beitrag auf Facebook teilen und jemand auf diesen Beitrag auf Facebook kommentiert, wie können wir diesen Kommentar auf unserer Website anzeigen?
Nikhil
Hallo. Gibt es ein Plugin, das Beiträge automatisch auf verschiedene FB-Seiten entsprechend verschiedenen Kategorien hochlädt. Zum Beispiel: Wenn ein bestimmter Beitrag zur Kategorie Technik gehört, sollte er auf der FB-Technikseite geteilt werden, und wenn seine Kategorie Gesundheit ist, sollte dieser Beitrag auf der entsprechenden FB-Seite geteilt werden.
Sue
Ich habe die Einrichtung durchlaufen und meinen Blog gepostet, aber er wird auf f.b. nicht angezeigt. Ich frage mich nur, was ich falsch gemacht habe, oder gibt es eine Verzögerung beim Posten. Ich habe vor etwa 10 Minuten gepostet. Danke!
Ed
Wenn es Ihr allererster Beitrag mit IFTTT ist, dauert es BIS ZU einer Stunde. Dies ist in Kleingedrucktem auf dem Applet angegeben.
teslim
Ich versuche, die Facebook-App-Methode zu verwenden, aber ich habe Schwierigkeiten, mein Konto zu autorisieren. Facebook sagt (URL kann nicht geladen werden: Die Domain dieser URL ist nicht in den Domains der App enthalten. Um diese URL laden zu können, fügen Sie alle Domains und Subdomains Ihrer App zum Feld „App-Domains“ in Ihren App-Einstellungen hinzu.). Bitte helfen Sie mir schnellstmöglich, danke..
Daniel
Wie ändert man den Beitrag auf Facebook, der sagt…
„John Doe hat einen Artikel auf WordPress veröffentlicht“
damit „WordPress“ etwas anderes sagt, wie die URL oder der Name Ihrer Website?
Karen
Hallo. Ich habe die Anweisungen genau befolgt und die Methode mit dem Wordpress-Plugin verwendet und sehe absolut keine Beiträge auf meiner FB-Seite. Ich habe sogar einen Beitrag aktualisiert (in der Annahme, dass frühere Beiträge möglicherweise nicht erscheinen), und das hat auch nicht funktioniert. Ich habe die Bereiche Timeline und Feed meiner FB-Seite aufgerufen und sehe nichts.
Bitte helfen Sie oder ich werde keine andere Wahl haben, als dieses Plugin zu deaktivieren und neu zu beginnen.
Danke.
isah
Hey, toller Artikel. Ich habe das gerade auf meiner Website mit der IFTTT-Methode ausprobiert und es funktioniert einwandfrei. Danke für den Tipp.
naresh
Vielen Dank für die Erstellung eines so nützlichen Beitrags.
JM Koh
Danke für das Tutorial. Weiß jemand, wie man sowohl auf das FB-Profil als auch auf die FB-Seite postet (die mit 1 FB-Konto verbunden ist, wie von FB gefordert)? Beachten Sie, dass die IFTTT-Methode erfordert, dass Sie wählen, ob Sie entweder auf das Profil oder die Seite posten, was dasselbe ist wie bei Jetpack. Danke!
Miso
Hallo,
beim Plugin gibt es jetzt einen Fehler und das Konto kann nicht autorisiert werden.
Jemand hat mir gesagt, dass die Weitergabe von Admin-Zugangsdaten an die Website keine gute Idee ist,
weshalb der Benutzer, der die Website postet, kein Administrator sein kann.
Sandra K
Funktionieren diese Methoden für Facebook-Gruppen? Ich bin Administrator einer geschlossenen Facebook-Gruppe und möchte automatisch Neuigkeiten und Veranstaltungen von unserer Website in unserer Facebook-Gruppe veröffentlichen. Ist das machbar?
Lori
Welches ist also das BESTE, das man wählen sollte?
WPBeginner-Support
IFTTT ist am einfachsten und schnellsten.
Administrator
Marc
Allerdings postet IFTTT einen Link und nicht den gesamten Posttext inklusive Bild, oder?
WPBeginner-Support
Ja, Facebook erledigt den Rest und ruft automatisch ein Vorschaubild, den Titel des Beitrags und eine kurze Beschreibung Ihres Beitrags ab. Benutzer müssen Ihre Website trotzdem besuchen, um den vollständigen Artikel zu lesen.
iostar
Hallo! Ich benutze Zapier, um automatisch auf Facebook und anderen sozialen Medien basierend auf RSS-Technologie zu posten.
Ich hoffe, das hilft.
Claudio
Wenn ich versuche, meine gehosteten WordPress-Informationen einzugeben, werde ich aufgefordert, XML-RPC unter meinen WordPress-Einstellungen/Schreiben zu aktivieren, aber ich sehe keine Checkbox dafür.
Tâm Hoàng
Danke
Sufyan
Vielen Dank für dieses wunderbare Tutorial
Pankaj Dhawan
Leute reden darüber, Buffer mehr zu nutzen, und es ist sehr berühmt. Ich habe noch nie eine solche Technik verwendet, da ich nicht genug Zeit habe, daher stelle ich mir vor, dass IFTTT für jemanden wie mich ideal wäre.
Das wusste ich vorher nicht, also danke, dass Sie diese nützlichen Informationen geteilt haben.