
Facebook è uno dei più grandi siti di social media al mondo, con quasi 3 miliardi di utenti attivi. Condividendo i tuoi post del blog su Facebook, puoi portare più visitatori al tuo sito e ottenere più visualizzazioni di pagina.
Noi di WPBeginner comprendiamo il potere dei social media e promuoviamo costantemente i nostri prodotti, servizi e nuovi articoli su Facebook. Questo ci aiuta a generare traffico, aumentare l'interazione e supportare la crescita della nostra attività.
In questo articolo, ti mostreremo come pubblicare automaticamente su Facebook ogni volta che pubblichi un nuovo post del blog di WordPress.
Perché condividere automaticamente i post di WordPress su Facebook?
Ci sono molti modi per rimanere in contatto con il tuo pubblico, come creare una lista email e inviare regolarmente una newsletter via email. Tuttavia, non puoi ignorare l'enorme base di utenti dei social media come Facebook.
Essendo il più grande sito di social media, Facebook può essere una grande fonte di traffico per il tuo sito WordPress.
Per costruire un seguito forte, è importante interagire con il tuo pubblico di Facebook. Ciò significa rispondere ai commenti, condividere contenuti e pubblicare aggiornamenti regolari su Facebook.
Questo può diventare opprimente, quindi abbiamo messo insieme un foglio di trucchi completo sui social media per WordPress per aiutarti a iniziare. Puoi anche risparmiare tempo e fatica automatizzando le tue attività sui social media.
Detto questo, vediamo come puoi pubblicare automaticamente su Facebook ogni volta che pubblichi un nuovo post di WordPress.
Pubblica automaticamente su Facebook da WordPress usando Uncanny Automator
Il modo migliore per pubblicare automaticamente su Facebook è utilizzare Uncanny Automator. È il miglior plugin di automazione per WordPress sul mercato e ti consente di creare potenti flussi di lavoro che ti faranno risparmiare tempo, offriranno una migliore esperienza utente e faranno crescere la tua attività.
Ancora meglio, si integra con oltre 185 plugin, app e servizi, tra cui Google Drive, Slack, Asana, Facebook e altro ancora.

In questa guida, utilizzeremo la versione Pro di Uncanny Automator.
Nota: Esiste anche un plugin gratuito Uncanny Automator che ti fornisce 1.000 crediti da utilizzare con Facebook, in modo da poter provare il plugin prima di acquistarlo. Una volta utilizzati questi crediti, dovrai passare a un account Pro o superiore per continuare a pubblicare automaticamente su Facebook.
I passaggi saranno per lo più gli stessi se stai usando il plugin gratuito.
Innanzitutto, devi installare e attivare il plugin Uncanny Automator. Per maggiori dettagli, consulta la nostra guida passo passo su come installare un plugin di WordPress.
Dopo l'attivazione, ti verrà anche chiesto di installare la versione gratuita di Uncanny Automator. Questa versione leggera del plugin viene utilizzata come base per il piano Pro.
Dopo l'attivazione, visita la pagina Automator » Impostazioni e inserisci la tua chiave di licenza nel campo 'Chiave di licenza Uncanny Automator Pro'.

Puoi trovare queste informazioni nel tuo account sul sito web di Uncanny Automator.
Fatto ciò, fai clic sul pulsante 'Attiva licenza'.
Collegare la tua pagina Facebook a Uncanny Automator
Prima di poter creare un flusso di lavoro automatizzato per Facebook, dovrai collegare la tua pagina Facebook a Uncanny Automator.
Per stabilire questa connessione, visita la pagina Automator » Integrazioni app e passa alla scheda ‘Pagine Facebook’ dalla colonna di sinistra.
Qui, seleziona ‘Connetti account Facebook.’

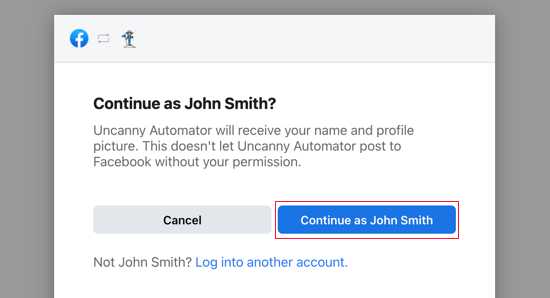
Dopo aver fatto clic su questo pulsante, apparirà un popup in cui potrai accedere al tuo account Facebook. Se hai abilitato l'autenticazione a due fattori, dovrai anche superare questo controllo aggiuntivo per collegare Facebook a Uncanny Automator.
Una volta effettuato l'accesso, Facebook ti chiederà se desideri concedere a Uncanny Automator l'accesso al tuo nome e alla tua immagine del profilo. Se sei d'accordo, fai clic sul pulsante ‘Continua come’.
Successivamente, ti verrà chiesto se desideri consentire a Uncanny Automator di pubblicare su Facebook.
Puoi procedere e fare clic su ‘Continua.’

Una volta fatto ciò, verrai riportato alla dashboard di Uncanny Automator.
Ora vedrai tutte le pagine collegate al tuo account Facebook. Queste sono le pagine su cui Uncanny Automator può pubblicare automaticamente.

Pubblicazione automatica su Facebook da Uncanny Automator
Ora sei pronto per creare una ricetta che pubblicherà automaticamente uno stato su Facebook ogni volta che pubblichi un nuovo post del blog di WordPress.
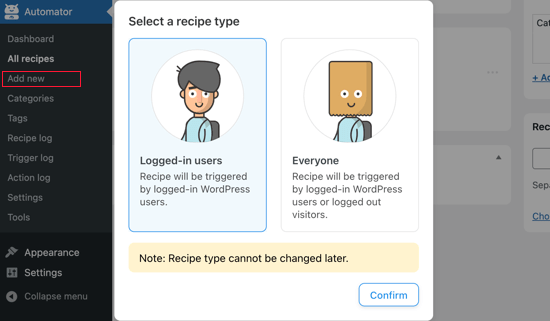
Vai semplicemente su Automator » Aggiungi nuovo nella tua dashboard di WordPress
Ora puoi scegliere se creare una ricetta ‘Connesso’ o una ricetta ‘Tutti’. Per questa ricetta, procedi e seleziona ‘Utenti connessi’ e quindi fai clic sul pulsante ‘Conferma’.
Successivamente, puoi dare un nome alla ricetta digitandolo nel campo ‘Titolo’.
Questo è solo per tuo riferimento, quindi puoi usare quello che vuoi.

Dopo di che, devi definire la condizione che attiverà l'azione.
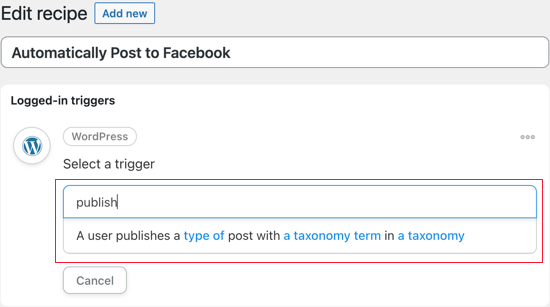
Vogliamo pubblicare su Facebook ogni volta che pubblichiamo un blog WordPress, quindi fai clic su ‘WordPress’ sotto ‘Seleziona un'integrazione.’

Ora vedrai tutti i trigger che puoi utilizzare sul tuo sito web WordPress.
Dovresti cercare 'publish' e scegliere il trigger chiamato 'A user publishes a type of post with a taxonomy term in a taxonomy'.
In questo esempio, vogliamo aggiornare Facebook solo quando pubblichiamo un post e non una pagina. Tenendo presente questo, apri il menu a discesa 'Tipo di post' e seleziona 'Post'.
Puoi quindi decidere se condividere post da una particolare categoria o tag modificando le impostazioni di 'Taxonomy'.
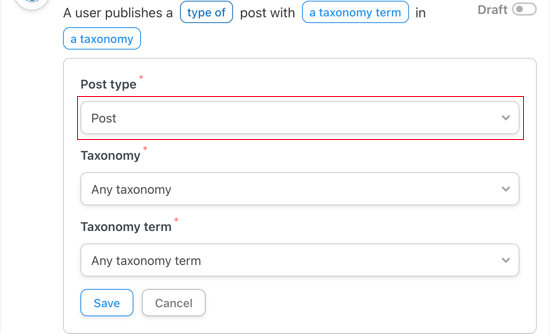
Non dimenticare di fare clic su 'Salva' per memorizzare le tue modifiche.
Successivamente, dovrai scegliere l'azione che Uncanny Automator eseguirà ogni volta che pubblichi un post. Inizia facendo clic sul pulsante 'Aggiungi azione'.
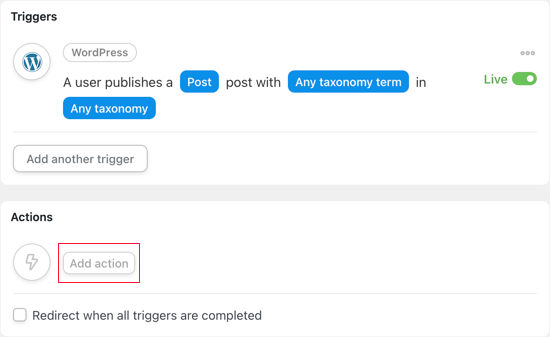
Uncanny Automator ti mostrerà ora tutte le integrazioni che puoi utilizzare. Ad esempio, c'è un'integrazione che ti consente di twittare automaticamente quando pubblichi un nuovo post in WordPress.
Poiché vogliamo pubblicare su Facebook, procedi e fai clic sul pulsante 'Pagine Facebook'.

Ora vedrai tutte le diverse azioni di Facebook.
Se i tuoi post hanno un'immagine in primo piano, è una buona idea selezionare 'Publish a post with an image'. Tuttavia, se non vuoi aggiungere un'immagine ai tuoi post di Facebook, puoi selezionare 'Publish a post to a Facebook page' invece.

Se possiedi più di una pagina Facebook, seleziona quella a cui desideri pubblicare utilizzando il menu a discesa ‘Pagina Facebook’.
Successivamente, puoi creare lo stato che desideri pubblicare digitandolo nella casella ‘Messaggio’.
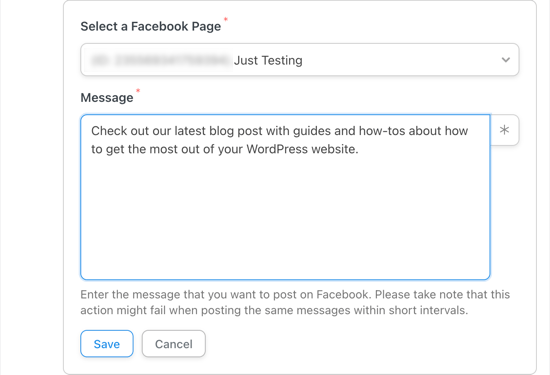
Durante la scrittura dello stato, dovrai aggiungere il titolo del post e l'URL al messaggio utilizzando i token. Quando Uncanny Automator pubblicherà il tuo stato, sostituirà questi token con informazioni reali dal post.
Per aggiungere un token, fai clic sul pulsante ‘*’.

Quindi, fai clic sulla freccia accanto a ‘Un utente pubblica un Post…’
Questo ti mostra tutti i diversi token per il post.

Puoi aggiungere qualsiasi token al tuo stato di Facebook.
Tuttavia, in genere vorrai selezionare 'Titolo del post' e 'URL del post' in modo che le persone possano visitare il post del blog.

Se hai selezionato 'Pubblica un post con un'immagine' come azione, dovrai far sapere a Uncanny Automator dove trovare quell'immagine.
Trova il campo 'URL immagine o ID libreria multimediale' e fai clic sul pulsante '*'.

Quindi, fai clic per espandere il trigger 'Un utente pubblica un post...'.
Qui, fai clic su 'URL immagine in evidenza del post'.

Quando sei soddisfatto di come è impostata l'azione, non dimenticare di fare clic su 'Salva'.
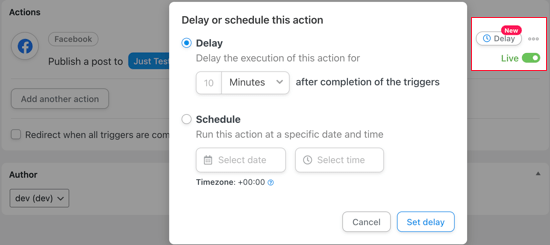
A questo punto, potresti voler aggiungere un ritardo in modo che Uncanny Automator non pubblichi su Facebook non appena pubblichi il blog.
Per fare ciò, passa il mouse sopra l'azione 'Pubblica un post su...' e fai clic su 'Ritardo' quando appare.

Ora puoi scegliere se attivare l'azione Uncanny Automator dopo un ritardo o a una data o ora specifica.
Questo ti consente di pubblicare su Facebook quando il tuo pubblico è più propenso a essere online.
Ora che hai impostato il trigger e l'azione, è ora di pubblicare la ricetta.
Per fare ciò, fai clic sull'interruttore 'Bozza' in modo che mostri invece 'Live'.
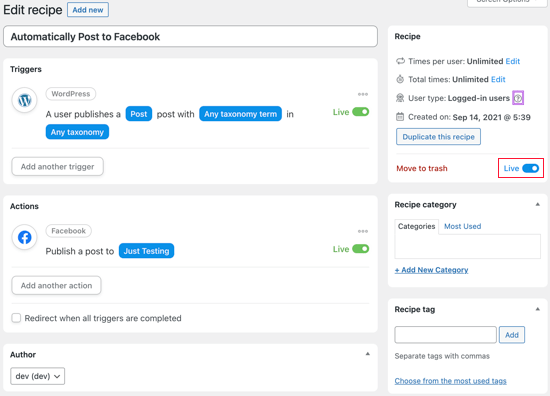
Una volta che la ricetta è live, Uncanny Automator pubblicherà un nuovo stato di Facebook ogni volta che pubblichi un post.
Abbiamo pubblicato un nuovo post sul blog sul nostro sito di prova, ed ecco come è apparso il post sulla nostra pagina Facebook.

Se la miniatura corretta non appare nello stato di Facebook, puoi consultare la nostra guida su come risolvere il problema della miniatura errata di Facebook in WordPress.
Tutorial video
Se sei più uno studente visivo, potresti voler dare un'occhiata al nostro tutorial su YouTube su come pubblicare automaticamente su Facebook da WordPress:
Bonus: Crea un feed Facebook personalizzato in WordPress
Oltre a pubblicare su Facebook da WordPress, puoi anche incorporare l'intero feed di Facebook sul tuo sito web. Ciò consentirà ai visitatori di visualizzare i tuoi post di Facebook senza dover lasciare il tuo sito e può migliorare l'esperienza utente.
Inoltre, può incoraggiare gli utenti a controllare la tua pagina Facebook e portare a più follower.
Per incorporare il tuo feed di Facebook, dovrai installare e attivare il plugin Smash Balloon Facebook Feed. Dopo l'attivazione, vai su Facebook Feed » All Feeds e fai clic su 'Add New'.

Questo ti porterà a un'altra schermata in cui devi selezionare 'Timeline' come tipo di feed e fare clic sul pulsante 'Avanti'.
Dovrai quindi collegare il tuo account Facebook con Smash Balloon. Per maggiori dettagli, puoi consultare il nostro tutorial su come incorporare un feed di gruppo Facebook in WordPress.

Una volta fatto, puoi personalizzare facilmente il tuo feed di Facebook nell'editor visivo di Smash Balloon. Qui puoi cambiare il colore di sfondo, selezionare un layout, aggiungere diversi pulsanti e molto altro.
Quindi, fai clic sul pulsante 'Salva' in alto per memorizzare le tue impostazioni.

Ora apri l'editor a blocchi e aggiungi il blocco 'Feed di Facebook' dal menu. Successivamente, seleziona il feed di Facebook che hai appena creato dal menu a discesa all'interno del blocco.
Infine, fai clic sul pulsante ‘Aggiorna’ o ‘Pubblica’ per salvare le tue impostazioni. Per ulteriori informazioni, consulta il nostro tutorial su come creare un feed Facebook personalizzato in WordPress.

Speriamo che questo tutorial ti abbia aiutato a imparare come pubblicare automaticamente su Facebook da WordPress. Potresti anche voler imparare come incorporare un video di Facebook in WordPress e vedere le nostre scelte esperte per i migliori plugin WordPress per Facebook per far crescere il tuo blog.
Se ti è piaciuto questo articolo, iscriviti al nostro Canale YouTube per tutorial video su WordPress. Puoi trovarci anche su Twitter e Facebook.

")

")
Jiří Vaněk
Questo mi farà risparmiare una notevole quantità di tempo con il numero di articoli. Pubblicavo manualmente gli articoli su Facebook dopo che erano stati pubblicati.
Supporto WPBeginner
Siamo lieti di aver potuto semplificare il processo per te
Amministratore
Terje Pettersen
Ciao. Voglio permettere a tutti i miei utenti di poter, in modo semplice, pubblicare automaticamente tutti i nuovi blog di WordPress sul proprio muro privato di Facebook. È possibile?
Supporto WPBeginner
Al momento non abbiamo un metodo che raccomandiamo, poiché non ci sarebbe un modo semplice per i tuoi utenti di disabilitare la condivisione automatica. Per ora, dovresti dare un'occhiata ai plugin per aggiungere un pulsante di condivisione ai tuoi post.
Amministratore
G
Grazie per aver condiviso. Questo è stato utile.
Supporto WPBeginner
Siamo lieti che la guida sia stata utile
Amministratore
Beth Younker
Grazie per le informazioni, tuttavia non menzioni che alcune di queste opzioni potrebbero avere un costo. Ad esempio, con WordPress non puoi più utilizzare i plug-in a meno che non passi a un account business. Trovo questo davvero frustrante, dato che prima potevo collegarmi facilmente alla mia pagina FB, ma ora non posso a meno che non paghi di più? Grazie mille.
Supporto WPBeginner
Per quanto riguarda il costo di WordPress, le nostre guide riguardano WordPress.org e non WordPress.com, il che potrebbe creare confusione. Puoi vedere la nostra guida qui sotto sulle differenze tra i due:
https://www.wpbeginner.com/beginners-guide/self-hosted-wordpress-org-vs-free-wordpress-com-infograph/
Amministratore
morgan kane
Qualcuno di questi metodi pubblica automaticamente sui GRUPPI di Facebook?
Supporto WPBeginner
Queste sono per le pagine di Facebook, al momento Facebook limita l'automazione per i suoi gruppi.
Amministratore
Eduardo Rivera
Ciao ragazzi, ottime informazioni come sempre! Dovreste davvero aggiornare la terza opzione, l'API Graph è stata deprecata e ora Facebook utilizza un altro metodo, molto intuitivo e autoesplicativo.
Supporto WPBeginner
Grazie per avercelo comunicato, esamineremo l'aggiornamento del nostro articolo non appena possibile.
Amministratore
ebenezer
Non riesco a trovare la nuova applet dal menu a discesa quando ho cliccato sul mio nome utente
Supporto WPBeginner
Potrebbero aver modificato la loro interfaccia da quando questo articolo è stato aggiornato l'ultima volta; dovresti comunque essere in grado di utilizzare la loro funzione di ricerca in cima alla pagina per trovare un'applet.
Amministratore
Darlington
Per favore, non riesco più a trovare il tuo gruppo Facebook. O è stato chiuso?
Supporto WPBeginner
Il nostro gruppo Facebook è ancora attivo. Se visiti la nostra pagina Facebook e vai alla scheda gruppi sul lato, dovresti essere in grado di vedere il gruppo lì
Amministratore
Amanda
Ho trovato il processo per Buffer molto più semplice di quanto descritto in questo post. Devi solo registrarti per Buffer e collegare i tuoi account di social media lì, quindi installare il plugin WP to Buffer, quindi premere il pulsante "Autorizza" nelle impostazioni del plugin. Tutto qui. Nessun token di accesso, nessun URL di callback, nessuna creazione di un'app. Tutto questo è automatizzato con il pulsante Autorizza ora, suppongo.
Supporto WPBeginner
Grazie per avercelo fatto sapere, è probabile che gli autori del plugin abbiano aggiornato il loro metodo di autorizzazione dall'ultimo aggiornamento di questo articolo
Amministratore
M kose
Voglio solo imparare, questo metodo pubblica automaticamente i nostri post di WordPress non appena li pubblichiamo?
Supporto WPBeginner
Sì
Amministratore
Anthony
Grazie mille per i consigli
Marius
Questo post è obsoleto dopo che FB ha rimosso la pubblicazione sulla timeline del profilo dalla sua API.
Supporto WPBeginner
Grazie per avercelo fatto sapere, ci assicureremo di dare un'occhiata a questo articolo
Amministratore
Daniel
Ciao,
Ho provato a usare IFTTT ma continuava a dirmi URL di WordPress non valido. dopo numerosi controlli incrociati ho potuto vedere che l'URL è corretto.
Per favore, cosa posso fare al riguardo?
Supporto WPBeginner
Ciao Daniel,
Assicurati che XML-RPC sia abilitato sul tuo sito web. È una funzionalità di WordPress che consente a servizi di terze parti come IFTTT di connettersi. Alcuni plugin di sicurezza di WordPress potrebbero disabilitarlo. Controlla le impostazioni del tuo plugin di sicurezza.
Amministratore
Charlie
Posso usare il metodo IFTTT per collegare WordPress a più di una delle mie pagine Facebook??
Supporto WPBeginner
Ciao Charlie,
Sì, puoi farlo.
Amministratore
Mariano
Come posso includere gli aggiornamenti dei post su ifttt? Perché quando c'è un nuovo post la notifica viene inviata normalmente. Ma quando c'è un aggiornamento di un post non invia nulla.
waynedpj
sto anche cercando un modo per aggiornare il post di Facebook corrispondente quando viene apportata una modifica al post originale su WordPress. Sfortunatamente la maggior parte delle opzioni sembra consentire solo nuovi post come trigger. Hai mai trovato una soluzione?
grazie.
Kylie
Quando seguo i passaggi per AccessPress Facebook Autopost (che ho usato con successo in precedenza), e clicco sulla casella 'Pubblica' per rendere pubblica la revisione, ora ricevo una finestra di dialogo che chiede un URL della Privacy Policy. Ho trovato solo siti per lo sviluppo di URL della privacy policy che costano. C'è qualcosa di generale che si può aggiungere gratuitamente?
Stefan
Ora c'è un'opzione in Wordpress per "Privacy policy". Puoi trovarla nel pannello di amministrazione nel sottomenu "Impostazioni" e poi "Privacy".
Joe
Sono riuscito a usare IFTTT per condividere il mio post su Facebook. Ma il nuovo problema con questo è che Facebook mostra la descrizione del sito web, invece della descrizione del post.
Facebook ha anche utilizzato un'altra immagine di anteprima, invece dell'immagine che ho usato per il post. Come posso risolvere questo problema??
Francois
Questo non ha funzionato. Quando clicco su autorizza, ricevo questo errore qui sotto, anche dopo aver aggiunto il mio dominio e la mia pagina dove faccio i miei post al Dominio dell'app.
Impossibile caricare l'URL: Il dominio di questo URL non è incluso nei domini dell'app. Per poter caricare questo URL, aggiungi tutti i domini e sottodomini della tua app al campo Domini dell'app nelle impostazioni della tua app.
Samuel
C'è un modo per cui quando qualcuno commenta il nostro post che condividiamo su facebook, questo venga visualizzato sul nostro sito.
So che possiamo avere un plugin di commenti di Facebook che consente agli utenti di commentare i post usando il loro account Facebook.
Quello che non so è, se condividiamo il nostro post su Facebook e qualcuno commenta quel post su Facebook, come possiamo visualizzare quel commento sul nostro sito
Nikhil
Ciao. c'è qualche plugin che carica automaticamente i post su diverse pagine FB in base a diverse categorie. ad esempio: se un particolare post è della categoria tech, dovrebbe essere condiviso sulla pagina FB tech e se la sua categoria è salute, quel post dovrebbe essere condiviso sulla pagina FB corrispondente.
Sue
Ho seguito la configurazione e ho pubblicato il mio blog, ma non viene visualizzato su f.b. Mi chiedo cosa ho sbagliato, o c'è un ritardo nella pubblicazione. Ho pubblicato circa 10 minuti fa. Grazie!
Ed
Se è il tuo primissimo post utilizzando IFTTT, ci vorrà FINO a un'ora. Questo è indicato in piccolo sull'applet.
teslim
sto cercando di usare il metodo dell'app di Facebook ma trovo difficile autorizzare il mio account, Facebook dice (Impossibile caricare URL: Il dominio di questo URL non è incluso nei domini dell'app. Per poter caricare questo URL, aggiungi tutti i domini e sottodomini della tua app al campo Domini dell'app nelle impostazioni della tua app.). per favore aiutami al più presto grazie..
Daniel
Come si cambia il post su Facebook che dice...
“John Doe ha pubblicato un articolo su WordPress”
in modo che 'WordPress' dica qualcos'altro, come l'URL o il nome del tuo sito?
Karen
Ciao. Ho seguito le istruzioni alla lettera usando il metodo del plugin Wordpress e non vedo assolutamente nessun post sulla mia pagina FB. Ho persino aggiornato un post (pensando che eventuali post precedenti potrebbero non apparire), e anche quello non ha funzionato. Sono andato nella mia timeline e nelle aree feed della mia pagina FB e non vedo nulla.
Per favore, assistimi o non avrò altra scelta che disattivare questo plug-in e ricominciare da capo.
Grazie.
isah
ehi bel articolo l'ho appena provato ora sul mio sito usando il metodo IFTTT e funziona a meraviglia. grazie per il consiglio
naresh
Grazie mille per aver creato un post così utile.
JM Koh
Grazie per il tutorial. Qualcuno conosce un modo per pubblicare sia sul profilo FB che sulla pagina FB (che è collegata a 1 account FB come richiesto da FB)? Ho notato che il metodo IFTTT richiede di scegliere di pubblicare o sul profilo o sulla pagina, che è lo stesso di Jetpack. Grazie!
Miso
Ciao,
ora c'è un errore nel plugin e l'account non può essere autorizzato.
Qualcuno mi ha detto che dare le credenziali di amministratore al sito web non è una buona idea,
quindi l'utente che pubblica il sito web non può essere amministratore.
Sandra K
Qualcuno di questi metodi funziona per i Gruppi Facebook? Sono l'amministratore di un Gruppo Facebook Chiuso e voglio automatizzare la pubblicazione di notizie ed eventi sul nostro sito web sul nostro Gruppo Facebook. È fattibile?
Lori
Quindi qual è il MIGLIORE da scegliere?
Supporto WPBeginner
IFTTT è il più facile e veloce.
Amministratore
Marc
Tuttavia, IFTTT pubblica un link, non il testo completo del post inclusa l'immagine, giusto?
Supporto WPBeginner
Sì, Facebook fa il resto e recupera automaticamente una miniatura, il titolo del post e una breve descrizione del tuo post. Gli utenti dovranno comunque visitare il tuo sito web per leggere l'articolo completo.
iostar
Ciao! Sto usando Zapier per pubblicare automaticamente su Facebook e altri social media basati sulla tecnologia RSS.
Spero sia d'aiuto.
Claudio
Quando provo a inserire le informazioni del mio WordPress ospitato, mi viene richiesto di abilitare XML-RPC nelle "Impostazioni/Scrittura" del mio WordPress, ma non vedo una casella di controllo per questo.
Tâm Hoàng
Grazie
Sufyan
grazie mille per questo meraviglioso tutorial
Pankaj Dhawan
La gente parla di usare Buffer sempre di più ed è molto famoso. Non ho mai usato una tecnica simile perché non ho abbastanza tempo, quindi suppongo che IFTTT per qualcuno come me sarebbe l'ideale.
Non ne ero a conoscenza prima, quindi grazie per aver condiviso queste informazioni utili.