


You just signed up for a new affiliate program. Somewhere in your archive are dozens of old posts that mention that product, and not one of them has your link on it.
The good news is that you can automatically turn specific keywords into affiliate links across your WordPress site. This saves time, keeps your links consistent, and helps you monetize older content without editing every post.
In this guide, we’ll show you how to set up automatic affiliate links in WordPress using free and premium plugins. We’ll also share best practices to stay compliant with Google’s guidelines and the Amazon Associates Program.
How Do Automatic Affiliate Links Work in WordPress?
Automatic affiliate link plugins let you create rules that turn specific keywords or phrases into affiliate links. These can be anything from brand and product names to broader terms related to the products you’re promoting.
The plugin adds these links dynamically when visitors view your pages, rather than inserting them permanently into your posts. This means your original content remains unchanged, and if you deactivate the plugin, the automatic links disappear without requiring any cleanup.
For example, you could create a rule that links the keyword WPForms to your WPForms affiliate URL. You could also create another rule for a broader phrase, such as WordPress form plugin, and assign it a different affiliate URL. Whenever those terms appear in your content, the plugin can automatically add the appropriate links based on the rules you set.
Let’s take a look at how to easily set up an automatic affiliate link solution on your WordPress site. We’ll cover two methods, and you can use the quick links below to jump to the one you want to use.
Method 1: Automatically Link Keywords With Affiliate Links for Free
If you want to automatically add affiliate links without paying for a premium plugin, then Auto Affiliate Links is a great place to start. It includes all the core features you need to automatically link keywords across your website.
First, install and activate the Auto Affiliate Links plugin. For detailed instructions, see our beginner’s guide on how to install a WordPress plugin.
Upon activation, go to the Auto Affiliate Links » General Settings page. We recommend changing just a few settings before you start adding affiliate links.
Set the ‘Same keyword limit’ to 1 to link each keyword only once per post.
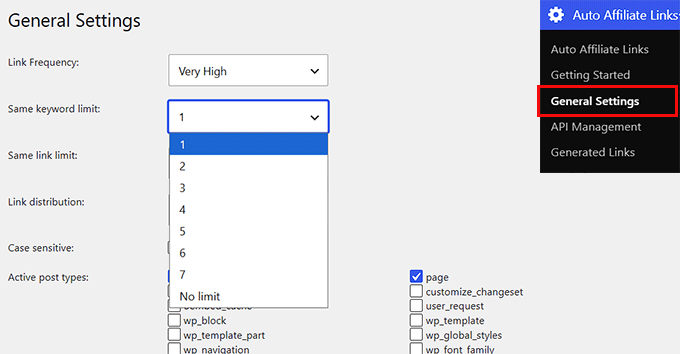
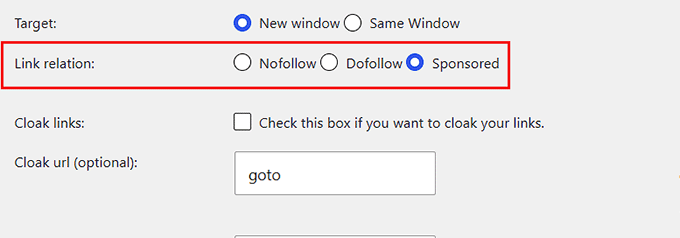
Then, choose ‘Sponsored’ under ‘Link relation’ to automatically add the rel="sponsored" attribute to your affiliate links.
If you promote Amazon products, then make sure ‘Cloak links’ is disabled. This keeps your affiliate links visible and helps you comply with the Amazon Associates Program.
You can leave the remaining settings at their default values. After that, click ‘Save Changes’ to store your settings.
Next, head over to the Auto Affiliate Links page from your WordPress dashboard and enter your affiliate URL into the ‘Affiliate Link’ field.
Then, add the keywords that should automatically link to that URL. You can separate multiple keywords with commas.
For example, if you have a travel blog and want to promote travel insurance, then you could use keywords like travel insurance, best travel insurance, and trip insurance.
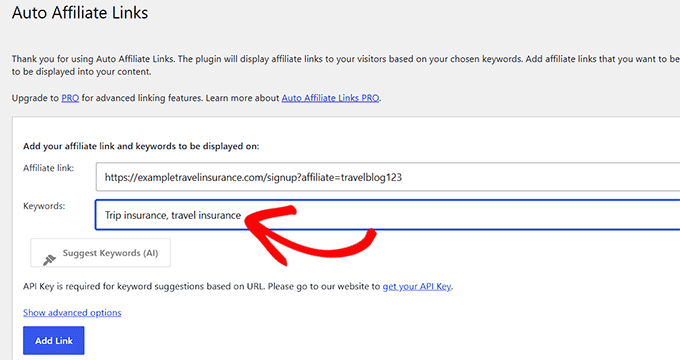
Go ahead and click the ‘Add Link’ button.
Once you save your changes, the plugin automatically converts those keywords into affiliate links wherever they appear on your website.

Method 2: Automatically Link Keywords Using ThirstyAffiliates Pro
If your website has dozens or even hundreds of affiliate links to manage, then we recommend ThirstyAffiliates Pro (Basic plan starts at $99.60/yr).
Along with automatic keyword linking, it gives you one place to organize, track, and report on all of your affiliate links. That makes it a great choice for growing affiliate websites.
At WPBeginner, we use ThirstyAffiliates to manage affiliate links on our site.
First, install and activate both the core free ThirstyAffiliates plugin and the Pro addon. Take a look at our beginner’s guide on how to install a WordPress plugin if you need help.
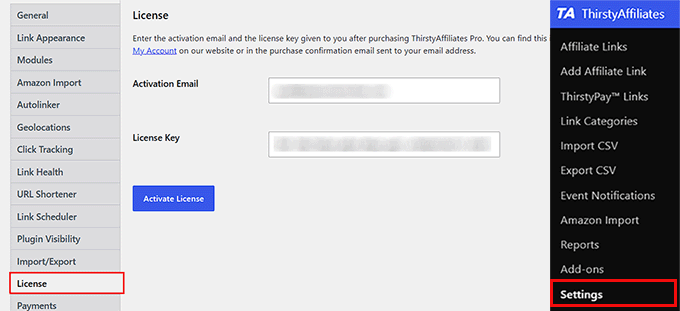
Once you’ve activated both plugins, go to ThirstyAffiliates » Settings » License, enter your activation email and license key, and click ‘Activate License Key.’
You can find this information in your ThirstyAffiliates account.
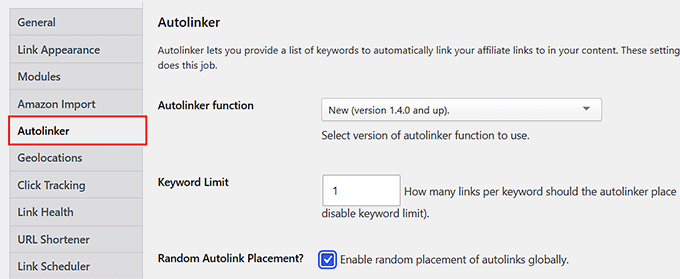
Next, switch to the ‘Autolinker’ tab and set the ‘Keyword Limit’ to 1 so each keyword is linked only once per post. This creates a better reading experience and prevents your content from becoming overloaded with affiliate links.
If you want to automatically add affiliate links inside headings, RSS feeds, or additional post types, then you can also enable those options here.
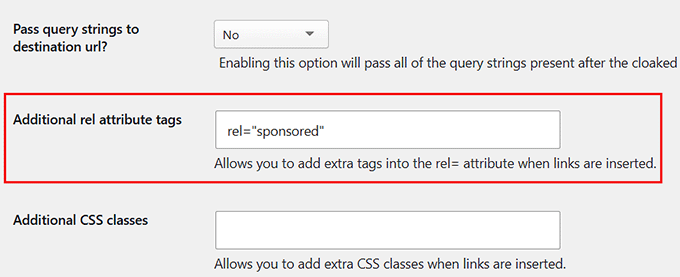
Finally, switch to the ‘Link Appearance’ tab and add sponsored to the ‘Additional rel attribute tags’ field.
This automatically adds the rel="sponsored" attribute to your affiliate links.
Once you’re finished, click ‘Save Changes.’
Now, go to ThirstyAffiliates » Add Affiliate Link. Enter a name for your affiliate link, then paste your referral URL into the ‘Destination URL’ field.
If you’re new to the plugin, then you can also see our complete guide on how to add affiliate links in WordPress using ThirstyAffiliates.
Next, scroll down to the ‘Autolink Keywords’ section and enter the keywords or phrases that should automatically link to your affiliate URL. Separate multiple keywords with commas.
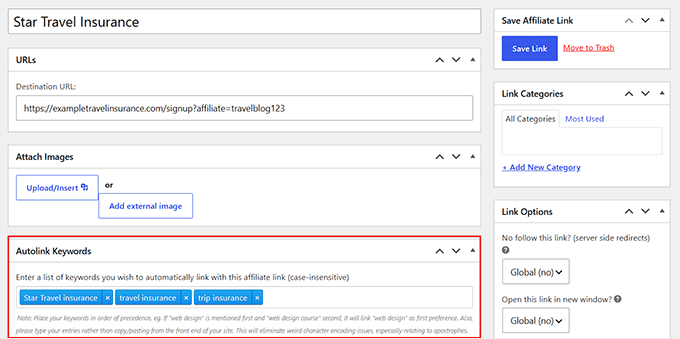
When you’re finished, click ‘Save Link.’
ThirstyAffiliates will now automatically convert those keywords into affiliate links wherever they appear across your WordPress website.
Alternative: If you’re already using Pretty Links (Marketer plan or higher), then you can also automatically link keywords using its keyword auto-linking feature. The setup process is similar, so there’s no need to install another plugin just for auto-linking.
How to Keep Auto-Linking Safe
Following these best practices will help you create a better experience for your readers while staying compliant with your affiliate program requirements.
1. Limit Each Keyword to One Link Per Post
It’s tempting to link every mention of a product or brand, but this can make your content look spammy and distract readers.
Instead, we recommend limiting auto-linking to one affiliate link per keyword per post. This keeps your content easier to read while still giving readers a clear opportunity to click your affiliate links.
2. Promoting Amazon Products? Disable Link Cloaking Before You Auto-Link
If you promote products through the Amazon Associates program, then you should leave link cloaking disabled.
Amazon’s Operating Agreement requires affiliate links to clearly show that they lead to Amazon. Cloaking those links can violate the program’s policies and may put your Associates account at risk.
Go to ThirstyAffiliates » Settings » Modules and enable the ‘Uncloak Links’ module. Once the module is enabled, you will see a new ‘Uncloak link’ checkbox when creating or editing individual affiliate links.
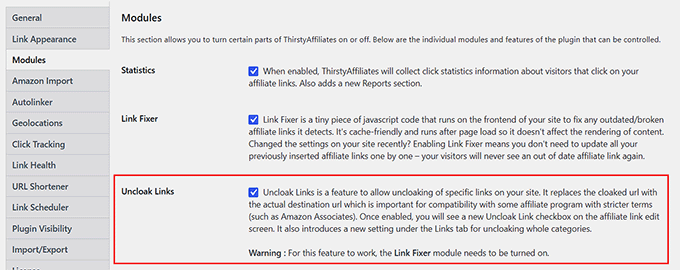
Alternatively, you can put your Amazon links in their own category. Then go to ThirstyAffiliates » Settings » Link Appearance and choose that category under ‘Set Category to Uncloak.’ Every link in it is uncloaked automatically, and new ones inherit the setting.
3. Should You Auto-Link All Affiliate Links?
No. Automatic keyword linking works best for informational content, where you naturally mention products or brands throughout the article.
For product reviews, comparison posts, and “best of” roundups, we recommend adding affiliate links manually. This lets you place links where readers are most likely to click after you’ve explained why you recommend the product.
Troubleshooting Automatic Affiliate Links
If automatic affiliate links aren’t working as expected, then these are the most common issues and how to fix them.
1. My Auto Links Are Not Showing Up
If your affiliate links aren’t appearing, then clear your WordPress cache and your browser cache before testing again. Cached pages may still show an older version of your content without the new links.
If you’re using a caching plugin or CDN, then purge its cache as well.
2. Keywords Inside My Headings Are Getting Linked
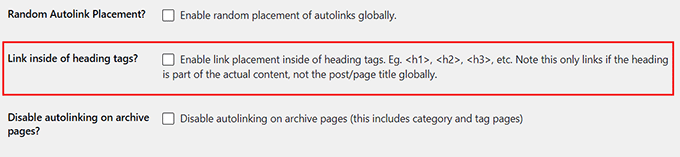
If your plugin is adding affiliate links inside headings, then you may need to adjust its auto-linking settings. The free Auto Affiliate Links plugin doesn’t include a setting to prevent affiliate links from being added inside heading tags.
If you’re using ThirstyAffiliates Pro, then you can disable this behavior by turning off the ‘Link inside of heading tags’ option in the plugin’s auto-linking settings.
3. My Manually Added Links Broke
Automatic keyword linking plugins shouldn’t modify affiliate links you’ve already added manually. If your manual links stop working after enabling auto-linking, then temporarily disable the plugin to confirm it’s the cause.
In our testing, both Auto Affiliate Links and ThirstyAffiliates Pro left manually added affiliate links unchanged and only auto-linked unlinked keyword occurrences.
If your experience is different, then update the plugin to the latest version and review its settings. If the problem persists, then another plugin or custom code is likely interfering with your affiliate links.
We hope this article helped you learn how to automatically link keywords with affiliate links in WordPress. You may also want to see our complete affiliate marketing guide and best affiliate marketing plugins for WordPress.
If you liked this article, then please subscribe to our YouTube Channel for WordPress video tutorials. You can also find us on Twitter and Facebook.




joseph mulwa
the article is more educative and much interractive
WPBeginner Support
Glad you like our article
Admin
susan
thank you for the post
Shamsher khan
how to add affiliate link to specific page/product using thrust affiliate
Fulfil En
Great article. I’m glad I did a complete read.
Thanks for sharing.