Do you want to create your own customized short URL for your blog?
Customized short URLs are often branded short URLs that are easy to remember and share. For example, we use wpbeg.in for our branded custom short URLs.
In this article, we will show you how to easily create your own customized short URLs for your blog.

Why Use a Branded Customized Short URL in WordPress?
You may have noticed how popular websites like The New York Times, Twitter, Facebook, and TechCrunch use branded short URLs on social media.
For instance, The New York Times uses nyti.ms, TechCrunch uses tcrn.ch, and WPBeginner uses the wpbeg.in domain name for shorter customized URLs.
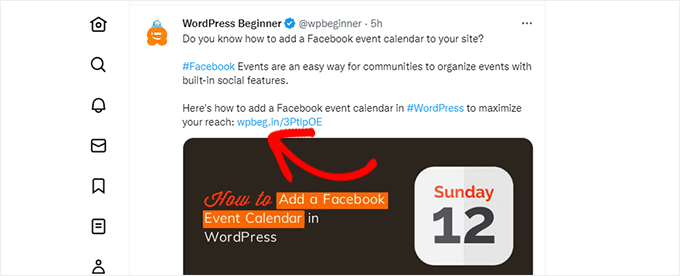
These branded domain names are called domain hacks.
They are created by combining the brand name and a domain TLD (top-level domain) to cleverly spell a brand name.
Since most websites use .com as their primary domain, picking a domain hack is a good way to create a short URL for your WordPress site. See our tips on picking the best domain name for your blog.
Using your own customized short URL improves brand recognition among your users. It also allows you to create shorter URLs for easy sharing on social platforms.
Most importantly, you can easily track these URLs to see how many clicks you got when you shared a URL.
Having said that, let’s see how to create your own branded customized short URLs in WordPress.
Note: If you are just looking to create memorable short URLs using your main domain, then we recommend using the Pretty Links plugin. This is what top podcasters and YouTubers use to feature short links in their videos and podcasts.
Step 1: Buy a Short URL or Short Domain Name
Most of us do not use a short URL as our primary domain name. This means you will need to register a new domain name that is much shorter than your current domain.
For example, when choosing a branded shorter domain for WPBeginner.com, we registered WPBeg.in. This made our short URL 6 characters shorter than our primary domain.
There are many free domain name generators that allow you to automatically generate domain name suggestions. See our list of the best free domain name generators.
In particular, Domainr specializes in helping you find short domains using domain hacks.
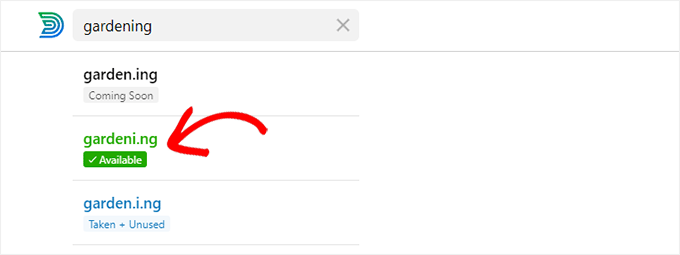
Just try different combinations and explore creative ways to spell your brand name.
Once you have found a domain name that meets your needs and is available, you can register it on any of the top domain registrars.
We recommend using Domain.com. They are the best domain registrar on the market, and you can get a 25% discount using our Domain.com coupon code.

Other domain registrars that we recommend include Network Solutions and GoDaddy.
The cost of domain name registration depends on which TLD you select. Country-specific TLDs cost a little more than some other new TLDs.
Once you have registered your domain name, you will be able to manage it from your domain registrar’s control panel.
Step 2: Set Up Your Custom Domain in Bitly
Bitly is a popular URL shortener service that allows you to manage and track links. We use it to shorten our WordPress URLs and manage them.
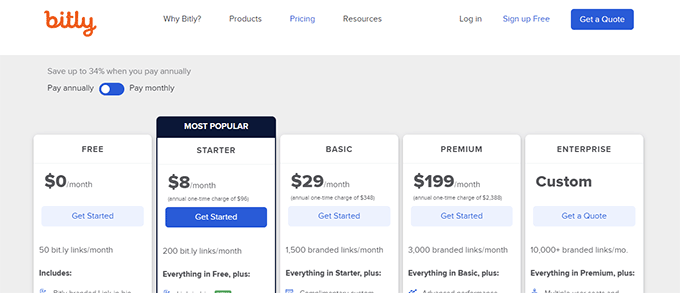
First, you will need to create a Bitly account. You will need at least a Basic plan to use your own custom domain name for link shortening.
After completing the signup, you will reach your Bitly account dashboard.
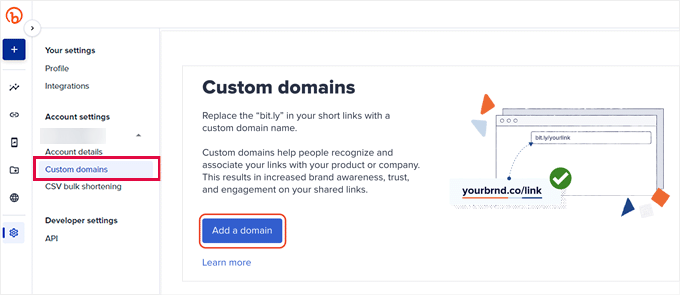
From here, you need to click on the Account settings » Custom domains menu and then click on the ‘Add a domain’ button.
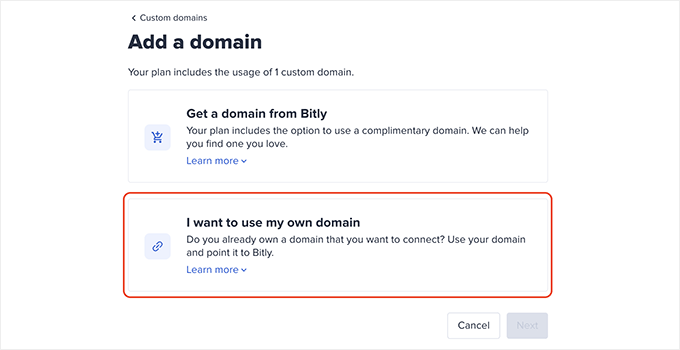
On the next screen, you will see options to buy a new domain name or use your own domain name.
Go ahead and click on the ‘I want to use my own domain name’ option to continue.
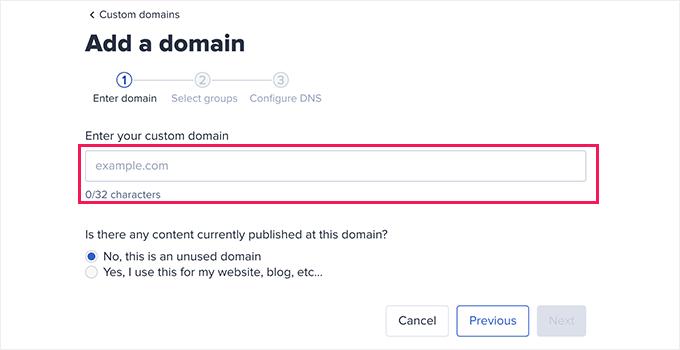
Next, enter the domain name you recently purchased.
Below that, you need to select the ‘No, this is an unused domain name’ option and click ‘Next’.
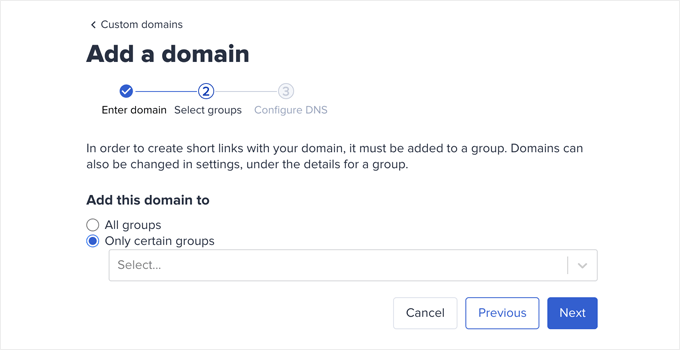
Now, you will see the option to choose a group.
Bitly allows you to organize your links, domains, and users into groups. This lets you limit certain domains to specific users.
Choose ‘All groups’ to make your custom domain available for all groups and click ‘Next’.
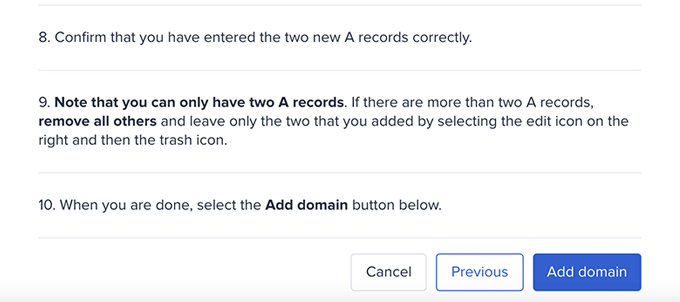
Now, you will be asked to add DNS records to your branded domain name before continuing.
You can leave this window open and proceed to the next step.
Step 3: Set DNS A Record to Point to Bit.ly
In order to create your own branded custom short URLs, you will need to point your domain to Bitly servers.
To do that, you will need to add DNS records to your custom domain name. DNS records instructions that point domain names to proper servers.
You can find the DNS records that you need to add on the Bitly website.

There are two types of DNS records that you can add.
For root domain names (e.g. wpbeg.in), you will need to enter A records.
However, if your custom domain is a subdomain (e.g. on.wsj.com), then you will need to enter the CNAME records.
To add these records, simply visit the domain management area on your domain registrar’s website and look for DNS records.
If you took our advice and registered your domain with Domain.com, then you will find the ‘DNS & Nameservers’ settings in the left column.
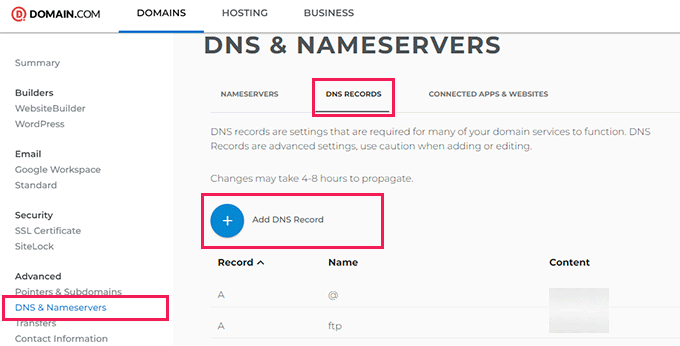
Switch to the DNS Records tab and then click on the ‘Add DNS Record’ button.
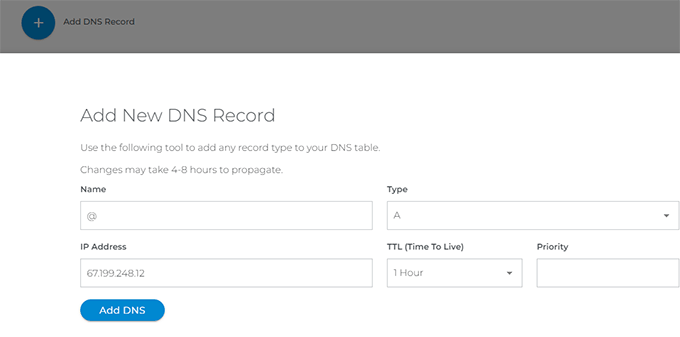
This will bring up a popup, where you need to enter the following information:
- Hostname in the Name field
- Choose A as the Type
- Copy and paste the Bitly IP address
- Choose 1 hour as the TTL
Then, go ahead and click on the ‘Add DNS’ button to save your settings.
If you are using a subdomain, like on.wsj.com, then you will need to set a CNAME record and point it to cname.bitly.com.
Simply repeat the above steps to create a new DNS record.
This time, add your subdomain under the name, choose CNAME as the record type, and add cname.bitly.com under Content or Value.
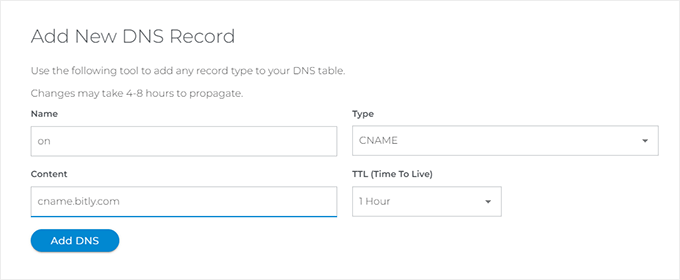
Then, click on the ‘Add DNS’ button to update your DNS records.
After adding DNS records, you can switch back to the Bitly website and click on the ‘Add domain’ button.

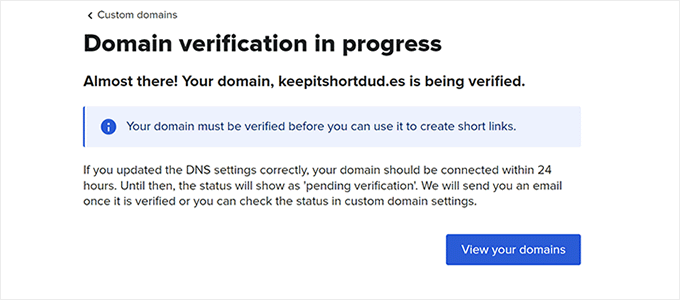
Now, you will see a notification that your domain settings are being verified.
Bitly will check your domain for DNS records and if everything looks ok, then you will receive an email notification.
Step 4. Create a Bitly App to Integrate With WordPress
Next, you need to create a Bitly app.
Don’t worry. You don’t need to write any code. Instead, you will need to create the App to generate API keys, which you will then need in the next step.
Log in to your Bitly account and go to the Settings » API section.
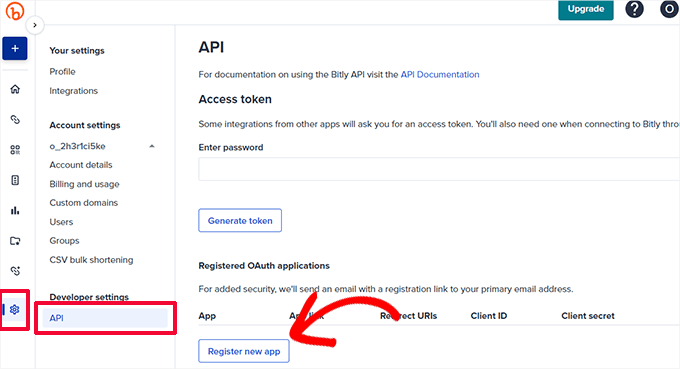
Click on the ‘Register new app’ button to continue.
This will open up a form where you need to provide the app name, link, and redirect URIs.
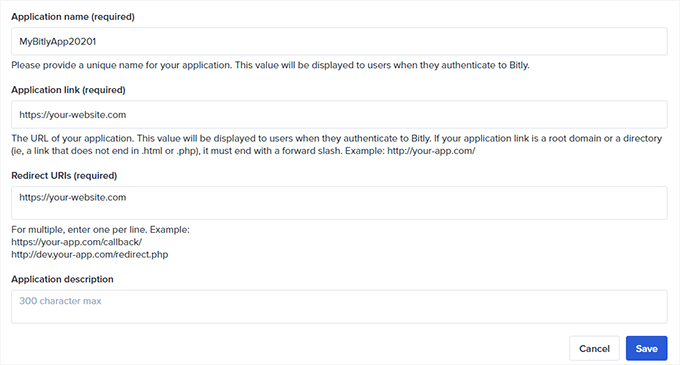
You can make a unique name for the app, and add your website URL as the ‘Application link’ and ‘Redirect URIs’.
Next, click on the ‘Save’ button to continue.
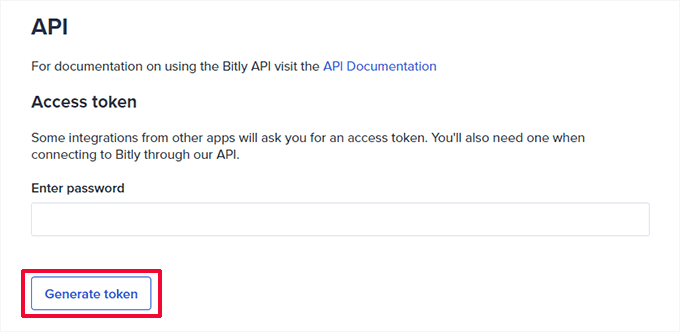
This will bring you back to the API page, where you need to enter your Bitly account password and then click on the ‘Generate token’ button.
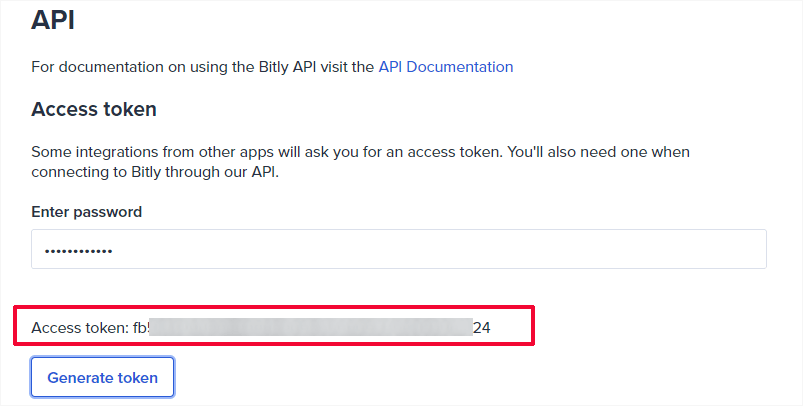
Bitly will then create an access token for you.
You need to copy the access token and paste it into a text editor, as you will need it in the next step.
Step 5: Set Up a Short URL on Your WordPress Site
The best thing about using Bitly is that you can easily manage, share, and track your short URLs directly from your WordPress site.
First, you need to install and activate the Bitly URL Shortener plugin. For more details, see our step-by-step guide on how to install a WordPress plugin.
Upon activation, you need to visit the Tools » Codehaveli Bitly page to configure the plugin settings.
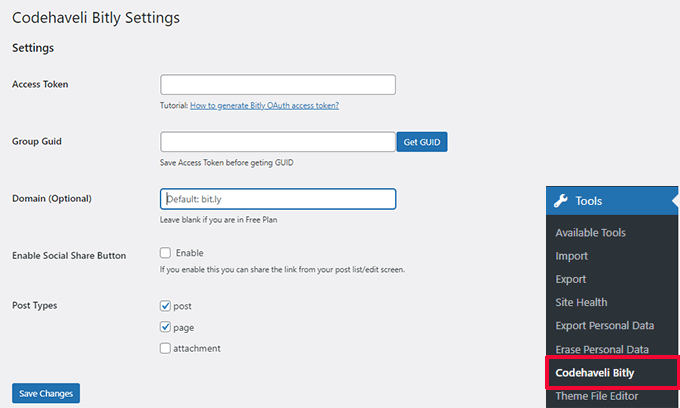
Enter the access token you copied earlier and then click on the ‘Save Changes’ button.
This will allow the plugin to authenticate your account with Bitly.
Next, you need to click on the ‘Get GUID’ button. The plugin will then fetch the Group GUID from your Bitly account.
After that, you can enter your short domain into the Domain field. Optionally, you can also turn on the social sharing feature.
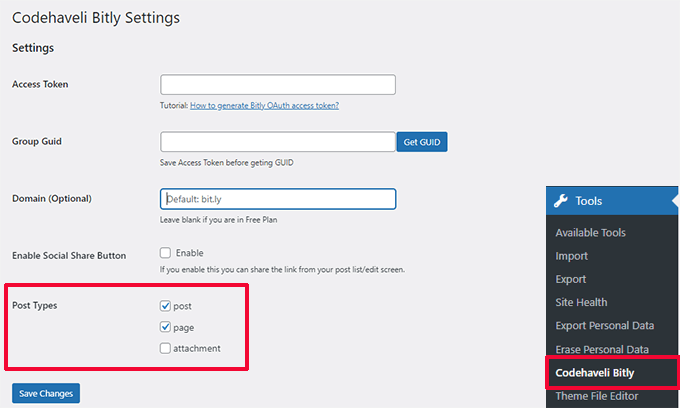
Finally, choose which post types you want to enable. If you are unsure, then check both the post and page options.
Don’t forget to click on the ‘Save Changes’ button to store your settings.
Once connected, you can choose which post types you want to generate shortlinks for.
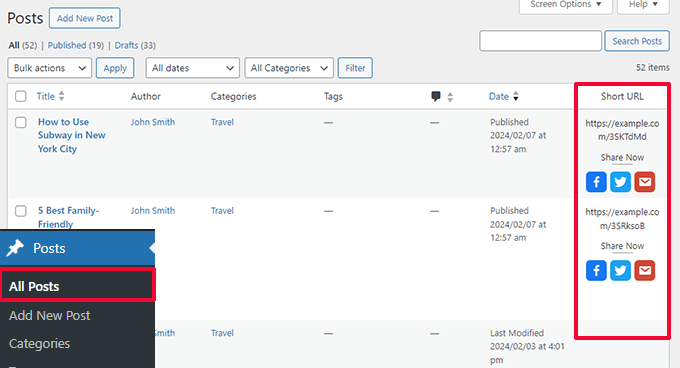
To generate a shortlink you can go to the Posts » All Posts page.
There, you will see the shortlinks for your published posts with share buttons (if you enabled the sharing option).
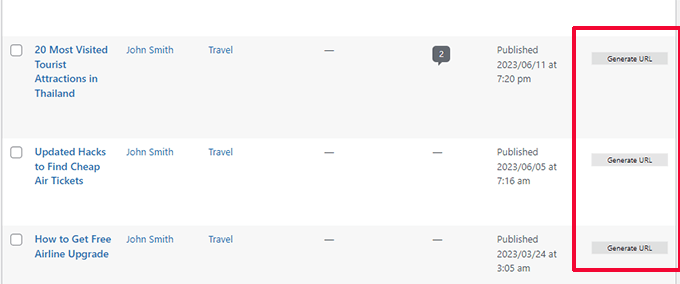
To preserve API requests, the plugin won’t automatically generate shortened links for all published posts.
You can click on the ‘Generate URL’ button next to a post to create a shortened URL when needed.
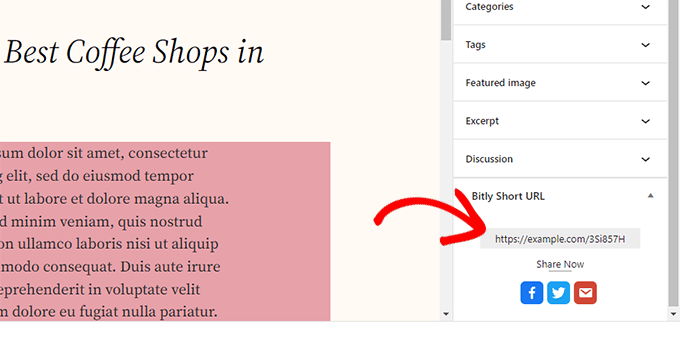
Optionally, you can also view, generate, and copy the shortened URL for a post by editing it.
The Bitly panel will be at the bottom of the Post panel in the editor.
The plugin does not have any link-tracking features.
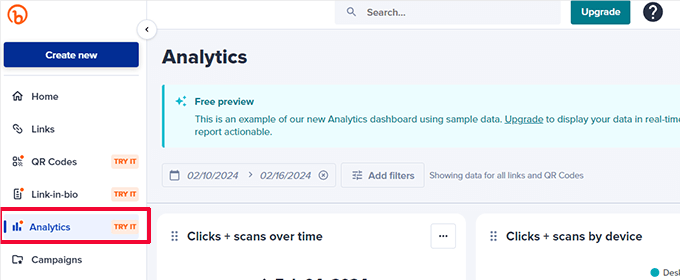
However, if you are on a paid Bitly plan, then you can view link reports in your dashboard by going to Analytics.
We hope this article helped you learn how to create your own customized short URLs in WordPress. You may also want to see our complete WordPress conversion tracking guide or our pick of the best social media plugins for WordPress.
If you liked this article, then please subscribe to our YouTube Channel for WordPress video tutorials. You can also find us on Twitter and Facebook.


Syed Balkhi says
Hey WPBeginner readers,
Did you know you can win exciting prizes by commenting on WPBeginner?
Every month, our top blog commenters will win HUGE rewards, including premium WordPress plugin licenses and cash prizes.
You can get more details about the contest from here.
Start sharing your thoughts below to stand a chance to win!
Jiří Vaněk says
Since the domain price is currently very low, this article really excited me. I’m a bit disappointed that the free plan doesn’t offer the option to use a custom domain, but I still really like the idea of a shortened or otherwise unique domain for my website. Thank you for the perfect guide. I already have one domain prepared externally, so I will at least try it for one month and see if this method will be successful for me.
Dennis Muthomi says
I always see big platforms like Twitter (or X as it’s now called) use “t.co” for their short URLs.
I’ll definitely give this Bitly method a try once my blogs gain more traction.
having a branded short URL seems like a great way to boost recognition and make sharing links easier, especially on social media.
Thanks for breaking it down in such an easy-to-follow guide!
Mrteesurez says
Nice post, it’s in-depth.
I have been noticing those short links on social media even twitter used t .co, telegram, t .me and WhatsApp wa .me.
It’s really a benefit to track all social traffics that come from those link.
I will like to try it out.
Thanks for this guide.
WPBeginner Support says
Glad you found our post helpful
Admin
Moinuddin Waheed says
For sharing blog posts or articles on different platforms it is very convenient when we have short url for that particular posts.
I have used other methods for shortening the url but was not aware that there exists a plugin which does the job inside wordpress dashboard itself.
Since bit.ly plugin has been discontinued, will it still work the same way as it used to be?
WPBeginner Support says
The plugin is currently under temporary review, we will be sure to keep an eye on it and look for a replacement should it not be fixed
Admin
Rick says
Unfortunately, WP Bit.ly plugin has been discontinued. And as the v3 API from bit.ly will be discontinued March 1, the plug-in will stop functioning at that date.
I have not yet found a replacement plug-in. Any recommendations are highly appreciated.
WPBeginner Support says
While we do not have a recommended alternative at the moment, we will certainly keep an eye out for one.
Admin
Paul says
Thanks for the information, an extra one to add to you list is AI6 I am using this and so far so good
WPBeginner Support says
Thank you for your recommendation of another option
Admin
Lorenzo says
Very interesting information. Another service for short links is shortpe. This can be useful.
WPBeginner Support says
Thanks for letting us know about this service
Admin
Muhammad says
i want create my website please help me to do this
WPBeginner Support says
Hi Muhammad,
Please see our guide on how to make a website for detailed step by step instructions.
Admin
Imamadyan says
Is it possible to use the domain for url shorting alongside by using it for WordPress site?
Louise Findlay says
If you have a domain that you use for a website can you use that for your short url? If so, how?
Geeta says
One problem. You can not customize your short url in WordPress.
You get some random characters after /
You are able to change it on bit.ly web app but it is a little bit uncomfortable
Fernando says
Awesome article!!!, I didn’t know I can do that
Irfan Tahir says
Great Article and trick bro.
Philip Verghese Ariel says
Hi All Team Members @ WPB,
This is indeed an amazing info.
Though I use Bit.ly since many years I never knew about this plugin which can be embedded in my wp site.
The step #4, is very well explained to set up Short URL on our WordPress Sites.
Thanks a lot for this wonderful guide.
Have a good day.
Best.
~ Philip
@PVAriel
Ashok says
Good Article
We can also use goo.gl shortcut generation tool for long url
WPBeginner Support says
Yes, you can.
Admin
WP Fan says
One problem. You can not customize your short url in WordPress.
You get some random characters after /
You are able to change it on bit.ly web app but it is a little bit uncomfortable
Abhisek says
No love for yourls ?
Ninja Team says
I thought we could do this without spending much extra cost.
Editorial Staff says
Your bitly account is free. Your domain name is the only cost that you have.
Admin
Chris says
I prefer yourls hosted at my own domain, and an URL like mysite.com/recommends/xyz sounds far better for me instead of such a “foreign” domain.