Over the years, many users have reached out to us and our partner companies to ask how they can create a buzz on social media.
The simple answer is: make it easy for people to share your content!
Pinterest is a fantastic platform to drive traffic to your WordPress site, especially if you publish visual content such as photographs, infographics, and digital artwork.
By adding a ‘Pin It’ button to your site, visitors can share your media to their Pinterest boards with a single click. This can get you more visitors, followers, comments, and conversions, with very little effort.
In this article, we will show you how to add the Pinterest ‘Pin It’ button to WordPress.
Why Add Pinterest “Pin It” Button in WordPress?
Pinterest is a popular social media website that allows users to collect website links and other visual content by creating boards.
When users add your content to their Pinterest board, it helps other people discover your website. Pinterest is a particularly important source of traffic if you are running a photography website, fashion blog, or any other type of blog that has lots of images and videos.
By adding a ‘Pin It’ button to your website, you can encourage visitors to share your content on Pinterest.
Note: Pinterest officially changed the ‘Pin It’ button name to ‘Save’ in 2016. However, many guides and WordPress plugins still use ‘Pin It,’ which is why we are using the original name in this guide.
With that being said, let’s see how you can add a Pinterest ‘Pin It’ button in WordPress. Simply use the quick links below to jump straight to the method you want to use:
Method 1: Using Shared Counts (Quick and Easy)
The easiest way to add a Pinterest button to your WordPress site is by using Shared Counts.
It is one of the best social media plugins for WordPress that allows you to easily add a Pinterest button to your site, along with buttons for all the other major social networks.
To get started, you need to install and activate the Shared Counts plugin. You can follow our step-by-step guide on how to install a WordPress plugin for detailed instructions.
Upon installation, you need to head over to Settings » Shared Counts to configure the plugin.
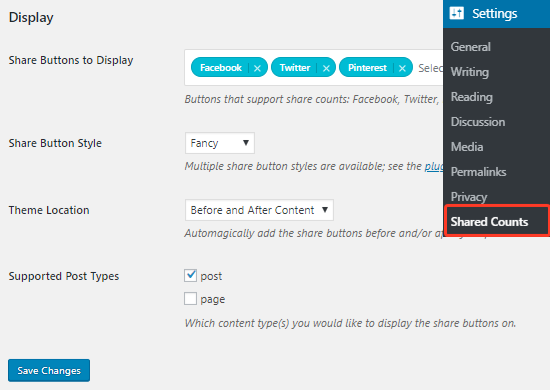
Here, scroll to the Display section and then click on the ‘Share Buttons to Display’ textbox.
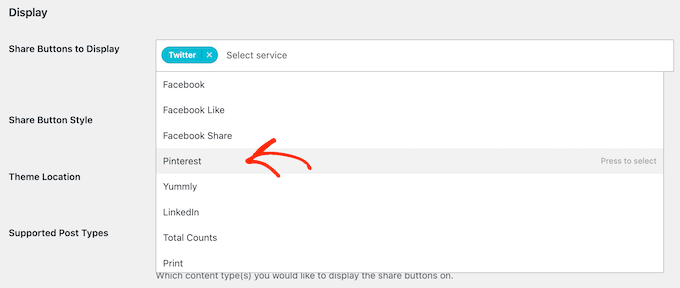
This will open a dropdown menu where you can select the social media services you want to add. For example, you can use Shared Counts to add a Facebook like button, add a Twitter share and retweet button, and more.
To create a ‘Pin It’ button, go ahead and select ‘Pinterest’ from the dropdown.
After that, you can open the ‘Share Button Style’ dropdown and choose a style for the Pinterest button.
You can also select the location and post type where you want to show the Pinterest button.
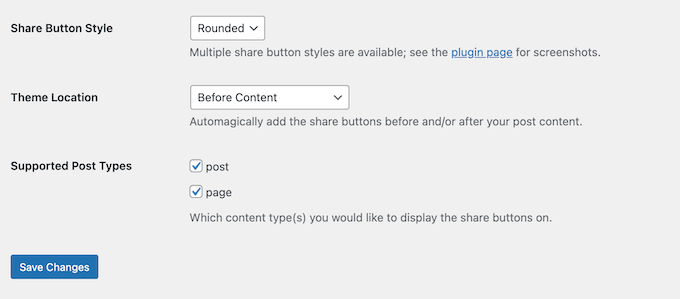
When you are happy with how the button is set up, just click on the ‘Save Changes’ button.
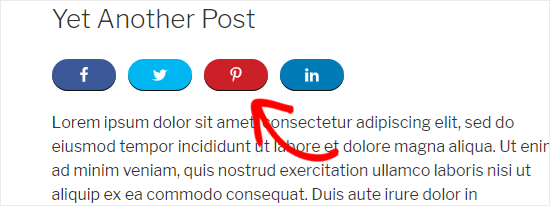
You can now visit any post on your WordPress blog to see the Pinterest button in action.
Method 2: Using a Custom Shortcode (Recommended)
Sometimes, you may want to control exactly where the ‘Pin It’ button appears on your site. For example, you may want to show the Pinterest button on specific ad landing page or inside the post content.
One option is to create the button using code and then place it on each page or post using a custom shortcode. This gives you the freedom to show the ‘Pin It’ button in different locations, but you will need to add it to each page or post manually.
The easiest way to add custom code to WordPress is by using WPCode. It is the best code snippets plugin and allows you to add custom PHP, CSS, JavaScript, and more to your website. You can also create custom shortcodes, so it’s perfect for adding a ‘Pin It’ button to your website.
First, you will need to install and activate the free WPCode plugin. For more information, see our step-by-step guide on how to install a WordPress plugin.
Once the plugin is activated, go to Code Snippets » Add Snippet.
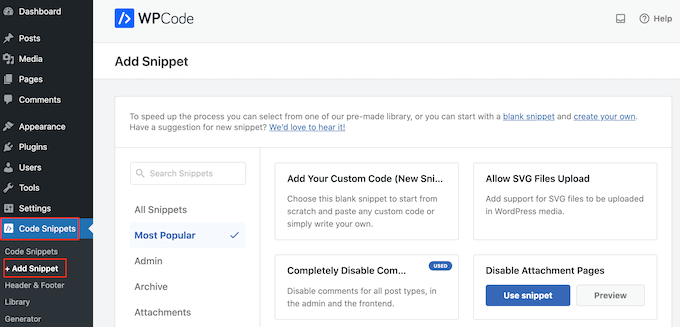
Here, you will see all the pre-made snippets that WPCode can add to your site. These include snippets that allow you to add social share buttons to WordPress, and display your social icons in a sidebar.
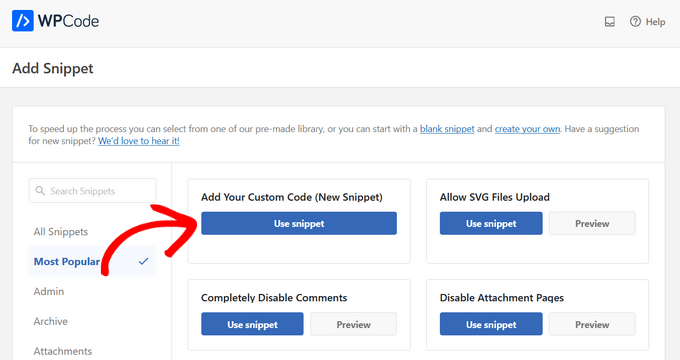
Here, you need to hover your mouse over the ‘Add Your Custom Code (New Snippet)’ option and click the ‘Use snippet’ button when it appears.
On the next screen, type in a title for the code snippet. This is just for your reference, so you can use anything you want.
You are going to add PHP to WordPress, so just open the ‘Code Type’ dropdown menu and choose ‘PHP Code.’
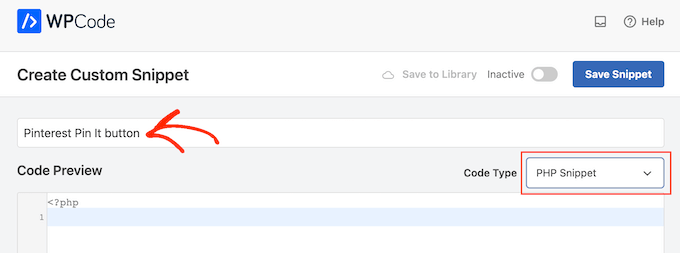
With that done, simply paste the following into the code editor:
function get_pin($atts) {
    global $post;
    if ($post) {
        $pinterestimage = wp_get_attachment_image_src(get_post_thumbnail_id($post->ID), 'full');
        if ($pinterestimage) {
            return '<a href="http://pinterest.com/pin/create/button/?url=' . urlencode(get_permalink($post->ID)) . '&media=' . $pinterestimage[0] . '&description=' . get_the_title() . '" class="pin-it-button" count-layout="vertical">Pin It</a>';
        } else {
            return 'No Pinterest image available.';
        }
    } else {
        return 'No post found.';
    }
}
add_shortcode('pin', 'get_pin');
After that, scroll down the page to the ‘Insertion’ section. Here, you can keep the default ’Auto Insert’ method to make sure the code runs everywhere.
If it isn’t already selected, then select ‘Run Everywhere’

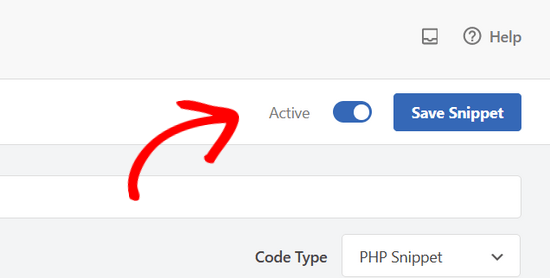
Finally, scroll to the top of the screen and click on the ‘Inactive’ slider so that it shows ‘Active.’
Then just click the ‘Save Snippet’ or ‘Update’ button to make the code snippet live.
Now, you can add a ‘Pin It’ button to any WordPress page, post, or widget-ready area using the [pin] shortcode.
For step-by-step instructions on how to place the shortcode, please see our guide on how to add a shortcode in WordPress.
![use the [pin] shortcode in your WordPress posts use the [pin] shortcode in your WordPress posts](https://www.wpbeginner.com/wp-content/uploads/2019/06/pin-it-button-shortcode.jpg)
After adding this code, visitors will see a ‘pin it’ button on any page or post that has a featured image.
If the page doesn’t have a featured image, then they’ll see a ‘No Pinterest image available’ error message instead.
How to Add Pinterest ‘Pin It’ Button Using the Full-Site Editor
If you are using one of the newer block-enabled themes, then you can add a ‘Pin It’ button anywhere in your WordPress theme using the custom shortcode.
This is an easy way to add the button to every page and post. You can also add the ‘Pin It’ button to areas you can’t edit using the standard WordPress content editor, such as your site’s 404 page template.
To get started, just go to Themes » Editor in the WordPress dashboard.
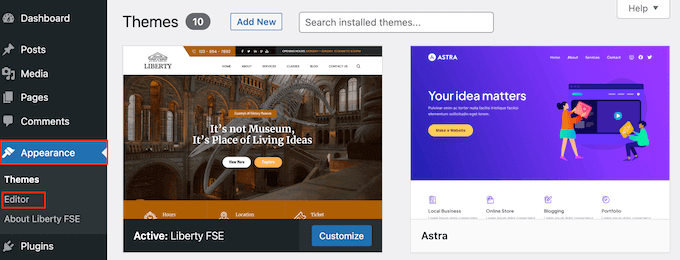
By default, the full site editor will show your theme’s home template.
To add a ‘Pin It’ button to a different page, just select either ‘Template’ or ‘Template Parts’ from the left-hand menu.
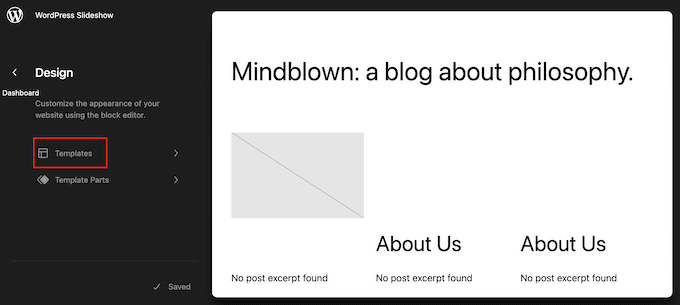
You can now select the template you want to edit.
In this example, we will show you how to add a ‘Pin It’ button to your site’s Single page template. However, the steps will be similar no matter what template you choose.
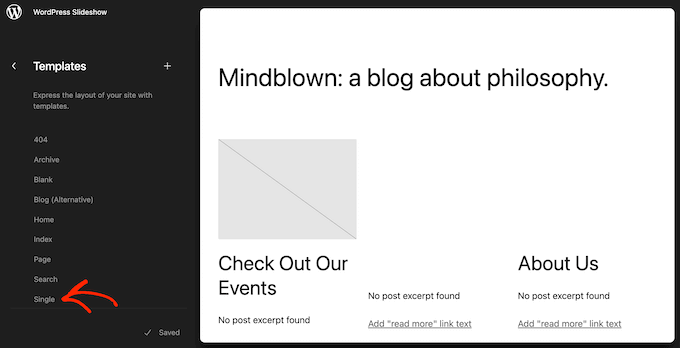
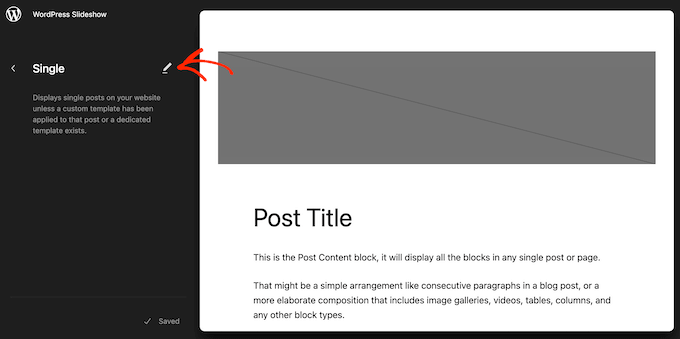
WordPress will now show a preview of the template or template part.
To edit this template, go ahead and click on the small pencil icon.
With that done, click on the blue ‘+’ icon in the top left corner.
In the search bar that appears, type in ‘Shortcode.’
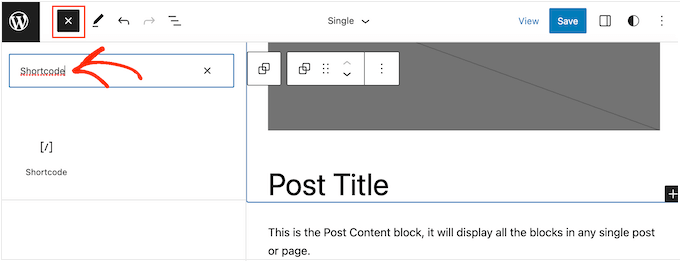
When the right block appears, drag and drop it onto the template layout.
You can now type the Pin shortcode into the block.
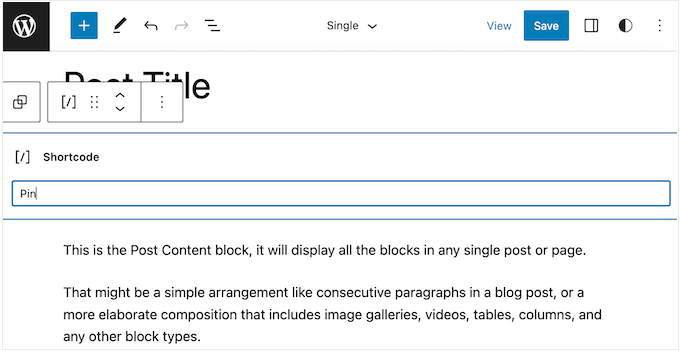
After that, simply click on ‘Save’ to make the new shortcode live.
Now, if you visit your WordPress website, you will see the ‘Pin it’ button in action.
Method 3: Using Code and FTP (No WordPress Plugin Required)
If you don’t want to use a plugin, then you can add a Pinterest button to your website by adding code to your theme files.
Editing the theme files directly can cause many common WordPress errors, and you’ll lose all the custom code when you update the WordPress theme. With that in mind, we always recommend using WPCode instead.
However, if you do use this method, then you’ll need to start by making a complete WordPress backup of your site. This will help you restore your site in case something breaks by accident.
With that done, connect to your WordPress hosting using an FTP client and then go to the /wp-content/themes/ folder.
From here, you need to open your current theme folder and then locate the footer.php file.
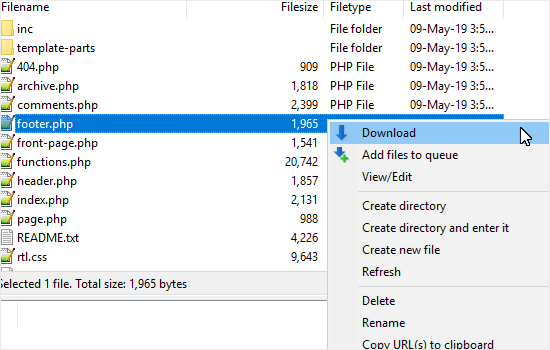
Next, simply right-click on that file and then select ‘Download’ from the menu. This will download the footer.php file to your computer.
Now, you need to open the footer.php file using a plain text editor like Notepad and paste the following script right before the </body> tag.
<script type="text/javascript">
(function() {
    window.PinIt = window.PinIt || { loaded:false };
    if (window.PinIt.loaded) return;
    window.PinIt.loaded = true;
    function async_load(){
        var s = document.createElement("script");
        s.type = "text/javascript";
        s.async = true;
        s.src = "https://assets.pinterest.com/js/pinit.js";
        var x = document.getElementsByTagName("script")[0];
        x.parentNode.insertBefore(s, x);
    }
    if (window.attachEvent)
        window.attachEvent("onload", async_load);
    else
        window.addEventListener("load", async_load, false);
})();
</script>
Once you have done that, you need to save the file and then upload it back to the current theme folder.
Next, locate the template file in your theme where you want to add the button. Usually, this will be the single.php file, but it can vary depending on your WordPress theme. If you are not sure, then you can see our beginner’s guide to the WordPress template hierarchy.
To edit the template file, simply download it from your theme folder and open it for editing.
You will need to choose the location where you want to show the ‘Pin It’ button. Many websites show social sharing buttons directly below the post title, but you can use any location you want.
After choosing a location, simply add the following code:
<?php $pinterestimage = wp_get_attachment_image_src( get_post_thumbnail_id( $post->ID ), 'full' ); ?>
<a href="http://pinterest.com/pin/create/button/?url=<?php echo urlencode(get_permalink($post->ID)); ?>&media=<?php echo $pinterestimage[0]; ?>&description=<?php the_title(); ?>" class="pin-it-button" count-layout="vertical">Pin It</a>
The above code snippet adds the post’s featured image, title, description, and URL in the share URL parameter.
The code snippet above will add a vertical share button to all your posts. If you want to display a horizontal share button instead, then simply change the count-layout="vertical"> section to count-layout="horizontal">.
When you are ready, save the file and upload it back to your theme directly using FTP.
Method 4: Add Pinterest Pin It Button Over Your Images
If you are running a fashion, photography, food, or some other type of blog that uses lots of images, then you can add a Pinterest button over these images. This allows visitors to share your content by simply hovering over the image they want to pin.
The easiest way to add a Pinterest button over your images is by using WP Tasty Pins.
WP Tasty Pins is the best WordPress Pinterest plugin that can add ‘Pin It’ hover buttons over all your images. You can also use Tasty Pins to add a Pinterest follow box, set Pinterest descriptions, disable pinning on certain images, hide Pinterest-specific images from your page, and more.
First, you’ll need to install and activate the plugin. If you need help, then please see our guide on how to install a WordPress plugin.
Upon activation, just go to Settings » Tasty Pins. You can now add your license key in the field toward the top of the screen.
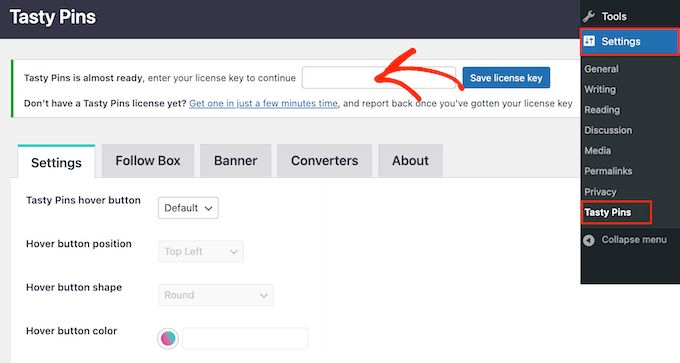
You will find this information in your account on the Tasty Pins website and in the confirmation email you received when you purchased Tasty Pins. With that done, click on the ‘Save license key’ button.
After that, head over to Settings » Tasty Pins and configure the ‘Pin It’ button. For example, you can change the button’s shape, color, and where it appears on the image.
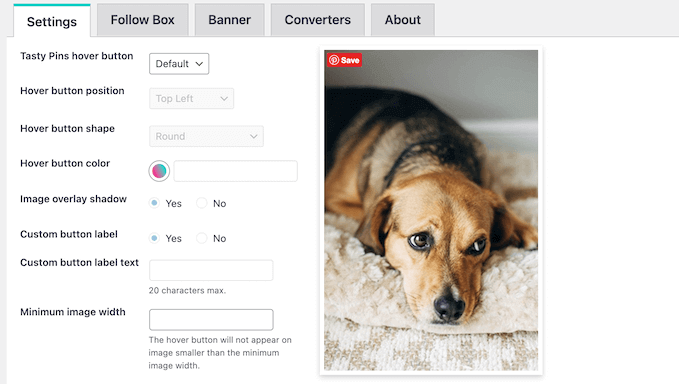
When you’re happy with the changes you’ve made, click on the ‘Save Changes’ button. Now, WP Tasty will add a ‘Pin It’ button to all your site’s images.
We hope this article helped you understand how to add a Pinterest ‘Pin It’ button to your WordPress blog. You may also want to see our guide on how to automatically publish from WordPress to Instagram, or read our expert pick of the best Facebook plugins to grow your blog.
If you liked this article, then please subscribe to our YouTube Channel for WordPress video tutorials. You can also find us on Twitter and Facebook.


Syed Balkhi says
Hey WPBeginner readers,
Did you know you can win exciting prizes by commenting on WPBeginner?
Every month, our top blog commenters will win HUGE rewards, including premium WordPress plugin licenses and cash prizes.
You can get more details about the contest from here.
Start sharing your thoughts below to stand a chance to win!
Dennis Muthomi says
Thabks for the PHP code snippet.
I copied and pasted the code into my website’s footer.php file, but the button did not initially appear after uploading.
I realized I needed to clear my cache before the new button would display properly.
Jiří Vaněk says
Thanks for the php snippet. I tried it on one of the sites and it works like a charm. You have saved me some space between plugins. Good job.
Alison says
Hi. I just added shared counts and the Pinterest add-on plugins recently. They seem to work fine, but I notice they haven’t been updated in several years nor have they been tested with my version of WordPress. Should I be looking for a new plugin or are they still ok to use?
WPBeginner Support says
The shared count plugin was updated 2 months ago and it should still be working well, for the warnings we would recommend taking a look at our article below for why you shouldn’t be very concerned
https://www.wpbeginner.com/opinion/should-you-install-plugins-not-tested-with-your-wordpress-version/
Admin
Julie says
I’m looking to add an individual graphic pin that I’ve custom designed to the travel blog post it belongs to (like the best things to do in Jaipur). Is that what this article is covering or is it just the literal Pinterst “Button” that looks like the Pinterst logo? Sorry to be co fixed with this technicality, but an image or two would make this much clearer what specifically the “button” you are referring to is….thank you in advance…
WPBeginner Support says
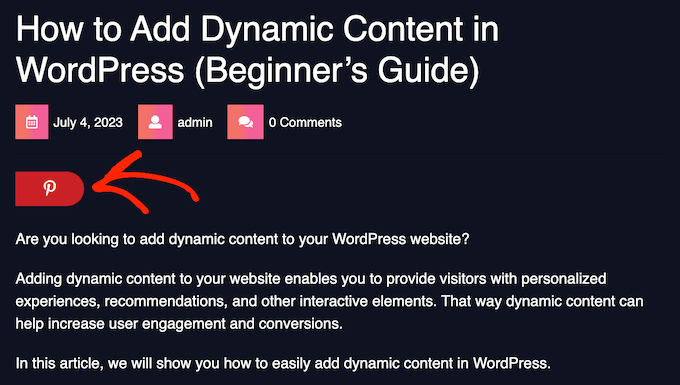
This is for the Pinterest pin it button, the second screenshot in the article should be what you are looking for as an example.
Admin
Ellen says
It works!! thankyou
WPBeginner Support says
Glad our guide could help
Admin
Kara says
After I installed the plugin, it never showed up in the settings.
WPBeginner Support says
You would want to ensure you activate the plugin as well.
Admin
Jais says
Thanks. It works.
WPBeginner Support says
You’re welcome, glad it worked for you
Admin
laira says
hi wpbeginner, I follow your codes, may i know if i will still pin the images on my pinterest boards? or it will automatically pin there? Im still a beginner in this platform. thank you
WPBeginner Support says
The button when used would add it to your board.
Admin
Lorraine Reguly says
Thanks for the code. I just added it to my author site. (I have no idea how the Pinterest button shows up on my images on my business site, but it does.)
Now my author site is all set up!
Thanks, Syed.
P.S. I just followed you on Pinterest.
WPBeginner Support says
Hey Lorraine,
Thanks for following us on Pinterest. You can also find us on Twitter and Facebook.
Admin
RB says
this is work !! thanks
and
I wonder…
how can I change icon? Icon is still same when change code
Thales says
I did the last option, adding the short code to my theme’s functions.php file. It worked, but I couldn’t save my posts as draft anymore. Then I removed the code and it is not working. My site is still online, but I cannot log in into my site anymore. The following message appear:
Warning: Cannot modify header information – headers already sent by (output started at /home/peque107/public_html/wp-content/themes/himmelen/functions.php:2) in /home/peque107/public_html/wp-includes/pluggable.php on line 1224
Please help!
Emma steave says
Thanks. Its great
Carissa says
Does this only apply for wordpress.org blogs? I have a wordpress.com blog and I am not sure if I can add this plugin to it?
Thank you!
WPBeginner Support says
Yes it is for WordPress.org. Please see our guide on the difference between self hosted WordPress.org vs free WordPress.com blog.
Admin
Ruth says
I have a problem. I followed the instructions and came up with this error:
Parse error: syntax error, unexpected ‘<' in /home/cmomb/butfirstwehavecoffee.com/wp-content/themes/notepad/functions.php on line 18
Now I cannot get rid of it. Could someone advise. My site is now down.
WPBeginner Support says
Open the functions.php file in a text editor like notepad. Go to line 18. You probably have <?php tag there that you don’t need. Delete it and also delete the ?> closing tag
Admin
Ian Harris says
Thanks for this firstly
I am struggling to position the element. It is seeming to always sit in the top left of the div.
Is it possible to position it and also change the bg image to own custom one.
Thanks
Paradise Found Around says
Great tutorial, as usual. I was wondering though if there was a way to modify it to use a custom button in place of the starboard one that automatically comes up.
Thanks,
Mark
mark taylor says
Good tutorial, i have put it on my site without any problems, i then tested it and it worked, but it still says 0 after i pinned.
Mark
vrinda says
I tried so many plugins… they don’t work with infinite scroll and nextgen gallery…. but with some changes this script solved my issue.. thanks
Michael says
Hello,
I just want to ask if I could change the size of the “pin it” button? Because it seems that it was a little bit small.
Regards,
Michael
Editorial Staff says
You could use the pin count layout vertical or horizontal. Other than that, no you cannot change the size.
Admin
Jenny says
This code just recently stopped working. I had it on my site and it was working great and recently images appear to be working but then when you go view the pinboard there is no image set. Other times when trying to pin it 502 error that comes from the Pinterest site. Any ideas?
Editorial Staff says
Probably server errors on Pinterest’s end. We have this code running on our other sites.
Admin
Ido Schacham says
There’s a bug in the code. The generated href for the pin it button should include ‘url=’, currently it’s missing the equals sign.
Editorial Staff says
Fixed the shortcode code for that. Thanks for reporting it
Admin
jess says
For wordpress users..adding the pin it or any other social media is easy! Under dashboard, go to setting, click on sharing and they all appear- click on what you want to add!
Editorial Staff says
You are referring to WP.com sites. This tutorial is for self-hosted WordPress sites. Two different things.
Admin
Jen M says
THANK YOU! I have been searching for how to do this for 2 days & downloaded something & that didn’t work, I was about to give up & then THANKFULLY read your comment. I appreciate someone making it as EASY as it really is, how come wordpress can’t do that?
Jenn K says
Ooh, thanks for the tip! Exactly what I was looking for
Nick says
Is there a way to customize this so you can select a custom image for the pin-it button ?
Editorial Staff says
If you mean a custom image for your article, then yes you can. Look at the &media tag in the second code.
Admin
Husein Yuseinov says
Hi,
I need to implement this code but in header file, but postthumbnail returns error?!
wpbeginner says
@Husein Yuseinov You have to call the thumbnail code within your post loop. In order to call it in your header.php file, you must utilize the global variable.
https://www.wpbeginner.com/wp-themes/how-to-display-custom-fields-outside-the-loop-in-wordpress/
Husein Yuseinov says
@wpbeginner Thanks for the fast respond, but I’m not a coder, and it’s hard for me to understand you.
wpbeginner says
@Husein Yuseinov Ok… so here is what you do. Add the following line above $pinterestimage line inside the PHP tags:
global $wp_query;
$postid = $wp_query->post->ID;
Then replace $post->ID with $postid and it will work. Also after the code, you may want to end wp_reset_query();
This is the best we can do. What you are asking for requires coding. If you are unable to do this, then shoot us an email. We can help you out for a small fee.
robthecomputerguy says
What in the world is going on with the “animhut blog” button on thee next 3 comments?
wpbeginner says
@robthecomputerguy I think they just liked our comments, and livefyre is showing their profile.
robthecomputerguy says
@wpbeginner Oh that’s fascinating – that didn’t even occur to me – thanks for the follow up!
FuturePocket says
I tried adding this… it worked but when you click on “Pin it” and it opens the window in a new browser and you actually submit the pin, it just reloads the newly opened window and the pin isn’t submitted. Decided not to implement it until they’ve fixed their bugs.
Phil Derksen says
If you don’t want to mess with adding code, I created a Pin It button plugin you can try out.
http://wordpress.org/extend/plugins/pinterest-pin-it-button/
(or just search for “pinterest pin it” under plugins)
Jean Oram says
I used the ‘follow me’ code on the Pinterest Goodies page and pasted it into the ‘text’ widget on my WordPress blog. The button now appears right after my mini bio. It works quite well.
Editorial Staff says
For any advanced theme framework like Thesis, Genesis, Headway etc, you have to add these codes via functions.php file using the framework appropriate hooks. We cannot possibly cover all the theme frameworks out there. Most theme framework blogs have instructions on how to do customize the themes.
Admin
wpbeginner says
Your method seems a bit tedious because you would have to do it for each image.
Ruby says
@wpbeginner It’s not ideal, but it’s really not much more than you have to do to post the image anyway. I’m still looking for a great option (plugin ideally) that a) works on my theme and b) is easy. Luckily, due to the popularity of Pinterest, I’m confident someone will have one up and running soon!
wpbeginner says
Make sure you set $pinterestimage[0] otherwise it will return an array. Other than that not sure why you are getting the error.
merrittsgret says
@wpbeginner It’s working now, thanks to the shortcode code you gave us. Thank you so much!
Now to get it to align with everything else via CSS… (http://ylcf.org/2012/01/tomorrow-2/) Ah, the joys.
wpbeginner says
@merrittsgret Yeah, you might have to utilize the !important tag in some cases.
dave2 says
Any idea on how to change it from featured image to first image?
wpbeginner says
@dave2 Use a variation of this snippet:https://www.wpbeginner.com/wp-themes/how-to-set-a-default-fallback-image-for-wordpress-post-thumbnails/
animhut blog says
@wpbeginner @dave2 Thank you for the tutorial ! i need that for my another photography site
Gretchen says
It works, but it shows the text “array” before the Pin It button. I’m calling it via my functions.php, like so “echo $pinterestimag…..<?php;" Could that be why?
Heidi at CrockPotLadies says
I cannot seem to get it to work. I put the first code in my footer.php before the closing body tag and then added the other code into my single php after my other sharing buttons provided by po.st. Yet when I look at a post on my site (http://crockpotladies.com/recipe-categories/entrees/crockpot-chicken-enchiladas/) I do not see a Pin It Button. Any suggestions?
wpbeginner says
@Heidi at CrockPotLadies We can see the button in the next line after the Subscribe to feed etc links.
wmwebdes says
Only just started to hear about Pinterest – looks as though it is really taking off.
Thanks for the tut.
Ruby says
Thanks for this. I recently tried a similar method but it doesn’t seem to work with my WordPress.org theme, so I came up with my own work-around and posted it here: http://www.tomaytotomaaahto.com/tools-and-tutorials/how-to-turn-your-images-into-pinterest-pin-it-buttons-wordpress
YeahThatsKosher says
How do you get this to integrate with an existing WP plugin like Digg Digg or Sociable?
wpbeginner says
@YeahThatsKosher You would have to ask the developers to do so for you.