
Publishing content consistently is one of the best ways to grow your WordPress blog and keep your audience engaged. But manually hitting ‘Publish’ every time can be a hassle if you’re managing a busy content calendar.
While we manually schedule all posts on WPBeginner, many bloggers and businesses use auto-scheduling to streamline their workflows.
That’s because scheduling your posts in advance lets you plan ahead, stay organized, and make sure that your articles go live at the best times for engagement.
In this article, we will show you how to easily auto-schedule your WordPress blog posts.
💡Quick Answer: How to Auto-Schedule WordPress Blog Posts
The easiest way to auto-schedule content is by using the PublishPress Planner plugin. It allows you to set a default publishing time for your editorial calendar, so you don’t have to manually set the clock for every single post.
Why Auto-Schedule WordPress Blog Posts?
Auto-scheduling is a workflow automation that sets a consistent, pre-defined publishing time for all your future blog posts.
By default, WordPress requires you to manually select the specific date, hour, and minute for every single article you write. This repetitive task can be time-consuming and prone to error.
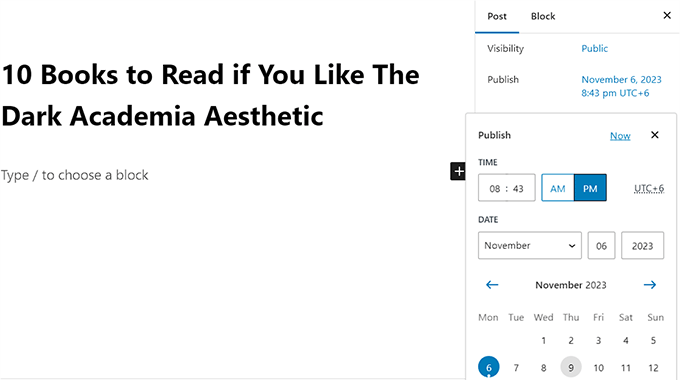
With auto-scheduling, you simply choose a date on your calendar. The system then automatically applies your default publishing time, ensuring your content always goes live when your audience is most active.
Having said that, let’s take a look at how to easily auto-schedule your WordPress posts, step by step.
How to Auto-Schedule WordPress Blog Posts
You can easily auto-schedule your WordPress blog posts using the PublishPress Planner plugin. This free plugin lets you organize and schedule your WordPress content.
Note👆: To unlock some of the more advanced features in the plugin, you will have to upgrade to the PublishPress Pro plan. This will give you access to reminder notifications, Slack integration, and more.
We have thoroughly tested this tool and found it to be an amazing choice for multi-author blogs. To learn more, see our PublishPress review.
First, you need to install and activate the free PublishPress Planner plugin. For detailed instructions, see our beginner’s guide on how to install a WordPress plugin.
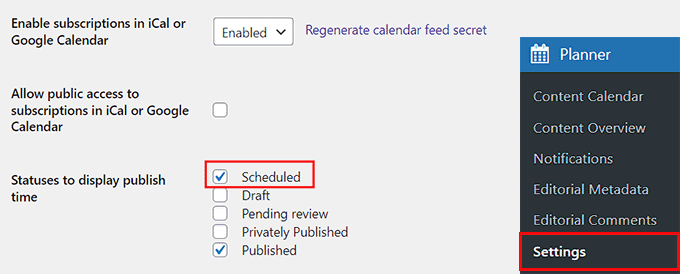
Upon activation, visit the Planner » Settings page from the WordPress dashboard and switch to the ‘Content Calendar’ tab from the top.
On this tab, find the ‘Statuses to display publish time’ setting and check the box next to ‘Scheduled.’
You can also choose to display other statuses on your calendar, like draft or pending review, if you like.
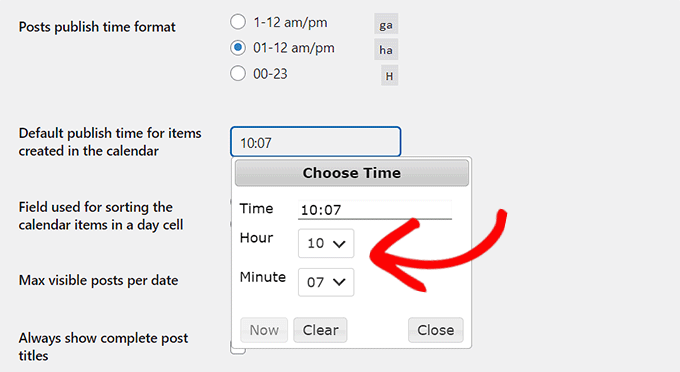
Once you have done that, you must choose a time format for your post’s publication and then click on the field next to the ‘Default publish time for items created in the calendar’ option.
This will open a prompt on the screen where you can pick the specific time, hour, and minute for your scheduled posts to be published daily.
We recommend choosing a publishing time when your blog traffic usually increases. To determine the correct time to publish your blog posts, you may want to see our tutorial on the best time to publish a blog.
Finally, click the ‘Save Changes’ button to store your settings.
Now, open the post you want to schedule in the block editor.
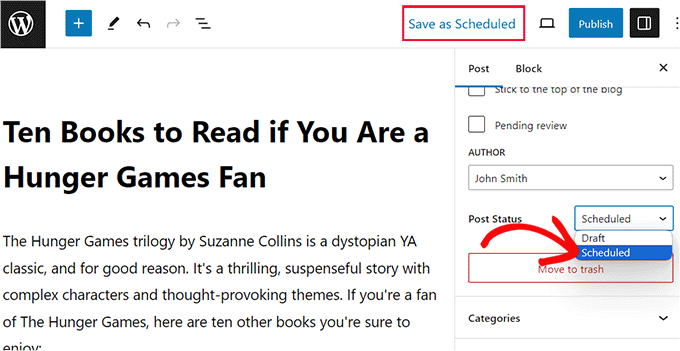
Here, you will see a ‘Post Status’ dropdown menu in the block panel on the right. Once you have completed your post, simply open this dropdown menu and select the ‘Scheduled’ option.
After that, click the Save as Scheduled button at the top of the screen to store your settings.
Your post is now scheduled. It will automatically be published on the next available calendar day at the default time you configured in the settings.
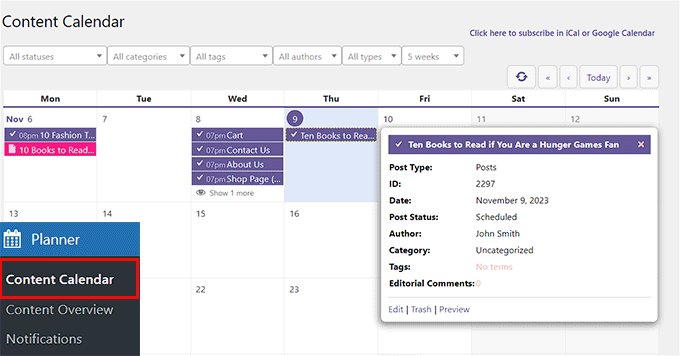
You can see all your published and scheduled posts by visiting the Planner » Content Calendar page from the WordPress admin sidebar.
Bonus: How to Increase WordPress Blog Traffic
Publishing new content regularly is a great start. But to get steady organic traffic, you also need to optimize your articles for search engines.
While scheduling ensures consistency, SEO ensures visibility. This helps improve your content’s authority and makes it more likely to appear on search results pages.
To do this, we recommend All in One SEO (AIOSEO). It is the best WordPress SEO plugin on the market, used by over 3 million professionals to rank higher in search results.
Our team switched to AIOSEO on WPBeginner for all our SEO needs, from managing sitemaps to adding schema markup.
You can learn more about why we switched from Yoast and see our complete AIOSEO review for a detailed look at its features.
It comes with powerful tools like a headline analyzer, a Flesch reading score, and XML sitemaps.
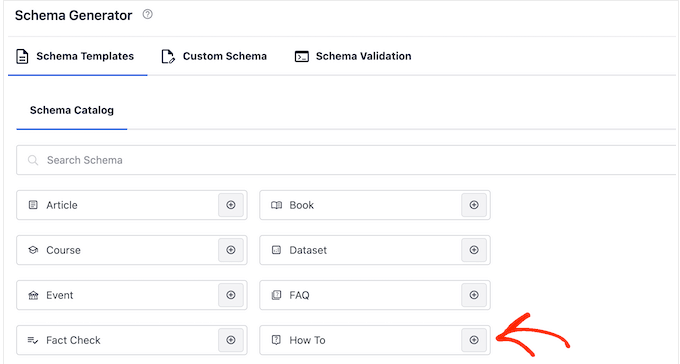
Plus, it lets you add advanced schema markup, like Article or How-to schema, to help your site stand out on Google.
AIOSEO provides suggestions on how to use active voice, insert transition words, and distribute subheadings better.
It also analyzes your blog posts for keyword density and readability, making it an incredibly powerful writing assistant for optimizing content for search engines.
For more information, you can see our guide on how to set up AIOSEO for WordPress correctly.
Frequently Asked Questions About Auto-Scheduling Posts
Here are some common questions we get about scheduling and automating WordPress content.
What is the difference between scheduling and auto-scheduling in WordPress?
Manual scheduling requires you to set the specific date and time for each post individually. Auto-scheduling automatically assigns a pre-set publishing time to your content calendar, saving you from repetitive work.
Can I auto-schedule posts in WordPress without a plugin?
No, WordPress does not have a native auto-schedule feature. You must use a plugin like PublishPress Planner to automatically assign default publishing times to your drafts.
Does scheduling blog posts affect SEO?
No, scheduling posts does not directly impact SEO rankings. However, it helps you publish consistently at optimal times, which improves user engagement and signals reliability to search engines.
What happens if a scheduled post fails to publish?
This is usually caused by a “missed schedule” error due to WordPress cron job issues. You can easily fix this by installing a missed schedule plugin or configuring a real cron job.
For more information, see our guide on how to fix the missed schedule post error.
We hope this article helped you learn how to easily auto-schedule your WordPress blog posts. You may also want to see our tutorial on how to avoid accidental publishing in WordPress and our guide on testing your site for updating to Gutenberg (block editor).
If you liked this article, then please subscribe to our YouTube Channel for WordPress video tutorials. You can also find us on Twitter and Facebook.

 in 2026")

")
Jiří Vaněk
I want to ask. WordPress CRON is responsible for scheduling articles. Will this work the same even if I have CRON turned off and it is set on the server to use the internal CRON to call the URL wp-cron.php?doing_wp_cron? I turned off CRON in wp-config on purpose, for the sake of speed, and I solve it internally with CRON of the server like this.
WPBeginner Support
As long as there is a CRON solution running for your site this should still work and it would update when your CRON runs.
Admin
Jiří Vaněk
Thank you very much for your response. At first, I struggled a bit because it wasn’t working, and I kept wondering why, but the mistake was ultimately on my end, and now it works fine just as you described. Thank you for your time and for reassuring me that it should be like this.
Muhammad Hammad
The best part of your blog posts is that they explain everything regarding WordPress in an easy way. So, it becomes very easy for the reader to comprehend and implement them. Bundle of thanks to the writer!
WPBeginner Support
You’re welcome, glad our content was helpful
Admin
Luis Santos
Hello,
I’m looking for a plugin to make sure the posts do not go overboard. Our site has several authors and we try to have the articles published at intervals of between 30 and 60 minutes.
We have already tested a few, but many have been discontinued by their authors. This would be close if it were not the issue of randomizing. He needed something with only a lapse of time.
Any suggestion?
Sarah
Is it possible to schedule a post to appear EVERY Monday? E.g. the same post every Monday?
Johan Hulitn
Is it possible to schedule a wordpress post with a schedule youtube video. Let me explain. If I schedule a youtube video to 12 pm and then schedule that video into a schedule wordpress post that relize at 12.30 pm. Is that possible?
Mandy
Is there a limit to the number of scheduled posts that can be loaded at any one time on a WordPress site? eg if I wanted to load 50 posts – 1 per day – would that be a problem?
WPBeginner Support
No.
Admin
Hassan
Hi WP… Do u have Telegram Channel ? it’s easy way to see your idea,dear friend..thanks
WPBeginner Support
No sorry we don’t have one yet. Meanwhile you can follow us on Twitter and Facebook.
Admin
Charles
Hello,
Yet again you have proven that this site is the world’s best in terms of resourceful contents for WordPress website developers, designers and bloggers. Please keep it up! VERY HELPFUL POST.