


If you run a hotel, guesthouse, or vacation rental, every booking that comes through a third-party platform can eat into your earnings. Booking sites are useful for finding guests, but their commission fees can quickly add up when you rely on them for every reservation.
A hotel room booking system on your WordPress website gives guests a way to check availability, choose their dates, and book directly with you. That means you can keep more of what guests pay while making it easier to manage reservations from one place.
In this guide, we’ll show you how to set up a hotel room booking system in WordPress, step by step.
💡Quick Answer: How to Add a Booking System in WordPress
MotoPress Hotel Booking Lite lets you add unlimited room types, seasonal rates, booking rules, and payment options to your WordPress site. Upgrade to Pro for Stripe payments, Booking.com and Airbnb sync, and the ability to add bookings from the WordPress admin.
Which Hotel Booking Plugin Should You Use?
MotoPress Hotel Booking Lite isn’t the only free plugin for taking room reservations in WordPress. Here’s how some of the best options compare before you install anything:
| Plugin | Best For | Pricing |
|---|---|---|
| MotoPress Hotel Booking | Hotels, B&Bs, and vacation rentals. Manage rooms, seasonal rates, and booking rules from one plugin. | Free + Pro from $139/year |
| WP Hotel Booking (ThimPress) | If you specifically need free Stripe payments. | Free (Stripe via free add-on) |
| Sugar Calendar Bookings | Hourly room or facility rentals and appointments, such as meeting rooms, spas, and tours. | Free + paid from $49.50/year |
We’re using MotoPress Hotel Booking Lite below because it’s the only option here actually built for room bookings. With that said, here’s everything we’ll cover in this guide:
- Step 1: Install a Hotel Booking Plugin
- Step 2: Configure Your Hotel Settings
- Step 3: Add Accommodation Types (Your Rooms)
- Step 4: Set Room Rates and Seasons
- Step 5: Manage Availability and Block Dates
- Step 6: Enable Online Payments
- Step 7: Review Your Hotel Booking System Flow
- FAQs About Hotel Booking in WordPress
Step 1: Install a Hotel Booking Plugin
The easiest way to create a hotel room booking system in WordPress is with MotoPress Hotel Booking Lite. This free plugin lets you manage rooms, rates, availability, and payments from your WordPress dashboard. It supports PayPal, direct bank transfers, and pay-on-arrival payments.
The MotoPress Hotel Booking Pro version adds Stripe, 2Checkout, Braintree, and Bambora, along with iCal sync with Booking.com and Airbnb, dashboard bookings, and pricing based on guest count or length of stay.
First, you need to install and activate the free MotoPress Hotel Booking Lite plugin from Plugins » Add Plugin in your WordPress dashboard.
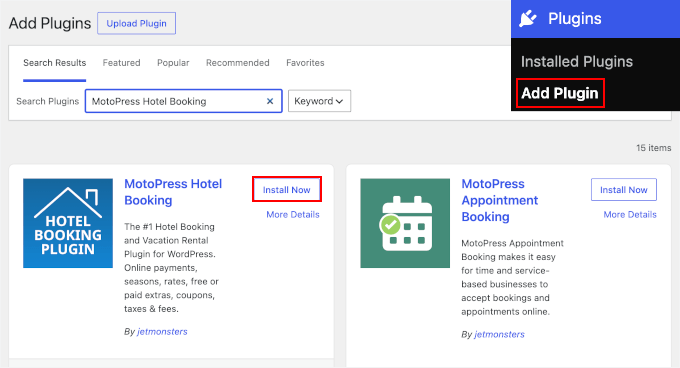
For detailed instructions, see our tutorial on how to install a WordPress plugin.
Step 2: Configure Your Hotel Settings
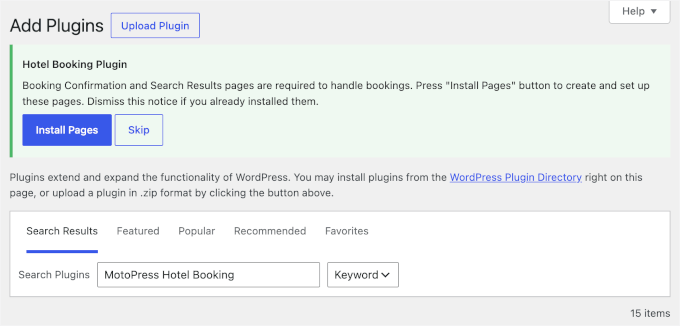
Once the plugin is active, you’ll see a notification asking you to install a few pages for different parts of the booking process, including:
- Search Results: Show rooms available for the guest’s selected dates.
- Booking Confirmation: Shows the booking details and lets guests verify their information.
- Checkout: Where guests enter their payment details.
Click the ‘Install Pages’ button to create these pages automatically.
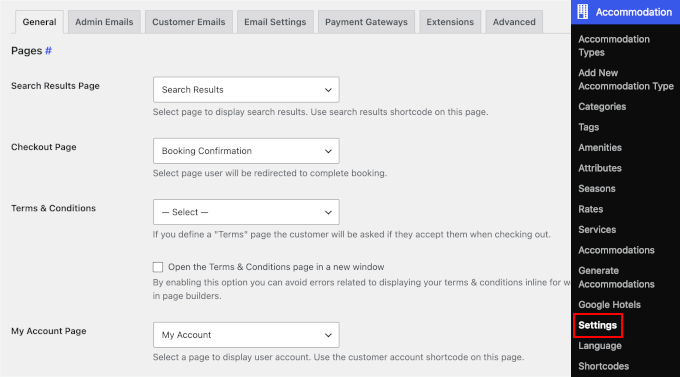
To check those pages, go to Accommodation » Settings » General and scroll to the ‘Pages’ section. Here, you can see which page is assigned to each part of the booking process and change them if needed.
While you’re here, you might want to review the other settings.
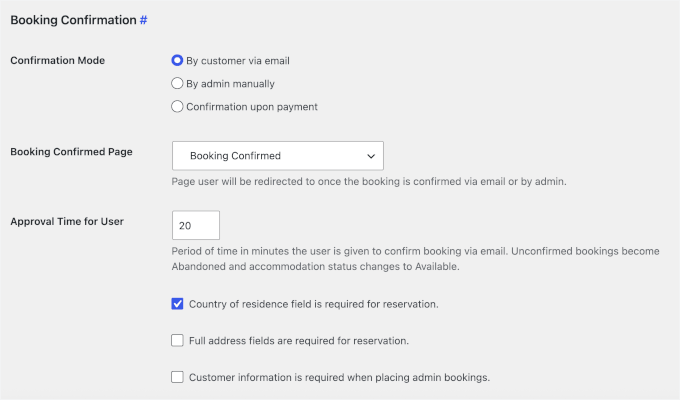
In the ‘Booking Confirmation’ section, you can choose to confirm bookings:
- Automatically after payment
- Manually by an admin
- By email confirmation from the customer
You can also set how long guests have to confirm a booking by email before it’s marked as abandoned. The default is 20 minutes, but you can increase the approval time if needed.
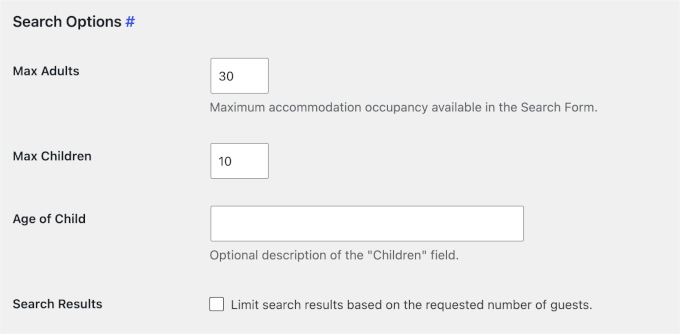
Under ‘Search Options,’ you can set the maximum number of adults and children allowed in a booking.
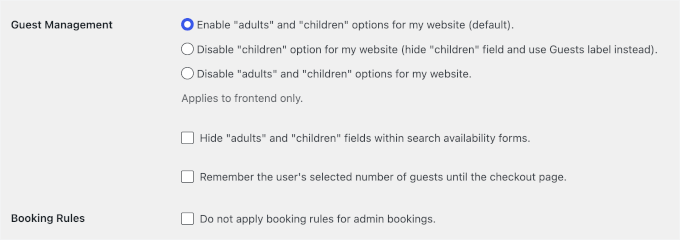
You can also show or hide the adult and child fields on the search form. For example, if you rent entire homes or cabins, you may prefer a single Guests field instead of separate adult and child fields.
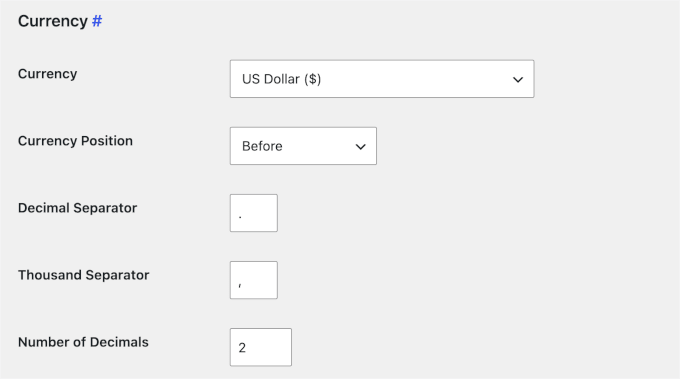
Under ‘Currency,’ select the currency you want to use (like USD or EUR) and choose where its symbol appears. You can also customize the decimal and thousand separators to match the number format commonly used in your region.
In the ‘Misc’ section, you can set the Datepicker Date Format to control how dates appear in your booking forms, such as dd/mm/yyyy or mm/dd/yyyy.
You can set your check-in and check-out times, too. For example, 2:00 PM for check-in and 11:00 AM for check-out are standard, but you can adjust them based on your policy.
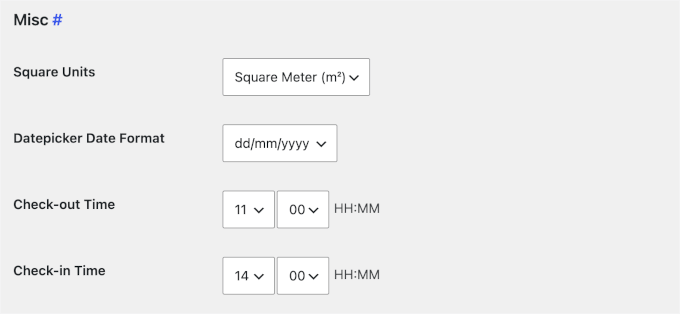
The rest of this page includes options for customer emails, admin notifications, booking behavior, and calendar display. We recommend taking a few minutes to go through each section and adjust things based on your business needs.
Once you’ve configured everything, click ‘Save Changes.’
Step 3: Add Accommodation Types (Your Rooms)
Now that your core settings are in place, the next step is to add your rooms.
In MotoPress Hotel Booking, rooms are added as ‘Accommodation Types.’ Each type represents a room, apartment, suite, or other rental unit you offer.
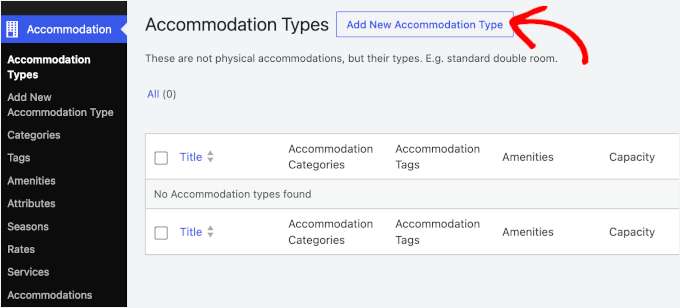
First, go to Accommodation » Accommodation Types and click ‘Add New Accommodation Type.’
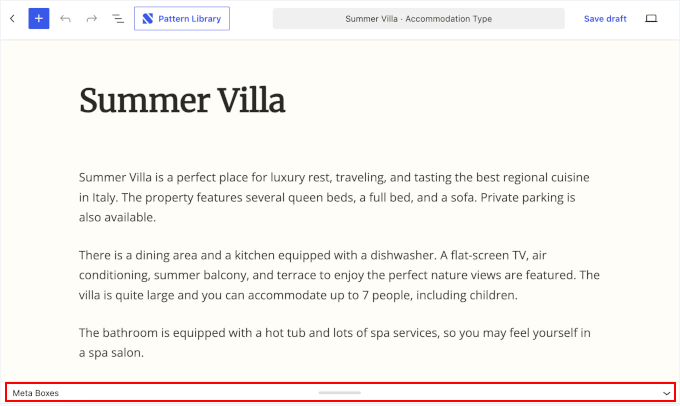
Next, enter the name of the room and add a detailed description so guests know what to expect.
We also recommend uploading a few high-quality photos using the featured image and gallery options. Good visuals can make a big difference when guests are deciding which room to book. Just don’t forget to optimize your images before uploading them to keep your site fast.
Next, you can set your accommodation details by expanding the Meta Boxes section.
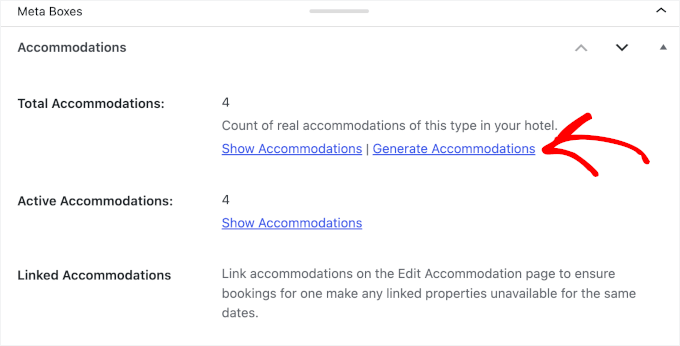
Under ‘Accommodations,’ enter how many identical rooms of this type you have by clicking the ‘Generate Accommodations’ link. The plugin will automatically track their availability.
Next, set the room capacity by choosing the number of adults and children it can accommodate. You can also select the available bed types, add custom amenities, and link services like breakfast or airport pickup if you’ve set them up.
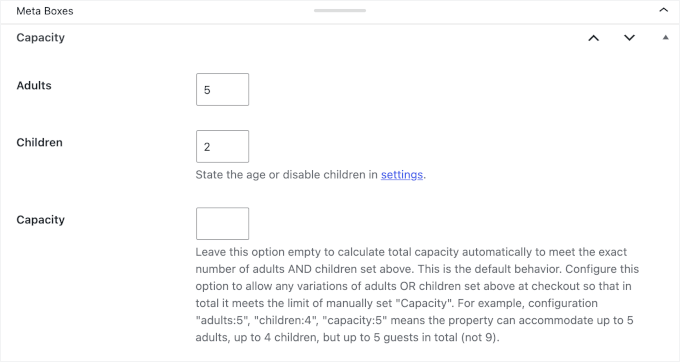
When you’re done filling out the details, click ‘Publish’ to save your first room.
Once published, your accommodation type will appear on your hotel website with the details you’ve added, along with an availability calendar and booking form.
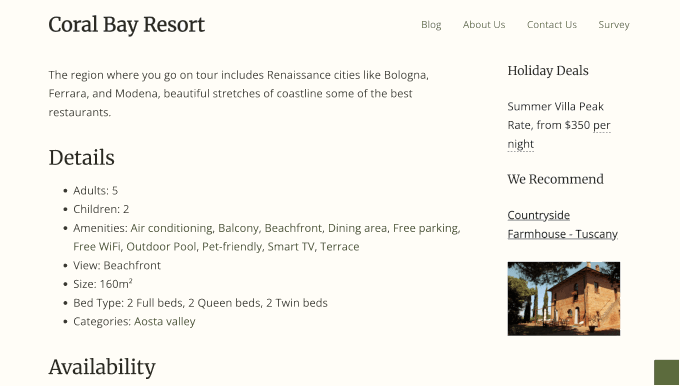
From here, you can repeat this process for each type of room you want to offer.
Step 4: Set Room Rates and Seasons
Now that your rooms are added, it’s time to set your pricing. MotoPress separates pricing into two parts:
- Seasons: The dates when a price applies, such as summer, holidays, or weekends.
- Rates: The price you charge during those dates.
You’ll need to create your seasons before setting your rates.
Defining Your Seasons
First, define the dates when your seasonal pricing will apply.
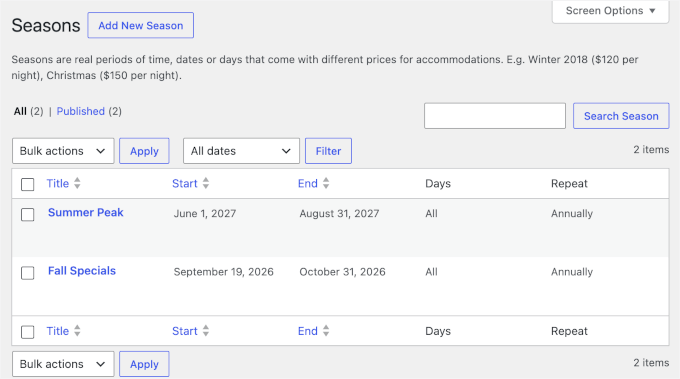
To add them, go to Accommodation » Seasons and click ‘Add New Season.’
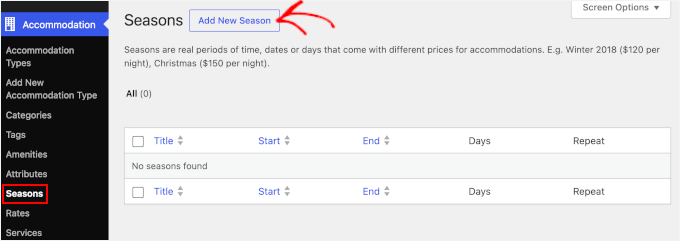
On the next screen, give your season a name and set the start and end dates.
You can also choose whether a season repeats every year or applies only once. This is useful for recurring periods like summer or Christmas, as well as one-time events.
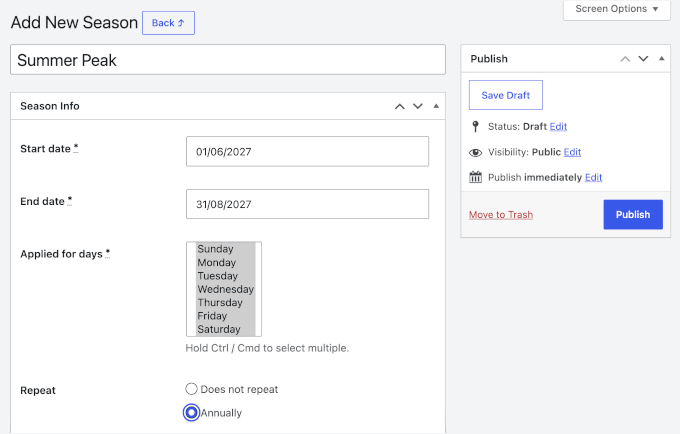
When you’re done, click ‘Publish’ to save the season.
Repeat these steps for any other seasons you want to create, and you can see all your seasons listed under Accommodation » Seasons.
Setting Your Rates
To add seasonal rates, go to Accommodation » Rates and click ‘Add New Rate.’
Then, select the accommodation type you want to price and click ‘Create Rate.’
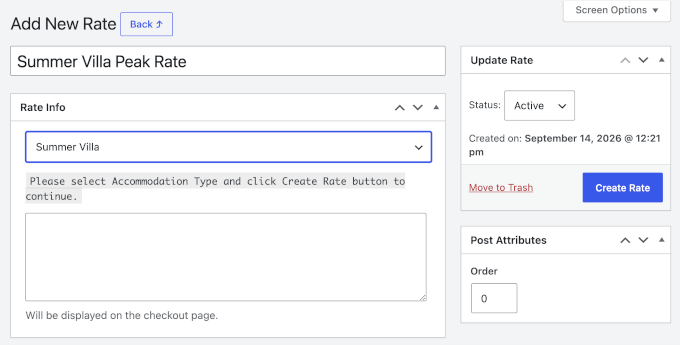
This will open a configuration panel, where you can click ‘Add New Season Price’ to add your rate.
From here, you can pick a season and enter the price per night. If needed, you can also add prices for extra adults or children.
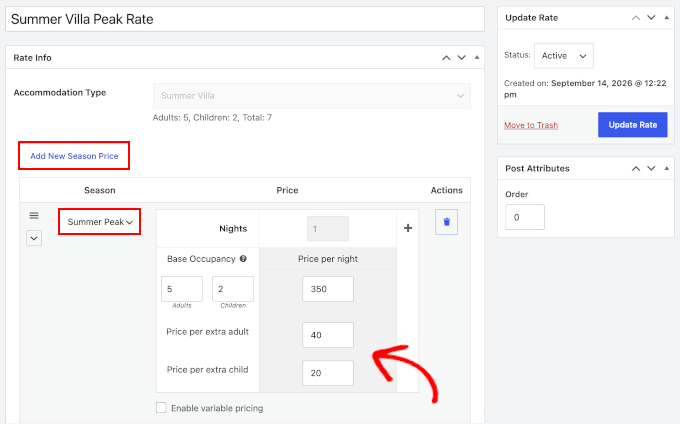
Repeat these steps for each room type and season.
When you’re done, click ‘Update Rate’ to save your changes, and you can see all your rates in Accommodation » Rates.
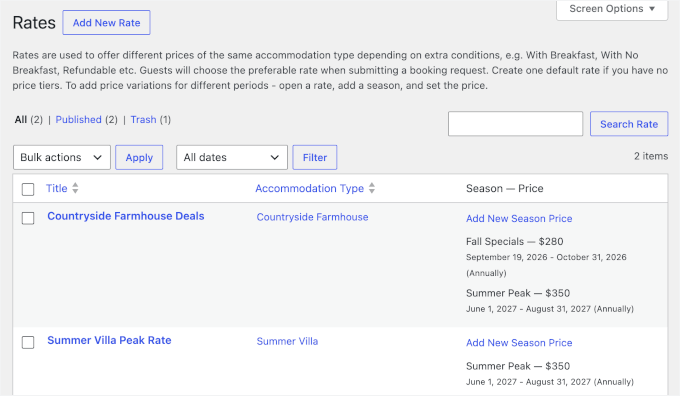
Need to change the price for just one date? You can use the admin calendar to set a daily price override without creating a new season. Plus, you can enable variable pricing to charge different rates based on the number of guests. That said, do note that this is a Pro feature.
Step 5: Manage Availability and Block Dates
Now that your rooms and rates are set up, you can manage dates, rates, and availability from Bookings » Calendar.
With the free version, guests need to make their bookings through your website. With Pro, you can also add bookings manually from the dashboard. This is useful for phone reservations or walk-in guests. Just click the ‘New Booking’ button at the top to open the booking form.
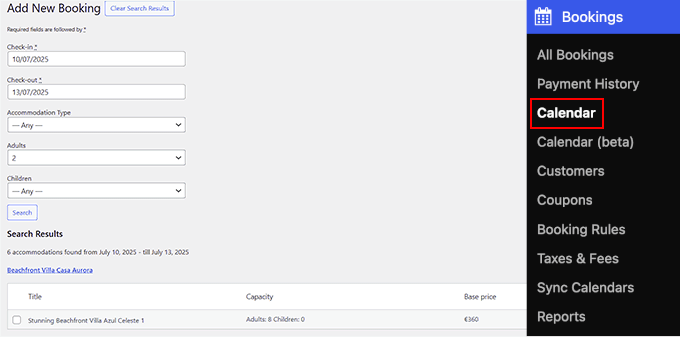
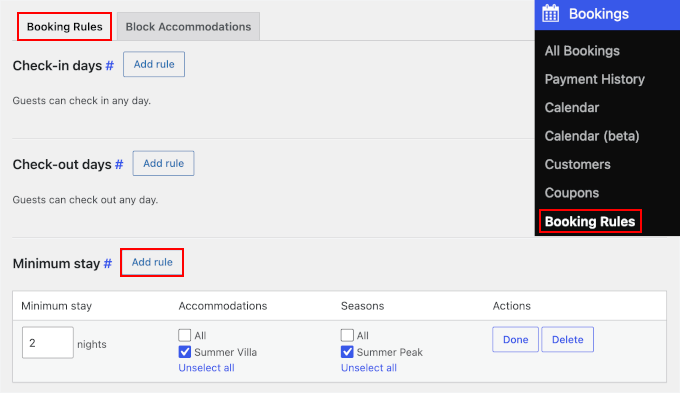
To control when and how guests can book, go to Bookings » Booking Rules. Here, you can:
- Restrict check-in and check-out days, such as allowing arrivals only on Fridays.
- Set minimum and maximum stay lengths, such as a 2-night minimum.
- Choose how far in advance guests can book.
For example, to set the minimum stay length, scroll down to the dedicated ‘Minimum stay’ section in the ‘Booking Rules’ tab. Then, enter the number of nights, choose the accommodation type, and select a season.
To book specific rooms for maintenance, you can switch to the ‘Block Accommodations’ tab.
On the next screen, choose the accommodation type from the dropdown, enter the From and Till dates, add restrictions, and write a note in ‘Comment.’
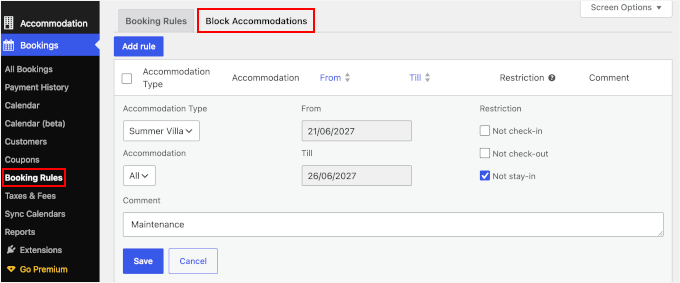
Don’t forget to click ‘Save’ to keep your changes.
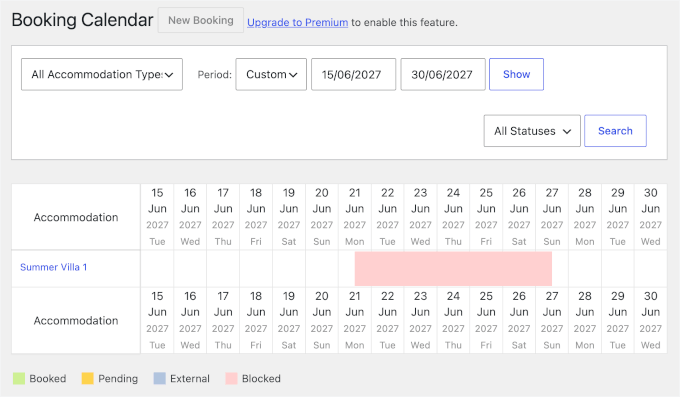
These rules are reflected in your availability calendar and prevent guests from selecting blocked dates. As the admin, you can also view these blocked dates under Bookings » Calendar.
Step 6: Enable Online Payments
Once your rooms and availability are ready, you can choose how guests will pay for their bookings. Allowing guests to pay when they book can make the process easier and help reduce no-shows and last-minute cancellations.
MotoPress Hotel Booking Lite includes online payments like PayPal, as well as direct bank transfer and pay-on-arrival payments. The Pro version adds Stripe, 2Checkout, and Bambora. Stripe also supports Apple Pay, Google Pay, and other local payment methods.
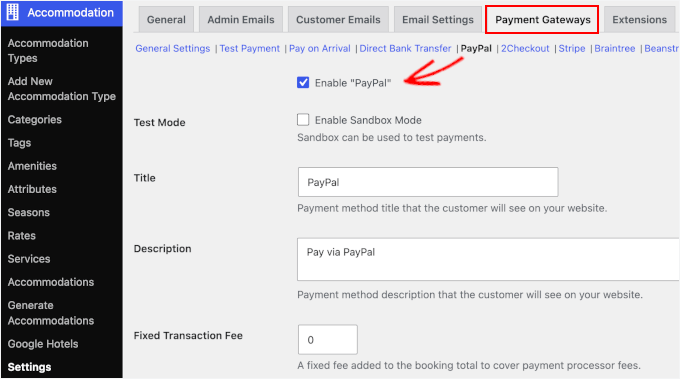
To set up your payment, go to Accommodation » Settings » Payment Gateways and select a payment method from the links at the top. Then, check the box to enable it and enter any required details.
For example, if you select PayPal, you’ll see the settings below:
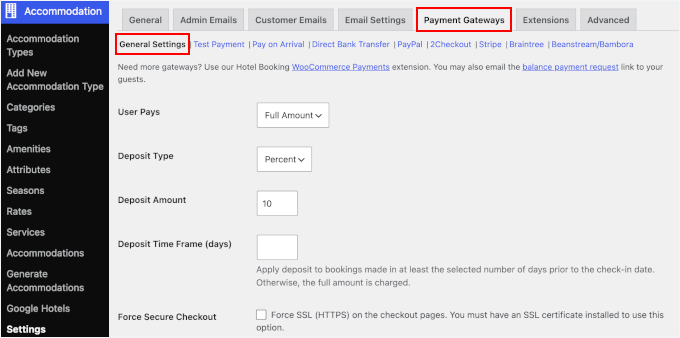
You can also open the ‘General Settings’ tab to choose how payments are collected. Depending on your setup, you can require full payment, charge a deposit, or allow guests to pay on arrival.
Once your payment methods are active, they’ll automatically appear during the checkout process on your site. Just make sure to run a test booking to confirm everything works correctly.
Step 7: Review Your Hotel Booking System Flow
At this point, your booking system is ready to use.
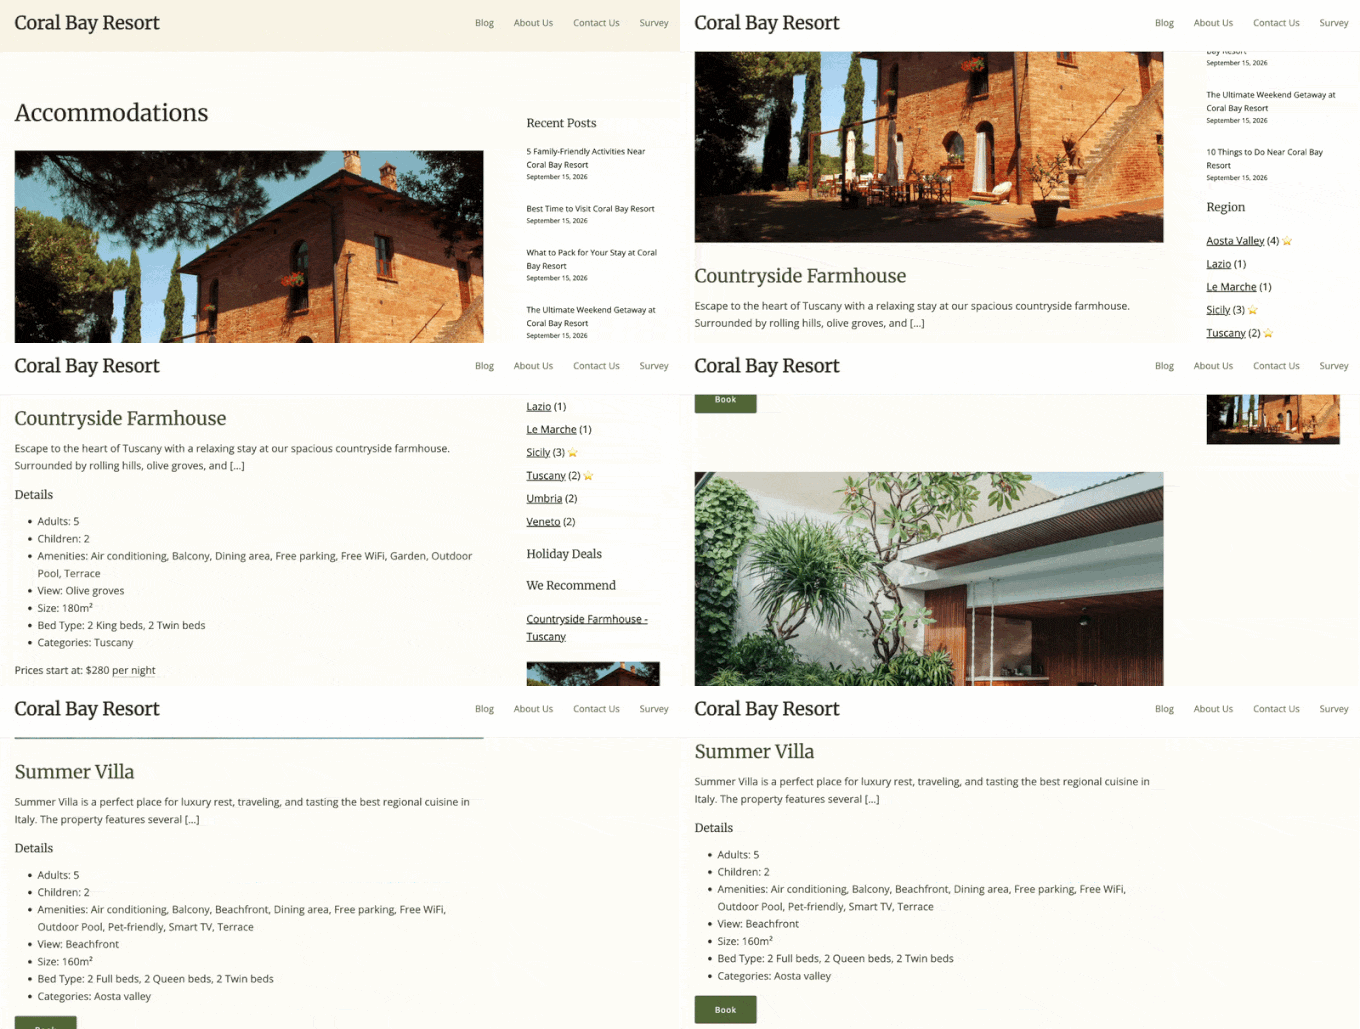
MotoPress Hotel Booking automatically creates the pages needed for the booking process, including your Accommodation listing, individual accommodation pages, Availability Search, and Booking Confirmation pages. The necessary blocks are already in place, so you don’t need to do anything.
For example, the ‘Accommodation’ page lists all your accommodation types. Each listing includes the room name, which links to the individual accommodation page, the featured image, an expandable description, amenities, and a booking button.
That said, you can edit this page to add your own headings, text, or other content. You can revisit our tutorial on how to create a custom page in WordPress for help with this.
Now, here’s what your booking flow should look like:
- Visitors choose their dates and check availability.
- They review the available rooms on the Availability Search page.
- They enter their information and review the booking details on the Booking Confirmation page.
- They complete the booking.
Finally, test the entire process before accepting real bookings. Open your site in an Incognito window or a different browser while logged out, then search for a room and complete a test booking.
FAQs About Hotel Booking in WordPress
Here are some common questions about adding a hotel booking system to WordPress.
Do I need a specific WordPress theme to use MotoPress?
No. MotoPress Hotel Booking works with most well-coded WordPress themes, so you can use it with your existing site. If you’re building a new site, you can also choose from MotoPress’s hotel-specific themes.
For more design options, see our list of the best hotel WordPress themes.
How do I prevent double bookings with Booking.com or Airbnb?
MotoPress automatically updates your availability when a guest books through your website. To sync that availability with Booking.com, Airbnb, or other booking platforms, you’ll need the iCal sync feature in Pro.
I hope this article helped you learn how to add a hotel room booking system in WordPress. You may also want to see our beginner’s guide to adding a customer reviews page in WordPress and our list of the best hotel WordPress themes.
If you liked this article, then please subscribe to our YouTube Channel for WordPress video tutorials. You can also find us on Twitter and Facebook.



sreekanth
hi how can i create the hotel website in which the users can search their desired hotel and flight and here the question is how can i get the data of flights and hotels data into my database
Ray Gulick
No Stripe integration?
ken
only one room type allow which i think no hotel can use this system…
Ramesh
interesting article… very informative & thoughtful message on Booking engine how to setup wordpress calender plugins.
見嘉 洪
I can’t see the “add calendar” drop down menu in the visual post editor.
What should i do now?
After the newest version updated, this problem is solved. Thanks~
Stephan Paul
Seems Wicked but I have multiple rooms available with different prices This seems to just do one price for the one room for one night and i cant seem to find how to add more rooms or different prices
jaimin
how to display all room post list in single page ????
Bongo
Very Nice. Looks simple. Well done guys
John
This plugin looks inviting.
However, if you want to book something without using PayPal you need to pay US$49 for the Pro version.
I wouldn’t mind paying for the pro version, but because I don’t want to use PayPal, I’ve no way of knowing if it will work.
Mark
Hi, great writeup and exactly what I’m in the process of looking for. My problem has been that there are so many options out there. Did you review any other paid/free plugins before writing this article? I’m curious as to what led you to choosing this as Your ‘plugin of choice’ for booking systems.
Thanks,
Mark
WPBeginner Support
There are other plugins with similar functionality. Among the free plugins we found this one. Let us know if you find something better.
Admin