
If you’re running a hotel, an event site, or a travel agency, one feature we always recommend adding in WordPress is a weather forecast.
Think about it. Visitors planning their trips or events often have one burning question: ‘What will the weather be like?’ By providing this information right on your site, you’re not just answering their question. You’re improving their experience and potentially influencing their decision to book.
In this article, we’ll walk you through how to add a sleek, functional weather forecast to your WordPress site.
")
Who Needs a Weather Forecast in WordPress?
Not all websites need to show a weather forecast to their users. However, sometimes, people may make a decision based on upcoming weather conditions.
If you run a website in the travel, event, hotel, bed & breakfast, or similar industry, then visitors may be interested in the upcoming weather.
By showing this information on your website, you can provide a better user experience. This can keep people on your website for longer, which helps you get conversions.
For example, a visitor may decide to complete your hotel booking form if they see the weather data is forecast as hot and sunny.

Even if you don’t run a travel or hospitality website, a WordPress weather widget may still be useful for your visitors.
For example, if you run a travel blog, then readers may use the upcoming forecast to plan their trip.
There are plenty of plugins that can get the most current weather information and then show it beautifully on your website. However, for the best results, you need to find a WordPress plugin that’s fast, user-friendly and doesn’t add lots of links to external weather services.
That being said, let’s take a look at how to easily add a weather update forecast to your WordPress posts, pages, and sidebar widgets. You can use the quick links below to skip to a specific step:
Step 1: Install and Set Up a Location Weather Account
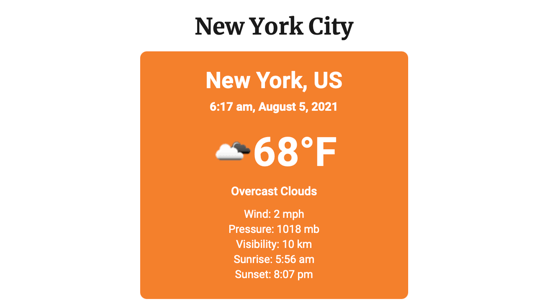
Location Weather is a beginner-friendly WordPress weather plugin that allows you to add a daily forecast to any page or post, or widget-ready area. Using this plugin, you can show the wind speed, temperature, air pressure, visibility, and more.

You can even show the weather report for multiple locations on the same page. To learn more, see our complete Location Weather review.
In this guide, we will be using the free plugin, as it has everything you need to show the weather forecast in WordPress. If you want to show multi-day forecasts or automatically detect the visitor’s location, then there’s also Location Weather Pro.
The first thing you need to do is install and activate the Location Weather plugin. For more details, see our step-by-step guide on how to install a WordPress plugin.
Location Weather gets its real-time forecasts from an online weather service called OpenWeather. To access OpenWeather, you will need to create an API key and then add it to the plugin’s settings.
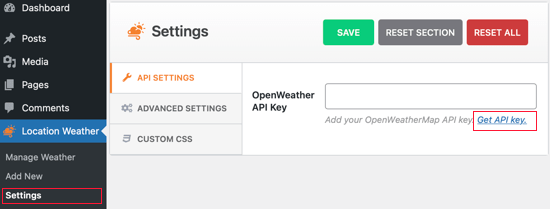
To create a key, go to Location Weather » Settings in the WordPress dashboard. Here, click on the ‘Get API key’ link.
This will take you to a screen where you can create a free OpenWeatherMap account by entering your email address and creating a password.
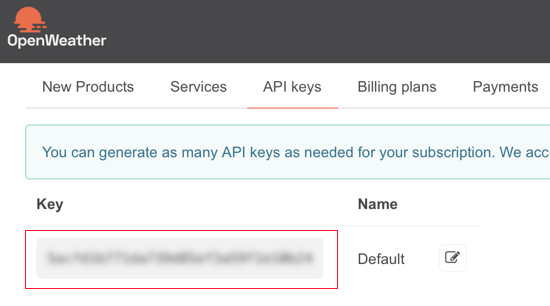
After signing into your OpenWeatherMap account, just click on your name in the toolbar and then select ‘My API keys’.

On this screen, you will see a default API key.
Simply go ahead and copy the key.
Now, switch back to your WordPress dashboard and paste the API key into the OpenWeather API Key box.
With that done, click on the ‘Save Settings’ button to store the API key.

Step 2: Add a Weather Forecast to WordPress
Now, you are ready to add a weather forecast to WordPress by going to Location Weather » Add New.
To start, type in a title for the weather forecast. This will appear above the weather forecast on your WordPress website so it will be visible to visitors.

After that, you need to scroll to ‘City Name’ and type in the location of your weather forecast.
Since we are using the free version, you will need to use the ‘City, Country’ format. This should work fine for most locations.

If multiple locations have the same name, then the plugin might choose the wrong city. If that happens, then you will need to upgrade to Location Weather Pro and then enter the City ID, ZIP, or location coordinates.
Once you have done that, check the units that Location Weather is using for temperature, pressure, and wind speed, and make any necessary changes.
For example, if you live in the US, then you will need to use Fahrenheit.

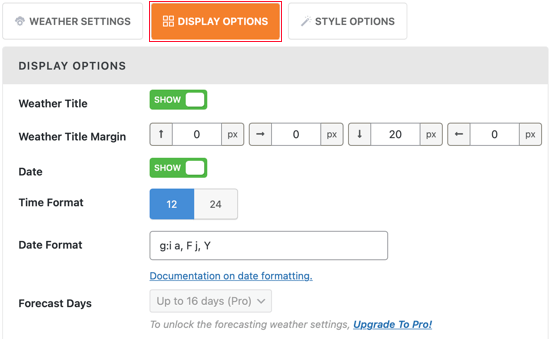
Next, you must select the ‘Display Options’ tab and choose what information you want to show on your WordPress blog.
Most of these settings are straightforward, so you can look through them and make any changes you want.
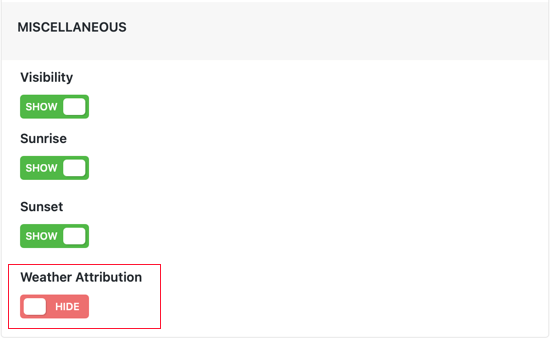
By default, Weather Location will show a ‘Weather from OpenWeatherMap’ message below the forecast.
If you want to hide this text, then scroll to the bottom of the Display Options screen and click to disable the ‘Weather Attribution’ switch.
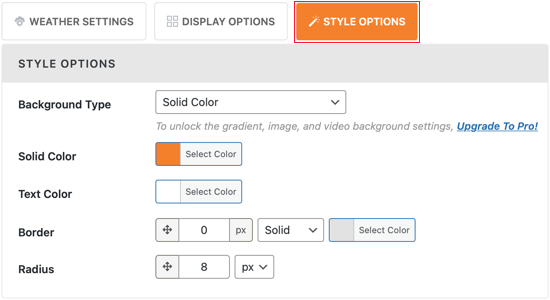
The next tab is ‘Style Options’, which lets you change the background color and the text color in WordPress.
You can also add a colored border or change the radius to create curved corners.
When you are happy with the weather forecast customization options, just click on the ‘Publish’ button.
After that, copy the shortcode that the weather forecast plugin creates automatically.

Step 3: Display the Weather Forecast on Your WordPress Site
You can now add the shortcode to any WordPress post or page or even a widget-ready area. For example, you can add the shortcode to a sidebar so that the weather forecast widget appears across your entire website.
For step-by-step instructions on how to place the shortcode, please see our guide on how to add a shortcode in WordPress and how to add and use WordPress widgets.
If you are using a block-enabled WordPress theme, then you can add the weather forecast to any area of your site using the full-site editor. This includes areas you cannot edit using the standard WordPress content editor.
For example, you might use a weather forecast to improve your 404 page template.
You can learn more about the full-site editor in our complete beginner’s guide to WordPress full-site editing.
After that, you can visit your website to see the WordPress weather widget in action.
Expert Tips to Enhance Your WordPress Site
Besides adding a weather forecast, there are many ways to make your WordPress site more engaging and informative for your visitors. Here are some ideas:
- How to Create a Simple Event Calendar with Sugar Calendar
- How to Add a Countdown Timer Widget in WordPress
- How to Build Customer Loyalty in WordPress with Gamification
- How to Integrate Zoom Meetings & Webinars in WordPress
- How to Add Google Slides Presentations to WordPress
- How to Show Random Quotes in Your WordPress Sidebar
We hope this tutorial helped you learn how to show a weather forecast on your WordPress website. You may also want to check out our expert picks of the best Google Maps plugins for WordPress and our guide on how to add an audio music player widget in WordPress.
If you liked this article, then please subscribe to our YouTube Channel for WordPress video tutorials. You can also find us on Twitter and Facebook.
")


")
Mohamed Shamir
What a fantastic tutorial! Adding a weather forecast to a WordPress site using the Location Weather plugin seems like a breeze, thanks to the clear instructions provided. I’m curious, though does the plugin offer any customization options for the design of the weather widget itself, like font styles or icon sizes?
Thanks for sharing this valuable information. It’s definitely going to elevate the user experience on my website!
WPBeginner Support
The plugin does have customization settings that you can use.
Admin
Jemal Bakars
Hello , thanks for the documentation, But ,what if I want to create a website only focused on ” showing weather forecast”
Can I put AdSense monetisation on my weather forecast website ?
WPBeginner Support
You would either need to create a post or custom post type for the different pages and if your site is approved for Adsense you could use it on your site.
Admin
Ciceer
This blog is very informative and simple. Thank you for the information.
WPBeginner Support
You’re welcome
Admin
schultzter
OpenWeatherMap works better in some countries than others. I tried using it for thunderstorm warnings but the closest it got in my area (eastern Canada) was “strong rain” so I ended up using the Environment Canada’s Weather Office applets.
Gail Issen
This article is very informative. I’m working on a blog for a client whose customers are very aware of the weather. I will definitely add the weather to the sidebar. It will add valuable information to the blog.