
¿Te preocupa mover tu sitio de WordPress a un nuevo nombre de dominio? Es un pensamiento aterrador para muchos propietarios de sitios web.
No quieres perder las clasificaciones de búsqueda y el tráfico que tanto te costó construir. Un movimiento en falso podría resultar en enlaces rotos y visitantes perdidos.
Hemos migrado cientos de sitios web con éxito. Conocemos los pasos exactos que debes seguir para asegurarte de que nada se rompa durante el proceso.
En esta guía, te mostraremos cómo mover fácilmente WordPress a un nuevo dominio sin perder el SEO.
Migrar tu sitio de WordPress a un nuevo nombre de dominio puede dar miedo, pero no tiene por qué ser así. Estamos aquí para guiarte en cada paso del proceso.
Puedes hacer clic en cualquiera de los siguientes enlaces para ir a un paso particular de la migración de tu sitio de WordPress a un nuevo nombre de dominio:
- Qué saber antes de cambiar de dominio
- Pre-pasos: Lo que necesitas para empezar
- Paso 1: Crea un paquete de Duplicator de tu sitio de WordPress
- Paso 2: Crea una base de datos para tu nuevo nombre de dominio
- Paso 3: Desempaqueta WordPress en tu nuevo nombre de dominio
- Paso 4: Configura redirecciones permanentes 301
- Paso 5: Notifica a Google sobre tu nuevo dominio
- Notifica a tus usuarios sobre el nuevo nombre de dominio
- Preguntas frecuentes sobre cómo mover un sitio de WordPress
- Tutorial en video
- Recursos adicionales
Qué saber antes de cambiar de dominio
Antes de empezar, hay algunas cosas que debes saber.
El proceso de transferencia a un nuevo dominio afectará *temporalmente* tus rankings en los motores de búsqueda, ya que Google y otros motores de búsqueda necesitarán ajustarse a los cambios.
También afectará temporalmente tu tráfico de búsqueda. Ten en cuenta que esto es normal y le sucede a todos los sitios web que cambian a un nuevo dominio.
Sin embargo, puedes disminuir drásticamente el impacto en el SEO siguiendo esta guía. Te mostraremos la forma correcta de mover tu sitio de WordPress a un nuevo nombre de dominio, configurar las redirecciones 301 adecuadas y notificar a los motores de búsqueda.
Ten en cuenta que esta guía no es para mover un sitio de WordPress a un nuevo host. Esto es solo para cambiar el nombre de dominio. Si bien el proceso es similar, hay algunos pasos adicionales. Estos pasos adicionales te ayudarán a proteger tus clasificaciones SEO y tu tráfico.
Por último, si tu sitio web antiguo está en WordPress.com, entonces necesitas seguir las instrucciones de nuestra guía sobre cómo migrar de WordPress.com a WordPress.org en su lugar.
Pre-pasos: Lo que necesitas para empezar
En esta guía, asumimos que tienes tu sitio web de WordPress configurado en sitioantiguo.com y que estás intentando migrarlo a sitenuevo.com.
También asumimos que ya tienes una cuenta de hosting de WordPress y que estás familiarizado con el panel de control de tu web hosting.
También necesitarás saber cómo usar un cliente FTP como FileZilla o cómo editar archivos usando la aplicación Administrador de Archivos disponible en el panel de control de tu hosting.
En caso de que no tengas un proveedor de web hosting o estés buscando cambiar a uno nuevo, recomendamos usar Bluehost (ideal para sitios pequeños + viene con un dominio gratuito) y ya sea SiteGround o WP Engine (ideal para sitios más grandes o tiendas en línea).
Una vez que tengas esas cosas listas, ¡estás preparado para comenzar el proceso!
Paso 1: Crea un paquete de Duplicator de tu sitio de WordPress
Lo primero que necesitas hacer es crear una copia de seguridad completa de tu sitio de WordPress.
Luego usarás esta copia de seguridad para crear un duplicado de tu sitio web para que puedas configurar correctamente las redirecciones de tu dominio antiguo al nuevo.
Si bien hay muchos plugins de copia de seguridad de WordPress disponibles, usaremos Duplicator para este tutorial.
Duplicator es el mejor plugin de copia de seguridad y migración de WordPress. Lo hemos utilizado para migrar innumerables sitios web tanto para nuestros propios negocios como para clientes. Hemos descubierto que funciona de manera confiable, incluso para sitios web muy grandes.
Nota: También hay una versión gratuita de Duplicator disponible, que puedes usar para esta migración. Sin embargo, recomendamos actualizar a un plan de pago para desbloquear más funciones como copias de seguridad automáticas en la nube, recuperación de sitios web con un solo clic, migraciones más sencillas y más.
Comencemos instalando y activando el plugin Duplicator en tu nombre de dominio antiguo. Para más detalles, consulta nuestra guía paso a paso sobre cómo instalar un plugin de WordPress.
Una vez activado, el plugin agregará un elemento de menú Duplicator en tu administrador de WordPress. Necesitas ir a la página Duplicator » Backups y luego hacer clic en el botón ‘Crear nuevo’ para crear una nueva copia de seguridad o copia de tu sitio de WordPress.

Duplicator ahora inicializará el asistente de copia de seguridad. Asignará automáticamente un nombre a este paquete.
Haz clic en el botón ‘Siguiente’ para continuar.

Duplicator ahora ejecutará algunas pruebas para ver si todo está en orden. Si el plugin encuentra un problema, verás una advertencia con instrucciones.
Si todos los elementos están marcados como ‘Bueno’, haz clic en el botón ‘Construir’.

El plugin ahora comenzará a crear un paquete duplicado de los archivos de tu sitio web. Dependiendo del tamaño de tu sitio, este proceso puede tardar unos minutos.
Una vez terminado, verás una opción de ‘Descargar’. Al hacer clic en ella, se te mostrarán opciones para descargar Ambos Archivos o descargar el Instalador y el Archivo (zip) por separado.
Elige ‘Descargar Ambos Archivos’ para descargarlos a tu computadora.

El archivo de Archivo es una copia completa de tus archivos de WordPress. Incluye tus temas de WordPress, configuraciones de enlaces permanentes, plugins, subidas y cualquier otro archivo creado por plugins de WordPress.
El script instalador es un archivo PHP que automatizará y ejecutará la migración de WordPress descomprimiendo el archivo de archivo.
Paso 2: Crea una base de datos para tu nuevo nombre de dominio
Antes de mover tu sitio de WordPress al nuevo dominio, necesitarás una nueva base de datos SQL para descomprimir WordPress en tu nuevo nombre de dominio.
Si ya has creado una base de datos, puedes omitir este paso.
Para crear una base de datos, necesitas visitar el panel de control cPanel de tu cuenta de hosting, desplazarte hacia abajo hasta la sección 'Bases de datos' y luego hacer clic en el ícono de 'Bases de datos MySQL'.
Nota: Si estás utilizando un proveedor de alojamiento de WordPress administrado como WP Engine, es posible que no necesites hacer este paso manualmente. Puedes consultar la documentación de tu proveedor de alojamiento para agregar un nuevo sitio o base de datos.
Te mostraremos cómo localizarlo en Bluehost, pero las instrucciones básicas son las mismas y deberían aplicarse a todos los proveedores de alojamiento.
Inicia sesión en el panel de control de tu cuenta de Bluehost y haz clic en el botón 'Configuración' debajo de tu sitio web.

Debajo de la configuración de tu sitio, necesitas cambiar a la pestaña ‘Avanzado’.
Desplázate un poco hacia abajo hasta la sección de cPanel y haz clic en ‘Administrar’.

Esto abrirá el panel de control de cPanel.
Desplázate hacia abajo hasta la sección de Bases de Datos y haz clic en la opción ‘Bases de Datos MySQL’.

Nota: Tu panel de control de hosting puede verse ligeramente diferente a las capturas de pantalla. Sin embargo, aún deberías poder encontrar una sección de Bases de Datos con una opción para crear una nueva base de datos.
Simplemente proporciona un nombre para tu base de datos y luego haz clic en el botón ‘Crear Base de Datos’.

cPanel creará una nueva base de datos para ti. Después de eso, necesitas desplazarte hacia abajo hasta la sección de Usuarios MySQL.
A continuación, proporciona un nombre de usuario y una contraseña para tu nuevo usuario y haz clic en el botón ‘Crear Usuario’. Asegúrate de anotar el nombre de usuario y la contraseña en un lugar seguro.

El nuevo usuario que acabas de crear todavía no tiene permiso para trabajar en la base de datos. Cambiemos eso.
Desplázate hacia abajo hasta la sección ‘Agregar usuario a la base de datos’. Primero, selecciona el usuario de la base de datos que creaste en el menú desplegable junto al campo ‘Usuario’. Luego selecciona la nueva base de datos que acabas de crear y haz clic en el botón ‘Agregar’.

A continuación, se te pedirá que elijas los privilegios para el usuario.
Selecciona ‘Todos los privilegios’ y haz clic en el botón ‘Realizar cambios’ para continuar.

Tu base de datos ahora está lista y se puede usar para mover WordPress al nuevo nombre de dominio.
Asegúrate de anotar el nombre de la base de datos, el nombre de usuario y la contraseña. Necesitarás esta información en el siguiente paso.
Paso 3: Desempaqueta WordPress en tu nuevo nombre de dominio
Ahora, necesitas subir los archivos de Duplicator que descargaste anteriormente a tu nuevo nombre de dominio.
El paquete Duplicator incluye tu instalación de WordPress. Esto significa que no necesitas instalar WordPress en tu nuevo dominio.
Primero, conéctate a tu nombre de dominio usando un cliente FTP. Una vez conectado, asegúrate de que el directorio raíz de tu sitio web esté completamente vacío.
Después de eso, puedes subir los archivos de archivo e instalador al directorio raíz. Esto generalmente se llama public_html.
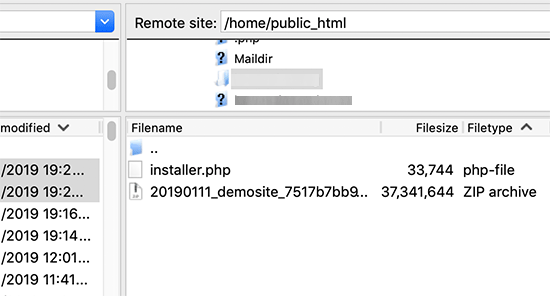
Una vez que ambos archivos hayan terminado de subirse, ahora estás listo para descomprimir WordPress.
Abre una nueva pestaña del navegador y ve a la siguiente URL:
http://example.com/installer.php
No olvides reemplazar example.com con tu nuevo nombre de dominio. Esto iniciará el asistente de migración de Duplicator.
Nota: Si tu nuevo dominio no se abre o te lleva a una página diferente, es posible que debas esperar a que se actualicen la configuración de DNS. Esto puede tardar hasta 24 horas, pero generalmente sucede mucho más rápido.

El instalador buscará el archivo de archivo y luego seleccionará automáticamente las opciones por ti en la pantalla.
Desplázate un poco hacia abajo para ingresar la información de la base de datos que creaste en el paso anterior.

Debajo de eso, Duplicator te mostrará automáticamente la URL de tu dominio antiguo y tu nuevo dominio.
Si todo se ve bien, haz clic en el botón ‘Validar’ para continuar.

Duplicator ahora intentará conectarse a la base de datos utilizando la información que proporcionaste.
Al tener éxito, te mostrará un Pase de Validación. De lo contrario, te mostrará una advertencia con detalles sobre cómo solucionarlo.

Haz clic en el botón ‘Siguiente’ para continuar.
Duplicator ahora comenzará a importar tu sitio web de WordPress. Una vez finalizado, verás un mensaje de éxito con un botón de Inicio de Sesión de Administrador.

Duplicator actualizará automáticamente las URL a tu nuevo nombre de dominio. Ahora puedes hacer clic en el botón 'Inicio de sesión de administrador' para ingresar al área de administración de WordPress de tu nuevo sitio.
Una vez que inicies sesión, Duplicator limpiará automáticamente los archivos de instalación (installer.php y el archivo zip). Este es un paso crítico de seguridad, así que asegúrate de verificar la notificación que confirma que estos archivos han sido eliminados.
Paso 4: Configura redirecciones permanentes 301
El siguiente paso es redirigir a los usuarios que llegan a tu nombre de dominio antiguo al nuevo dominio. Esto se hace configurando redirecciones 301.
Los redireccionamientos 301 son muy importantes para el SEO y la experiencia del usuario. Agregarlos te permitirá redirigir automáticamente a los usuarios y motores de búsqueda a tu nuevo nombre de dominio.
En otras palabras, cada vez que alguien aterrice en una publicación o página de tu dominio antiguo, será redirigido automáticamente a la misma publicación o página en tu nuevo dominio en lugar de ver un error 404.
En este punto, tienes dos sitios web: uno en tu dominio antiguo y otro idéntico en tu nuevo dominio.
Para mantener tus redirecciones en su lugar, debes mantener activa tu antigua instalación de WordPress para que pueda seguir redirigiendo a los visitantes al nuevo.
Hay dos maneras de configurar los redireccionamientos. El primer método es fácil y solo toma unos pocos clics. El segundo método requiere que edites archivos manualmente.
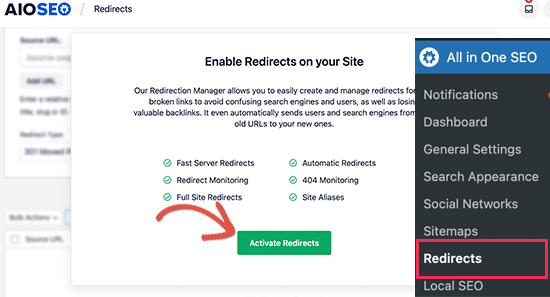
Método 1: Configurar redireccionamientos 301 con All in One SEO
Para este método, necesitarás All in One SEO (AIOSEO). Es el mejor plugin de SEO para WordPress del mercado y te permite optimizar fácilmente tu sitio web de WordPress para SEO.
Primero, necesitas volver al panel de WordPress de tu sitio web antiguo. Luego, instala y activa el plugin All in One SEO. Para más detalles, consulta nuestra guía paso a paso sobre cómo instalar un plugin de WordPress.
Nota: Necesitarás al menos la versión Pro del plugin para acceder al complemento del administrador de redirecciones. También puedes configurar AIOSEO en tu nuevo sitio de WordPress para aumentar aún más tus rankings en motores de búsqueda y tu tráfico.
Al activarlo en tu dominio antiguo, debes visitar la página All in One SEO » Redirects y hacer clic en el botón ‘Activate Redirects’.
A continuación, debes cambiar a la pestaña ‘Full Site Redirect’ y activar el interruptor ‘Relocate Site’.
Después de eso, debes ingresar el nombre de tu nuevo dominio junto a la opción ‘Relocate to domain’.
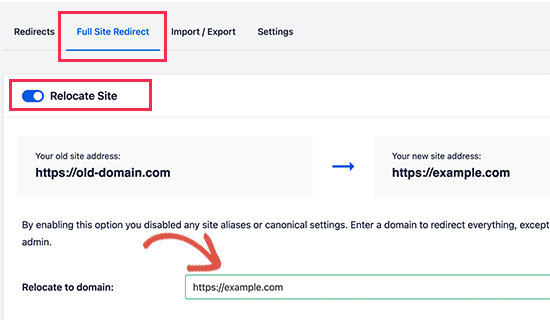
No olvides hacer clic en el botón ‘Guardar Cambios’ para almacenar tu configuración.
Método 2: Configurar redirecciones manualmente al nuevo dominio
Este método requiere que edites el archivo .htaccess de WordPress en tu dominio antiguo.
Nota: Esto solo funciona si tu servidor de hosting utiliza Apache. Si estás usando NGINX (común en hosting administrado como WP Engine), no tendrás un archivo .htaccess. En ese caso, utiliza el Método 1 en su lugar.
Primero, necesitas conectarte a tu sitio antiguo usando FTP y editar el archivo .htaccess.
Este se encontrará en el mismo directorio que tu carpeta wp-includes o wp-admin. Abre el archivo .htaccess y pega las siguientes líneas de código en la parte superior:
#Options +FollowSymLinks
RewriteEngine on
Unchanged: RewriteRule ^(.*)$ http://www.newsite.com/$1 [R=301,L]
Asegúrate de reemplazar newsite.com con tu nuevo dominio en el código anterior.
Una vez que hayas aplicado estos cambios, visita tu dominio antiguo. Debería redirigirte automáticamente al nuevo dominio.
Si no lo hace, significa que la redirección no está configurada correctamente y es probable que tu servidor no admita reglas de redirección. Debes contactar al equipo de soporte de tu empresa de hosting web para que activen RewriteEngine.
Paso 5: Notifica a Google sobre tu nuevo dominio
Ahora que has movido WordPress a un nuevo nombre de dominio y configurado las redirecciones, es hora de notificar a Google sobre tu cambio de dirección. Esto ayudará a Google a encontrar rápidamente el dominio de tu nuevo sitio web y a empezar a mostrarlo en los resultados de búsqueda.
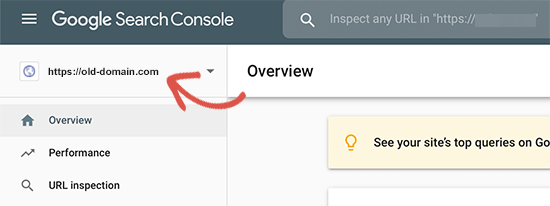
Primero, necesitas asegurarte de que tanto tu dominio nuevo como el antiguo estén agregados a Google Search Console como dos propiedades diferentes. Consulta el paso 1 en nuestra guía de Google Search Console para obtener instrucciones.
A continuación, debes seleccionar el nombre de dominio antiguo como la propiedad activa en el panel de control de tu cuenta de Google Search Console.
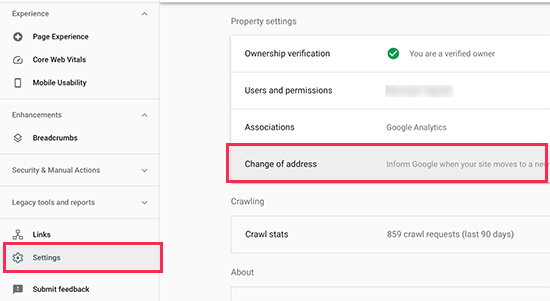
Después de eso, haz clic en el menú Configuración en la columna izquierda.
Ahora, puedes hacer clic en la herramienta ‘Cambio de dirección’.
Ahora, necesitas seleccionar tu nuevo dominio en la sección Actualizar Google.
Luego, deberías hacer clic en el botón ‘Validar y actualizar’.
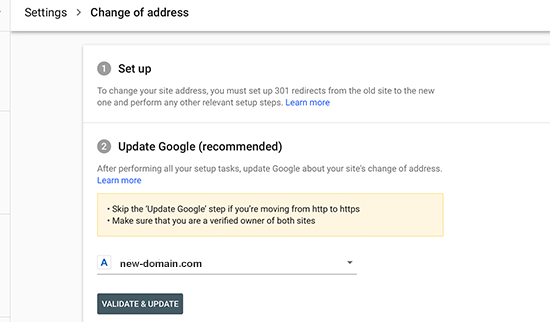
Eso es todo. Google ahora validará que tu dominio antiguo está redirigiendo al nuevo dominio y guardará tus cambios.
En la siguiente pantalla, Google Search Console te mostrará un asistente paso a paso para enviar tu solicitud de cambio de dirección.
Notifica a tus usuarios sobre el nuevo nombre de dominio
Mientras las redirecciones 301 hacen su trabajo, siempre es bueno hacer un anuncio público sobre la migración.
Puedes hacer esto simplemente escribiendo una entrada de blog en tu nuevo sitio y compartiéndola en tus cuentas de redes sociales.
Si tienes un boletín informativo por correo electrónico o suscriptores de notificaciones push, entonces también deberías enviarles un anuncio.
Esto puede ser útil de muchas maneras.
En primer lugar, es más probable que tus usuarios recuerden el nuevo dominio una vez que lean sobre él.
Segundo, puedes pedir a tus usuarios que te avisen si ven algún error. Tú solo no puedes probar tu sitio en todos los tipos de navegadores o entornos de sistema, por lo que siempre es útil tener una nueva perspectiva que lo revise.
Preguntas frecuentes sobre cómo mover un sitio de WordPress
Entendemos que aún podrías tener algunas preguntas sobre la migración de tu sitio de WordPress a un nuevo dominio. Aquí tienes respuestas a algunas de las más comunes que recibimos para ayudarte a tener total confianza en el proceso.
1. ¿Cambiar el nombre de mi dominio afectará permanentemente mi SEO?
No, no lo hará. Siempre y cuando sigas los pasos correctos, mover tu sitio no dañará permanentemente tu SEO. Si bien una caída temporal en las clasificaciones y el tráfico es normal mientras los motores de búsqueda procesan el cambio, esta guía está diseñada para minimizar ese impacto.
Al configurar correctamente las redirecciones 301 (Paso 4) y notificar a Google a través de la Consola de Búsqueda (Paso 5), le estás diciendo a los motores de búsqueda exactamente a dónde te has mudado, permitiéndoles transferir tu autoridad existente al nuevo dominio.
También te puede interesar nuestra guía sobre cómo verificar que tu SEO está intacto después de la migración del dominio de WordPress.
2. ¿Necesito conservar mi dominio anterior después de mudarme al nuevo?
Sí, absolutamente necesitas mantener tu antiguo nombre de dominio activo en el futuro previsible. Tu antiguo dominio es el que aloja las redirecciones permanentes 301 que guían tanto a los usuarios como a los motores de búsqueda a tu nuevo sitio. Dejar que expire rompería todos esos enlaces, lo que llevaría a una pérdida de tráfico y una caída significativa en tus rankings SEO.
3. ¿Cuánto tiempo tarda todo el proceso de migración de dominio?
Los pasos técnicos de esta guía, desde la copia de seguridad de tu sitio hasta la configuración de redirecciones, generalmente se pueden completar en unas pocas horas. Sin embargo, tardará más tiempo en que los motores de búsqueda como Google rastreen e indexen completamente tu nuevo dominio. Si bien notificar a Google acelera esto, pueden pasar varias semanas hasta que tus rankings se estabilicen por completo después de la mudanza.
4. ¿Puedo mover mi sitio de WordPress sin usar un plugin como Duplicator?
Si bien es técnicamente posible mover un sitio manualmente transfiriendo archivos a través de FTP y exportando/importando la base de datos, lo desaconsejamos enérgicamente para la mayoría de los usuarios.
Una migración manual es compleja y tiene un riesgo mucho mayor de errores, como actualizaciones de URL omitidas o problemas de conexión a la base de datos. Un plugin como Duplicator automatiza estos pasos críticos, haciendo que el proceso sea más seguro, rápido y confiable.
5. ¿Cuál es la diferencia principal entre mudarse a un nuevo dominio vs. a un nuevo host?
Piénsalo así: mudarse a un nuevo dominio es como cambiar la dirección de tu negocio. Mudarse a un nuevo host es como cambiar la empresa propietaria del edificio, pero tu dirección sigue siendo la misma. Esta guía es específicamente para cambiar tu dirección (dominio), lo que tiene requisitos SEO únicos, como las redirecciones 301, que son críticos para el éxito.
Tutorial en video
Recursos adicionales
Esperamos que este tutorial te haya ayudado a mover tu sitio de WordPress a un nuevo nombre de dominio. Los siguientes artículos y tutoriales te ayudarán a rastrear y recuperar tus clasificaciones SEO después de migrar a un nuevo nombre de dominio:
- La Lista de Verificación Definitiva para Migración SEO de WordPress (Para Principiantes)
- Cómo Comprobar Si las Publicaciones de Tu Blog de WordPress Están Posicionándose para las Palabras Clave Correctas
- Cómo Rastrear Visitantes del Sitio Web a Tu Sitio de WordPress
- Consejos para Optimizar Tus Publicaciones de Blog para SEO Como un Profesional (Lista de Verificación)
Si te gustó este artículo, suscríbete a nuestro Canal de YouTube para ver tutoriales en video de WordPress. También puedes encontrarnos en Twitter y Facebook.

")
")

Personal de WPBeginner
No estamos seguros de esta opción, no la hemos probado nosotros mismos, así que no podemos recomendarla. Cualquier redirección que configures debe ser 301 para que los motores de búsqueda puedan actualizar la nueva ubicación.
vikramforever
Tengo mi dominio con GoDaddy y tienen una opción de redirección con coincidencia de ruta mencionada en su página de ayuda: http://support.godaddy.com/help/article/5120/redirect-urls-with-your-hosting-account.
¿Es esta una opción factible cuando transfiero mi sitio activo a otro dominio? Según la opción en la publicación, necesito mantener el hosting de mi dominio antiguo hasta el momento en que quiera que funcionen las redirecciones. Usar la redirección con la opción 'coincidir ruta' eliminaría la necesidad de hacerlo. Pero quiero estar seguro de que esta es una opción que funciona de la misma manera que el script (como mencionaste).
Keely Worth
Excelente, hace que el proceso de mover un sitio de WordPress sea muy fácil. Gracias.
Ayman
Acabo de migrar un sitio web de una URL a otra. Realmente me gustaría agradecerles por esta excelente publicación. Instrucciones muy sencillas y 100% funcionales
Anas Khan
Buena publicación. Yo también tengo algunas preguntas,
Tengo 2 blogs en WordPress. El nuevo blog está activo y tengo 45 publicaciones en mi nuevo blog. El blog antiguo tiene 192 publicaciones y todas están indexadas en Google.
Ahora quiero transferir y publicar las 192 publicaciones antiguas en mi nuevo blog para que todas se puedan ver en mi nuevo blog. Si elimino todas las publicaciones de mi blog antiguo, elimino el mapa del sitio y la herramienta para webmasters del blog antiguo y después de 30 días publico las publicaciones antiguas en el nuevo blog usando el botón 'Agregar nueva publicación', ¿funciona? ¿Se considera contenido duplicado?
Soporte de WPBeginner
Puedes simplemente importar esas publicaciones a tu nuevo blog y configurar una redirección 301 en tus publicaciones antiguas, publicación por publicación.
Administrador
Mohammed Saimon
Sí, es una buena publicación. Gracias al autor.
Vinish Garg
Este es un excelente post y me dio una nueva dirección para mover mi blog de WP de un dominio a otro. Te agradecería si pudieras corregirme si me equivoco al planificarlo de la siguiente manera.
– Conozco HostGator y entiendo cómo usar el Administrador de archivos y configurar WP, la base de datos y la importación/exportación de bases de datos (archivos XML)
– Mi blog de WP actual está en: http;//www.example.com, y quiero moverlo a otro dominio http://www.example.org.
– Primero, configuraré un nuevo WP en la raíz del nuevo dominio (base de datos, archivo de configuración, tema personalizado e importación del archivo de datos del sitio antiguo)
– El nuevo sitio mostrará el sitio exactamente como el sitio antiguo, PERO la única diferencia es la URL (debido al nuevo dominio).
Si todo es correcto hasta ahora… no estoy seguro de cómo usar las redirecciones para todas las páginas/publicaciones de mi dominio antiguo al nuevo dominio. ¿Podrían por favor aconsejarme?
Soporte de WPBeginner
Puedes hacerlo siguiendo el paso 3 de esta guía, configurando redirecciones 301.
Administrador
Stefan
Gran publicación, desafortunadamente la leí demasiado tarde y ya moví mi dominio. Todo lo que hice fue comprar un nuevo dominio para mi blog (, antes era todavía está activo por otros 2 meses). Cambié la URL de WordPress y la Dirección del sitio en la configuración general de WordPress y volví a enviar el mapa del sitio con la nueva URL. Eso es todo lo que hice.
Esto fue hace un mes y desde entonces el tráfico ha bajado totalmente, de más de 1,000 visitas a la página al día a no tener ni 200.
Si busco en Google "thailand redcat" ni una sola de mis páginas aparece. Sin embargo, el mapa del sitio se ha enviado con éxito:
2:51:35pmStefan
¿Sabes cuál podría ser la razón de esto y cómo puedo resolver el problema y hacer que los resultados de búsqueda y, finalmente, el tráfico vuelvan a la normalidad?
Cualquier ayuda sería muy apreciada. ¡Saludos!
Soporte de WPBeginner
Stefan, no estamos seguros de entender el proceso que seguiste para mover tu sitio a un nuevo dominio. Aquí tienes algunos consejos generales. Primero, asegúrate de que los bots de búsqueda puedan rastrear e indexar tu sitio. Revisa tu sitio en Google Search Console para ver errores de rastreo.
Administrador
Charlie
Tengo el mismo problema. Los rastreadores de Google encuentran un error 500 en todo el sitio desde que hice la migración. Lo intenté en 2 entornos/proveedores diferentes, diferentes versiones de PHP, intenté desactivar/reactivar todos mis plugins uno por uno, intenté regenerar los permalinks, el htaccess, el robots.txt… nada funciona.
Mr Joy
Gracias por tu excelente post. Seguí tu post y moví mi sitio a un nuevo dominio. Todo funciona bien, pero hay un solo problema en mi sitio con respecto al editor visual de WordPress. El problema es: "Cuando subo una imagen en cualquier publicación a través de la opción Agregar medios, luego hago clic en la miniatura de la imagen "editar imagen", aparece un iFrame con un error de no encontrado". Pero cuando hago clic en eliminar, funciona bien. Por favor, ayúdame a resolver el problema. Mira la captura de pantalla: http://bit.ly/1fqjE1b
Soporte de WPBeginner
Lo primero que puedes intentar es actualizar tus permalinks, simplemente ve a Ajustes » Permalinks y haz clic en el botón de guardar cambios.
Administrador
AP
Excelente trabajo, ¡muchas gracias! Sería útil agregar la respuesta anterior, la que trata sobre la creación y uso de una nueva base de datos, a las instrucciones iniciales, ya que no todos leerán los comentarios antes de intentar una transferencia.
Gary Kirwan
Gran artículo. Mi pregunta es que uso el método de ocultación de afiliados recomendado por Yoast, lo que significa que tengo un archivo .htaccess en una carpeta llamada /out/
¿Necesitaría agregar el mismo código de redirección 301 mencionado en el artículo a ambos archivos .htaccess en el directorio raíz y en la subcarpeta de enlaces de afiliados? ¿Agregar el código de redirección 301 solo al archivo .htaccess del directorio raíz cubre automáticamente el de las subcarpetas?
Mi objetivo es asegurarme de que los enlaces de afiliados externos funcionen correctamente también.
Kingsley
Gran tutorial, lo usaré para migrar http://www.ideacrunch.org a http://technblogging.com en los próximos días, pero tengo una pregunta. ¿La contraseña y el nombre de usuario de la base de datos serán los mismos que los del sitio antiguo?
Craig
Hola, aprecio que esto sea un poco tarde. Pero literalmente solo quiero moverme de http://www.unlockworldtv.co.uk a http://www.unlockworldtv.com, ¿es este tutorial adecuado para eso? No me estoy mudando de host, solo cambiando la URL.
Soporte de WPBeginner
Sí, lo es.
Administrador
Craig
Gracias. Me quedé atascado en ir a newsite.com/installer.php, solo obtengo mi sitio antiguo pero con 404. No instalé wp en el nuevo directorio, solo creé un directorio vacío para poner el instalador y el zip. Estoy apuntando mi nuevo dominio desde la cuenta del registrador a ese nuevo directorio con mi host web, pero no obtengo nada más que el tema y 404. ¿Algún consejo obvio?
Craig
solo para que lo sepas, lo resolví. Parece ser un problema con 1&1 (no es de extrañar), pero se puede resolver teniendo un archivo index.html presente. Así que para cualquiera en 1&1, ajuste el paso 2 de
Asegúrate de que el directorio raíz, o el directorio donde quieres copiar tu sitio web esté completamente vacío, excepto por installer.php, el archivo .zip Y una página index.html
Creo que esto tiene que ver con la forma en que 1&1 prioriza las páginas en su servidor.
Denis Fitzgerald
Hola – Gracias por el artículo. Tengo una pregunta: Estoy cambiando mi sitio de Tumblr a Wordpress. Tiene su propio dominio. Me gustaría saber si los botones al final de cada artículo que muestran las comparticiones sociales, Twitter, Facebook, Google+, mantendrán el conteo original de comparticiones o volverán a cero. Gracias.
Soporte de WPBeginner
Si es el mismo dominio y la estructura de tu URL permanece intacta, entonces esperemos que puedas conservar esos conteos sociales.
Administrador
Bertjan
¡Excelente guía! Muchas gracias.
Sudha Mathew
Hola, hace unos 6 meses moví mi sitio usando redirecciones y funciona bien. Necesito renovar mi contrato con la empresa de seguridad web pronto. Así que necesito saber cuántico tráfico todavía se está redirigiendo desde el sitio antiguo. ¿Podrías explicarme cómo hacer eso? No soy experto en tecnología pero puedo usar tanto las herramientas de Webmaster como Google Analytics. ¡Gracias de antemano!
Mejor
Sudha
Moti
Hola,
Me gustaría cambiar el nombre de dominio de mi sitio (permaneciendo en el mismo host).
En las instrucciones anteriores se indica que debo “asegurarme de que el directorio raíz, o el directorio donde desea copiar su sitio web esté completamente vacío”.
En mi caso, WP está instalado en el directorio raíz (tengo la carpeta wp-content dentro de public-html) – asumo que esto significa que mi WP está instalado en el directorio raíz.
¿Qué carpetas debo limpiar / eliminar antes de ejecutar el archivo instalado generado por el duplicador?
Gracias,
Moti.
Declan
Gracias por el tutorial. Funcionó de maravilla sin ningún problema.
Tengo, por supuesto, una pregunta sobre SEO.
Mi sitio antiguo no estaba registrado en Google Webmaster Tools, así que obviamente no hay opción para informarles sobre los cambios que he realizado. Mi pregunta es: ¿Necesito registrar primero mi dominio antiguo en Google Webmaster Tools, y luego mi segundo dominio… y luego informarles sobre los cambios?
Cualquier comentario sería genial.
Gracias de nuevo por el artículo, fue de gran ayuda.
Declan.
Soporte de WPBeginner
Sí, tendrás que notificar sobre el cambio en la cuenta de herramientas para webmasters de tu sitio antiguo. Sin embargo, esta es solo la forma más rápida de hacerlo. Si configuraste tus redirecciones 302, los motores de búsqueda también lo detectarán.
Administrador
reza
hola,
esto funciona de maravilla, redirijo mi old.com que es mi dominio principal a new.com que es un dominio adicional (en el mismo hosting)
pero cuando agregué otro nuevo dominio adicional, hace que mi nuevo dominio adicional no se pueda acceder... siempre redirige mi addon.com a new.com/addon.com...
¿puedes ayudar??
Jennifer @ Delicieux
Gracias por explicar esto con tanto detalle. Sin embargo, tengo una pregunta. He estado pensando en mudarme a un nuevo nombre de dominio desde hace tiempo, pero quería saber si tendría algún problema dado que a principios de año cambié la estructura de permalinks de mi antiguo blog.
Seguí las instrucciones de Yoast sobre cómo cambiar mi estructura de permalinks y edité mi archivo .htaccess, y me pregunto si esto causará problemas cuando me mude a un nuevo dominio. Esta es la única cosa que me detiene porque no quiero que las cosas salgan mal y pierda mi ranking y termine con enlaces rotos.
Soporte de WPBeginner
puedes transferir tu antiguo archivo .htaccess a tu nuevo sitio. Si el archivo .htaccess tiene alguna referencia al antiguo nombre de dominio, reemplázalas con el nuevo nombre de dominio y estarás bien.
Administrador
Hrayr
¡Hola! Primero que nada, muchas gracias por este artículo. ¡Me funcionó de maravilla sin ningún problema!
Tengo una pregunta simple específica para mi caso, agradecería mucho tu opinión al respecto.
Básicamente, usé este enfoque para copiar mi sitio de WordPress de localhost al host/dominio de un tercero.
Como dije, todo funcionó bien. Solo quiero asegurarme de que este enfoque no deje ninguna URL/enlace/referencia antigua que pueda "molestar" a Google al rastrear este nuevo sitio. Mi sitio es bastante básico, así que en el peor de los casos, puedo simplemente recrearlo si hay alguna desventaja en el rastreo/SEO cuando el sitio se copia con duplicator.
¿Hay algún problema de SEO conocido con el nuevo sitio del que estés al tanto?
Soporte de WPBeginner
No somos conscientes de ningún problema de SEO, pero si encuentras alguno, puedes informar al autor del plugin abriendo un hilo de soporte en la página del plugin.
Administrador
Kevin
No creo que la forma en que sugieres que los usuarios hagan su redirección 301 sea la mejor. Está bien documentado, incluso recomendado por Google, que hagas redirecciones de página a página, NO que vacíes todas las páginas de tu sitio web antiguo en la página principal del nuevo sitio. El código htaccess que proporcionas hace lo último. No es una buena manera de preservar el jugo de enlaces.
¿Quizás puedas referirnos a un buen tutorial de htaccess en su lugar? También hay generadores de htaccess en línea que pueden hacer que sea mucho más rápido hacer redirecciones de página a página.
Soporte de WPBeginner
Kevin, tienes razón y las reglas de reescritura en el artículo hacen exactamente eso. En lugar de redirigir a los usuarios a la página principal, los envía a la página individual. El $1 al final del código anexa el enlace con la estructura de permalink correcta.
Administrador
Julian
Hola, cuando hago esto después del 'despliegue', se omite la sección de 'actualización' y vuelve a una página 404 en la antigua dirección web... ¿alguna idea de qué podría estar causando esto?
¡Muchas gracias!
Munna
Muchas gracias por esta publicación. Estaba en problemas para redirigir a los visitantes de mi sitio antiguo al nuevo sitio. Pero tu código .htaccess lo hizo súper fácil porque ambos sitios estaban en el mismo servidor de hosting.
Raspal
Hola,
Completé todos los pasos y el blog en el nuevo sitio está funcionando bien. Pero no puedo iniciar sesión en el área de administración. Tengo dos usuarios, uno es un usuario administrador. Recibo este error al intentar iniciar sesión:
"ERROR: Las cookies están bloqueadas o no son compatibles con tu navegador. Debes habilitar las cookies para usar WordPress."
Probé con diferentes navegadores y también intenté borrar las cookies. También intenté cambiar la contraseña. La contraseña se cambió bien, pero sigo recibiendo el error anterior.
¿Puedes ayudarme lo antes posible?
Usando WP versión 3.7.1
Saludos,
Raspal
Neil Bargas
¡Gracias, amigo! 100% funcionando y con instrucciones muy sencillas.
Lynn
¡Artículo fantástico! Eres mi héroe del día.
Jahid
”Inicia sesión en el WordPress de tu nuevo sitio usando el mismo nombre de usuario y contraseña que tenías en el sitio anterior. Ve a Ajustes » Enlaces permanentes en el WordPress de tu nuevo sitio y haz clic en el botón de guardar.”
Una vez que inicio sesión, me muestra la página del primer paso "Paso 1: Archivos y base de datos" en lugar de mostrarme el panel de control de WP. ¡Ayuda!
Soporte de WPBeginner
Parece que necesitas actualizar tu archivo wp-config.php
Administrador
Chrissy
¡Hola! Muchas gracias por este útil artículo. Estoy en proceso de seguir los pasos ahora.
Mi única pregunta es:
Tengo mi blog alojado en un dominio, llamémoslo http://www.reallylongdomainname.com/blog, pero tengo una redirección para enviarlo a mi otro dominio: blog.shortername.com. Ahora quiero migrar el blog a shortername.com/blog, porque algunos de los enlaces no funcionan después de la redirección.
Todas mis publicaciones y demás ya tienen enlaces permanentes en shortname.com/blog/post#, así que, ¿realmente necesito hacer algo de esto de las redirecciones 301? ¿Puedo omitir los pasos 3, 4 y 5 sin problemas, o hay algo que deba considerar? Y, ¿necesitaré eliminar el blog antiguo o solo la redirección una vez que lo lance en el nuevo dominio?
Sería genial saber cómo proceder, ya que he intentado docenas de cosas esta semana y ninguna situación es exactamente como la mía :/ ¡Gracias!
Soporte de WPBeginner
El propósito de las redirecciones 301 es no solo redirigir a los usuarios, sino también informar a los motores de búsqueda que te has mudado a una nueva ubicación, por lo que los pasos 3 y 4 son obligatorios, de lo contrario, podría afectar tus rankings SEO.
Administrador
Mark P
Gran publicación. Una pregunta, sin embargo.
Digamos que alguien hace clic en un enlace entrante a mi dominio antiguo. (Llamémoslo dominioviejo punto com / entrada-de-blog1). ¿Esto redirigirá entonces al enlace correspondiente del nuevo dominio (nuevodominio punto com / entrada-de-blog1) en lugar de simplemente redirigir a la página de inicio del nuevo dominio?
Soporte de WPBeginner
Sí, redirigiría a los usuarios que lleguen a tus entradas y páginas del sitio antiguo a las entradas/páginas del sitio nuevo.
Administrador
Mark P
¡Gracias!
Morgan
Pregunta: Estoy cambiando mi sitio de un host a un nuevo host. Al mismo tiempo, estoy cambiando el nombre de mi dominio. Ya he transferido con éxito mi sitio de WordPress a mi nuevo host usando el nuevo nombre de dominio. Ahora estoy en el paso 3 y quiero usar redirecciones 301 para apuntar esas URL antiguas a las URL del nuevo sitio. Sin embargo, el sitio antiguo está en el host antiguo y planeo deshacerme de ese sitio.
¿Las redirecciones 301 seguirán funcionando? ¿O también necesito mover el sitio antiguo a mi nuevo host y LUEGO hacer las redirecciones? No estoy muy seguro de qué hacer y agradecería cualquier consejo.
Soporte de WPBeginner
Si es posible que mantengas el sitio antiguo en línea durante al menos un mes, entonces puedes agregar la redirección 301. Después de eso, actualiza la información de tu sitio en las herramientas para webmasters de Google. Una vez que hayas recuperado tus rankings de búsqueda y tráfico, puedes cerrar tu cuenta con el host web antiguo.
Administrador
Nj
Gracias por las útiles publicaciones, pero a veces con este tipo de plugins, un video ayudaría MUCHO. Espero que lo consideres
Gracias de nuevo
Arnold
Hola. ¿Podrías por favor explicar la parte donde dijiste “El instalador te pedirá que proporciones información de la base de datos para el nuevo sitio y marques la casilla para eliminar tablas?” ¿Dónde encuentro esta información de la base de datos? Entonces, ¿debo marcar la casilla para eliminar tablas? ¡Gracias!
Soporte de WPBeginner
Esta es la base de datos desde la que importarás tu sitio antiguo del paquete que creaste anteriormente. Inicia sesión en tu panel de control de hosting web, busca phpmyadmin y crea una nueva base de datos. Vuelve a installer.php y proporciona el nuevo nombre de la base de datos, host, usuario y contraseña.
Administrador
Kara Lumsden
Entonces, ¿no deberías instalar WordPress en la raíz del nuevo dominio? Lo único que necesitas hacer en el nuevo dominio es solo crear una nueva base de datos, ¿es correcto? ¿Puedes explicar un poco más cómo crear la base de datos en phpmyadmin?
¡Muy agradecido, gracias por todo lo que haces!
Soporte de WPBeginner
No, está bien instalar WordPress en la raíz del nuevo dominio. Sí, solo necesitas crear una nueva base de datos y Duplicator se encarga del resto.
Kara Lumsden
¿Puedes por favor proporcionar instrucciones sobre cómo crear la base de datos?
Muchas gracias,
Kara
Dennis J. Smith
¿Cuánto tiempo se debe esperar antes de eliminar el sitio antiguo?
Soporte de WPBeginner
De 30 a 90 días, depende de qué tan exitosa haya sido tu mudanza. Si confías en que tu nuevo dominio ha ganado casi el mismo tráfico que el sitio antiguo, entonces puedes eliminarlo.
Administrador
dyer
Hola, he encontrado un problema. No puedo guardar mis Permalinks porque no encuentro el archivo WP admin. He intentado subir el archivo WP admin de nuevo, pero esto no ha solucionado el problema. ¿Podrías por favor aconsejarme si hay algún otro paso que pueda seguir para rectificar este problema?
Gracias
Dyer
Soporte de WPBeginner
@dyer No podemos entender tu pregunta. Asumimos que no puedes acceder a tu área de administración de WordPress. En ese caso, conéctate a tu sitio usando un cliente FTP como FileZilla. Busca el archivo
.htaccessdescárgalo a tu disco duro y elimínalo de tu sitio web. Esperamos que esto resuelva tu problema.Administrador
Fakhre
¡Gracias por el artículo, chicos!
Estoy alojando mi sitio en Bluehost y solo quiero cambiar el nombre de dominio sin perder el SEO y los backlinks.
El contenido de mi sitio es enorme, tengo alrededor de 8000 publicaciones. ¿Alguna solución para renombrar el dominio??
Sanjay Patel
Hola…
Información realmente útil pero el plugin duplicador no funciona en mi sitio web. Por favor, soluciona mi problema. ¿Cómo hago esto?
Gracias de antemano.
Dinah
¿Funciona esto al mover de un dominio a un subdominio?
Personal editorial
Sí
Administrador
Dinah
¿Funciona esto para mover a un nuevo subdominio? Como si mi blog de WordPress estuviera en oldsite.com y quisiera que estuviera en blog.newsite.com, ¿haría lo mismo?
Personal editorial
Sí.
Administrador
Emmie
Recientemente hice esto y los enlaces y todo se redirigió bien y bonito, sin embargo, Google me penalizó por tener tantos backlinks de inmediato; piensan que los compré. ¿Alguien más se ha encontrado con esto? Hice las notificaciones apropiadas en las herramientas para webmasters de Google antes de mudarme, y eso no ha ayudado en nada. Me ha afectado mucho, así que si alguien tiene experiencia en remediar esto, ¡por favor comparta!
Personal editorial
Hola Emmie, ¿dónde ves que te penalizan por tener demasiados backlinks? ¿Te muestra ese error en tus Herramientas para Webmasters? Solo estoy tratando de ver cómo llegaste a la conclusión de que fuiste penalizada por Google.
https://www.google.com/webmasters/tools/reconsideration << Esta es la página donde puedes enviar una solicitud de reconsideración a Google.
Administrador
Lateef Adewale
¿Tienes alguna idea si esto funcionará si estoy moviendo un sitio de Bluehost a Wp Engine?
Personal editorial
Sí, debería funcionar.
Administrador
Emily
Acabo de pasar por todo este proceso, funcionó perfectamente y justo lo que necesitaba saber. ¡Gracias WPBeginner! El único inconveniente que tuve fue mi culpa: no desactivé mis plugins de seguridad primero, así que tuve que hacerlo todo de nuevo. Ahora, soy un experto... : )
Sandra Christie
¡Gracias por el artículo!
¿Los pasos para mover un dominio a un nuevo host son básicamente los mismos? ¿Y eso también puede causar una caída en el SEO?
Travis Pflanz
Además, la opción “Cambio de dirección” en Webmaster Tools ahora se encuentra en el menú Opciones en la parte superior derecha, en el ícono de engranaje.
Zach Smith
Gracias por publicar otro gran artículo para nosotros. Esto es lo mejor para cualquier blog relacionado con la tecnología.
Bob
Gracias, esta es una gran información. Estoy muy emocionado de aprender sobre Duplicator. Si bien mover un dominio es algo que podría tener que hacer ocasionalmente, constantemente clono entornos para fines de desarrollo y pruebas. El proceso de clonación manual que he estado usando consume mucho tiempo y es propenso a errores. ¡Duplicator tiene el potencial de ser una mejora considerable!
Sam
Acabo de mover WP a un nuevo dominio y servidor usando este método. Webmaster Tools ahora muestra muchos errores 403 en el nuevo servidor para cada carpeta en uploads, como wp-content/uploads/2012/07 y un error 403 por cada uno de los meses. En mi servidor antiguo no tuve esto. Al mover el sitio, ¿deberíamos también cambiar o verificar los permisos? ¿Cuáles deberían ser para la carpeta wp-content/uploads?
Personal editorial
Google no debería indexar las carpetas, sino los archivos dentro de ellas. Si intentas acceder a la carpeta directamente usando un navegador, WordPress te dará un error 404. No quieres permitir el acceso a un directorio que no tiene una página de índice, lo que luego producirá una lista de directorios que se indexará y rastreará, incluidos los enlaces a todos los archivos.
Administrador
sam
Gracias por la respuesta. Entonces, ¿por qué Google muestra un error 403 para las carpetas en Webmaster Tools? ¿No significa esto que algo está mal?
Zimbrul
¡¡ESTE ES EL ARTÍCULO QUE ESTABA BUSCANDO POR 1 AÑO!!
Personal editorial
Más vale tarde que nunca
Administrador
Jasim Ahmed
Duplicator es un gran plugin, pero el problema es que no funciona con algunos servidores, ya que necesita una versión de PHP más alta. Aparte de eso, ¿hay alguna otra forma de hacerlo?
Personal editorial
Yes, you can manually download the files and the database. Upload them on the new domain. Replace all the old url instances in the database using phpMyAdmin SQL search and replace query. The easier solution would be to ask your host why they are not on the higher versions of PHP or switch to a better host.
Administrador
iAn
hi, I believe this won’t preserve your social network network sharing counters (number of shares and likes). Any idea how to retain those popularity meter?
Personal editorial
You can’t retain the social counts because those go based on your canonical URLs which will be the new site (very important for SEO). The counters are mainly for social proof. All existing links in social media will properly redirect, so you won’t lose any traffic there.
Administrador