Una de las primeras cosas que hacemos cuando queremos renovar un sitio web es clonarlo en un entorno local o de ensayo. De esta forma, podemos crear una réplica exacta del sitio en el que estamos trabajando sin afectar a la versión en vivo.
Si eres propietario de un sitio web con escasos o nulos conocimientos técnicos, probablemente estés cansado de ver cómo los cambios que realizas dan lugar a errores inesperados. Quieres intentar clonar tu sitio WordPress para hacer pruebas, pero temes que el proceso sea demasiado difícil.
En realidad es todo lo contrario. Con el plugin Duplicator, clonar un sitio de WordPress es superfácil, y en este artículo te mostraremos cómo.
¿Qué es la clonación de sitios web de WordPress y por qué utilizarla?
La idea detrás de la clonación de un sitio web de WordPress es que usted hace una copia exacta de un sitio y aplicarlo a otro sitio.
Hay muchas razones por las que puede necesitar clonar un sitio web. Por ejemplo, puede que esté trasladando un sitio a un nuevo alojamiento o a un nuevo nombre de dominio. Al clonar un sitio web, puedes ahorrar mucho tiempo y esfuerzo y completar el proceso de migración mucho más rápido.
Otro ejemplo es desarrollar un sitio web para un cliente en tu propio host local. Una vez terminado el trabajo, basta con clonar el sitio y trasladarlo al servidor del cliente.
También puede clonar un sitio de WordPress en vivo y establecer un sitio de ensayo para probar los cambios antes de hacerlos en vivo.
Dicho esto, vamos a mostrarte cómo puedes clonar un sitio de WordPress en unos sencillos pasos. Puedes utilizar los enlaces rápidos que aparecen a continuación para navegar por el tutorial:
- Step 1: Set Up the Duplicator WordPress Plugin for Easy Cloning
- Step 2: Create a Duplicator Package of Your WordPress Site
- Step 3: Upload Your WordPress Site Archive and Installer to a New Location
- Step 4: Create a New WordPress Database for Your Website
- Step 5: Run the WordPress Website Importer Script
- Step 6: Test Your Cloned Website and Delete Temporary Files
Paso 1: Establecer el plugin Duplicator WordPress para facilitar la clonación
La mejor manera de clonar un sitio web de WordPress es utilizando el plugin Duplicator. Es un potente plugin de clonación y duplicación de WordPress que sigue siendo muy fácil de usar.
El plugin realiza copias de seguridad de todo el contenido de tu sitio web en un único archivo, que puedes mover a la nueva ubicación.
Lo primero que tienes que hacer es activar e instalar el plugin en el sitio web que quieres clonar. Para más detalles, consulta nuestra guía paso a paso sobre cómo instalar un plugin de WordPress.
Nota: Existe una versión pro de Duplicator que tiene características adicionales como copias de seguridad programadas, migración multisitio y más. Sin embargo, vamos a utilizar la versión gratuita para esta guía, ya que tiene todo lo necesario para clonar un sitio web de WordPress.
Paso 2: Crear un paquete duplicador de su sitio WordPress
Una vez activado, vaya a Duplicator ” Copias de seguridad y, a continuación, haga clic en el botón “Crear nuevo” situado en la parte superior de la página.
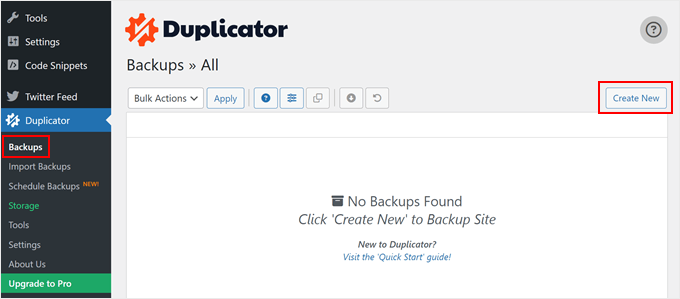
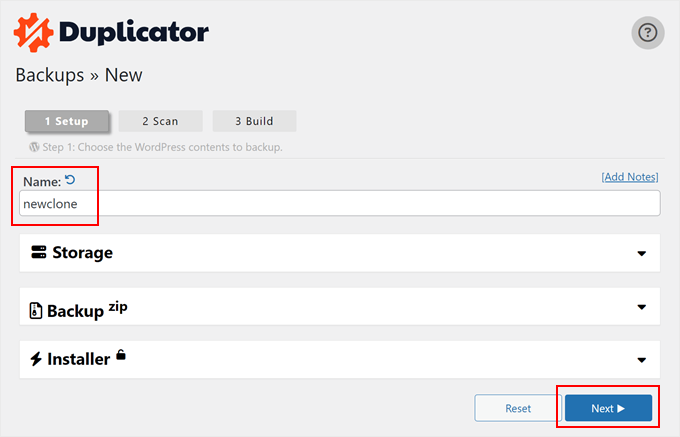
A continuación, aparecerá una pantalla en la que podrá introducir un nombre para el archivo duplicado. Esto es sólo para su referencia, por lo que puede utilizar cualquier cosa que desee.
A continuación, haga clic en el botón “Continuar”.
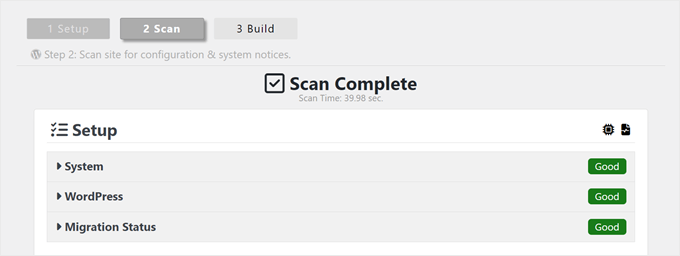
Duplicator explorará su sitio.
Si encuentra un problema con cualquier parte de su sitio web WordPress, verá una advertencia con información sobre cómo corregir el problema. De lo contrario, simplemente dirá “Bien”.
Ahora, desplázate por la página.
A continuación, haga clic en “Crear” para crear el archivo de copia de seguridad.
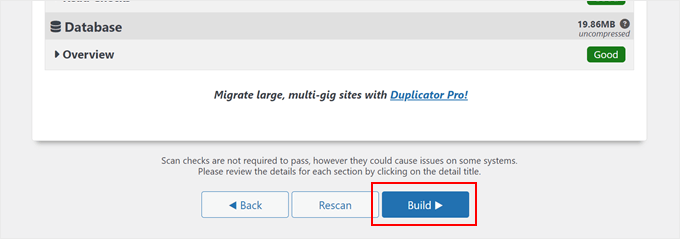
El plugin ahora hará una copia de seguridad de su base de datos de WordPress, imágenes, plantillas, plugins y todos los demás archivos en un único paquete descargable.
Dependiendo del tamaño de su sitio web, el proceso puede durar un par de minutos.
Una vez finalizado el proceso de copia de seguridad, es hora de descargar tus archivos.
Tienes que descargar tanto el archivo que contiene la copia de seguridad como el instalador que descomprime el archivo.
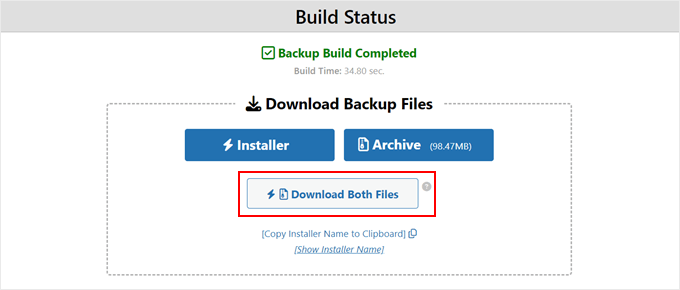
Para ello, haga clic en el botón “Descargar ambos archivos”.
Consejo profesional: Técnicamente, puede omitir el resto de estos pasos y limitarse a seguir nuestro tutorial sobre cómo restaurar una copia de seguridad de un sitio de WordPress, donde le mostramos cómo importar su archivo de copia de seguridad con Duplicator.
Dicho esto, no dudes en seguir el resto de estos pasos si quieres restaurar el sitio clonado en un entorno vacío.
Paso 3: Suba el archivo y el instalador de su sitio WordPress a una nueva ubicación
Ahora que tiene una copia de seguridad completa de su sitio y el archivo de instalación, el siguiente paso es subirlos a la nueva ubicación.
Esta nueva ubicación puede ser un blog de WordPress en vivo o un sitio en su servidor local. Si el sitio está en un servidor local, deberá crear una nueva carpeta en la carpeta raíz de su servidor local. Este es el archivo donde su servidor local almacena todos los sitios web.
Por ejemplo, si utiliza MAMP, será la carpeta ‘/Applications/MAMP/htdocs/’.
Alternativamente, si está utilizando WAMP, entonces sería la carpeta ‘C:\wamp\www \’.
A continuación, abre la carpeta que has creado para el sitio web clonado y copia en ella tanto el archivo como el instalador.

Si desea clonar su sitio web en otra plataforma de alojamiento de WordPress, puede crear primero un sitio web vacío y subirle los archivos mediante el gestor de archivos del proveedor.
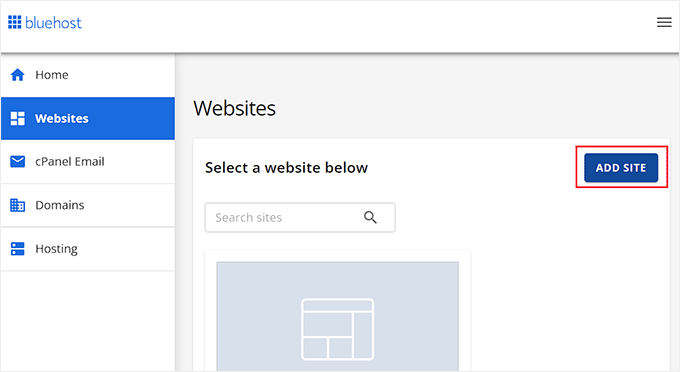
Si utiliza Bluehost, acceda al Escritorio de su cuenta de alojamiento y vaya a la pestaña “Sitios web”. A continuación, haga clic en “Añadir sitio”.
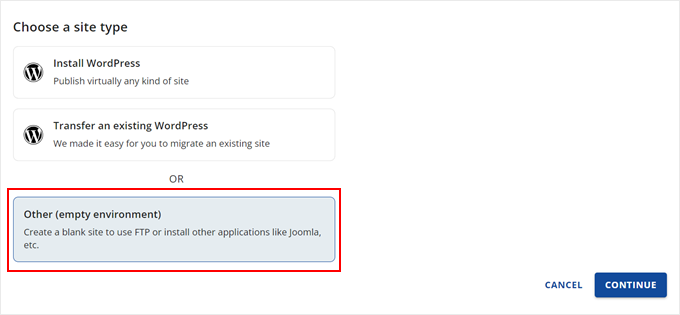
En la pantalla siguiente, verá algunas opciones de tipo de sitio.
Sólo tienes que seleccionar “Otros (entorno vacío)” y hacer clic en “Continuar”.
A continuación, introduzca el título de su sitio web.
También puede omitir este paso si es necesario y simplemente hacer clic en “Continuar”.

En esta fase, puede conectar su sitio web con un nombre de dominio.
O bien, puede utilizar un dominio temporal mientras tanto si aún no tiene un nombre de dominio.
Haga clic en “Continuar” para seguir.
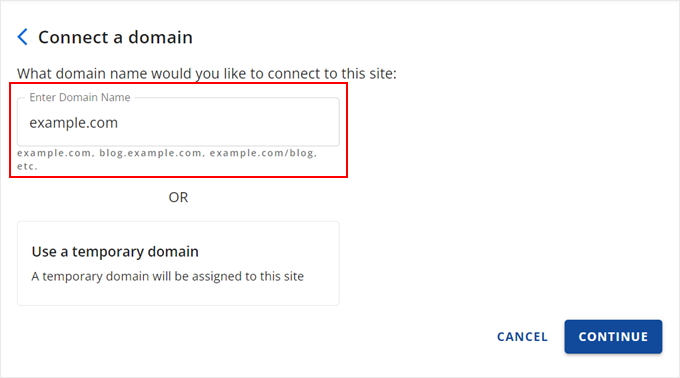
Una vez que su sitio web vacío esté listo, volverá a la pestaña “Sitios web”.
En su sitio web recién creado, haga clic en el botón “Ajustes”.
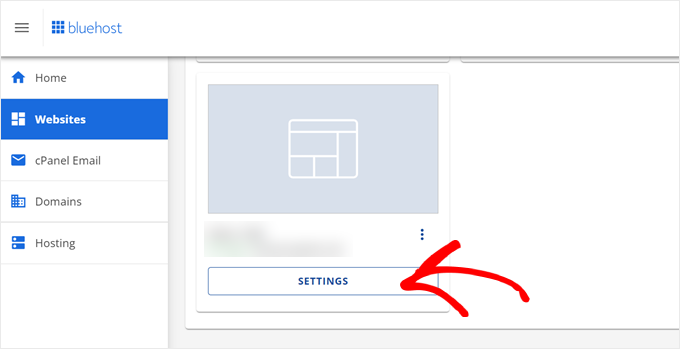
A continuación, desplácese hasta la sección “Enlaces rápidos”.
Una vez allí, basta con hacer clic en el botón “Gestión de archivos”.
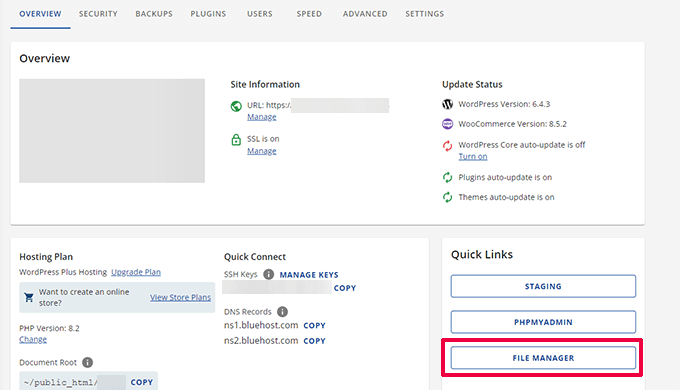
Bluehost le llevará ahora al gestor de archivos de su sitio web.
Haz clic en el botón “Subir” para subir tus archivos.
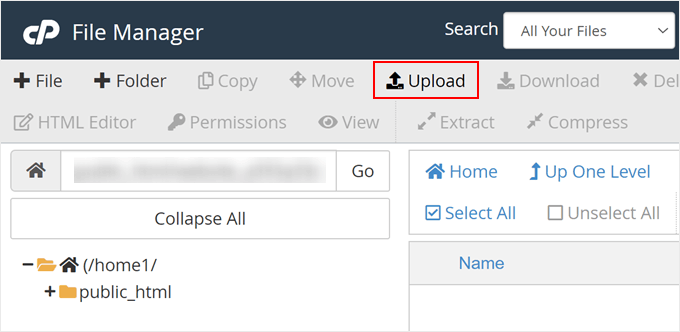
Ahora, seleccione los archivos que desea subir al sitio web vacío.
Una vez hecho esto, basta con hacer clic en “Volver a …”.
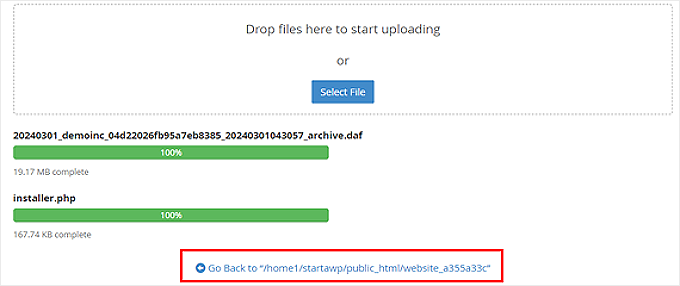
Ahora debería ver los archivos y el instalador en el gestor de archivos.
Quite / elimine los demás archivos que se encuentran en este directorio para asegurarse de que la instalación se realiza correctamente más adelante.

También puede subir el instalador y el archivo al directorio raíz utilizando un cliente FTP.
Si no lo ha hecho antes, consulte nuestra guía para principiantes sobre cómo usar FTP para subir archivos a WordPress.
No importa dónde subas los archivos, debes asegurarte de que la carpeta solo contiene tu installer.php y los archivos zip.

Paso 4: Crear una nueva base de datos de WordPress para su sitio web
A continuación, debe crear una nueva base de datos de WordPress para descomprimir su versión clonada de WordPress. Si ya ha creado una base de datos, puede omitir este paso.
Hay varias formas de crear una base de datos, dependiendo de si la nueva ubicación es un sitio activo o un sitio en su servidor local.
Si utiliza un sitio activo, sólo tiene que acceder al escritorio de su cuenta de alojamiento de WordPress.
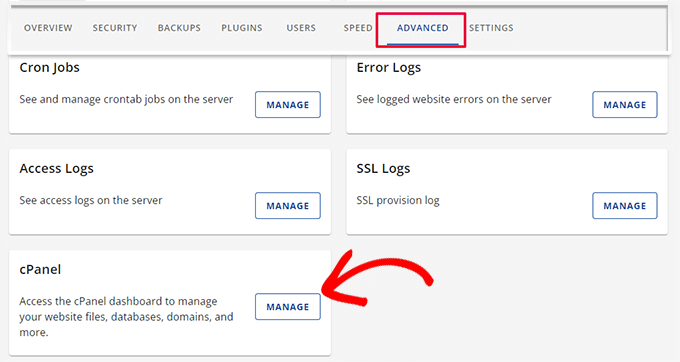
Para los usuarios de Bluehost, tienes que ir a la pestaña ‘Ajustes’ de tu sitio web vacío como antes. A continuación, cambie a la pestaña “Avanzado” y haga clic en “Gestionar” al lado de cPanel.
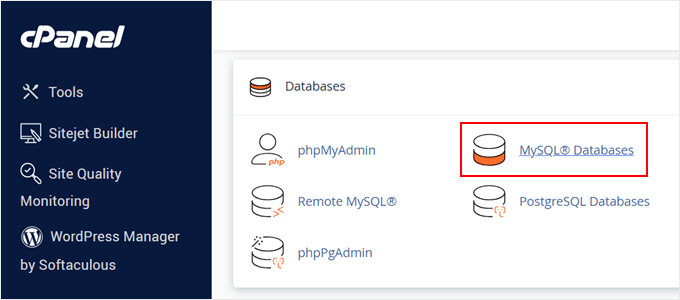
Dentro de cPanel, desplácese hasta la sección ‘Bases de datos’.
A continuación, seleccione “Bases de datos MySQL”.
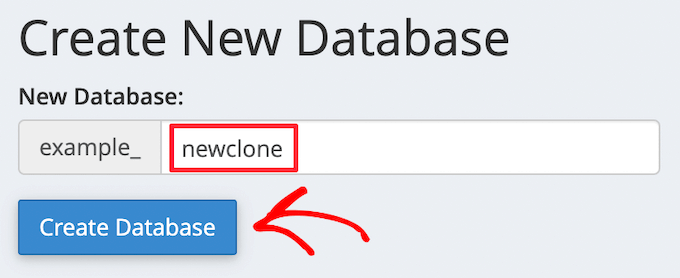
Accederá a una pantalla en la que podrá introducir un nombre para su base de datos.
A continuación, haga clic en el botón “Crear base de datos”.
A continuación, debe añadir un nuevo usuario a la base de datos MySQL.
Simplemente desplázate hasta la sección ‘Usuarios MySQL’. A continuación, escriba un nombre de usuario y una contraseña para el nuevo usuario y haga clic en el botón “Crear un usuario”.
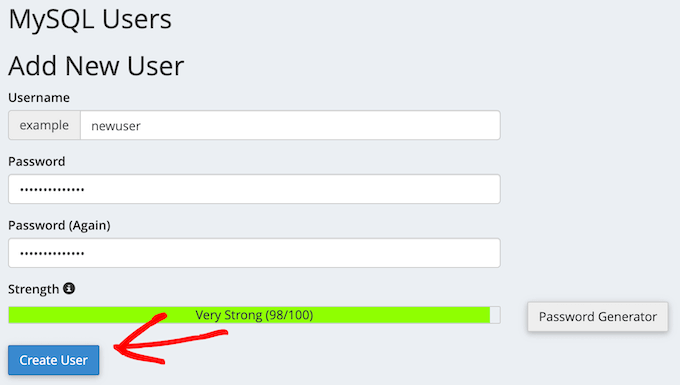
Una vez hecho esto, el siguiente paso es añadir el usuario a la base de datos.
Desplácese hasta la sección “Añadir usuario a una base de datos” y abra el menú desplegable “Usuario”. Aquí, seleccione el usuario de base de datos que creó en el paso anterior.
A continuación, abra el menú desplegable “Base de datos” y seleccione la base de datos que creó anteriormente.
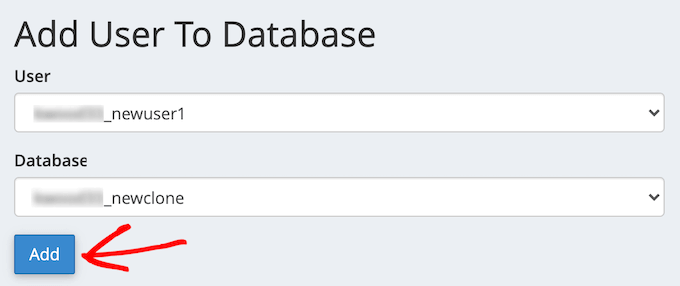
Asegúrese de anotar el nombre de la base de datos, el nombre de usuario y la contraseña, ya que necesitará esta información en el siguiente paso.
Una vez hecho esto, haz clic en el botón “Añadir”.
Si estás usando una instalación localhost usando XAMPP u otras herramientas, simplemente visita ‘http://localhost/phpmyadmin/’ o ‘http://localhost:8080/phpmyadmin/’ en tu navegador web para lanzar phpMyAdmin.
A continuación, haga clic en la pestaña “Menú” y seleccione la opción “Base de datos”.
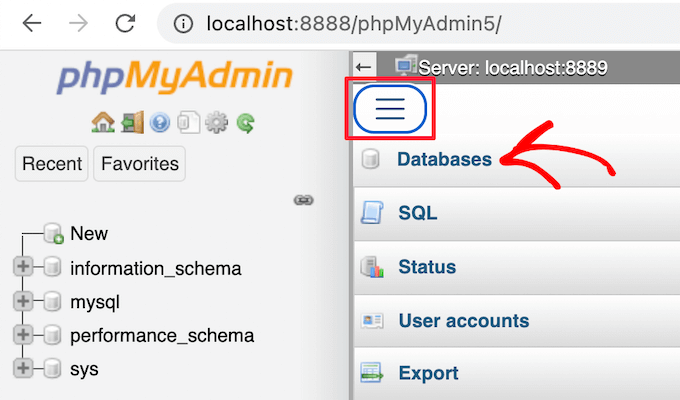
A continuación, debe introducir un nuevo nombre para la base de datos.
A continuación, basta con hacer clic en el botón “Crear”.

Utilizará el nombre de la base de datos en el siguiente paso. Para la mayoría de las instalaciones localhost, su alojamiento será localhost, y el nombre de usuario será root, con una contraseña en blanco.
Paso 5: Ejecute el script de importación de sitios web de WordPress
Ahora que todos los archivos están en su lugar, es el momento de ejecutar el script de instalación de Duplicator. Este script descomprime el archivo en unos pocos clics.
En primer lugar, escriba la URL de su sitio web en el navegador / explorador y añada installer.php al final de la misma. Se parecerá a ‘https://example.com/installer.php’. Asegúrate de sustituir ‘example.com’ por tu propio nombre de dominio o la dirección localhost de tu sitio.
A continuación, aparecerá en pantalla el script de instalación de Duplicator. En primer lugar, debe introducir la información de su base de datos de WordPress.
Esta es la información de la base de datos que copió anteriormente.
Una vez hecho esto, haga clic en “Validar”.
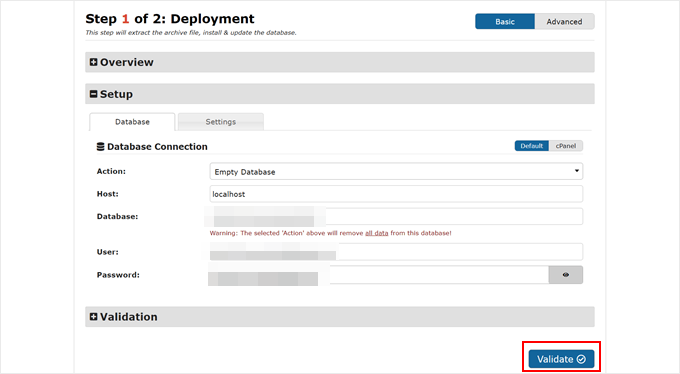
Si no hay errores, marque / compruebe la casilla de verificación de términos y avisos situada en la parte inferior.
A continuación, haga clic en “Siguiente” para continuar.
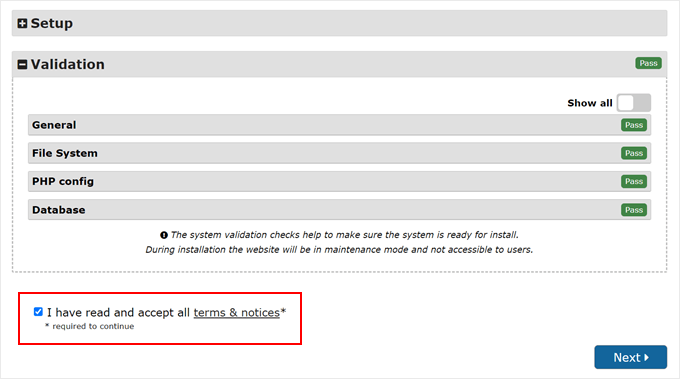
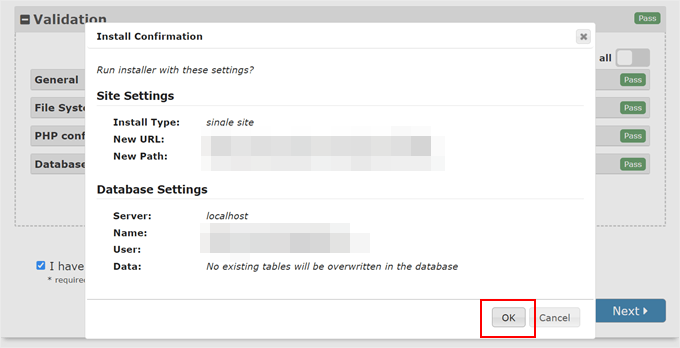
A continuación, aparecerá un mensaje / ventana emergente para confirmar la instalación.
Continúe y haga clic en el botón “Aceptar”.
Si la instalación es correcta, podrá acceder inmediatamente a su nuevo sitio de WordPress.
Para ello, asegúrese de marcar la opción “Borrar automáticamente los archivos de instalación tras acceder al sitio seguro (recomendado)” y haga clic en el botón “Acceso de administrador”.
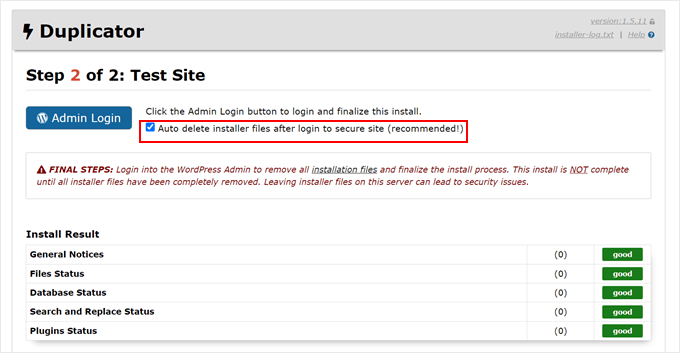
Al marcar / comprobar esta casilla se eliminarán automáticamente los archivos de instalación para eliminar posibles problemas / conflictos / incidencias de seguridad y finalizar la instalación.
Paso 6: Pruebe su sitio web clonado y borre los archivos temporales
Ya puedes probar tu sitio web clonado.
Te recomendamos que pruebes tanto el área de administrador de WordPress como el front-end público de tu sitio web para asegurarte de que todos tus datos están ahí y de que el sitio web funciona como se espera.
Si tiene algún error de WordPress, compruebe nuestra guía para principiantes para diagnosticar errores de WordPress.
También tendrá que marcar / comprobar si sus archivos de instalación todavía existen. Para ello, le recomendamos que vaya a Duplicator ” Herramientas y, a continuación, haga clic en el botón “Quitar / eliminar archivos de instalación”.
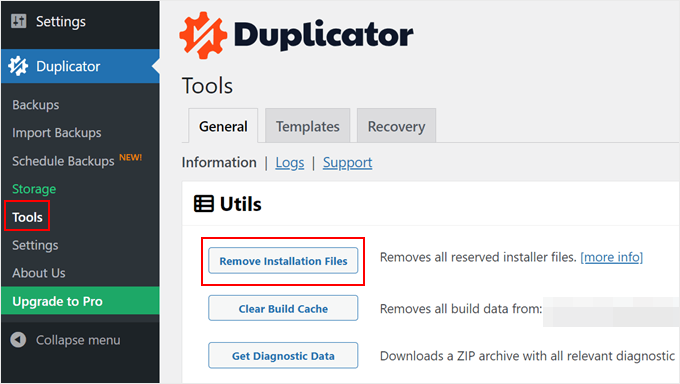
Eso es todo, has clonado correctamente un sitio de WordPress.
He clonado mi sitio web de WordPress, ¿qué es lo siguiente?
Si ha clonado correctamente su sitio web de WordPress, a continuación le indicamos algunas cosas que puede hacer a continuación:
- Marque / compruebe si ha migrado correctamente su sitio web con esta lista de comprobación de migración definitiva.
- Compruebe los ajustes de enlace permanente de su sitio web clonado.
- Instala los plugins imprescindibles de WordPress para hacer crecer tu sitio web.
- Desactiva las características del blog si piensas gestionar un sitio que no sea un blog.
- Consulte esta lista de comprobación para el lanzamiento de un sitio web antes de publicarlo.
- Obtenga una vista previa de su sitio web para comprobar que todo funciona correctamente.
- Active el modo de depuración de WordPress para resolver posibles errores rápidamente.
- Aprenda a liberar espacio en disco y a reducir el uso de inodos para mantener su servidor web en buen estado.
- Realice una prueba de velocidad del sitio web para ver si el rendimiento de su sitio necesita mejorar.
Esperamos que este artículo te haya ayudado a aprender cómo clonar fácilmente tu sitio de WordPress. Puede que también quieras ver nuestra guía sobre cómo gestionar varios sitios de WordPress desde un mismo escritorio y nuestra selección de los mejores plugins de seguimiento y registro de actividad de WordPress.
If you liked this article, then please subscribe to our YouTube Channel for WordPress video tutorials. You can also find us on Twitter and Facebook.


Dan
Hi, I have done this however upon completing the Install and clicking the admin button, it takes me back to the original domain page prior to a WordPress Install. I’ve double checked the process and I don’t think I’ve missed any steps?
It just appears that everything was wiped (just an original WP install) but the duplicate file hasn’t been installed?
WPBeginner Support
Your domain is pointing to your original host. You can either change your hosts file to see the cloned site or point your domain to the new host location. For moving your site to a new domain, we would recommend taking a look at our article below:
https://www.wpbeginner.com/wp-tutorials/how-to-properly-move-wordpress-to-a-new-domain-without-losing-seo/
Admin
Martin Page
I have followed your instructions and uploaded the 2 files to an otherwise empty file but when i go to the site/installer.php I get a 404 page.
My FileZilla screen loos exactly like your example.
Any suggestions?
Thanks
WPBeginner Support
You would want to visit the duplicator plugin’s FAQ page and they cover the different troubleshooting steps for that error.
Admin
Rene Young
Thanks. I did that and I have successfully completed creating the clone. I have a question about the step to install the database in the new location (Step 2 of 4 – Install Database): The screen shot shows a choice between “Basic” and “cPanel” but you don’t discuss this.
WPBeginner Support
In this tutorial, we went with Basic
Admin
Rene Young
I could not complete Step 2. I do get warnings in Duplicator, under Paths:
“If the root WordPress path is not writable by PHP on some systems this can cause issues.
If Duplicator does not have enough permissions then you will need to manually create the paths above.”
WPBeginner Support
You would want to either follow our guide below for updating your file permissions:
https://www.wpbeginner.com/beginners-guide/how-to-fix-file-and-folder-permissions-error-in-wordpress/
Or you can reach out to your hosting provider for assistance with the folder permissions.
Admin
Sue
I’m trying to clone a demo site I’m making for people to use as a template. Using Duplicator I’ve created the package, gone into File Manager of CPanel and navigated to the root directory for the subdomain I’m testing it on, and uploaded the zip file and installer file. There is nothing else in the folder.
When I follow the instructions and go to the website address with installer.php added to the end, I do not get the Duplicator import info. I get a Page Not Found….though it does have the header, footer and top menu of the site I’m cloning. What did I do wrong?
WPBeginner Support
If you are using the same domain then you are likely still looking at the old site and not the new one, if you reach out to your hosting provider, they can normally assist with setting up a temporary domain that you can use.
Admin
Tarık Hacıalioğulları
Thank you very much, this saved me so much time. It worked very good!!!
WPBeginner Support
You’re welcome
Admin
saad
Everything s clear thank you but what about login and password to WordPress dashboard can we duplicate ?
WPBeginner Support
It copies your users table so it would transfer your user and password over for you.
Admin
Kara
I’m having a bit of trouble with step 4. With my Hostgator account I don’t have access to my server panel but when I try to add the file via an FTP client, I’m under able to find the folder containing the installer.php. Am I missing something? Could the file name be different or could someone tell me where exactly to put the zip file?
WPBeginner Support
You would want to reach out to your hosting provider and they would be able to assist
Admin
ed
HI there, what if i have paid plugins and themes specific for 1 wordpress site
Will it still work ? Thanks alot, your tutorial so far is the easiest to follow
WPBeginner Support
You would want to reach out to the support for those tools for how they handle that.
Admin
Emma
What do you do when there is a size check notice? Limit is 500mb and my site is 1.32gb uncompressed. Not sure how to compress. It is recommending a 2 part install manually from c panel which is sadly beyond my tech abilities.
WPBeginner Support
You would want to reach out to your hosting provider’s support and they should be able to assist
Admin
Dominique
uploaded zip and installer script to root and i am getting this message when i enter domain.com/installer.php
403 Forbidden
Request forbidden by administrative rules.
What next?
WPBeginner Support
There are a few different options you can try, for a starting point, you would want to take a look at our article below:
https://www.wpbeginner.com/wp-tutorials/how-to-fix-the-403-forbidden-error-in-wordpress/
Admin
Loz Bigrave
Great article, worked like a charm.
WPBeginner Support
Thank you, glad our article was helpful
Admin
Derek
I’ve successfully copied across to a new URL and the cloned website seems to be working. However, when I go into wordpress it’s a reduced version with quite a few tabs missing such as: users/plugins/settings to name a few. How can I get a full version of wordpress the same as the site I copied from?
WPBeginner Support
You may want to ensure you are logged in as an admin user on your cloned site as the most likely reason for that issue.
Admin
Adi
How do you change the name of the website, the url and also the database when installing the cloned site using Duplicator?
WPBeginner Support
To do that, you would want to take a look at our article here:
https://www.wpbeginner.com/wp-tutorials/how-to-properly-move-wordpress-to-a-new-domain-without-losing-seo/
Admin
diana
Hi, I have a question , can a clone my site without erased the other one , i mean the original website ?
WPBeginner Support
Yes, cloning your site does not remove the original
Admin
Todd Murray
This is a great post. Just one clarification before I run the import…on STEP 4, these are the instructions:
No matter where you are copying the files, you need to make sure that the folder is completely empty and has no other files or folders inside it except installer.php file and your backup zip file.
If I already have a theme and started building a site before finding this article, do I need to delete everything from the destination? “folder completely empty” refers to which folder?
Thanks!
Todd
WPBeginner Support
If you want to duplicate a site from elsewhere then you would need to remove what is currently there for your site.
Admin
Christie Bellah
Been using this article for years. Thanks so much!
WPBeginner Support
You’re welcome, glad our guide has been so helpful
Admin
Alexandre
You were right, I didn’t put in the root folder :/
So I tried again, but in the end, I got an error 404 result.
I’ve fixed the wp_config (name, user, pw & host) and made the changes to the htaccess (copied the NEW .htaccess).
All files are deleted, besides the now unzipped folder which contain all the files. *what about the __MACOSX folder? I tried with and without, but get the same result.
Even after this, in Step 4, I still get the 2 warnings in the General Notices:
wp-config not found
wp-config.php not found.
I found the wp-config.php, but seem like I don’t have the wp-config. Are they the same?
Anything else missing?
Thank you
WPBeginner Support
The macosx you don’t need, the wp-config files should be the same. For moving from the subfolder if the original site is still available you would likely want to go through the steps in: https://www.wpbeginner.com/wp-tutorials/how-to-get-rid-of-wordpress-from-your-wordpress-site-url/
Admin
Alexandre
I end up on a “Index of” page showing the file in my sub folder. Anyone know why?
Thanks
WPBeginner Support
You likely installed your WordPress site in the subfolder rather than the root folder for your site.
Admin
Alexandre
Sorry, forgot to say. If I type in the full path on my web browser, I have a loading time, but end up on a white page.
Thanks
WPBeginner Support
If you are getting that white screen you may want to try the recommendations in our article here: https://www.wpbeginner.com/wp-tutorials/how-to-fix-the-wordpress-white-screen-of-death/
JanysF
Does anyone know why the Packages option under Duplicator » Packages isn’t showing for me? I only see under Duplicator: Tools, Settings, and Go Pro.
WPBeginner Support
You may want to try reinstalling the plugin and if that doesn’t work you would want to reach out to the plugin’s support and let them know about that not appearing properly
Admin
ouiouiphoto
Cloning works well with duplicator but having a clone site online seems not to be liked by jetpack
During my tests Jetpack have put himselt in failure on the original site even if jetpack was not active one the cloned site telling me the original was a copy of the clone
If google find your clone you have also some possible issues
WPBeginner Support
While there is a problem with simply cloning a site without any new content, the primary goal would normally be to use this when transferring your site from one location to another and then removing the old site or using the copied site as a template and adding new content to your new site.
Admin
Bidmead
For some inexplicable reason, when I save this useful page to Pocket, what actually arrives there is the old 11 May 2015 version, which discusses a completely different method based on a plugin called BackupBuddy which costs $52 for the 1-site version.
—
Chris
WPBeginner Support
We’ll certainly take a look if it is something on our end. You may want to check with Pocket if there is a cache that needs to be cleared on their end as well
Admin
Chris Bidmead
I’ve been in touch with Pocket. They suggest it might be a problem with their Parser, which checks the content and determines the best way to display it. They’ve managed to reproduce the bug and are investigating.
—
Chris
Gary Andrews
I wand to upgrade my production site to WP 5 and change themes. I thought it might be a good idea to clone my site on my local windows machine under Desktop Server.
I’ve been trying for 2 days to clone my site.
Let me just add that your tuto is perfectly straightforward as long as things go well. It doesn’t go into what might not work correctly.
Firstly Duplicator package creation times out (despite having filtered out the big files). Of course my hosting company doesn’t support Duplicator because it tries to change the time limit, can’t really blame the host company.
I also tried the Duparchive option which doesn’t time out and generates a .daf archive instead of a .zip.
On the Desktop Server local side I tried to run installer.php from my browser but got messages saying I needed to enable ziparchive and/or shell exec. I contacted Desktop Server support about that and have had no answer.
I thought I’d try to extract the data from the daf archive manually but the software that is needed to do this no longer seems to be available.
I imagine that the Duplicator Pro version would work better but I don’t have the budget (association website).
Oh woe is me, looks like I’ll have to do it all by hand.
WPBeginner Support
From the sound of it you sadly may need to manually import/export the data, the other option would be if you have a backup of your site that you could restore to your local installation.
Admin
Adam
Awesome article!!!
Followed your steps and it worked perfectly.
I did make one error though, I extracted the zip file and uploaded the files in ftp which did create errors. Much easier to simply upload the zip instead.
Thanks heaps!
WPBeginner Support
You would likely need to extract the zip once it is on your hosting provider but glad you found a solution for your error
Admin
Donna Lutheran
I copy sites all the time.
The plugins actually look more complicated than doing it manually.
Just download your files, back up your database, ftp to the new server, restore your database to your new database, edit the wp-config file to point to the new database, edit the url in your database to point to the new url.
I also download velvet blue to correct any url problems.
I had a site not pass our security scan that used the plugin. Also, the database back up was stored in the root of your site.
James Cook
I used a much simpler way. My WP installation is with Godaddy…so logged in the cPanel of the site I wanted to cloned…went to subdomains and created the domain for the site destination…then I went to applications and the top of cPanel and clicked the little check box next the primary site I wanted to clone…then hit the clone button…and voila…and exact copy of our site was created in less than 10 minutes…
Indusekar S K
Is there any plugin or other software that could clone a wordpress website to another wordpress on the live?
Mark C
The price for this is riduculous. Even the cheapest option is $80 PER YEAR! What an absolute rippoff!
Better off just going to Control Panel, zipping up your files and download them … then go to PHPMyAdmin and downloading a copy of your database. Then upload your zipped files to the new location…edit the config file, then import the database.
If that’s too hard for website retards … just install the free version of “Duplicate” (similar to Backup Buddy … but FREE).
Carlos A. B. S.
You’re right man, no need to spend a dime on such a a simple task…
Felisha
Either of you have a step by step guide? I am trying to copy my site to a subdomain to target a different city from the main site.
The only thing I understand so far is that I have to:
1. create a subdomain
2. create a new database
3. copy the public html folder of the main site over to the subdomain pubic html folder
After that, every tutorial I’ve seen on the internet gets too confusing
Jerri
What are you talking about? Duplicator is free. I mean, there’s a pro version, but I use the free version all the time to duplicate websites.
The only thing these instructions didn’t add is that you need to first create a new database and add a user to it on the new site before running the installer.
But it’s all easy and free.
Lipa
thx a lot !!! ;]
Mack
Can i copy someone’s site page to my site??
Allan Seabrook
Hi,
I really appreciate all the posts you share with us! Please keep them coming!
My question regarding this post is…
This technique using BackupBuddy works flawlessly.
However, I now have a problem:
When I type in the URL of my original site (where I took the backup), I get directed to the site I cloned from that backup. It’s as if my original site now has a redirect to the cloned site.
What on earth have I broken?
Any advice would be much appreciated!
Thanks,
Allan
Stephen
Check your DNS record. That would be one of the only ways this would happen.
Jonathan
Thanks! Worked perfect!
Mamun sarkar
Hi,
I would like to know how to clone any wordpress website have no hosting access information as well. I mean, suppose a buyer order your wpbeginner like website. Then, How to do it sir. Do you have any tutorials plz.
Hanna
not possible anymore to use backup buddy unless you want to pay. Is their a different method?
Nelson
Duplicator is perfect.
sandeep
i want to copy the theme of running website to another website…
Moses
Hi Sandeep,
Did you get solution to this. I also want to copy a theme to another website(subdomain)
Chris
I’ve used another service to clone WordPress sites and have discovered a problem with residual tables, and I was curious whether this was an issue with BackupBuddy as well.
In the scenario I recently encountered, I create WP Site A with table prefix wp1_.
Then I have to create a new environment to clone to, so I install WordPress at WP Site B with table prefix wp2_.
Now I use my [unnamed] tool to clone site A to site B, which appears good on the admin and public side but when I look in the database I have both wp1_ and wp2_ sets of tables, and all of the GUIDs in the functioning tables for the new cloned site have WP Site A’s URL, not WP Site B’s as I would have expected.
These have to be cleaned up manually. So I wonder, does BackupBuddy do the same thing? Is this to be expected?
WPBeginner Support
BackupBuddy’s sales/support team can probably answer this better.
Admin
Andrew Lopez
I’d be curious to know how to manually perform this task without a plugin or is a plugin recommended for backing up and migrating over to a new website?
Dave Navarro
BackupBuddy fails on large WordPress installs. I can’t get it to back up our site which between database all files is over 400GB in size.
I had to manually download all of the files, then re-upload them to the new site and use importbuddy with just the database. Even that fails if the raw database is too large (failed around 200MB in size).
Nitin
wonderful technique but there is use of another plugin
Gf
I recently moved a small simple blog with all-in-one wordpress migration and it worked great. But when I attempted a larger site on wp4.1 it failed. I think I would like back up buddy but the price is staggering. It would be my biggest wordpress expense, almost twice as much as my hosting!
Jean
I love using BackupBuddy for backups and migrations.
All you need is access to install the plugin and your set to move.
Great article!
johnraf
I used to have similar problems too, but after using
“long path tool” You can use to solve this problem.
yaser
How about if we want to clone a website that we have no backend access? Is there an easy way?
fletch
Do you have ftp access? Do you have access to the database? You would need those two things to backup a website if you don’t have access to wp-admin.