Volete clonare un sito web WordPress?
La clonazione di un sito WordPress esistente è spesso il primo passo da compiere quando si passa a un nuovo host, si avvia un progetto di sviluppo per un cliente su un host locale, si configura un sito web di staging e altro ancora.
In questo articolo vi mostreremo come clonare facilmente un sito WordPress.
Cos’è la clonazione di siti web WordPress e perché usarla?
L’idea che sta alla base della clonazione di un sito WordPress è quella di creare una copia esatta di un sito e applicarla a un altro sito.
Ci sono molte ragioni per cui si potrebbe aver bisogno di clonare un sito web. Ad esempio, potreste spostare un sito su un nuovo host o su un nuovo nome di dominio. La clonazione di un sito web consente di risparmiare tempo e fatica e di completare il processo di migrazione molto più rapidamente.
Un altro esempio è lo sviluppo di un sito web per un cliente sul proprio host locale. Una volta completato il lavoro, si può semplicemente clonare il sito e spostarlo sul server live del cliente.
Potete anche clonare un sito WordPress live e creare un sito di staging per testare le modifiche prima di renderle effettive.
Detto questo, vi mostriamo come clonare un sito WordPress in pochi semplici passi. Potete usare i link rapidi qui sotto per navigare attraverso il tutorial:
- Step 1: Set Up the Duplicator WordPress Plugin for Easy Cloning
- Step 2: Create a Duplicator Package of Your WordPress Site
- Step 3: Prepare to Clone Your WordPress Site
- Step 4: Upload Your WordPress Site Archive and Installer to a New Location
- Step 5: Create a New WordPress Database for Your Website
- Step 6: Run the WordPress Website Importer Script
- Step 7: Test Your Cloned Website and Delete Temporary Files
- I've Cloned My WordPress Website, What's Next?
Passo 1: Impostare il plugin Duplicator per WordPress per una facile clonazione
Il modo migliore per clonare un sito web WordPress è utilizzare il plugin Duplicator. Si tratta di un potente plugin per la clonazione e la duplicazione di WordPress, ma molto facile da usare.
Il plugin esegue il backup di tutto il sito web in un unico file, che può essere semplicemente spostato nella nuova posizione.
La prima cosa da fare è attivare e installare il plugin sul sito web che si desidera clonare. Per maggiori dettagli, consultate la nostra guida passo-passo su come installare un plugin di WordPress.
Nota: esiste una versione pro di Duplicator che offre funzioni aggiuntive come backup programmati, migrazione di più siti e altro ancora. Tuttavia, per questa guida utilizzeremo la versione gratuita, che ha tutto ciò che serve per clonare un sito web WordPress.
Passo 2: Creare un pacchetto duplicatore del vostro sito WordPress
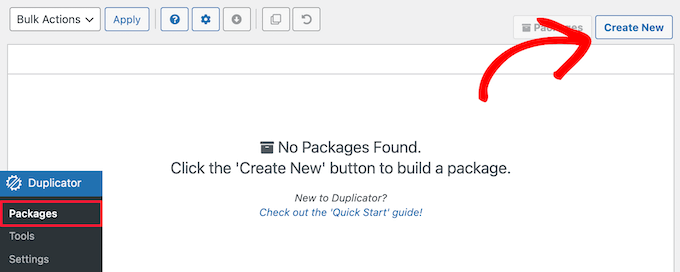
Dopo l’attivazione, andare su Duplicator ” Pacchetti e fare clic sul pulsante “Crea nuovo” nella parte superiore della pagina.
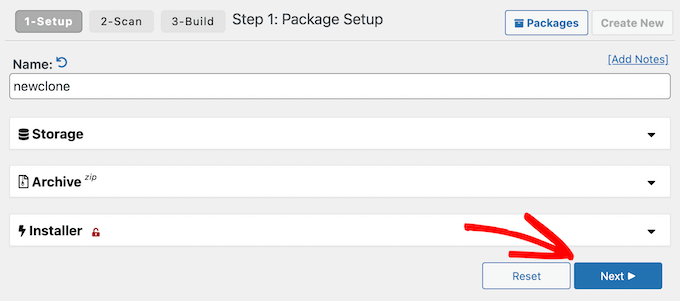
Successivamente, verrà visualizzata una schermata in cui è possibile digitare un nome per il file duplicato. Questo è solo un riferimento, quindi potete usare qualsiasi cosa vogliate.
Quindi, fare clic sul pulsante “Avanti”.
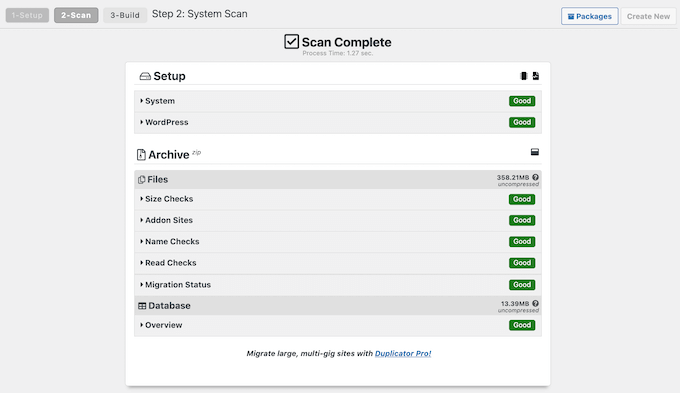
Duplicator ora analizzerà il vostro sito. Se trova un problema in una parte del sito WordPress, viene visualizzato un avviso con le informazioni su come risolvere il problema.
Quando viene visualizzato il messaggio “Scansione completata”, fare clic sul pulsante “Costruisci” per continuare.
Il plugin esegue il backup del database di WordPress, delle immagini, dei modelli, dei plugin e di tutti gli altri file in un unico pacchetto scaricabile.
A seconda delle dimensioni del vostro sito web, il processo potrebbe richiedere un paio di minuti.
Passo 3: Prepararsi a clonare il sito WordPress
Una volta terminato il processo di backup, è il momento di scaricare i file.
È necessario scaricare sia il file di archivio, che contiene il backup, sia il programma di installazione che scompatta l’archivio.
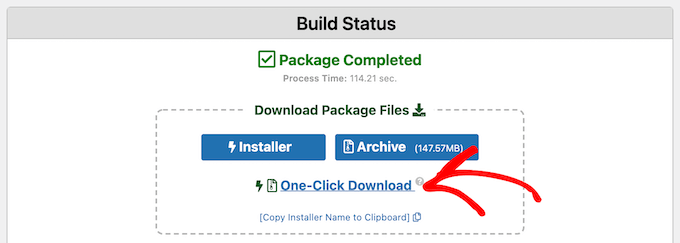
Per farlo, fate clic sul link “Download in un clic”.
Passo 4: Caricare l’archivio e il programma di installazione del sito WordPress in una nuova posizione
Ora si dispone di un backup completo del sito e del file di installazione; il passo successivo consiste nel caricarli nella nuova posizione.
Questa nuova posizione può essere un blog WordPress live o un sito sul server locale. Se il sito si trova su un server locale, è necessario creare una nuova cartella nella cartella principale del server locale. Si tratta del file in cui il server locale memorizza tutti i siti web.
Ad esempio, se si utilizza MAMP, la cartella sarà ‘/Applications/MAMP/htdocs/’.
In alternativa, se si utilizza WAMP, la cartella è ‘C:\wamp\www’.
Successivamente, è necessario aprire la cartella creata per il sito web clonato e copiare sia il file di archivio che il programma di installazione in tale cartella.

Se volete clonare il vostro sito web su un’altra piattaforma di hosting WordPress, potete prima creare un sito web vuoto e caricarvi i file utilizzando il file manager del provider.
Se si utilizza Bluehost, basta accedere al cruscotto del proprio account di hosting e navigare nella scheda “Siti web”. Quindi, fare clic su “Aggiungi sito”.
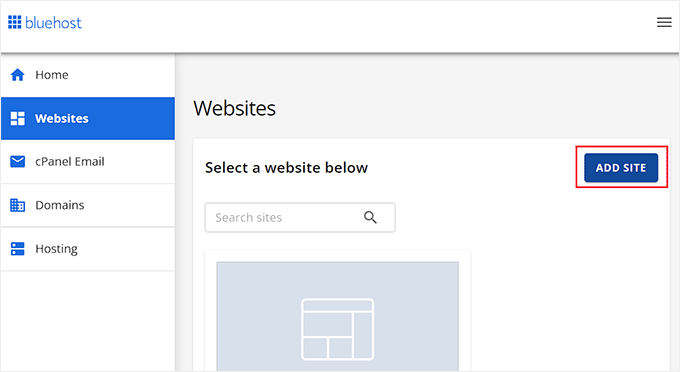
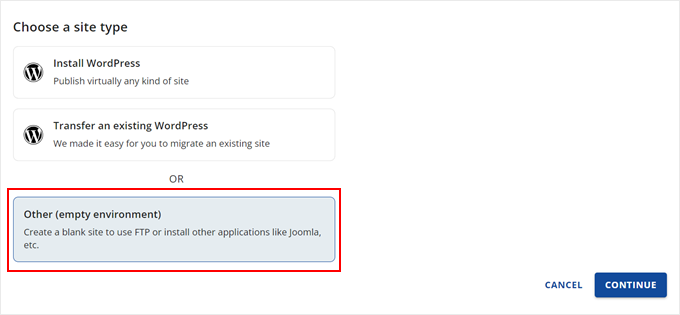
Nella schermata successiva vengono visualizzate alcune opzioni relative al tipo di sito.
Selezionare “Altro (ambiente vuoto)” e fare clic su “Continua”.
Inserite quindi il titolo del vostro sito web.
Se necessario, è possibile saltare questo passaggio e fare clic su “Continua”.

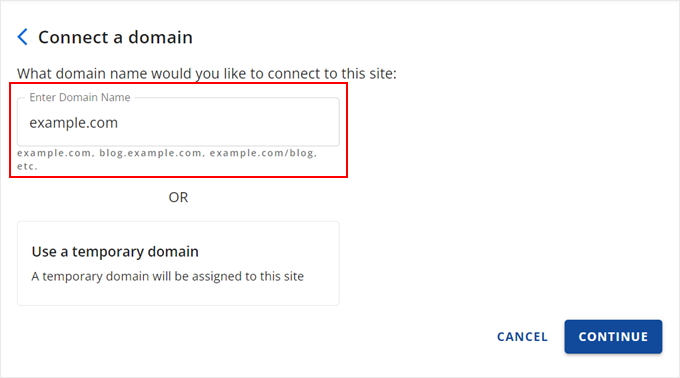
A questo punto, è possibile collegare il proprio sito web con un nome di dominio.
Oppure, se non avete ancora un nome di dominio, potete utilizzare un dominio temporaneo.
Fare clic su “Continua” per procedere.
Una volta che il sito web vuoto è pronto, si torna alla scheda “Siti web”.
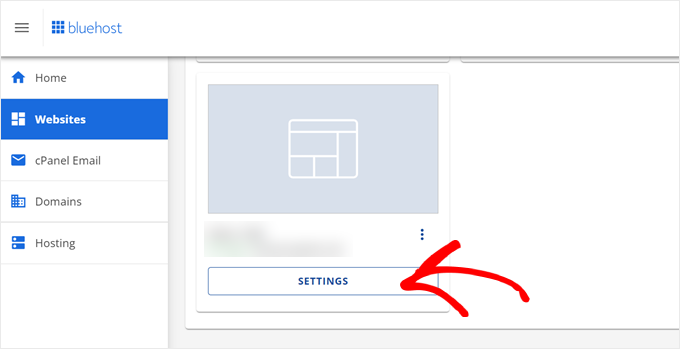
Sul sito appena creato, fare clic sul pulsante “Impostazioni”.
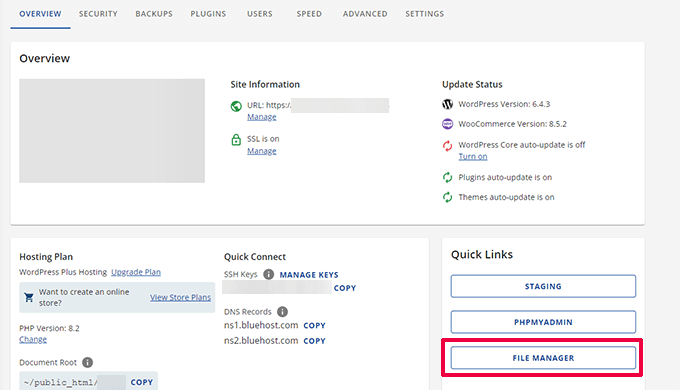
A questo punto, scorrere fino alla sezione “Collegamenti rapidi”.
Una volta lì, basta fare clic sul pulsante “File Manager”.
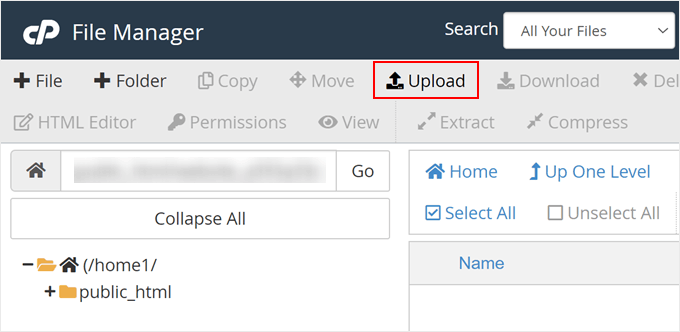
Bluehost vi porterà ora al File Manager del vostro sito web.
Fare clic sul pulsante “Carica” per caricare i file.
A questo punto, selezionate i file che volete caricare sul sito web vuoto.
Al termine, fare clic su “Torna a …”.
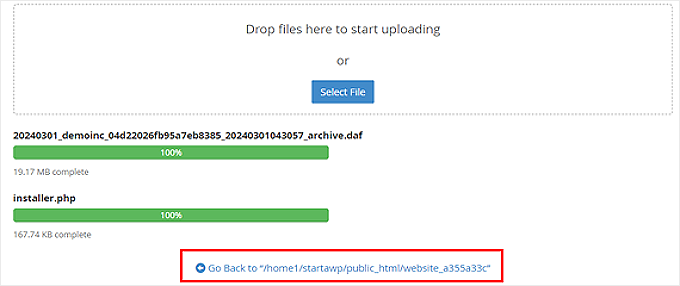
A questo punto si dovrebbero vedere i file dell’archivio e del programma di installazione nel file manager.
Rimuovere gli altri file presenti in questa directory per assicurarsi che l’installazione vada a buon fine in seguito.

In alternativa, è possibile caricare il programma di installazione e l’archivio nella directory principale utilizzando un client FTP.
Se non l’avete mai fatto prima, consultate la nostra guida per principianti su come usare l’FTP per caricare i file su WordPress.
Indipendentemente da dove si caricano i file, è necessario assicurarsi che la cartella contenga solo i file installer.php e i file zip dell’archivio.

Passo 5: Creare un nuovo database WordPress per il sito web
Successivamente, è necessario creare un nuovo database di WordPress per scompattare la versione clonata di WordPress. Se avete già creato un database, potete saltare questo passaggio.
Esistono diversi modi per creare un database, a seconda che la nuova posizione sia un sito live o un sito sul server locale.
Se si utilizza un sito live, è sufficiente accedere alla dashboard del proprio account di hosting WordPress.
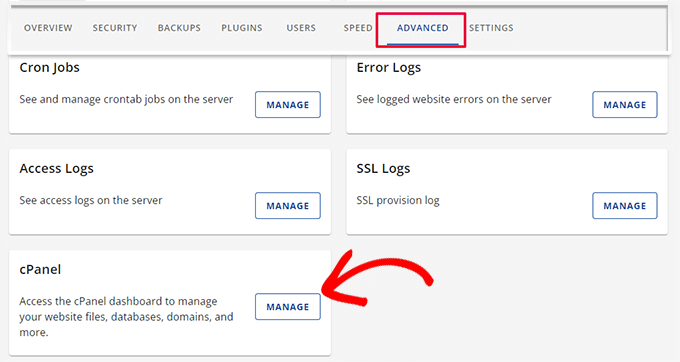
Per gli utenti di Bluehost, è necessario andare alla scheda “Impostazioni” del sito web vuoto come prima. Quindi, passare alla scheda “Avanzate” e fare clic su “Gestisci” accanto a cPanel.
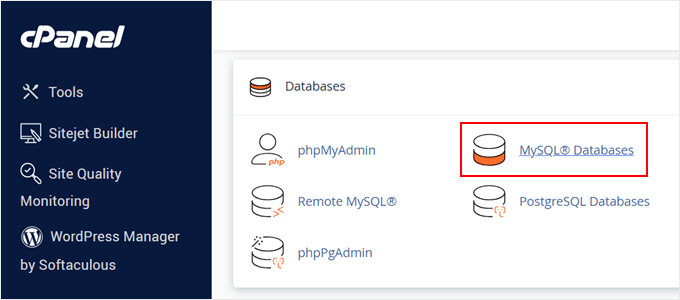
All’interno di cPanel, scorrere fino alla sezione “Database”.
Quindi, selezionare “Database MySQL”.
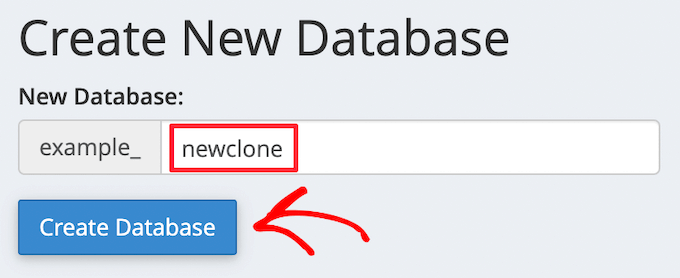
Si accede così a una schermata in cui è possibile digitare un nome per il database.
Quindi, fare clic sul pulsante “Crea database”.
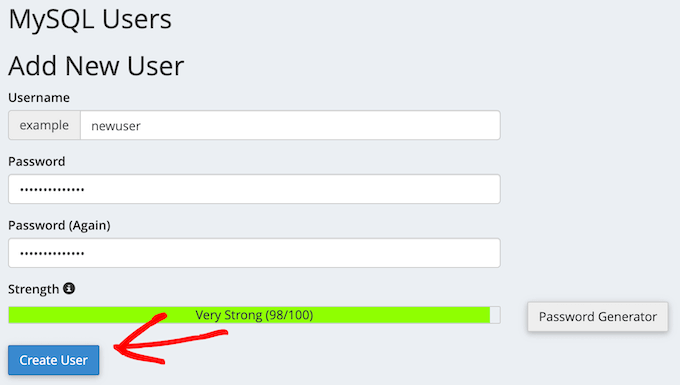
Successivamente, è necessario aggiungere un nuovo utente al database MySQL.
È sufficiente scorrere fino alla sezione “Utenti MySQL”. Quindi, digitate un nome utente e una password per il nuovo utente e fate clic sul pulsante “Crea un utente”.
Una volta fatto questo, il passo successivo è l’aggiunta dell’utente al database.
Basta scorrere la sezione “Aggiungi utente a un database” e aprire il menu a tendina “Utente”. Selezionare l’utente del database creato nel passaggio precedente.
Quindi, aprire il menu a tendina “Database” e selezionare il database creato in precedenza.
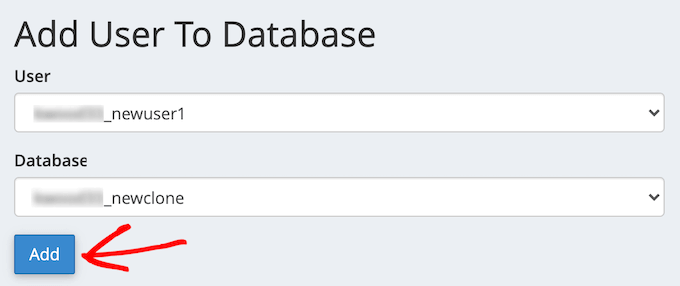
Assicuratevi di prendere nota del nome del database, del nome utente e della password, perché vi serviranno nella fase successiva.
A questo punto, fare clic sul pulsante “Aggiungi”.
Se si utilizza un’installazione localhost, è sufficiente visitare ‘http://localhost/phpmyadmin/’ o ‘http://localhost:8080/phpmyadmin/’ nel browser web per avviare phpMyAdmin.
A questo punto, fare clic sulla scheda “Menu” e selezionare l’opzione “Database”.
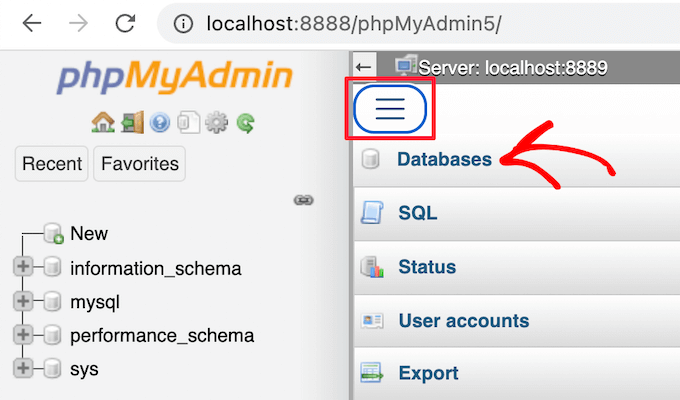
Successivamente, è necessario inserire un nuovo nome per il database.
Quindi, fare clic sul pulsante “Crea”.

Il nome del database verrà utilizzato nel passaggio successivo. Per la maggior parte delle installazioni localhost, l’host sarà localhost e il nome utente sarà root, con una password vuota.
Passo 6: Eseguire lo script Importazione sito WordPress
Ora che tutti i file sono al loro posto, è il momento di eseguire lo script di installazione di Duplicator. Questo script scompone il file di archivio in pochi clic.
Per prima cosa, digitate l’URL del vostro sito web nel browser e aggiungete installer.php alla fine. L’aspetto sarà simile a quello di “https://example.com/installer.php”. Assicuratevi di sostituire “example.com” con il vostro nome di dominio o con l’indirizzo localhost del vostro sito.
Successivamente, apparirà sullo schermo lo script di installazione di Duplicator. Innanzitutto, cercherà automaticamente i file di backup esistenti e le impostazioni iniziali.
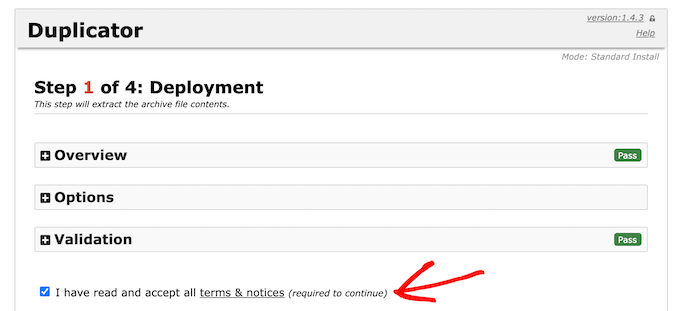
Se non ci sono errori, selezionare la casella di controllo Termini e avvisi in basso e fare clic su “Avanti” per continuare.
Nella schermata successiva, è necessario inserire le informazioni sul database di WordPress.
Si tratta delle informazioni del database copiate in precedenza.

In fondo alla pagina, c’è un pulsante “Test Database” che può essere usato per verificare che tutte le informazioni del database siano corrette.
Se tutto sembra a posto, fare clic sul pulsante “Avanti”.

Duplicator importerà ora il database di WordPress.
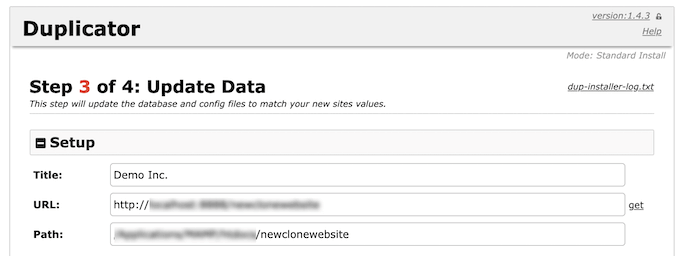
Durante questo processo, il programma rileverà automaticamente eventuali modifiche e completerà i campi “URL”, “Percorso” e “Titolo”. È sufficiente fare clic sul pulsante “Avanti” per continuare.
Duplicator terminerà l’installazione e verrà visualizzato il pulsante “Admin Login”.
Basta cliccare su questo pulsante per visitare il vostro nuovo sito web clonato.

Passo 7: Testare il sito web clonato e cancellare i file temporanei
Ora si può procedere a testare il sito web clonato.
Si consiglia di testare sia l’area di amministrazione di WordPress che il front-end pubblico del sito web per assicurarsi che tutti i dati siano presenti e che il sito funzioni come previsto.
Se si verificano errori di WordPress, consultate la nostra guida per principianti alla risoluzione degli errori di WordPress.
Una volta accertato che tutto sia stato importato correttamente, si può procedere alla cancellazione dei file di installazione creati dal plugin Duplicator.
Sul vostro sito WordPress clonato, andate su Duplicator ” Strumenti e fate clic sul pulsante “Rimuovi i file di installazione”.
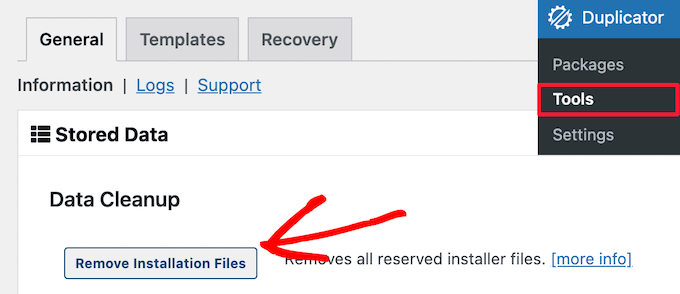
Ecco fatto, avete clonato con successo un sito WordPress.
Ho clonato il mio sito web WordPress, cosa devo fare?
Se siete riusciti a clonare il vostro sito web WordPress, ecco alcune cose da fare in seguito:
- Verificate se avete migrato il vostro sito web in modo corretto utilizzando questa lista di controllo della migrazione definitiva.
- Controllare le impostazioni dei permalink del sito web clonato.
- Aggiornate il core, i temi e i plugindi WordPress per motivi di sicurezza.
- Aggiornare i dati dell’amministratore del sito, se necessario, come l’indirizzo e-mail dell’amministratore.
- Installate i plugin WordPress indispensabili per far crescere il vostro sito web.
- Prima di pubblicare il vostro sito web, consultate la lista di controllo per il lancio del sito.
- Visualizzate l’anteprima del vostro sito web per verificare che tutto funzioni.
Speriamo che questo articolo vi abbia aiutato a capire come clonare facilmente il vostro sito WordPress. Potreste anche voler consultare la nostra guida sulla differenza tra un nome di dominio e un web hosting e la nostra scelta dei migliori servizi di email marketing per le piccole imprese.
Se questo articolo vi è piaciuto, iscrivetevi al nostro canale YouTube per le esercitazioni video su WordPress. Potete trovarci anche su Twitter e Facebook.


Syed Balkhi says
Hey WPBeginner readers,
Did you know you can win exciting prizes by commenting on WPBeginner?
Every month, our top blog commenters will win HUGE rewards, including premium WordPress plugin licenses and cash prizes.
You can get more details about the contest from here.
Start sharing your thoughts below to stand a chance to win!
Dennis Muthomi says
This step-by-step guide was extremely helpful! I followed the tutorial to clone my existing WordPress site to a new server with a different host. Everything went smoothly except I ran into an SSL issue initially on the cloned site. However, after contacting my new host’s support team, they were able to resolve the SSL problem quickly. Thanks so much for providing such a clear and valuable walkthrough
WPBeginner Support says
Glad our guide could help you
Admin
Dan says
Hi, I have done this however upon completing the Install and clicking the admin button, it takes me back to the original domain page prior to a WordPress Install. I’ve double checked the process and I don’t think I’ve missed any steps?
It just appears that everything was wiped (just an original WP install) but the duplicate file hasn’t been installed?
WPBeginner Support says
Your domain is pointing to your original host. You can either change your hosts file to see the cloned site or point your domain to the new host location. For moving your site to a new domain, we would recommend taking a look at our article below:
https://www.wpbeginner.com/wp-tutorials/how-to-properly-move-wordpress-to-a-new-domain-without-losing-seo/
Admin
Martin Page says
I have followed your instructions and uploaded the 2 files to an otherwise empty file but when i go to the site/installer.php I get a 404 page.
My FileZilla screen loos exactly like your example.
Any suggestions?
Thanks
WPBeginner Support says
You would want to visit the duplicator plugin’s FAQ page and they cover the different troubleshooting steps for that error.
Admin
Rene Young says
Thanks. I did that and I have successfully completed creating the clone. I have a question about the step to install the database in the new location (Step 2 of 4 – Install Database): The screen shot shows a choice between “Basic” and “cPanel” but you don’t discuss this.
WPBeginner Support says
In this tutorial, we went with Basic
Admin
Rene Young says
I could not complete Step 2. I do get warnings in Duplicator, under Paths:
“If the root WordPress path is not writable by PHP on some systems this can cause issues.
If Duplicator does not have enough permissions then you will need to manually create the paths above.”
WPBeginner Support says
You would want to either follow our guide below for updating your file permissions:
https://www.wpbeginner.com/beginners-guide/how-to-fix-file-and-folder-permissions-error-in-wordpress/
Or you can reach out to your hosting provider for assistance with the folder permissions.
Admin
Sue says
I’m trying to clone a demo site I’m making for people to use as a template. Using Duplicator I’ve created the package, gone into File Manager of CPanel and navigated to the root directory for the subdomain I’m testing it on, and uploaded the zip file and installer file. There is nothing else in the folder.
When I follow the instructions and go to the website address with installer.php added to the end, I do not get the Duplicator import info. I get a Page Not Found….though it does have the header, footer and top menu of the site I’m cloning. What did I do wrong?
WPBeginner Support says
If you are using the same domain then you are likely still looking at the old site and not the new one, if you reach out to your hosting provider, they can normally assist with setting up a temporary domain that you can use.
Admin
Tarık Hacıalioğulları says
Thank you very much, this saved me so much time. It worked very good!!!
WPBeginner Support says
You’re welcome
Admin
saad says
Everything s clear thank you but what about login and password to WordPress dashboard can we duplicate ?
WPBeginner Support says
It copies your users table so it would transfer your user and password over for you.
Admin
Kara says
I’m having a bit of trouble with step 4. With my Hostgator account I don’t have access to my server panel but when I try to add the file via an FTP client, I’m under able to find the folder containing the installer.php. Am I missing something? Could the file name be different or could someone tell me where exactly to put the zip file?
WPBeginner Support says
You would want to reach out to your hosting provider and they would be able to assist
Admin
ed says
HI there, what if i have paid plugins and themes specific for 1 wordpress site
Will it still work ? Thanks alot, your tutorial so far is the easiest to follow
WPBeginner Support says
You would want to reach out to the support for those tools for how they handle that.
Admin
Emma says
What do you do when there is a size check notice? Limit is 500mb and my site is 1.32gb uncompressed. Not sure how to compress. It is recommending a 2 part install manually from c panel which is sadly beyond my tech abilities.
WPBeginner Support says
You would want to reach out to your hosting provider’s support and they should be able to assist
Admin
Dominique says
uploaded zip and installer script to root and i am getting this message when i enter domain.com/installer.php
403 Forbidden
Request forbidden by administrative rules.
What next?
WPBeginner Support says
There are a few different options you can try, for a starting point, you would want to take a look at our article below:
https://www.wpbeginner.com/wp-tutorials/how-to-fix-the-403-forbidden-error-in-wordpress/
Admin
Loz Bigrave says
Great article, worked like a charm.
WPBeginner Support says
Thank you, glad our article was helpful
Admin
Derek says
I’ve successfully copied across to a new URL and the cloned website seems to be working. However, when I go into wordpress it’s a reduced version with quite a few tabs missing such as: users/plugins/settings to name a few. How can I get a full version of wordpress the same as the site I copied from?
WPBeginner Support says
You may want to ensure you are logged in as an admin user on your cloned site as the most likely reason for that issue.
Admin
Adi says
How do you change the name of the website, the url and also the database when installing the cloned site using Duplicator?
WPBeginner Support says
To do that, you would want to take a look at our article here:
https://www.wpbeginner.com/wp-tutorials/how-to-properly-move-wordpress-to-a-new-domain-without-losing-seo/
Admin
diana says
Hi, I have a question , can a clone my site without erased the other one , i mean the original website ?
WPBeginner Support says
Yes, cloning your site does not remove the original
Admin
Todd Murray says
This is a great post. Just one clarification before I run the import…on STEP 4, these are the instructions:
No matter where you are copying the files, you need to make sure that the folder is completely empty and has no other files or folders inside it except installer.php file and your backup zip file.
If I already have a theme and started building a site before finding this article, do I need to delete everything from the destination? “folder completely empty” refers to which folder?
Thanks!
Todd
WPBeginner Support says
If you want to duplicate a site from elsewhere then you would need to remove what is currently there for your site.
Admin
Christie Bellah says
Been using this article for years. Thanks so much!
WPBeginner Support says
You’re welcome, glad our guide has been so helpful
Admin
Alexandre says
You were right, I didn’t put in the root folder :/
So I tried again, but in the end, I got an error 404 result.
I’ve fixed the wp_config (name, user, pw & host) and made the changes to the htaccess (copied the NEW .htaccess).
All files are deleted, besides the now unzipped folder which contain all the files. *what about the __MACOSX folder? I tried with and without, but get the same result.
Even after this, in Step 4, I still get the 2 warnings in the General Notices:
wp-config not found
wp-config.php not found.
I found the wp-config.php, but seem like I don’t have the wp-config. Are they the same?
Anything else missing?
Thank you
WPBeginner Support says
The macosx you don’t need, the wp-config files should be the same. For moving from the subfolder if the original site is still available you would likely want to go through the steps in: https://www.wpbeginner.com/wp-tutorials/how-to-get-rid-of-wordpress-from-your-wordpress-site-url/
Admin
Alexandre says
I end up on a “Index of” page showing the file in my sub folder. Anyone know why?
Thanks
WPBeginner Support says
You likely installed your WordPress site in the subfolder rather than the root folder for your site.
Admin
Alexandre says
Sorry, forgot to say. If I type in the full path on my web browser, I have a loading time, but end up on a white page.
Thanks
WPBeginner Support says
If you are getting that white screen you may want to try the recommendations in our article here: https://www.wpbeginner.com/wp-tutorials/how-to-fix-the-wordpress-white-screen-of-death/
JanysF says
Does anyone know why the Packages option under Duplicator » Packages isn’t showing for me? I only see under Duplicator: Tools, Settings, and Go Pro.
WPBeginner Support says
You may want to try reinstalling the plugin and if that doesn’t work you would want to reach out to the plugin’s support and let them know about that not appearing properly
Admin
ouiouiphoto says
Cloning works well with duplicator but having a clone site online seems not to be liked by jetpack
During my tests Jetpack have put himselt in failure on the original site even if jetpack was not active one the cloned site telling me the original was a copy of the clone
If google find your clone you have also some possible issues
WPBeginner Support says
While there is a problem with simply cloning a site without any new content, the primary goal would normally be to use this when transferring your site from one location to another and then removing the old site or using the copied site as a template and adding new content to your new site.
Admin
Bidmead says
For some inexplicable reason, when I save this useful page to Pocket, what actually arrives there is the old 11 May 2015 version, which discusses a completely different method based on a plugin called BackupBuddy which costs $52 for the 1-site version.
—
Chris
WPBeginner Support says
We’ll certainly take a look if it is something on our end. You may want to check with Pocket if there is a cache that needs to be cleared on their end as well
Admin
Chris Bidmead says
I’ve been in touch with Pocket. They suggest it might be a problem with their Parser, which checks the content and determines the best way to display it. They’ve managed to reproduce the bug and are investigating.
—
Chris
Gary Andrews says
I wand to upgrade my production site to WP 5 and change themes. I thought it might be a good idea to clone my site on my local windows machine under Desktop Server.
I’ve been trying for 2 days to clone my site.
Let me just add that your tuto is perfectly straightforward as long as things go well. It doesn’t go into what might not work correctly.
Firstly Duplicator package creation times out (despite having filtered out the big files). Of course my hosting company doesn’t support Duplicator because it tries to change the time limit, can’t really blame the host company.
I also tried the Duparchive option which doesn’t time out and generates a .daf archive instead of a .zip.
On the Desktop Server local side I tried to run installer.php from my browser but got messages saying I needed to enable ziparchive and/or shell exec. I contacted Desktop Server support about that and have had no answer.
I thought I’d try to extract the data from the daf archive manually but the software that is needed to do this no longer seems to be available.
I imagine that the Duplicator Pro version would work better but I don’t have the budget (association website).
Oh woe is me, looks like I’ll have to do it all by hand.
WPBeginner Support says
From the sound of it you sadly may need to manually import/export the data, the other option would be if you have a backup of your site that you could restore to your local installation.
Admin
Adam says
Awesome article!!!
Followed your steps and it worked perfectly.
I did make one error though, I extracted the zip file and uploaded the files in ftp which did create errors. Much easier to simply upload the zip instead.
Thanks heaps!
WPBeginner Support says
You would likely need to extract the zip once it is on your hosting provider but glad you found a solution for your error
Admin
Donna Lutheran says
I copy sites all the time.
The plugins actually look more complicated than doing it manually.
Just download your files, back up your database, ftp to the new server, restore your database to your new database, edit the wp-config file to point to the new database, edit the url in your database to point to the new url.
I also download velvet blue to correct any url problems.
I had a site not pass our security scan that used the plugin. Also, the database back up was stored in the root of your site.
James Cook says
I used a much simpler way. My WP installation is with Godaddy…so logged in the cPanel of the site I wanted to cloned…went to subdomains and created the domain for the site destination…then I went to applications and the top of cPanel and clicked the little check box next the primary site I wanted to clone…then hit the clone button…and voila…and exact copy of our site was created in less than 10 minutes…
Indusekar S K says
Is there any plugin or other software that could clone a wordpress website to another wordpress on the live?
Mark C says
The price for this is riduculous. Even the cheapest option is $80 PER YEAR! What an absolute rippoff!
Better off just going to Control Panel, zipping up your files and download them … then go to PHPMyAdmin and downloading a copy of your database. Then upload your zipped files to the new location…edit the config file, then import the database.
If that’s too hard for website retards … just install the free version of “Duplicate” (similar to Backup Buddy … but FREE).
Carlos A. B. S. says
You’re right man, no need to spend a dime on such a a simple task…
Felisha says
Either of you have a step by step guide? I am trying to copy my site to a subdomain to target a different city from the main site.
The only thing I understand so far is that I have to:
1. create a subdomain
2. create a new database
3. copy the public html folder of the main site over to the subdomain pubic html folder
After that, every tutorial I’ve seen on the internet gets too confusing
Jerri says
What are you talking about? Duplicator is free. I mean, there’s a pro version, but I use the free version all the time to duplicate websites.
The only thing these instructions didn’t add is that you need to first create a new database and add a user to it on the new site before running the installer.
But it’s all easy and free.
Lipa says
thx a lot !!! ;]
Mack says
Can i copy someone’s site page to my site??
Allan Seabrook says
Hi,
I really appreciate all the posts you share with us! Please keep them coming!
My question regarding this post is…
This technique using BackupBuddy works flawlessly.
However, I now have a problem:
When I type in the URL of my original site (where I took the backup), I get directed to the site I cloned from that backup. It’s as if my original site now has a redirect to the cloned site.
What on earth have I broken?
Any advice would be much appreciated!
Thanks,
Allan
Stephen says
Check your DNS record. That would be one of the only ways this would happen.
Jonathan says
Thanks! Worked perfect!
Mamun sarkar says
Hi,
I would like to know how to clone any wordpress website have no hosting access information as well. I mean, suppose a buyer order your wpbeginner like website. Then, How to do it sir. Do you have any tutorials plz.
Hanna says
not possible anymore to use backup buddy unless you want to pay. Is their a different method?
Nelson says
Duplicator is perfect.
sandeep says
i want to copy the theme of running website to another website…
Moses says
Hi Sandeep,
Did you get solution to this. I also want to copy a theme to another website(subdomain)
Chris says
I’ve used another service to clone WordPress sites and have discovered a problem with residual tables, and I was curious whether this was an issue with BackupBuddy as well.
In the scenario I recently encountered, I create WP Site A with table prefix wp1_.
Then I have to create a new environment to clone to, so I install WordPress at WP Site B with table prefix wp2_.
Now I use my [unnamed] tool to clone site A to site B, which appears good on the admin and public side but when I look in the database I have both wp1_ and wp2_ sets of tables, and all of the GUIDs in the functioning tables for the new cloned site have WP Site A’s URL, not WP Site B’s as I would have expected.
These have to be cleaned up manually. So I wonder, does BackupBuddy do the same thing? Is this to be expected?
WPBeginner Support says
BackupBuddy’s sales/support team can probably answer this better.
Admin
Andrew Lopez says
I’d be curious to know how to manually perform this task without a plugin or is a plugin recommended for backing up and migrating over to a new website?
Dave Navarro says
BackupBuddy fails on large WordPress installs. I can’t get it to back up our site which between database all files is over 400GB in size.
I had to manually download all of the files, then re-upload them to the new site and use importbuddy with just the database. Even that fails if the raw database is too large (failed around 200MB in size).
Nitin says
wonderful technique but there is use of another plugin
Gf says
I recently moved a small simple blog with all-in-one wordpress migration and it worked great. But when I attempted a larger site on wp4.1 it failed. I think I would like back up buddy but the price is staggering. It would be my biggest wordpress expense, almost twice as much as my hosting!
Jean says
I love using BackupBuddy for backups and migrations.
All you need is access to install the plugin and your set to move.
Great article!
johnraf says
I used to have similar problems too, but after using
“long path tool” You can use to solve this problem.
yaser says
How about if we want to clone a website that we have no backend access? Is there an easy way?
fletch says
Do you have ftp access? Do you have access to the database? You would need those two things to backup a website if you don’t have access to wp-admin.