
The term ‘CSS delivery optimization’ sounds technical, but fixing it is one of the fastest ways to speed up your WordPress site.
When we optimized CSS delivery on our own projects, we saw dramatic improvements in page load times. It made our sites smoother for visitors and helped with SEO rankings.
The best part is that you don’t need to write any code to get these results. We have filtered through the options to show you two methods that work perfectly.
Here is how to easily optimize WordPress CSS delivery to improve your site speed.

How WordPress CSS Delivery Affects WordPress Performance
CSS files are used to define the visual appearance of your WordPress website. Your WordPress theme contains a CSS stylesheet file, and some of your plugins may also use CSS stylesheets.
CSS is necessary for modern websites, but it’s possible for CSS files to slow down your site’s speed and performance depending on how they are set up.
Even a small delay in website speed creates a bad user experience and may affect your search rankings and conversions, resulting in less traffic and sales.

By default, WordPress tries to load all your CSS styling before showing the page to the visitor. This makes sure the page doesn’t look ‘broken’ for a split second. However, this causes a delay where visitors see a blank screen while waiting for the files to load. This is known as render-blocking CSS.
Another common reason CSS files can slow your website is when they contain more code than is needed to display the visible part of the current page. That extra unused CSS code means that their load time will be longer.
The good news is you can improve your WordPress site’s performance by optimizing the way the CSS code is delivered.
That’s done by identifying the minimum CSS code needed to display the first part of the current web page. This is known as ‘critical CSS’.
This critical code is then added inline to the page’s HTML instead of in separate stylesheets so that the code can be rendered without needing to load the CSS file first.
The rest of the CSS can then be loaded after your visitors can see the contents of the page. This is known as ‘deferred loading’.
With that being said, let’s take a look at two methods to optimize WordPress CSS delivery, and you can choose the one that works best for you:
Method 1: Optimizing WordPress CSS Delivery With WP Rocket
WP Rocket is the best WordPress caching plugin on the market. It offers the simplest way to optimize your WordPress CSS delivery. In fact, it’s as easy as checking a box.
WP Rocket is a premium performance plugin, but the best part is that all features are included in their lowest plan.
The first thing you need to do is install and activate the WP Rocket plugin. For more details, see our step-by-step guide on how to install a WordPress plugin.
Once activated, you need to navigate to the Settings » WP Rocket page and switch to the ‘File Optimization’ tab.

Once there, you need to check the box next to the ‘Optimize CSS delivery’ option.
This will automatically enable the Remove Unused CSS feature (which is the recommended setting).

This feature scans your website and removes any CSS styles that aren’t actually being used. It also identifies the ‘critical CSS’ needed to display your page immediately, making your site load much faster.
All you need to do now is click the ‘Save Changes’ button and wait for WP Rocket to generate the necessary CSS file for all your posts and pages.
It will also automatically clear the cache for your website so that your visitors will see the new optimized version of your site instead of an unoptimized version stored in the cache.
There are plenty of other ways that WP Rocket can help you improve your website’s performance. To learn more, see our guide on how to properly install and set up WP Rocket in WordPress.
Method 2: Optimizing WordPress CSS Delivery With Autoptimize
Autoptimize is a free plugin designed to improve the delivery of your website’s CSS and JavaScript files.
While the base Autoptimize plugin is free, the specific features needed for critical CSS delivery require a paid subscription to a third-party service. It also takes significantly more time to set up than WP Rocket.
For example, it’s not able to automatically identify critical CSS like WP Rocket can. Instead, Autoptimize requires the help of a premium third-party service, which is an additional cost and requires extra time to configure.
However, it is a good option if you want a lightweight solution and don’t need the comprehensive caching features included in the WP Rocket suite.
The first thing you need to do is install and activate the Autoptimize plugin. For more details, see our step-by-step guide on how to install a WordPress plugin.
Upon activation, you need to visit the Settings » Autoptimize page to configure the plugin settings. Once there, you need to scroll down to the CSS Options section and check the ‘Optimize CSS Code’ box at the top.
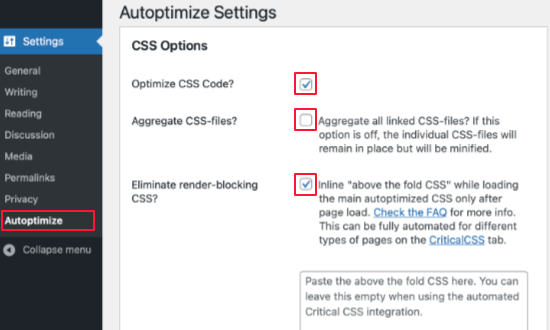
Once you do that, make sure the ‘Aggregate CSS-files’ option is unchecked and then check ‘Eliminate render-blocking CSS’.
Note: Only uncheck the ‘Aggregate CSS-files’ box if you intend to complete the Critical CSS setup in the next step. Otherwise, leaving this unchecked may slow down your site.
You can now click on the ‘Save Changes and Empty Cache’ button to store your settings.
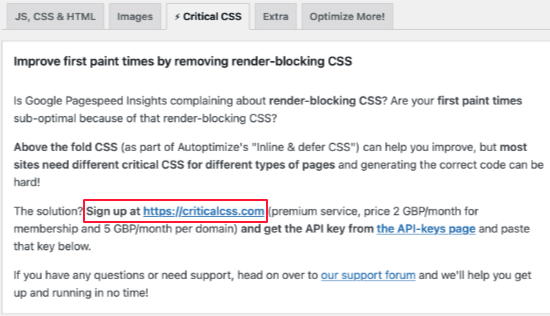
But the plugin will not work properly until you sign up for a Critical CSS account. This is a premium subscription service that will provide Autoptimize the critical CSS code it needs to optimize your WordPress CSS delivery.
To do that, navigate to the Critical CSS tab in Autoptimize’s settings. Here you’ll find the information you need to sign up with Critical CSS. You can get started by clicking the sign-up link in the third paragraph.
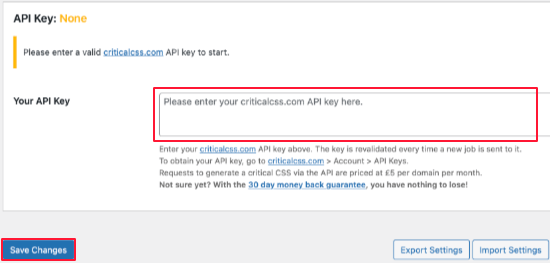
Once you’ve received your Critical CSS API key, scroll down to the API Key section so you can paste it into the ‘Your API key’ text box.
After that, make sure you click the ‘Save Changes’ button.
Autoptimize now has all of the information it needs to add the critical CSS inline and defer loading the stylesheets until after the page has been rendered. As a result, your website will have a faster loading speed.
FAQs About Optimizing WordPress CSS Delivery
Below are some of the most common questions we receive about optimizing WordPress CSS delivery. These should help clarify any remaining doubts you might have about implementing these optimization techniques.
1. What is CSS delivery optimization and why does it matter for WordPress sites?
CSS delivery optimization is the process of improving how your website loads stylesheets to reduce page loading times. It matters because poorly optimized CSS can create render-blocking issues, causing visitors to see blank pages while waiting for stylesheets to load. This directly impacts user experience, search rankings, and conversion rates.
2. Will optimizing CSS delivery break my WordPress theme’s design?
No, when done correctly, CSS optimization should not break your theme’s design. Both WP Rocket and Autoptimize are designed to preserve your site’s appearance while improving performance. However, we always recommend testing the optimization on a staging site first and keeping a backup of your original site before making changes.
3. What’s the difference between critical CSS and render-blocking CSS?
Critical CSS is the minimum CSS code needed to display the visible part of a webpage (above the fold content). Render-blocking CSS refers to stylesheets that prevent the page from displaying until they’re fully loaded. CSS optimization works by identifying critical CSS and loading it inline, while deferring non-critical CSS to load after the page is visible.
4. Do I need coding skills to implement CSS delivery optimization?
No coding skills are required for either method we’ve covered. WP Rocket makes it as simple as checking a box, while Autoptimize requires basic plugin configuration. Both plugins handle the technical aspects automatically, so you don’t need to write or modify any CSS code yourself.
5. How much can CSS optimization improve my site’s loading speed?
The improvement varies depending on your current setup, but we’ve seen loading time improvements of 30-50% in many cases. The exact speed boost depends on factors like your theme, plugins, hosting, and current CSS structure. Most sites see noticeable improvements in Core Web Vitals scores and Google PageSpeed Insights ratings.
6. Is WP Rocket worth the cost compared to using the free Autoptimize plugin?
WP Rocket offers more comprehensive optimization features and handles the entire process automatically. While the Autoptimize plugin is free, the critical CSS feature requires a separate paid subscription and more manual work. For most users, WP Rocket’s ease of use and all-in-one feature set justify the cost.
Additional Resources
We hope this tutorial helped you learn how to optimize WordPress CSS delivery. You may also want to see these other guides to improve your website performance:
- The Ultimate Guide to Boost WordPress Speed & Performance
- How to Fix Render-Blocking JavaScript and CSS in WordPress
- How to Optimize Core Web Vitals for WordPress (Ultimate Guide)
- Best WordPress Caching Plugins to Speed Up Your Website
- How to Apply CSS for Specific User Roles in WordPress
If you liked this article, then please subscribe to our YouTube Channel for WordPress video tutorials. You can also find us on Twitter and Facebook.


")

Jiří Vaněk
I use both plugins simultaneously because, according to the results, it has helped speed up my website. However, I have the “Optimize CSS delivery” feature enabled in WP Rocket and disabled in Autoptimize. I’ve tested on my site that these two plugins complement each other perfectly. The only thing you need to watch out for is that the same function is not enabled in both plugins at the same time. Nevertheless, together they form a powerful duo.
Dennis Muthomi
I’ve implemented WP Rocket on several client sites and can attest to its effectiveness in improving page load times.
The “Optimize CSS delivery” feature is indeed as simple as checking a box, but it’s impressive how much it can impact performance.
One additional tip I’d offer is to use a tool like GTmetrix or Google PageSpeed Insights to measure your site’s performance before and after implementing these optimizations. This can help quantify the improvements and identify any remaining issues.
Jiří Vaněk
Yes, Dennis, I do the same, with the difference that I use WP Rocket everywhere. Due to speed issues, I’ve tried all the cache plugins during my time using WordPress, and WP Rocket is unbeatable. The preload feature has helped me the most, but various minifications and code optimizations have also made a significant impact. Your recommendation is a great idea that complements the text well. However, for speed measurement, I find GT Metrix more professional and better. Especially the waterfall feature, where the entire loading process of the website is displayed in detail. It’s a great tool, free at its core, and it’s fantastic that you mentioned it here.