Are you looking for a way to integrate Zoom meetings and webinars in WordPress?
Integrating WordPress with Zoom allows you to automatically enroll customers, visitors, and new members into Zoom video calls and webinars. This can improve user engagement and help build a community around your brand.
In this article, we will show you how to easily integrate Zoom meetings and webinars in WordPress, step by step.
Why Integrate Zoom Meetings and Webinars With WordPress?
Integrating Zoom with WordPress lets you easily automate your meeting and webinar registration process. This can save you a lot of time that you can spend on other business tasks.
Zoom is one of the most popular meeting, webinar, and video conference call software in the world, used by over 300 million people every day.
It’s a must-have tool for businesses with remote teams or website owners who need to get in touch with customers and clients virtually.
For instance, if you have an online store, then you can use Zoom for live product demos, customer support, online training, and even host webinars with your customers to promote upcoming products on your site.
That being said, let’s take a look at how you can easily integrate Zoom meetings and webinars in WordPress. Here’s a quick overview of the topics we will cover in this guide:
- Install and Activate the Uncanny Automator Plugin for WordPress
- Set Up Your Zoom Account the Right Way
- Connect Zoom Meetings and Webinars With WordPress
- Adds Users To a Zoom Meeting After Form Completion in WordPress
- Register Users for a Zoom Webinar After Form Completion in WordPress
- Add Customers for a Zoom Webinar After They Make a Purchase in WordPress
- Register Members for a Zoom Meeting After Sign Up in WordPress
- Bonus: Use Google Meet for Webinars and Meetings
Install and Activate the Uncanny Automator Plugin for WordPress
The easiest way to connect Zoom with WordPress is by using Uncanny Automator.
It’s the best WordPress automation plugin that helps you create automated workflows in WordPress without writing any code. The tool allows you to connect your site with over 150 plugins and apps like Zoom, Slack, and Asana.
It’s like Zapier for WordPress websites but without the high costs.
To learn more, see our article on how to create automated workflows in WordPress.
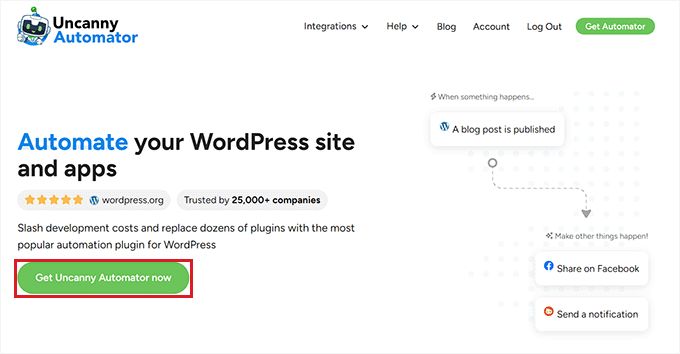
To connect Zoom with WordPress, you will first have to visit the Uncanny Automator website.
From here, click the ‘Get Uncanny Automator Now’ button to continue.
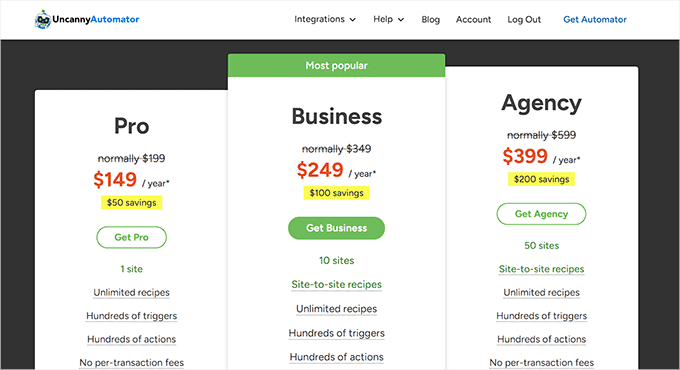
This will take you to the ‘Pricing’ page, where you can select a plan of your choice.
Keep in mind that Uncanny Automator also has a free version, but it has limited features. That is why we are using the premium plan for this tutorial.
Upon purchase, you must install and activate the Uncanny Automator plugin on your WordPress site. For detailed instructions, you may want to see our beginner’s guide on how to install a WordPress plugin.
Note: You will also have to install the free version of the Uncanny Automator plugin because it will be used as the base for the pro plan.
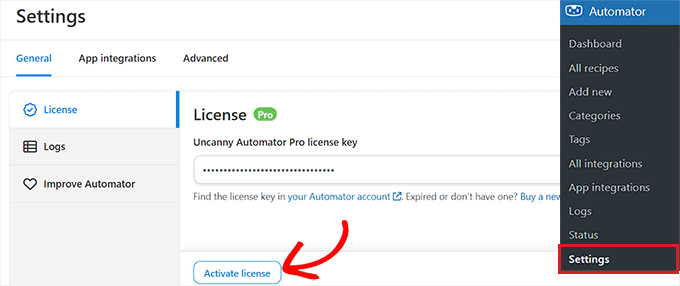
Once you have done that, visit the Automator » Settings page from the WordPress admin sidebar to enter the license key. You will find this information in your account on the Uncanny Automator website.
After that, don’t forget to click the ‘Activate license’ button.
Now that Uncanny Automator is installed and activated, let’s set up your Zoom account.
Set Up Your Zoom Account the Right Way
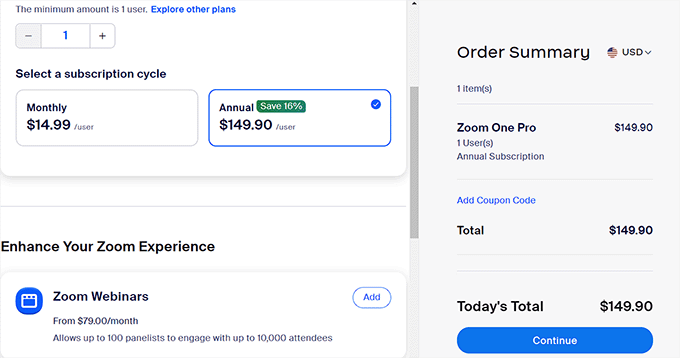
In order to integrate Zoom and WordPress, you need at least the Pro version of Zoom and the Zoom Webinars addon.
There is a free version of Zoom, but you will need a paid account to set up the integration. First, head to the Zoom website and sign up for the plan that best suits your needs.
If you want to integrate webinars on your website, then you will also have to buy the Zoom Webinars addon.
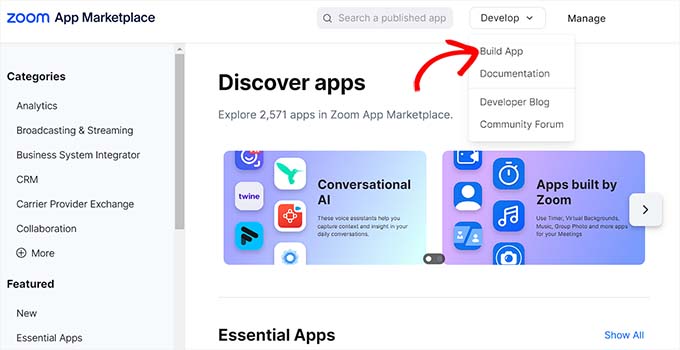
Once you have a premium account, you need to head to the Zoom App Marketplace and sign in to your account. Here, you will create an app that sends data between Zoom and WordPress.
To do this, click the ‘Develop’ menu item and select the ‘Build App’ option from the dropdown menu in the top right corner of the screen.
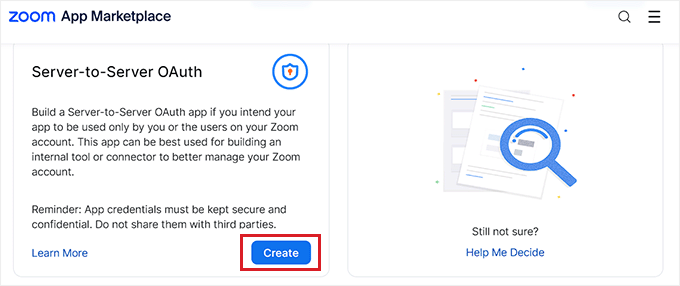
This will bring you to the ‘Choose your app type’ page, where you must select the type of app you want to build.
From here, you have to find the ‘Server-to-Server OAuth’ app type and click the ‘Create’ button under it.
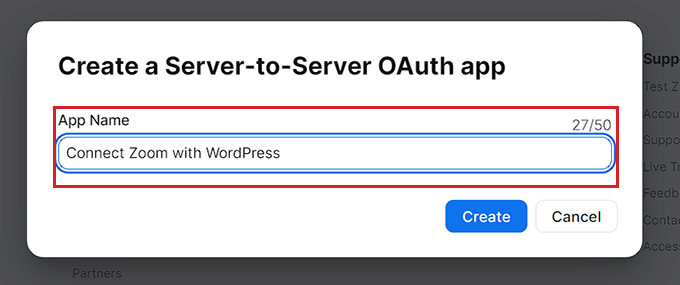
Next, you can name your app in the popup. The name is to help you remember the purpose of the app and won’t be visible to your visitors.
Simply enter your app name and click the ‘Create’ button to start the process.
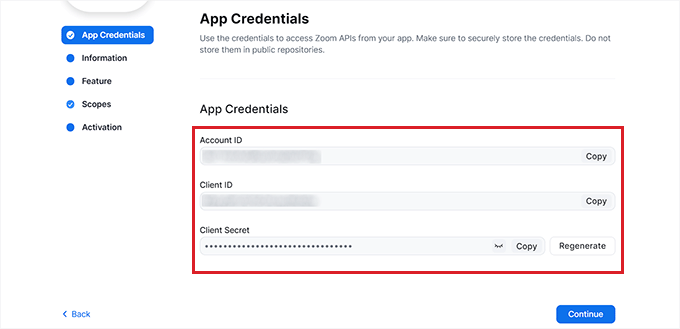
This will take you to the ‘Connect Zoom with WordPress’ screen, where you will see the app credentials listed.
From here, you must copy the ‘Account ID’, ‘Client ID’, and the ‘Client Secret’ credentials and paste them into a text editor for now.
These credentials will be used to connect Zoom with your WordPress website. Then, click the ‘Continue’ button.
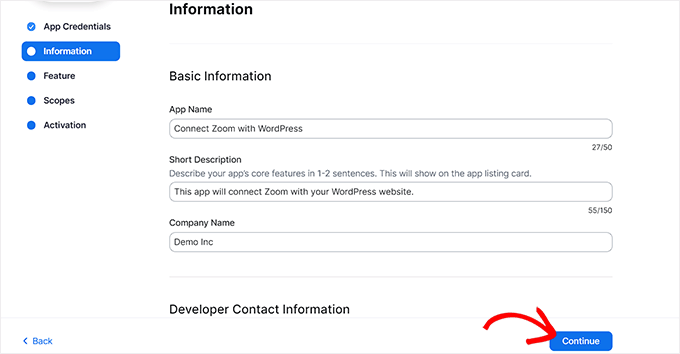
You’ll now be taken to the next step, where you have to provide basic information for your app, including the app name, company name, short description, developer name, and email address.
Once you are done, just click the ‘Continue’ button to move to the next step.
After that, you’ll be taken to the ‘Feature’ screen, where you don’t have to configure any settings, so you can click ‘Continue’ on this screen too.
You will now be taken to the ‘Scopes’ screen, where you have to select at least one scope for your app to be able to activate it.
These scopes provide a way to limit the amount of access granted to an app. To set a scope, click the ‘+ Add Scopes’ button.
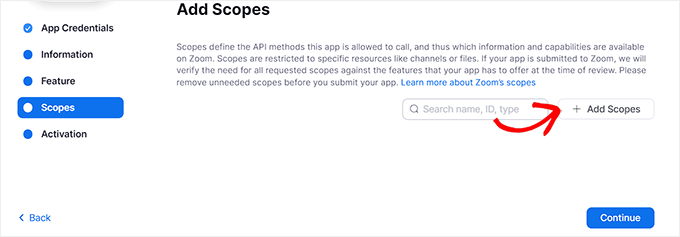
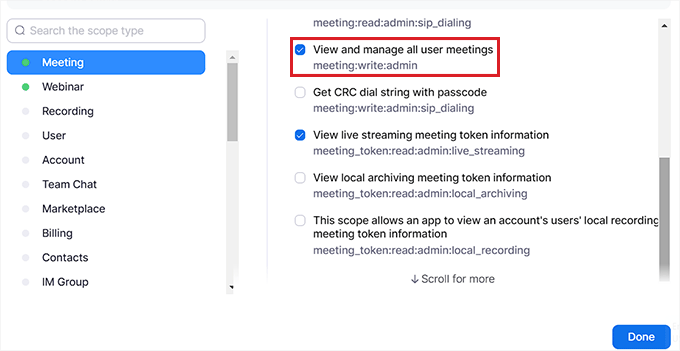
This will open a prompt on the screen where you can select scopes for Zoom meetings and webinars that will be hosted on your website using this app.
For example, if you want the app to be able to view live streaming token information or all user meetings information, then simply check the boxes next to these options.
You can also configure the scopes for Zoom webinars here by simply switching to the ‘Webinar’ option from the left column. After that, click the ‘Done’ button to move forward.
Next, click the ‘Continue’ button to move to the next step.
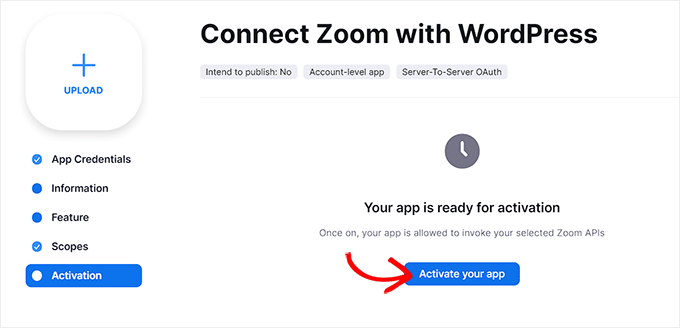
On the ‘Activation’ page, you will now see a message informing you that your app is ready.
From here, simply click the ‘Activate your app’ button.
Create a New Zoom Meeting
Now, you can create a new Zoom meeting that you will connect to your WordPress site.
To do this, visit your Zoom account to click the ‘Schedule’ link, and then fill in your meeting details.
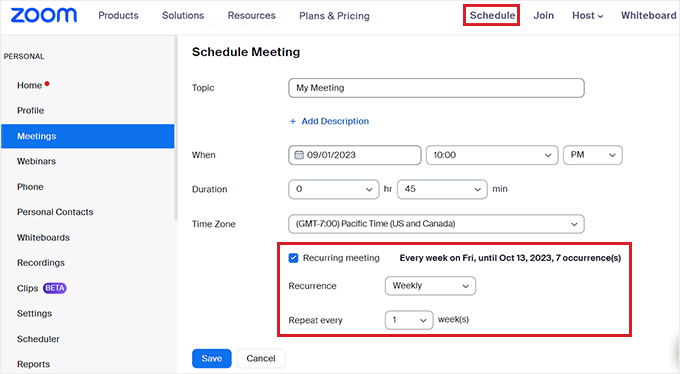
You can even set a recurring Zoom meeting for your users by checking the ‘Recurring meeting’ box in the ‘Timezone’ section.
Once you are done, don’t forget to click the ‘Save’ button to store your settings.
Create a New Zoom Webinar
To create a new Zoom webinar, click the ‘Webinars’ menu option in the ‘Personal’ tab inside your Zoom account.
After that, just click the ‘Schedule a Webinar’ button.

On the next page, you can enter all of your webinar information.
After that, you need to make sure the ‘Required’ box is checked in the Registration section.
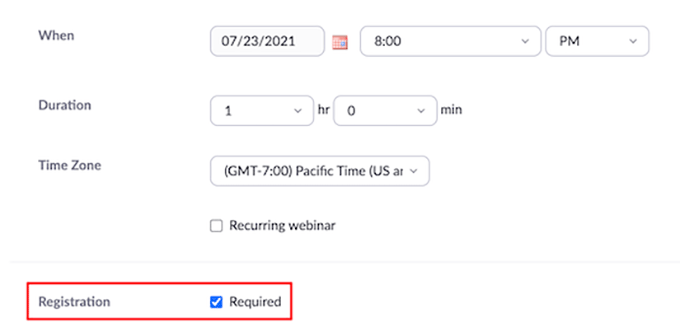
After that, simply click the ‘Save’ button at the bottom of the page.
Connect Zoom Meetings and Webinars With WordPress
Once Uncanny Automator is activated and Zoom is set up, you need to connect both of these apps to each other.
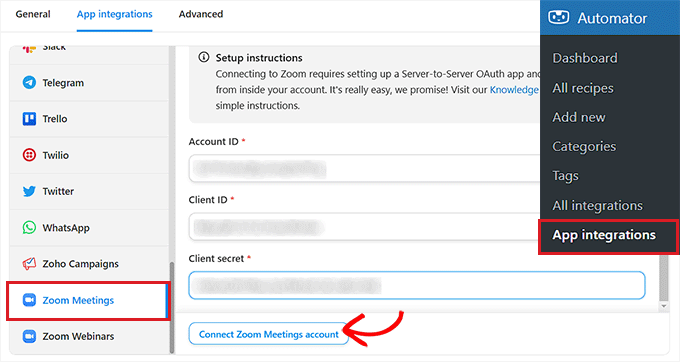
For this, head over to the Automator » App Integrations page from the WordPress dashboard.
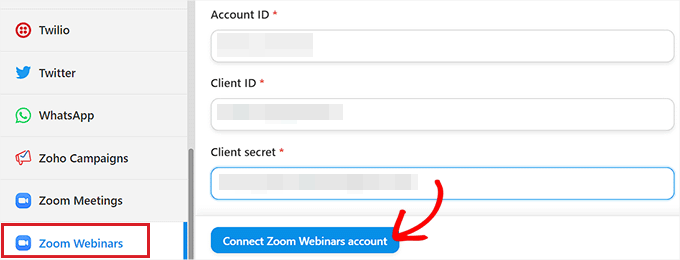
Next, click the ‘Zoom Meetings’ tab in the left column and then add the ‘Account ID’, ‘Client ID’, and the ‘Client Secret’ credentials that you copied earlier into the fields.
Finally, click the ‘Connect Zoom Meetings Account’ button.
If you want to integrate Zoom Webinars, too, then just click the ‘Zoom Webinars’ menu option.
Then, paste the same ‘Account ID’, ‘Client ID’, and ‘Client Secret’ credentials that you used above.
Once you are done, go ahead and click the ‘Connect Zoom Webinars Account’ button.
Now that we have set up Zoom and integrated it with WordPress, let’s look at some of the cool things that you can do with this Uncanny Automator integration.
Adds Users To a Zoom Meeting After Form Completion in WordPress
This integration will automatically register users for a Zoom meeting when they fill out a form on your website. This can be used to onboard new clients, schedule coaching calls, and more.
If you don’t have an active WordPress form on your website, then you need to create one now.
Uncanny Automator works with all major forms solutions, including WPForms, Formidable Forms, and more.
For this tutorial, we will be using WPForms because it’s the best contact form plugin for WordPress, used by over 6 million websites. There’s also a webinar form template in the form templates pack addon that makes form creation easy.
For more details, see our step-by-step guide on how to create a contact form in WordPress.
Now, you are ready to connect your WordPress form with Zoom.
To do this, you will be creating what’s called a ‘recipe’. In Uncanny Automator, recipes are the automations that link different plugins and apps together.
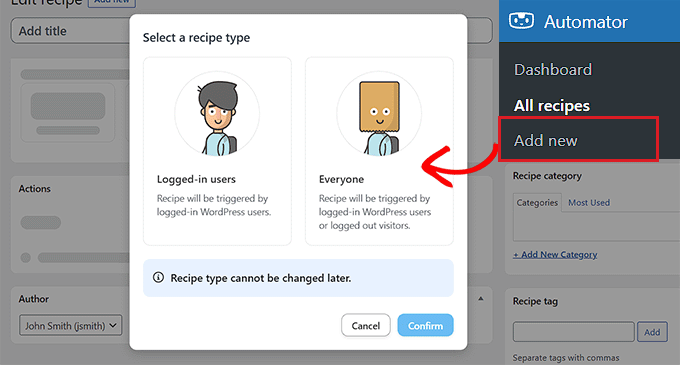
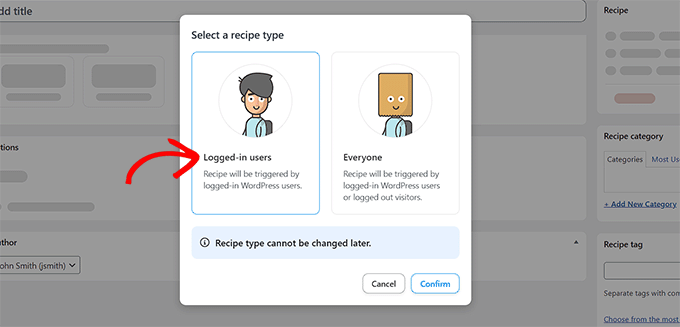
To get started, navigate to the Automator » Add new page from the WordPress admin sidebar and click the ‘Everyone’ option as the recipe type.
The Everyone recipes can be triggered by any user, while logged-in recipes can only be activated by users logged in to your website.
After that, click the ‘Confirm’ button.
Next, you have to provide a name for your recipe. This will help you remember the recipes you create without the name being visible to your users.
Keep in mind that each recipe has two different parts: the trigger and the action. The trigger is the event that will start the recipe, and the action is the task that runs after the trigger takes place.
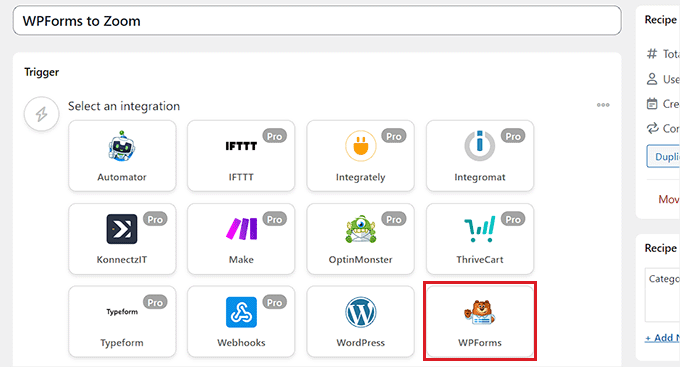
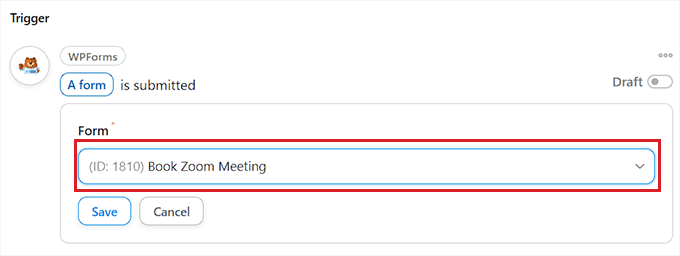
For your first trigger, you need to select ‘WPForms’ in the ‘Trigger’ meta box.
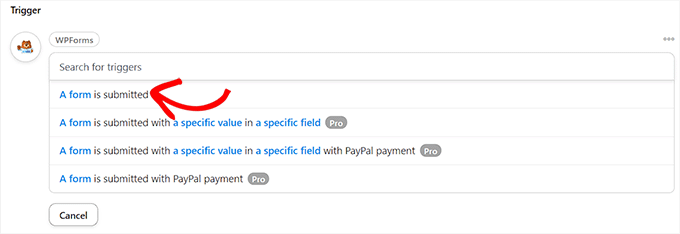
After that, you have to choose a specific trigger related to WPForms.
For example, if you want your users to be added to a Zoom meeting once they submit a contact form, then you can select the ‘A form is submitted’ option.
If you have multiple forms on your WordPress blog, then you will also have to select the form where the submission will trigger the action.
To do this, simply select a form of your choice from the ‘Form’ dropdown menu.
Once you are done, don’t forget to click the ‘Save’ button to store your settings.
Next, you need to add an action for your automation.
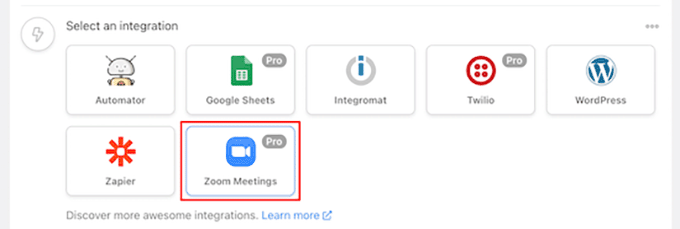
To do this, scroll down to the ‘Actions’ sections and click the ‘Add action’ button under the meta box.
This will open a list of all the integrations available in the Uncanny Automator. From here, you need to pick the ‘Zoom Meetings’ option.
This will open the ‘Zoom Meetings’ action settings on the screen.
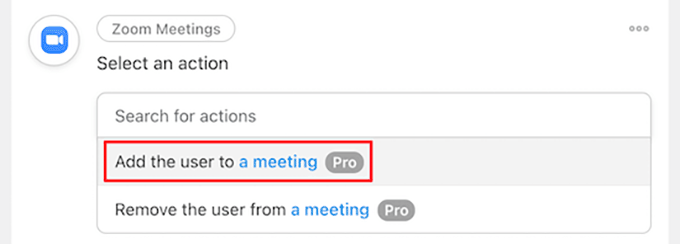
From here, you must choose the action that Zoom will perform upon form submission.
If you want to add a user to a Zoom meeting after they fill out a specific form on your website, then you need to select the ‘Add the user to a meeting’ option.
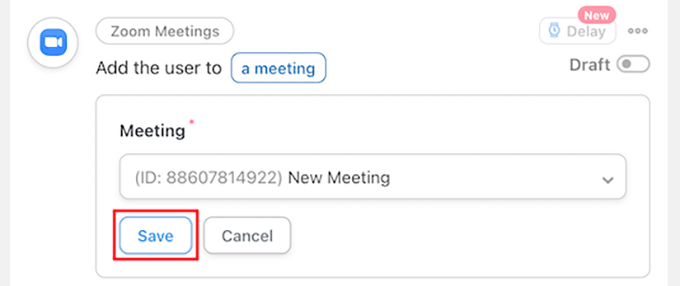
Then, you can choose the Zoom meeting you want users to register for in the ‘Meeting’ box.
Once you are done, don’t forget to click the ‘Save’ button to store your settings.
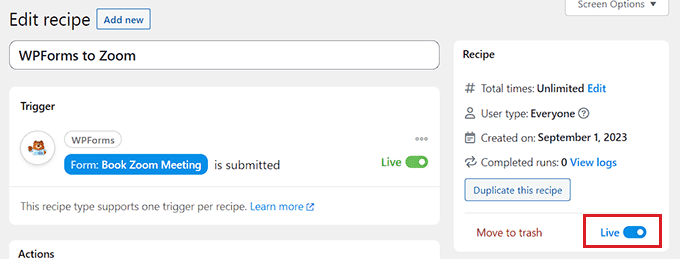
Now, it’s time for you to finally publish your Uncanny Automator recipe. To do this, all you need to do is toggle the switch in the ‘Recipe’ box to ‘Live’.
Now, when your users fill out the form, they will automatically be registered for your Zoom meeting.
Register Users for a Zoom Webinar After Form Completion in WordPress
Another popular integration is registering users for a webinar when they fill out a form on your website.
To do this, you will follow the same steps as above. However, you will select ‘Zoom Webinars’ instead of ‘Zoom Meetings’ in the actions section.
First, follow the same initial ‘Triggers’ section as above. This means that you will have to choose WPForms as the integration for the trigger.
After that, you can select the ‘A form is submitted’ option as the trigger.

Next, scroll down to the ‘Actions’ section and click the ‘Add action’ button to expand the menu.
Then, simply select the ‘Zoom Webinars’ option as the integration.

This will open up the actions settings for the Zoom webinar.
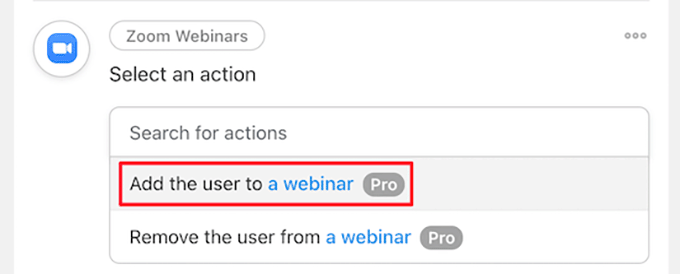
From here, you can select the ‘Add the user to a webinar’ option from the dropdown menu. This will automatically add a user to your Zoom webinar after they fill out a specific form on your website.
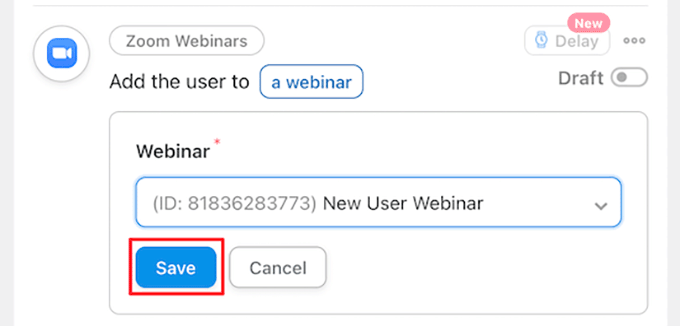
Next, you will also have to choose a Zoom webinar from the dropdown list.
Once you are done, don’t forget to click the ‘Save’ button to store your settings.
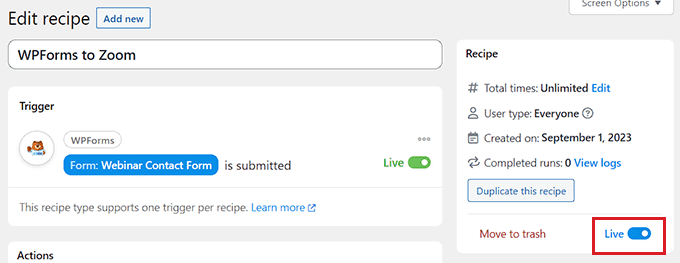
After that, you must make your recipe live so that new users will automatically be enrolled in your webinar.
To do this, simply click the toggle in the ‘Recipe’ box so it says ‘Live’.
Add Customers for a Zoom Webinar After They Make a Purchase in WordPress
Another way to connect WordPress with Zoom is to enroll new customers in a product webinar after they make a purchase in your WooCommerce store.
Keep in mind that the WooCommerce plugin and store must be set up before you start creating a recipe with Uncanny Automator.
First, you need to visit the Automator » Add new screen from the WordPress dashboard and click the ‘Everyone’ option.
After that, click the ‘Confirm’ button to move forward.

Next, you have to provide a name for your recipe. This name won’t be displayed to your customers on the front and is only for your identification.
Once you have done that, choose WooCommerce as the integration in the ‘Trigger’ meta box.
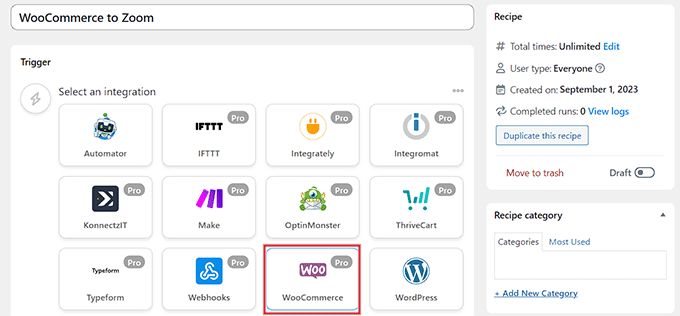
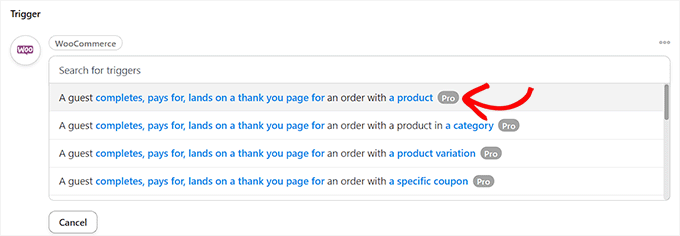
This will open the list of WooCommerce triggers in the dropdown menu. From here, you can select any trigger that suits your needs.
For example, if you want customers to be added to your webinar after they buy a product, then you can select the first option.
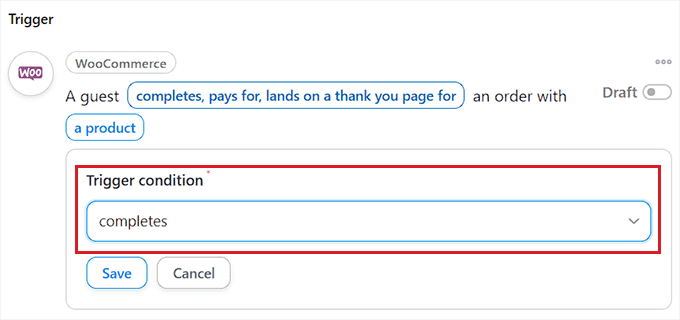
After that, select the ‘completes’ option in the ‘Trigger condition’ box to start the automation when a customer completes a purchase.
Then, just click the ‘Save’ button to store your settings.
Now, you can choose a specific product in your store or have the automation run when a customer purchases any product.
Simply select the ‘Any product’ option if you want all of your products to be included in the automation, and then click the ‘Save’ button.

Next, scroll down to the ‘Actions’ section and click the ‘Add action’ button to expand the menu.
Then, choose the ‘Zoom Webinars’ integration from the list.

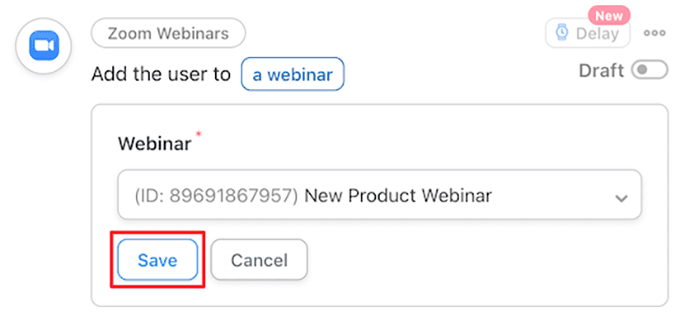
This will open the Zoom webinar action settings on the screen, where you can select the ‘Add the user to a webinar’ option.
This will automatically register new customers for your webinar once they make a purchase.

After that, select the webinar of your choice from the dropdown list in the ‘Webinar’ box.
If you have multiple webinars running, then make sure to choose the webinar that’s associated with your WooCommerce products.
The last thing you need to do is make your recipe live.
To do this, simply click the toggle in the ‘Recipe’ box so it says ‘Live’.
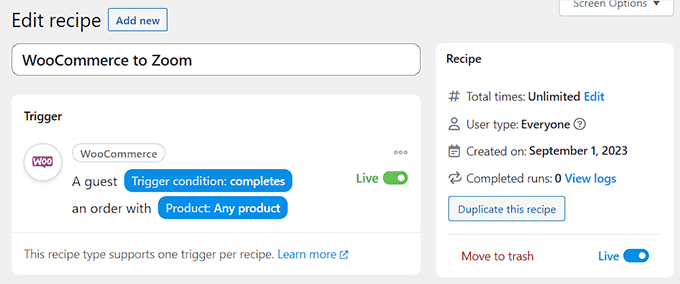
Now, when your customers purchase a product, they will automatically be registered for your product webinar.
Register Members for a Zoom Meeting After Sign Up in WordPress
When running a membership site, registering new members for a Zoom call can be a great way to welcome them into your community.
If you haven’t set up your members-only site yet, then you can see our ultimate guide to creating a WordPress membership site.
You can also register new users for a Zoom orientation call when they enroll in your online course.
After your website is set up, you can navigate to the Automator » Add new screen from the WordPress admin sidebar and click the ‘Logged-in’ option.
Now, only the registered members on your site will be able to trigger the recipe.
After that, click the ‘Confirm’ button to continue.
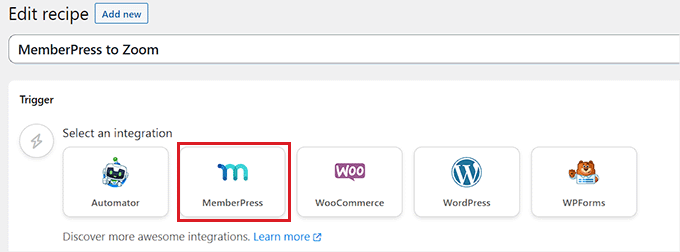
Next, add a name for your recipe. This name won’t be displayed to anyone on the front end and is only for your identification.
After that, select the ‘MemberPress’ integration in the trigger section.
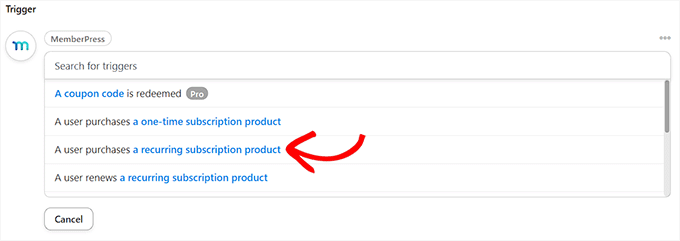
This will open the MemberPress trigger options on the screen in a dropdown menu list.
We will select ‘recurring subscription product’, but you can select the product type that’s right for your site.
Next, you need to choose the subscription product from the dropdown in the ‘Product’ box.
After that, just click the ‘Save’ button.
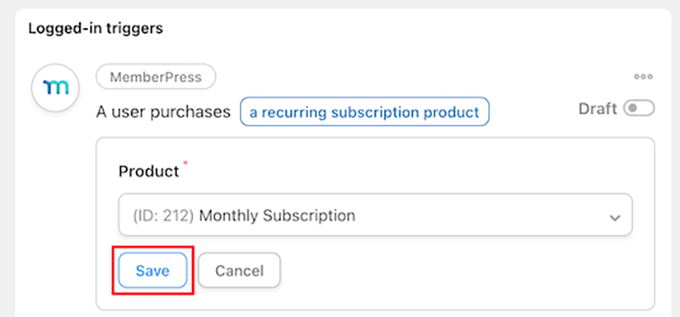
Now, it’s time to add an action to your recipe. To do this, simply click the ‘Add action’ button in the ‘Actions’ box to expand the menu.
This will bring up a list of available integrations, where you need to pick the ‘Zoom Meetings’ option.

This will open the Zoom Meetings actions settings on the list.
From here, choose the ‘Add the user to a meeting’ option if you want to add a user to a meeting when they make a recurring subscription purchase.

Then, select the Zoom call for your new members in the ‘Meeting’ box.
After that, simply click the ‘Save’ button to store your settings.
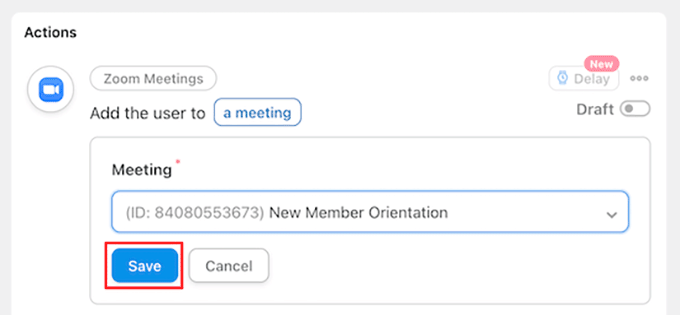
The last thing you need to do is make your recipe live.
To do this, simply click the Draft toggle in the ‘Recipe’ box so it shows ‘Live’.
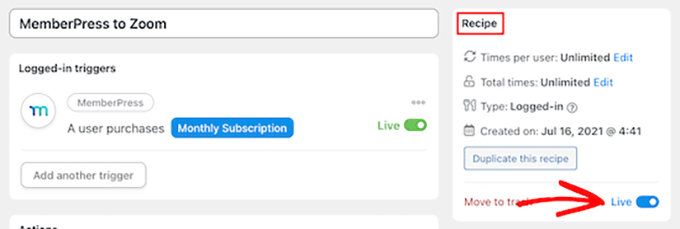
Now, your new members will automatically be enrolled in a Zoom member orientation call.
Besides Zoom, Uncanny Automator also allows you to create countless other recipes for different plugins and apps like Twilio and Google Sheets.
Bonus: Use Google Meet for Webinars and Meetings
If you do not like using Zoom, then Google Meet is an amazing alternative.
The platform is a part of Google Workspace and allows you to schedule meetings, share your virtual screen, use in-meeting chat, and add visual effects to your video screen.
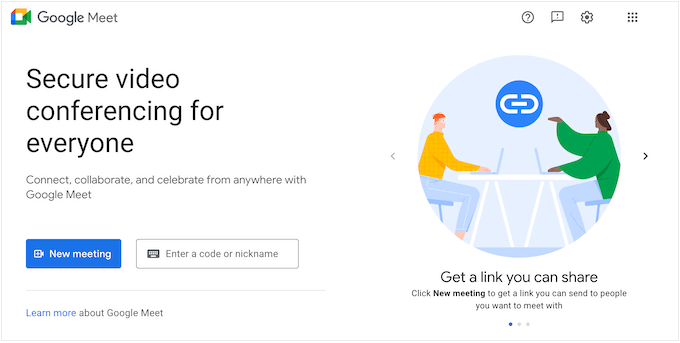
If you are using other Google Services, then Google Meet can also connect with Gmail and Google Calendar. Plus, it is easier to use and navigate, making it a great choice if you are looking for a simple video call tool.
However, if you want a more advanced tool, then you may have to opt for Zoom. For more details, you can see our comparison on Google Meet vs. Zoom: Which is better for your business?
We hope this article helped you easily integrate Zoom meetings and webinars in WordPress. You may also want to see the best WooCommerce automations to increase sales or our expert comparison of the best business phone services for small businesses.
If you liked this article, then please subscribe to our YouTube Channel for WordPress video tutorials. You can also find us on Twitter and Facebook.


Syed Balkhi says
Hey WPBeginner readers,
Did you know you can win exciting prizes by commenting on WPBeginner?
Every month, our top blog commenters will win HUGE rewards, including premium WordPress plugin licenses and cash prizes.
You can get more details about the contest from here.
Start sharing your thoughts below to stand a chance to win!
Jiří Vaněk says
I am currently working on a website for a person who does psychotherapy and sometimes needs to talk to people as part of therapy in this way – remotely (e.g. due to the distance between the patient and the therapist). Thank you for expanding the possibilities and providing some insight into the possibilities of how this matter could be handled technically.
WPBeginner Support says
Glad we could share this
Admin
Ralph says
I’m a little bit lost with all that details. Can this be used to fulfill one on one meetings that people buy from me in woocemerce shop in form of private lesson?
WPBeginner Support says
If we understand what you’re looking for correctly then yes you should be able to achieve that.
Admin
Ralph says
Cool, I will definitely take a closer look. Better ask support for confirmation but this looks like it can help.