


By default, when a user logs in to WordPress, they’re redirected to the WordPress admin dashboard.
However, if you’re using WordPress as an eCommerce platform to sell products, courses, software, etc, then you probably want to redirect users to the members area, a course portal, or an account page instead for a better experience.
In this guide, we’ll walk you through the easiest way to set up custom login redirects in WordPress, step by step.
Quick summary: You can use a free plugin like LoginWP to set up login redirects based on user role, username, or capability. Alternatively, you can use a tiny code snippet with the login_redirect filter to redirect users anywhere you want.
Here’s what we’ll cover in this article:
Method 1: Setting Up Login Redirects With LoginWP
The easiest way to redirect users to a specific page after they sign in is with LoginWP, a free login page plugin. It lets you set up simple login redirects in a couple of clicks based on user roles, capabilities, usernames, and more.
First, install and activate the LoginWP plugin from your WordPress dashboard. For more details, see our step-by-step guide on how to install a WordPress plugin.
Upon activation, go to LoginWP » Redirection Rules.
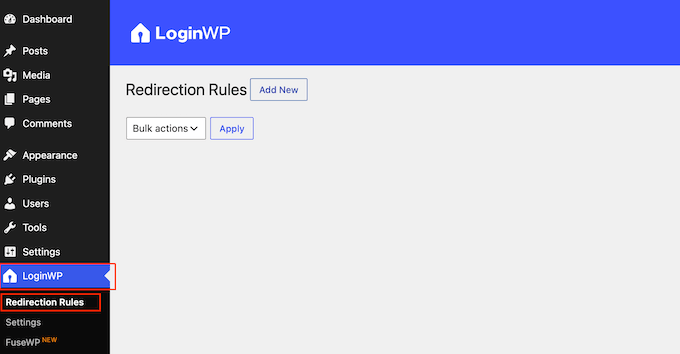
Here, you can create login redirects for a range of situations. Let’s start with the option that most website owners need first.
Redirecting All Users After Login
If you want every user to land on the same page after login, then you don’t need to create any rules at all. Instead, you can use the blanket setting that LoginWP applies to anyone who doesn’t match a more specific rule.
On the LoginWP » Redirection Rules screen, scroll down to the ‘All Other Users’ section. Here, you can enter the links you want to use for the Login URL and the Logout URL.
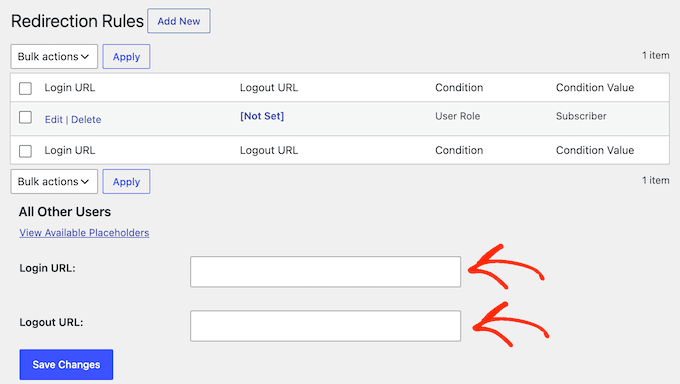
Once you’re done, click the ‘Save Changes’ button.
With no other rules in place, this one setting covers everyone who logs in to your site. It also works as a safety net later on, so any user who doesn’t match a rule still lands somewhere useful.
Redirecting WordPress Users by User Role
For most membership sites and online stores, the useful next step is to send different user roles to different pages. For example, you might send editors to the admin area, while sending your email subscribers to a separate, custom page.
To do this, click the ‘Add New’ button at the top of the ‘Redirection Rules’ screen.
Then, open the ‘Rule Condition’ dropdown and select ‘User Role’. Then, choose the role you want from the second dropdown.
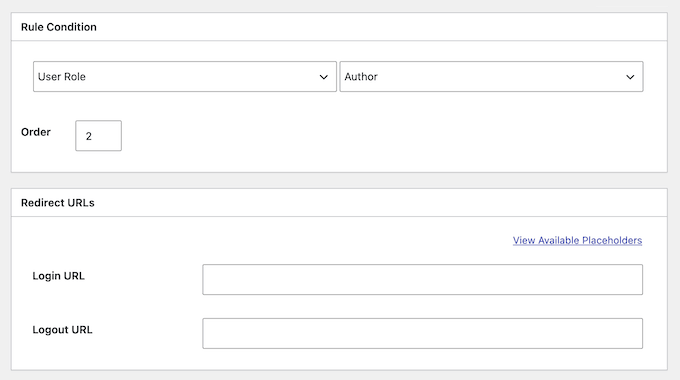
After that, scroll to the ‘Redirect URLs’ section and enter the page you want this role to land on in the Login URL field. You can also set a Logout URL to control where these users go after they sign out.
You may also decide to set an order number, which decides the priority when someone matches more than one rule. LoginWP applies the rule with the lower number first, though this only works between rules that use the same condition. That means an order number cannot make a user role rule override a user capability rule.
Finally, click the ‘Save Rule’ button. If you want to create different login redirects for multiple user roles, then repeat these steps for each one.
Other Rule Conditions You Can Use
While standard user roles cover most setups, the ‘Rule Condition’ dropdown lets you target your audience using three different filters.
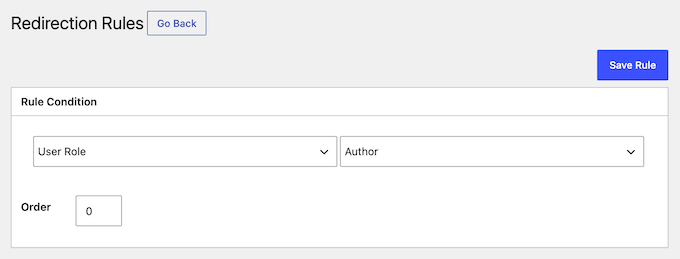
Here’s an overview of the different options:
- User Role – targets everyone who shares a role, such as every subscriber or every customer.
- User Capability – targets everyone who holds a single permission, such as the publish_posts capability, instead of a named role.
- Username – targets one named person. This tends to suit small teams where every individual needs their own landing page.
Whichever condition you choose, the rest of the rule works exactly the same way. You pick the value from the second dropdown, enter your login and logout URLs, and then click the ‘Save Rule’ button.
Setting Up a User Registration Redirect in WordPress
When a new user signs up on your website, WordPress redirects them to the login page. You can use a redirect URL to send them to any other page on your website instead.
To do this, go to the LoginWP » Redirection Rules screen and scroll to the ‘After Registration’ section.
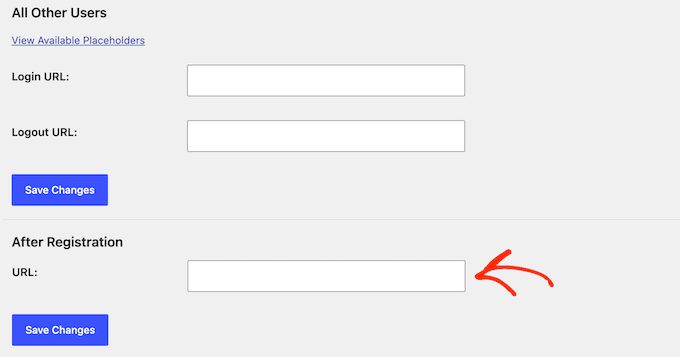
Here, enter the URL you want to use and click the ‘Save Changes’ button.
Once your rules are in place, it is worth checking that they actually work by logging in with a test account. Then, confirm that you’re being redirected to the right page.
If you’d rather have a custom-designed login form and login page, then see our guide to building a complete custom login page with its own redirect settings.
Method 2: Redirect Users With a Code Snippet (Using WPCode)
If you’d rather create your login redirect with code, you can use WordPress’s built-in login_redirect filter. Filters let you modify how WordPress works without changing its core files. In this case, the login_redirect filter lets you control where users are sent after they sign in.
Below are two code snippets you can use, depending on what you want your redirect to do. Don’t worry if you don’t know how to code. After you choose a snippet, we’ll show you exactly how to add it to your site safely.
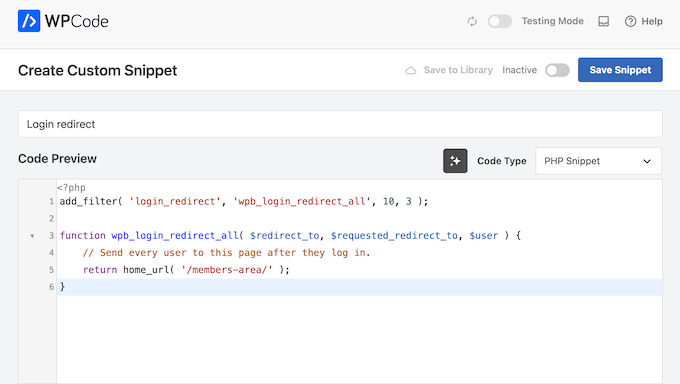
Here is a snippet that sends every user to the same page after they log in:
add_filter( 'login_redirect', 'wpb_login_redirect_all', 10, 3 );
function wpb_login_redirect_all( $redirect_to, $requested_redirect_to, $user ) {
    // Send every user to this page after they log in.
    return home_url( '/members-area/' );
}
Just remember to change /members-area/ to the page you want people to land on after login.
Sending Different User Roles to Different Pages
A single redirect works fine for basic sites, but it isn’t ideal for all websites. For example, on a membership site you may want to send admins straight to the dashboard, while active members land directly on their account page.
This alternative code snippet checks each person’s user role and sends them to the right place:
add_filter( 'login_redirect', 'wpb_login_redirect_by_role', 10, 3 );
function wpb_login_redirect_by_role( $redirect_to, $requested_redirect_to, $user ) {
    // Make sure we have a valid user with roles.
    if ( isset( $user->roles ) && is_array( $user->roles ) ) {
        // Send administrators to the WordPress dashboard.
        if ( in_array( 'administrator', $user->roles, true ) ) {
            return admin_url();
        }
        // Send all other users to a custom page.
        return home_url( '/members-area/' );
    }
    return $redirect_to;
}
Currently, this snippet sends administrators to the main dashboard and everyone else to your members page. You can swap administrator for another role, such as editor or subscriber, and change the URLs to match your site.
Adding the Snippet Safely With WPCode
Editing your theme’s functions.php file by hand can be risky, because one small mistake there can take your whole site offline.
To add either snippet safely, we recommend the free WPCode plugin instead. It lets you add custom code without touching your theme files.
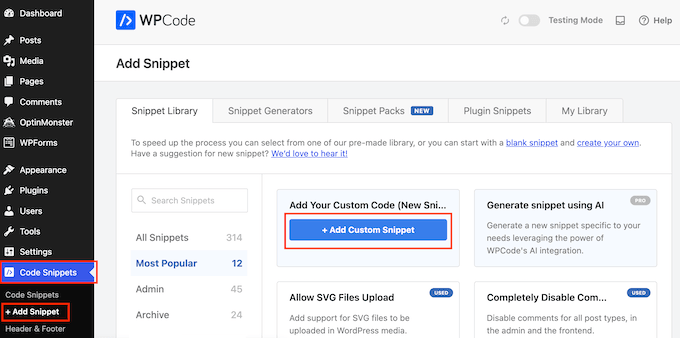
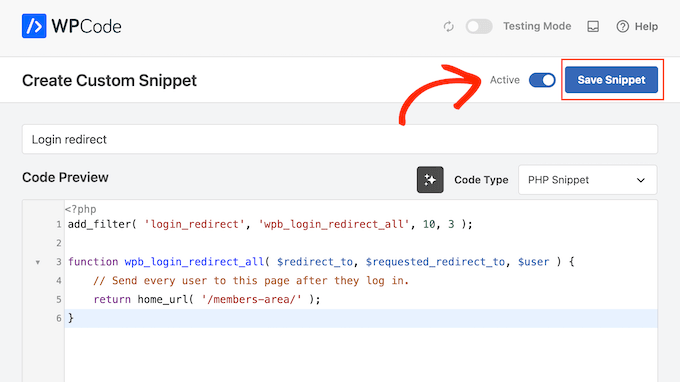
After installing and activating WPCode, go to Code Snippets » + Add Snippet. Then, hover over the ‘Add Your Custom Code (New Snippet)’ box, click the ‘Add Custom Snippet’ button, and choose ‘PHP Snippet’ as the code type.
On the next screen, give your snippet a name you will recognize later, such as ‘Login redirect’. After that, paste your chosen snippet into the ‘Code Preview’ box.
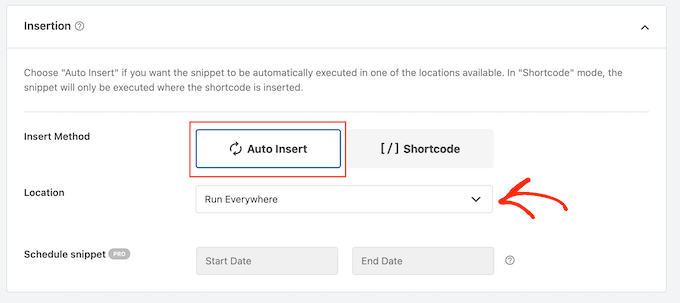
Below the code box, make sure the insertion method is set to ‘Auto Insert’ with the location set to ‘Run Everywhere’.
This lets the snippet load during the login process.
Finally, toggle the switch at the top of the page from ‘Inactive’ to ‘Active’, then click the ‘Save Snippet’ button.
To confirm the redirect works, log out of your site and then log back in with a test account.
If you’re using the role-based snippet, then it’s a good idea to test more than one account, such as an administrator and a subscriber. This lets you check that each role lands on the correct page.
If the redirect does not happen, open the snippet again and confirm the toggle is set to ‘Active’ and the location is ‘Run Everywhere’. Then, click the ‘Save Snippet’ button and test the login once more.
For more ways to use the plugin, see our guide on how to add custom code in WordPress.
How to Troubleshoot Common Login Issues in WordPress
Setting up redirects usually works smoothly. However, you might run into problems depending on your website setup and plugins.
Here are some tips to help you resolve those issues:
1. Update Your Permalink Structure
From your dashboard, go to Settings » Permalinks and click the ‘Save Changes’ button without making any changes.
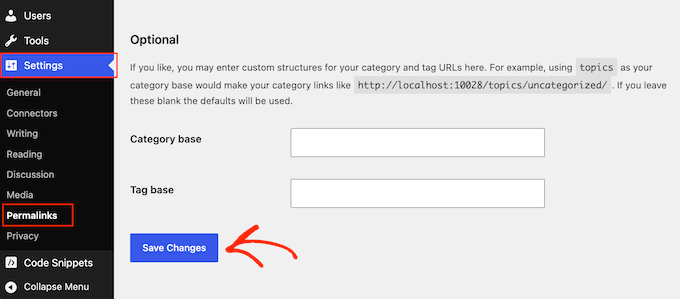
This refreshes your WordPress permalink settings. If you are seeing general redirect issues, this often fixes the problem.
For more information, read our guide on how to regenerate WordPress permalinks.
2. Fix Login Page Redirect Issue
If your login page keeps refreshing and sending you back to the login form, it is often due to a browser cache or cookie issue.
To start, try clearing your browser cache and cookies. If you use a WordPress caching plugin or if your web hosting has built-in server caching, you should clear those caches as well. If that doesn’t solve the problem, it could be a sign of a settings conflict.
For help, see our guide on fixing the WordPress login page refreshing and redirecting issue.
Frequently Asked Questions About Redirecting Users After a Successful Login
Here are some questions our readers often ask about redirecting users after a successful login:
Can I redirect users to different pages based on their role?
Yes. You can redirect users based on their role with a plugin like LoginWP or with a tiny code snippet. This is helpful if you run a membership site, online store, or multi-author blog.
For example, you can redirect:
- Admins to the WordPress dashboard.
- Customers to their account or a thank you page.
- Contributors or authors to the post editor or pending drafts section.
Can I redirect users after login without using a plugin?
Yes. You can add a tiny code snippet that hooks into the login_redirect filter, as covered in Method 2 above. We recommend adding it with the free WPCode plugin rather than editing your theme’s functions.php file directly so that a small mistake cannot break your site.
If you do decide to edit code directly, always create a backup first so you can restore your site if anything goes wrong.
Is it possible to redirect users after logging in through a custom login form?
Yes. If you use a custom login form built with a plugin like WPForms, you can set a redirect URL right in the form settings.
This lets you:
- Send users to a welcome or thank-you page.
- Take them to their account area or dashboard.
- Show them a special offer or message based on their membership level.
We hope this article helped you learn how to redirect users after a successful login in WordPress. You may also want to see our complete guide on how to find your WordPress login URL and our tutorial on how to set up two-factor authentication in WordPress.
If you liked this article, then please subscribe to our YouTube Channel for WordPress video tutorials. You can also find us on Twitter and Facebook.


Jiří Vaněk
Thank you for the article, it solved our problem when we wanted to redirect all users except the administrator to the rules page. This worked out great and really easy thanks to WPForms. Now users have site rules available right after logging in.
Mike
Great tutorial! Solved the vexing problem of having users login and go to their profile page.
WPBeginner Support
Glad our article was helpful!
Admin
Kassem
Thanks for this post. The “troubleshooting issues” section have saved me as I’ve been trying to solve a “Cannot Modify Header Information – Header Already Sent By…” warning that kept appearing on my plugin admin pages with redirect requests, until I tried your suggestion and saved permalinks without any change.
It worked like magic
WPBeginner Support
Glad our recommendation was helpful
Admin
Faisal
How to redirect them to the page they were in before they login?
WPBeginner Support
We do not have a simple recommended method for that at the moment.
Admin
Tonka
Thank you, very helpful!
WPBeginner Support
Glad our article was helpful
Admin
Jailson Pacagnan Santana
Thank you! God bless
WPBeginner Support
You’re welcome
Admin
Owen Carver
Does this plugin allow you to make all logged in users who visit the homepage “root url” redirect to a specific page which would normally send to the homepage otherwise?
WPBeginner Support
These redirects are for directly after a user logs into the site and not when a user comes back when still logged in
Admin
Jono
Need to use custom code for that and works for woocommerce too, I’ve done it.
David
Hi,
I am able to successfully redirect the user to a custom page after the user logs in.
But on logging in I see the Edit profile option is present. How can that be disabled so the user does not have access to the profile editing options?
Regards
David
WPBeginner Support
To hide the admin bar you could use: https://www.wpbeginner.com/wp-tutorials/how-to-disable-wordpress-admin-bar-for-all-users-except-administrators/
or you could remove the profile area with adminimize:https://www.wpbeginner.com/plugins/how-to-hide-unnecessary-items-from-wordpress-admin-with-adminimize/
Admin
Danny
Hello,
How do I redirect a user to the page they were before logging in?
WPBeginner Support
You would use the http_referer variable for the plugin but you would want to reach out to the support for the plugin for the specifics of how to set it up
Admin
sebastian
Hello,
what is the limit on users?
I am planning a site with about 2000-5000 registered WP users.
I want everyone to have his own private area.
thx
WPBeginner Support
There is not a user limit for WordPress
Admin
Eric Simmons
I really thought I was getting the hang of WordPress. I followed the instructions and it is not working. It must be me… Because I see not other replies that it isn’t working for anyone else.
s2tm
Hi,
I’ve loved Peter’s login redirect for years, however, since i’ve moved to Woocommerce, i have found like many others, that woo has secured the redirect post login hook.
And now, all my logins go to my-account.
I’ve read Peters’ support pages, and there is mention of checking on what’s grabbing the hook, but my question is i know what it is, and now i need to know how to fix it.
Thought i’d ask the interweb to see what she would say.
Mike
Hi,
I was wondering if you can help, i am looking to set up many different users, but each user will be directed to a certain page, to only see certain information
I.E
User 1 once logged in can only see Page 1
User 2 once logged in can only see Page 2
User 3 once logged in can only see Page 3.
There could be up to 30 different users.
Is this something you could help with? Or is there a plugin that allows this?
Swapnil
How it is working with multisite setup?
Patrick
Is it possible to redirect the users to the same page they were viewing after login or registration.
Chris
Hello, I’m using Peter’s login redirect and would like to know how to get it redirect user to their
profile page. example.com/my-account/members/USERNAME/profile doesn’t work.
However, example.com/my-account/members/SPECIFIC USERNAMES/profile does.
So I can’t make it redirect to specific users unless I include their profile name in place of username
I tired using the plugin directory: You can use the syntax [variable]username[/variable] in your URLs so that the system will build a dynamic URL upon each login, replacing that text with the user’s username. In addition to username, there is “userslug”, “homeurl”, “siteurl”, “postid-23”, “http_referer” and you can also add your own custom URL “variables”. See Other Notes / How to Extend for documentation.
BUT it doesn’t work. Can you please help me ? Thanks.
WPBeginner Support
Please open a support thread on the plugin’s support page. Someone may have faced this issue before and the plugin author may be able to point you in the right direction.
Admin