Volete avviare il vostro negozio online?
Sappiamo che la creazione di un negozio online può essere un pensiero terrificante, soprattutto se non si è esperti di tecnologia. Ma non siete soli. Qui a WPBeginner abbiamo aiutato centinaia di utenti ad avviare il loro negozio online, quindi siete nel posto giusto.
In questo articolo vi mostreremo come avviare facilmente un negozio online.
Di cosa avete bisogno per avviare un negozio online?
Non c’è mai stato un momento migliore di questo per avviare un’attività online.
Chiunque abbia un computer può iniziare a lavorare in pochi minuti e senza acquisire particolari competenze.
Le tre cose necessarie per avviare un negozio online sono:
- Un’idea di nome di dominio (questo sarà il nome commerciale del vostro negozio online, ad esempio wpbeginner.com)
- Un account di web hosting (è il luogo in cui il vostro sito web vive su Internet)
- La vostra totale attenzione per 30 minuti.
Sì, è davvero così semplice.
Potete creare il vostro negozio online con WordPress in meno di 30 minuti e vi guideremo in ogni fase del processo.
In questa esercitazione verranno trattati i seguenti argomenti:
- Step 1. Set up Your Online Store Platform (Hosting & Domain)
- Step 2. Set Up Your WordPress Website
- Step 3. Set Up Your WooCommerce Store
- Step 4. Set Up Payments for Your Online Store
- Step 5. Add Products to Your Online Store
- Step 6. Select and Customize WordPress Theme
- Step 7. Extend Your Online Store With Plugins
- Learning WordPress to Grow Your Online Business
- FAQs About Starting an Online Store
Pronti? Iniziamo.
Video tutorial
Se il video non vi piace o avete bisogno di ulteriori istruzioni, continuate a leggere.
Fase 1. Impostare la piattaforma del negozio online
L’errore più grande che la maggior parte degli utenti commette è quello di non scegliere la piattaforma giusta per il proprio negozio online.
Per fortuna siete qui, quindi non farete questo errore.
Sono due le piattaforme di eCommerce più diffuse che consigliamo: Shopify o WordPress + WooCommerce.
Shopify è una soluzione di e-commerce completamente ospitata che parte da 29 dollari al mese (da pagare mensilmente o annualmente in anticipo per ottenere uno sconto). È una soluzione senza problemi, in cui basta accedere e iniziare a vendere.
Lo svantaggio di Shopify è che diventa piuttosto costoso e le opzioni di pagamento sono limitate a meno che non si paghino costi aggiuntivi.
Per questo motivo la maggior parte degli utenti sceglie WordPress + WooCommerce per la flessibilità che offre. Richiede una certa configurazione, ma a lungo termine ne vale la pena.
WordPress è il costruttore di siti web più popolare e WooCommerce è la più grande piattaforma di eCommerce al mondo. Per maggiori dettagli, consultate il nostro confronto Shopify vs WooCommerce e la nostra guida su WordPress per l’eCommerce.
In questo tutorial vi spiegheremo come creare un negozio online in WordPress utilizzando WooCommerce su alcuni dei migliori hosting WooCommerce.
Per creare il vostro negozio di e-commerce, avete bisogno di un nome di dominio, di un hosting web e di un certificato SSL.
Il nome di dominio è l’indirizzo del vostro sito web su Internet. È quello che gli utenti digitano nel loro browser per raggiungere il vostro sito web (ad esempio, google.com o wpbeginner.com).
L’hosting web è il luogo in cui il vostro sito di commercio elettronico vive su Internet. È la casa del vostro sito su Internet. Ogni sito web su Internet ha bisogno di web hosting.
Ilcertificato SSL aggiunge uno speciale livello di sicurezza al vostro sito web, in modo da poter accettare informazioni sensibili come i numeri di carta di credito e altre informazioni personali. È necessario per accettare pagamenti con carta di credito sul vostro sito di commercio elettronico.
Normalmente, un nome di dominio, un hosting web e un certificato SSL possono ammontare a un centinaio di dollari. Si tratta di un sacco di costi iniziali.
Fortunatamente, Bluehost, un provider ufficiale di hosting raccomandato da WordPress e WooCommerce, ha accettato di offrire ai nostri utenti un nome di dominio gratuito, un certificato SSL gratuito e uno sconto sull’hosting web.
In pratica, potete iniziare a lavorare con soli 1,99 dollari al mese.
Bluehost è uno dei marchi più importanti quando si tratta di hosting WordPress, perché ospita milioni di siti web.
Nota: noi di WPBeginner crediamo nella trasparenza. Se vi iscrivete a Bluehost utilizzando il nostro link di riferimento, guadagneremo una piccola commissione senza alcun costo aggiuntivo per voi (anzi, risparmierete denaro e avrete un dominio gratuito).
Otterremmo questa commissione per raccomandare qualsiasi società di hosting WordPress, ma raccomandiamo solo prodotti che usiamo personalmente e che riteniamo possano aggiungere valore ai nostri lettori.
Procediamo all’acquisto del dominio + hosting + SSL.
Aprite Bluehost in una nuova finestra utilizzando questo link e seguitelo.
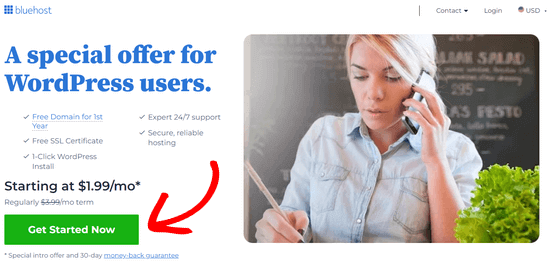
La prima cosa da fare è cliccare sul pulsante verde “Inizia” per iniziare.
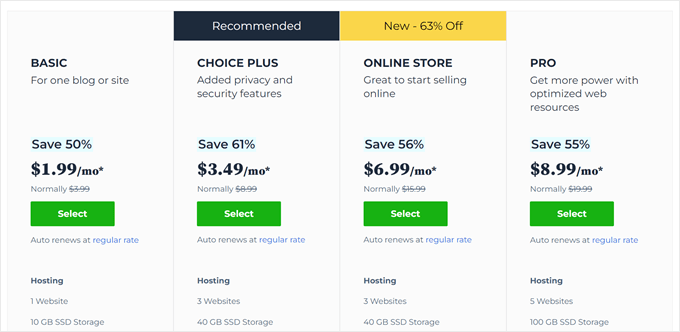
Nella schermata successiva, selezionare il piano desiderato.
Per un negozio online, potete scegliere il piano Negozio online. Fate clic sul pulsante “Seleziona”.
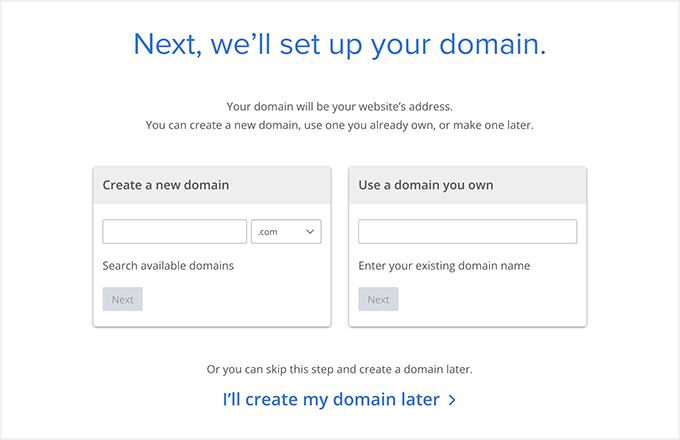
Successivamente, vi verrà chiesto di inserire il nome di dominio del vostro sito web.
Per creare un nuovo nome di dominio, è sufficiente digitarlo nel campo. Se ne avete già uno che volete utilizzare, c’è una casella in cui potete inserire anche quello.
Una volta scelto il nome di dominio, fare clic su “Avanti”.
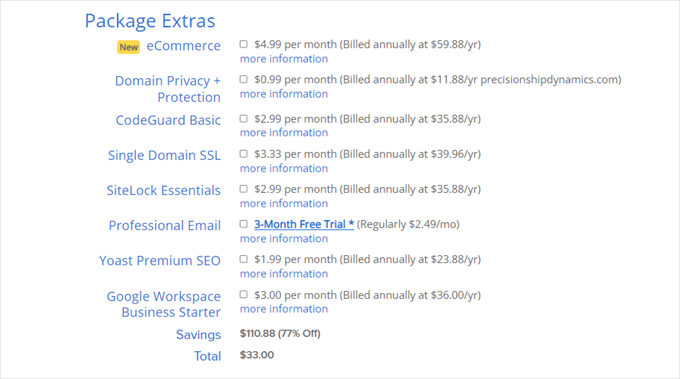
Infine, per completare il processo, dovrete aggiungere le informazioni sul vostro account e finalizzare le informazioni sul pacchetto. In questa schermata, sono visualizzati gli extra opzionali che è possibile acquistare.
Sta a voi decidere se acquistarli o meno, ma in genere non ve ne consigliamo l’acquisto. Potrete sempre aggiungerli in seguito, se decidete di averne bisogno.
Una volta completato, è possibile accedere al cruscotto di hosting di Bluehost.
In genere Bluehost installa WordPress per voi, in modo che possiate iniziare subito a costruire il vostro sito WordPress. Tuttavia, se in qualche modo saltate questo passaggio, potete seguire le istruzioni successive.
Nota: se utilizzate Hostinger, SiteGround o HostGator, potete leggere il nostro articolo su come installare WordPress passo dopo passo per maggiori informazioni.
Come installare WordPress su Bluehost
Nella dashboard di Bluehost, passare alla scheda “Siti web” e fare clic su “Aggiungi sito”.
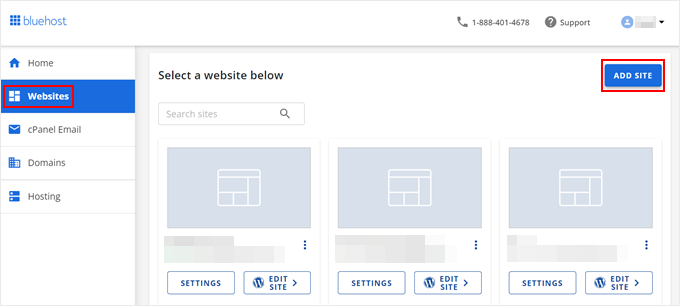
A questo punto si completa l’installazione guidata di WordPress.
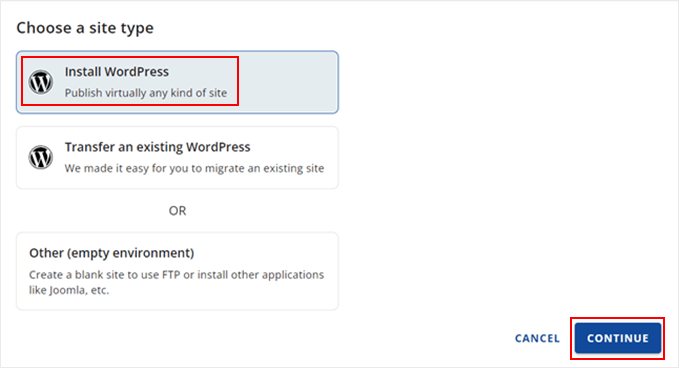
Per prima cosa, selezionate “Installa WordPress” sullo schermo e fate clic su “Continua”.
Successivamente, si inserirà un titolo per il nuovo sito WordPress.
Può essere qualsiasi cosa si voglia e si può modificare in seguito se si cambia idea. Procedete e fate clic su “Continua”.

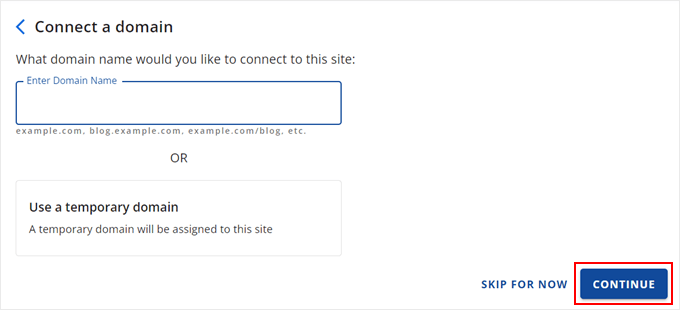
Ora, colleghiamo il vostro sito WordPress con un nome di dominio.
È possibile inserire il nome di dominio scelto o utilizzare un sottodominio temporaneo di Bluehost nel frattempo. Una volta effettuata la scelta, fare clic su “Continua”.
A questo punto si torna alla scheda Siti web e si attende che Bluehost installi il software WordPress.
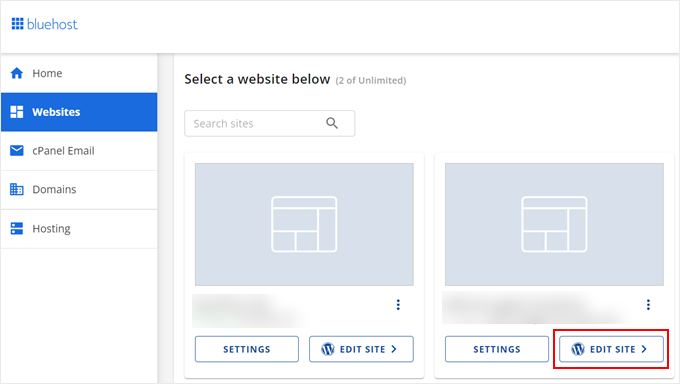
Se l’installazione è andata a buon fine, il nuovo sito web apparirà in questa scheda. Si può andare avanti e fare clic su “Modifica sito” per accedere alla dashboard di WordPress.
Congratulazioni, avete finito di configurare l’hosting e il dominio!
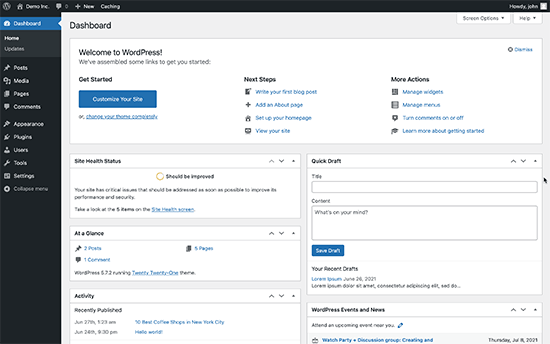
Se non avete familiarità con la dashboard o l’area di amministrazione di WordPress, ecco come si presenta:
Fase 2. Configurare il sito web WordPress
Configuriamo il vostro sito web WordPress.
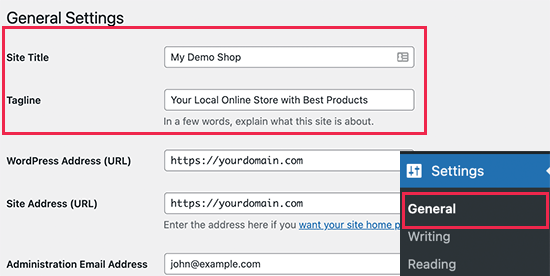
Per prima cosa, è necessario visitare la pagina Impostazioni ” Generale per impostare il titolo e il tagline del sito WordPress. Se siete soddisfatti del titolo del sito che avete scelto in precedenza, non è necessario cambiarlo.
Anche la tagline è facoltativa, quindi non preoccupatevi se non vi viene subito in mente qualcosa.
Impostare HTTPS per utilizzare SSL
Il vostro pacchetto di hosting WordPress è dotato di un certificato SSL gratuito. Questo certificato è preinstallato per il vostro nome di dominio. Tuttavia, il vostro sito WordPress deve essere configurato in modo da essere caricato come https anziché http.
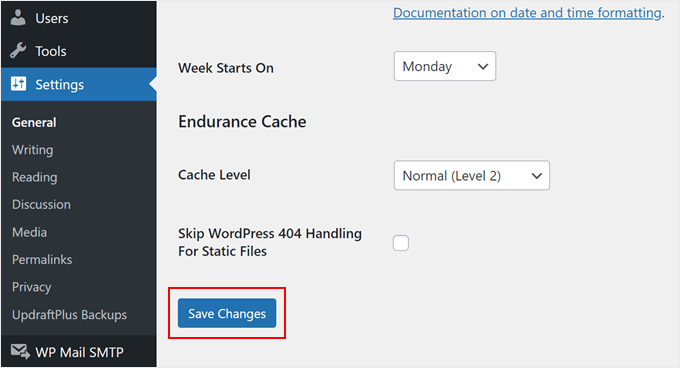
Nella pagina Impostazioni ” Generale, è necessario modificare l’indirizzo di WordPress (URL) e l’indirizzo del sito(URL) in modo da utilizzare https anziché http.
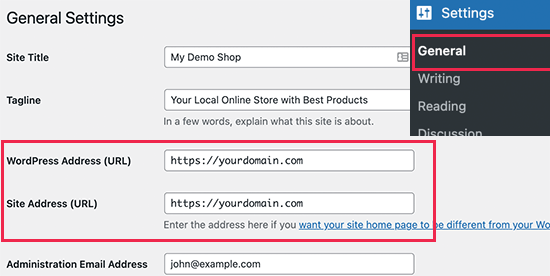
Non dimenticate di scorrere fino alla fine della pagina e di fare clic sul pulsante “Salva modifiche” per memorizzare le impostazioni.
La configurazione di base di WordPress è completa. Ora è il momento di configurare il vostro negozio online.
Fase 3. Configurare il negozio WooCommerce
WooCommerce è il miglior costruttore di negozi online sul mercato. È costruito sulla base di WordPress, che offre la flessibilità di WordPress con la libertà di vendere qualsiasi tipo di prodotto.
Per prima cosa, è necessario installare e attivare il plugin WooCommerce. Per maggiori dettagli, consultate la nostra guida passo passo su come installare un plugin di WordPress.
Basta andare alla pagina Plugin ” Aggiungi nuovo e cercare WooCommerce. Nei risultati della ricerca, fare clic sul pulsante “Installa ora” accanto all’elenco di WooCommerce.
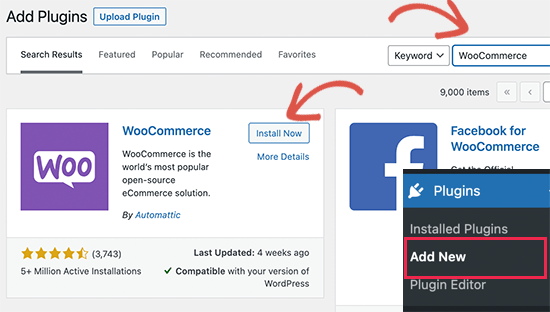
WordPress ora recupererà e installerà il plugin WooCommerce per voi.
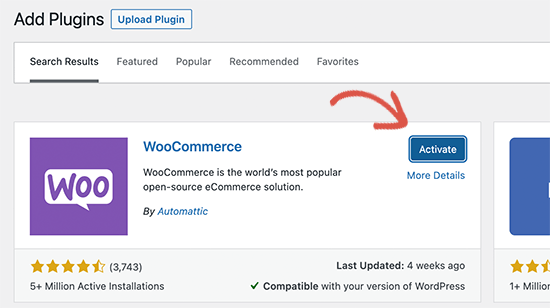
Attendere il termine del download del plugin e fare clic sul pulsante “Attiva” per continuare.
Dopo l’attivazione, WooCommerce avvierà la procedura guidata di configurazione e verrà visualizzata la schermata Welcome to WooCommerce.
Questa configurazione guidata vi guiderà attraverso le impostazioni importanti di WooCommerce.
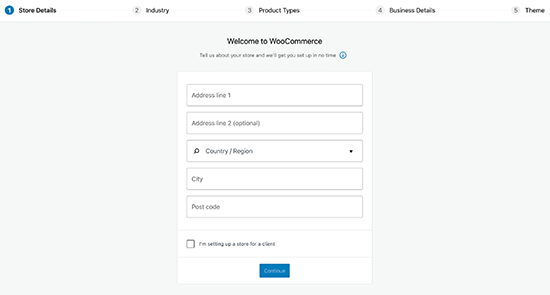
Innanzitutto, è necessario fornire le informazioni di base del proprio negozio online, come l’indirizzo, il Paese e la regione. Se siete un rivenditore, potete aggiungere le informazioni sulla vostra sede come indirizzo.
Dopodiché, fare clic sul pulsante “Continua” per passare alla fase successiva.
Successivamente, vi verrà chiesto di scegliere un settore del negozio. È possibile scegliere il settore più vicino al tipo di negozio che si desidera creare.
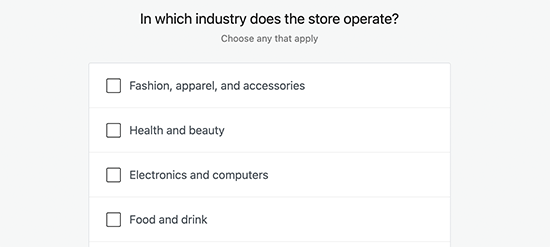
Fare clic sul pulsante “Continua” per proseguire.
Successivamente, vi verrà chiesto di scegliere i tipi di prodotti che venderete nel vostro negozio. Ad esempio, se i vostri prodotti devono essere spediti, potete scegliere “Prodotti fisici”.
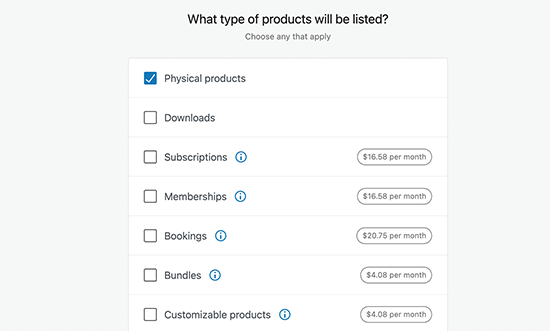
È inoltre possibile scegliere più tipi di prodotti.
Ad esempio, potete scegliere sia i prodotti fisici che i download. Non preoccupatevi di vendere diversi tipi di prodotti. È possibile selezionare il tipo di prodotto da aggiungere per ogni prodotto.
Fare clic sul pulsante “Continua”.
Successivamente, vi verrà chiesto di fornire alcuni dettagli sull’attività, come il numero di prodotti che intendete vendere e se vendete altrove. Potete scegliere l’opzione “Non ho ancora prodotti” e selezionare “No” per l’altra opzione.
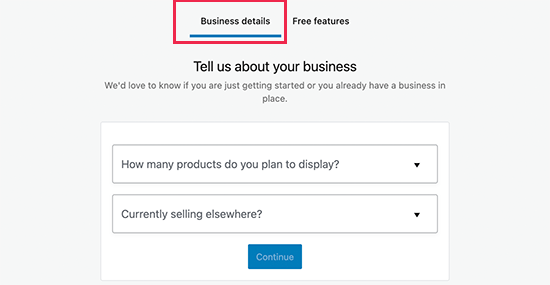
Ora è necessario passare alla scheda “Funzioni gratuite”.
Vedrete una casella pre-selezionata per installare funzioni gratuite per il vostro sito web.
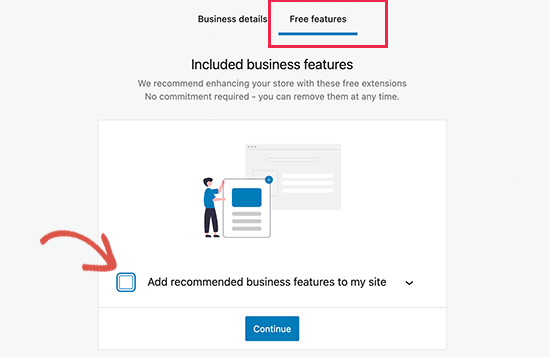
È necessario deselezionare questa opzione, poiché installerà diverse altre estensioni di WooCommerce che potrebbero non essere necessarie. Se ne avrete bisogno in seguito, potrete sempre installarle da soli.
Fare clic sul pulsante “Continua” per il passaggio successivo.
Successivamente, vi verrà chiesto di scegliere un tema per il vostro negozio online. Potete continuare con il vostro tema predefinito, scegliere “Storefront” o uno dei temi WooCommerce gratuiti elencati nella pagina.
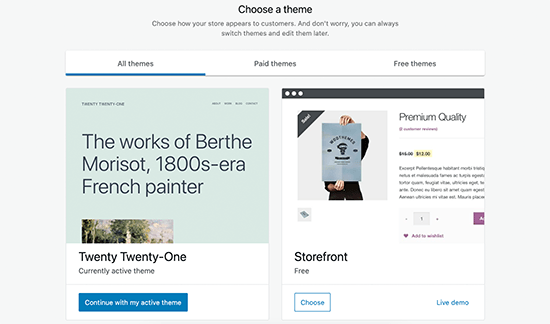
Non preoccupatevi di scegliere subito il tema perfetto. Vi mostreremo come scegliere il tema migliore per il vostro negozio online più avanti in questo articolo.
Questo è tutto, avete completato con successo la configurazione di base di WooCommerce.
Passo 4. Impostare i pagamenti per il vostro negozio online
Successivamente, è necessario impostare i metodi di pagamento per accettare pagamenti online sul proprio negozio. WooCommerce offre una serie di gateway di pagamento che si possono impostare facilmente.
Basta andare alla pagina “Impostazioni” di WooCommerce e passare alla scheda “Pagamenti”. Per impostazione predefinita, è possibile scegliere tra PayPal Standard, Contrassegno, Assegni e Bonifici bancari.
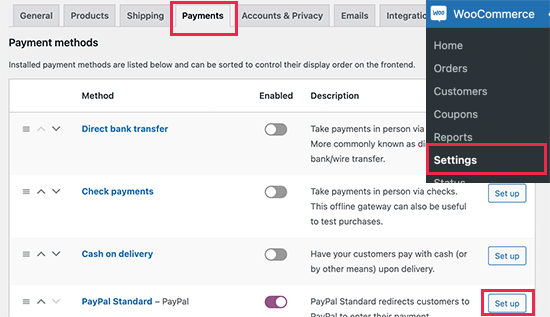
Scorrendo in basso, si vedrà anche l’opzione per installare Stripe, PayPal Checkout e WooCommerce Payments.
Si consiglia di scegliere Stripe e PayPal Standard come opzioni di pagamento.
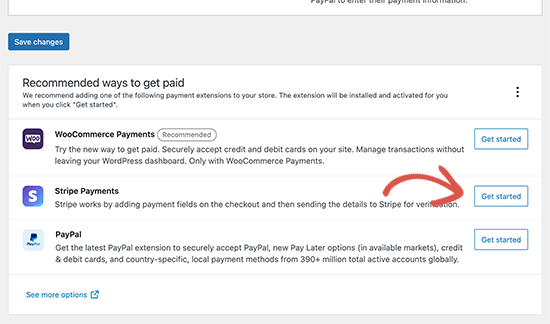
Per ogni gateway di pagamento, è possibile fare clic sul pulsante Imposta e fornire le informazioni richieste.
Ad esempio, è possibile attivare Stripe e inserire le chiavi API (queste informazioni si trovano nel proprio account Stripe).
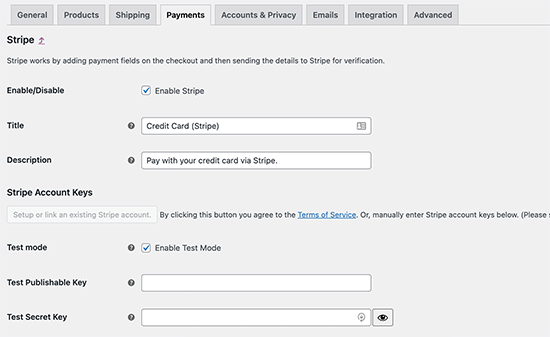
Non dimenticate di cliccare sul pulsante “Salva modifiche” per memorizzare le impostazioni di pagamento.
Nota: invece di utilizzare l’addon Stripe predefinito di WooCommerce, si consiglia di utilizzare il plugin WP Simple Pay.
È dotato di ulteriori funzioni, come la procedura guidata di configurazione, la creazione automatica di webhook, i pagamenti espressi con un solo clic e altro ancora.
Passo 5. Aggiungere prodotti al vostro negozio online
Cominciamo con l’aggiungere il primo prodotto al vostro negozio online.
Per aggiungere un nuovo prodotto è necessario visitare la pagina Prodotti ” Aggiungi nuovo”.
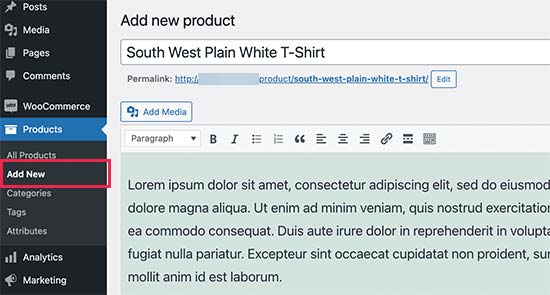
Per prima cosa, fornite un titolo per il vostro prodotto e poi una descrizione dettagliata.
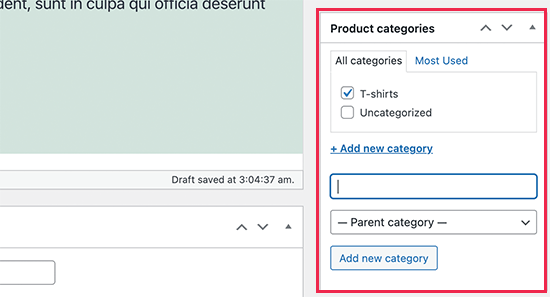
Nella colonna di destra è presente il riquadro “Categorie di prodotti”. Fare clic su “+ Aggiungi nuova categoria” per creare una categoria per questo prodotto. Ciò consente a voi e ai vostri clienti di ordinare e sfogliare facilmente i prodotti.
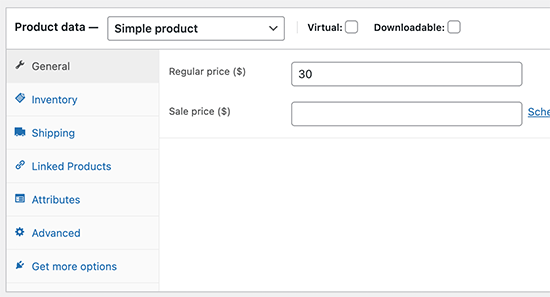
Scorrete un po’ in basso e noterete la casella “Dati prodotto”.
Qui si forniscono le informazioni relative al prodotto, come i prezzi, l’inventario, la spedizione, ecc.
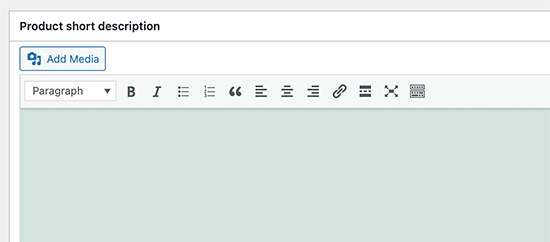
Sotto il riquadro dei dati del prodotto, è presente una casella per aggiungere una breve descrizione del prodotto.
Queste descrizioni dei prodotti saranno utilizzate quando gli utenti visualizzeranno più prodotti in una pagina.
Infine, sulla colonna di destra, sono presenti le caselle per aggiungere un’immagine principale del prodotto e una galleria di prodotti.
A questo punto, non vi resta che aggiungere le immagini che ritenete possano rappresentare al meglio i vostri prodotti.
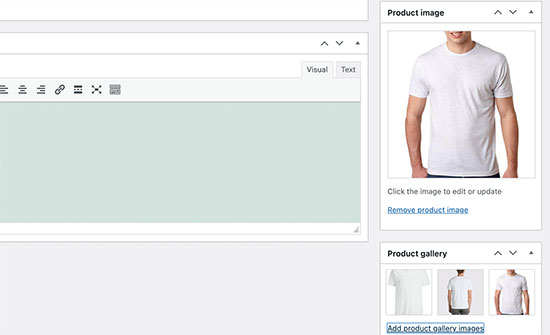
Una volta soddisfatti di tutte le informazioni sui prodotti aggiunte, è possibile fare clic sul pulsante “Pubblica” per renderle attive sul proprio sito web.
Ripetere il processo per aggiungere altri prodotti, se necessario.
Passo 6. Selezionare e personalizzare il tema di WordPress
I temi controllano l’aspetto del vostro sito WordPress agli utenti che lo visitano. Per un negozio WooCommerce, controllano anche il modo in cui vengono visualizzati i prodotti.
Sono disponibili migliaia di temi WordPress a pagamento e gratuiti che aiutano a creare una presenza online straordinaria.
Tuttavia, non tutti i temi WordPress sono progettati specificamente per i negozi di e-commerce. Abbiamo selezionato alcuni dei migliori temi WooCommerce che potete scegliere.
Una volta installato un tema WooCommerce, è possibile personalizzarne l’aspetto in base alle proprie esigenze.
Se si utilizza un tema classico, è sufficiente andare alla pagina Aspetto ” Personalizza. In questo modo si aprirà il Theme Customizer, dove è possibile modificare diverse impostazioni del tema.
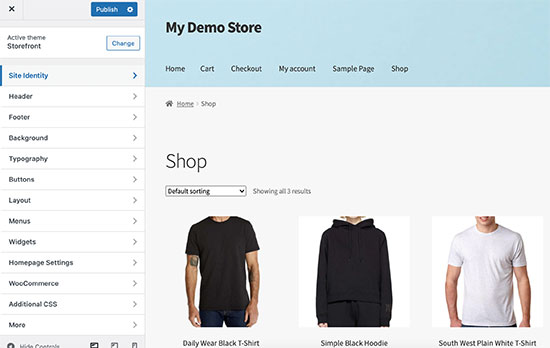
La maggior parte dei temi WooCommerce moderni offre diverse opzioni di personalizzazione e funziona bene sia con i dispositivi desktop che con quelli mobili.
Se invece utilizzate un tema a blocchi, potete seguire il nostro tutorial su come utilizzare l’editor completo di WordPress.
Passo 7. Estendere il negozio online con i plugin
Ora che il vostro negozio è quasi pronto, potreste voler aggiungere altre funzionalità per creare un negozio online di successo. Ad esempio, potete aggiungere un modulo di assistenza clienti o promuovere la vostra nuova attività sui social media per realizzare la prima vendita.
È qui che entrano in gioco i plugin.
Sia WooCommerce che WordPress consentono di aggiungere facilmente nuove funzionalità al sito web utilizzando plugin o estensioni.
I plugin sono come applicazioni per il vostro sito WordPress. Ce ne sono migliaia che potete utilizzare, sia gratuiti che premium. La sola directory dei plugin di WordPress.org conta più di 59.000 plugin.
Tuttavia, questa abbondanza di scelta rende anche difficile per i principianti scegliere i plugin giusti. Come si fa a sapere quale plugin scegliere?
Ecco alcuni dei nostri migliori plugin essenziali che ogni negozio online dovrebbe installare.
OptinMonster vi aiuta a convertire facilmente i visitatori del sito web in clienti paganti. È dotato di strumenti come lightbox popup, banner adesivi nell’intestazione e nel piè di pagina, timer per il conto alla rovescia, spin to win e altro ancora.
Tutti contribuiscono a migliorare le conversioni, a incrementare le vendite, a far crescere la vostra lista di e-mail e a ridurre l’abbandono del carrello.
WPForms è il miglior plugin per la creazione di moduli per WordPress. Permette di creare facilmente qualsiasi tipo di modulo per il vostro negozio, compresi i moduli di contatto, i sondaggi, i moduli di accesso, i moduli per l’ordine di carte regalo e altro ancora.
È dotato di un intuitivo costruttore di moduli drag-and-drop che consente di creare moduli semplicemente puntando e facendo clic. Per istruzioni dettagliate, consultate la nostra guida su come creare facilmente un modulo di contatto in WordPress.
WPForms ha anche una versione gratuita, chiamata WPForms Lite, che si può usare se non si ha bisogno delle funzioni Pro.
AffiliateWP vi aiuta ad aggiungere facilmente un programma di affiliazione al vostro negozio online. Questo vi permette di collaborare con i marketer affiliati per promuovere i vostri prodotti in cambio di una commissione.
È dotato di un potente sistema di tracciamento degli affiliati, nessuna spesa per le transazioni, rilevamento delle frodi, pagamenti in un solo clic e un cruscotto di affiliazione per i vostri partner. Per maggiori dettagli, consultate la nostra guida su come creare un programma di affiliazione per il vostro negozio online.
Advanced Coupons è il miglior plugin di codici coupon per WooCommerce. Permette di estendere le funzionalità predefinite dei coupon di WooCommerce e di creare coupon altamente efficaci per far crescere il vostro business.
Con Advanced Coupons è possibile creare programmi fedeltà, coupon programmati, offerte Buy 1 Get 1 Free, coupon di spedizione e molto altro. Per maggiori dettagli, consultate la nostra guida su come creare coupon intelligenti per il vostro negozio di e-commerce.
SeedProd è il miglior plugin di page builder per WordPress e WooCommerce. Permette di creare facilmente pagine di destinazione personalizzate per il vostro negozio online.
Viene fornito con modelli pronti all’uso progettati per le conversioni e le vendite. Include anche blocchi WooCommerce che si possono trascinare e rilasciare per creare pagine prodotto personalizzate, homepage personalizzate, pagine di checkout, pagine di ringraziamento e altro ancora.
Inoltre, è possibile collegarlo al proprio servizio di email marketing per far crescere la propria lista di email.
È possibile provare la versione gratuita di SeedProd direttamente da WordPress.org.
Con PushEngage, potete inviare facilmente notifiche push personalizzate per l’eCommerce al vostro pubblico di riferimento, anche quando non sono più sul vostro sito web.
Potete inviare promemoria per i carrelli abbandonati, notifiche di abbandono della navigazione, avvisi di ribasso dei prezzi, annunci di nuovi prodotti, notifiche di back-in-stock, messaggi di benvenuto e altro ancora.
Per maggiori dettagli, consultate la nostra guida sulle notifiche web push e sul loro funzionamento.
7. SEO tutto in uno per WordPress
All in One SEO for WordPress è il miglior plugin SEO per WooCommerce. Consente di ottimizzare facilmente il vostro negozio online per la SEO senza alcuna competenza in materia di ottimizzazione dei motori di ricerca.
È dotato di supporto completo per l’e-commerce, schema markup, sitemap, briciole di pane e altro ancora. Questo vi aiuta a portare più traffico al vostro negozio online. Per maggiori dettagli, consultate la nostra guida completa alla SEO di WooCommerce per i principianti.
Esiste anche una versione gratuita di AIOSEO, che è comunque piuttosto potente per chi è agli inizi.

MonsterInsights è il miglior plugin di Google Analytics per WordPress. Vi aiuta a vedere da dove vengono i vostri clienti e cosa fanno sul vostro sito web.
MonsterInsights è dotato di tracciamento WooCommerce, in modo da poter vedere le conversioni e i dati di vendita sul vostro sito web. Questo vi aiuta a modificare la vostra strategia di marketing e a far crescere la vostra piccola impresa con decisioni basate sui dati.
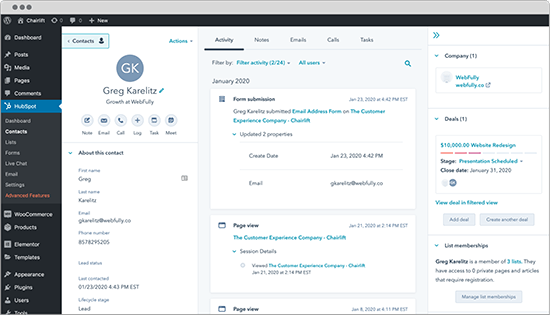
HubSpot è uno dei migliori plugin CRM per WordPress e WooCommerce. Permette di sincronizzare automaticamente i moduli, gestire i contatti, segmentarli in liste e vedere ogni interazione dei visitatori con il vostro sito. Ha anche una funzione di email marketing gratuita.
Consentono inoltre di aggiungere la chat live alle pagine del sito web e di ottenere analisi sulle prestazioni dell’intero programma di marketing.
FunnelKit è il più potente costruttore di imbuti di vendita e piattaforma di automazione del marketing per WordPress. Vi aiuta a creare checkout ad alto tasso di conversione, carrelli laterali scorrevoli, salti d’ordine, upsell con un solo clic e altre automazioni che vi aiutano a incrementare i profitti del vostro negozio online.
Hanno anche un plugin di automazione del marketing per i siti di e-commerce WordPress che consente di inviare tempestivamente e-mail di follow-up, inviare broadcast, costruire campagne di drip e-mail e altro ancora.
Per ulteriori consigli sui plugin, consultate la nostra selezione di plugin WooCommerce essenziali per un’azienda di commercio elettronico.
Imparare WordPress per far crescere il vostro business online
WordPress è incredibilmente potente e flessibile, ma a volte può essere difficile per i principianti configurarlo nel modo desiderato.
In WPBeginner, il nostro obiettivo principale è quello di fornire tutorial di WordPress all’avanguardia e utili, facili da capire anche per i proprietari di siti web WordPress non esperti di tecnologia (per saperne di più).
WPBeginner è il più grande sito di risorse gratuite su WordPress per principianti. Offriamo molte risorse, tra cui:
- WPBeginner Blog – Il luogo centrale per tutte le nostre esercitazioni su WordPress.
- Video WPBeginner – Siete nuovi a WordPress? Guardate questi video tutorial gratuiti per imparare a usare WordPress.
- Dizionario WPBeginner – Il vostro unico punto di riferimento per imparare i termini e il gergo comune di WordPress.
- Gruppo Facebook WPBeginner Engage – Ottenete il supporto gratuito di esperti nel più grande gruppo WordPress su Facebook.
Potete anche iscrivervi al canale YouTube di WPBeginner, dove condividiamo regolarmente video tutorial per aiutarvi a imparare WordPress.
Abbiamo anche una guida per mostrare agli utenti come sfruttare al meglio le risorse gratuite di WPBeginner.
Molti dei nostri utenti digitano le loro domande su Google e aggiungono semplicemente “wpbeginner” alla fine. Questo mostra loro gli articoli correlati di WPBeginner.
Domande frequenti sull’avvio di un negozio online
Molti dei nostri utenti ci contattano regolarmente con domande sull’avvio di un’attività in proprio con un negozio online. Di seguito abbiamo cercato di rispondere ad alcune delle domande più frequenti:
1. Dove trovo i prodotti da vendere nel mio negozio?
I negozianti possono procurarsi i prodotti in diversi modi. Alcuni vendono prodotti come software, arte digitale, musica e altri prodotti scaricabili.
Altri si riforniscono di prodotti da venditori locali o esteri utilizzando mercati online come Alibaba o AliExpress. Se non si vuole gestire in proprio l’inventario o la spedizione, si può anche pensare di avviare un negozio di stampa su richiesta o di dropshipping.
Per maggiori dettagli, consultate il nostro articolo su come scegliere i prodotti da vendere online.
2. Posso avviare un negozio online gratuitamente?
Sì, alcune piattaforme di e-commerce offrono prove gratuite limitate per avviare il vostro negozio online gratuitamente, ma al termine della prova dovrete pagare.
Mentre WooCommerce è di per sé gratuito, per farlo funzionare avrete bisogno di un nome di dominio e di un account di web hosting, che avranno un costo.
3. Quanto costa avviare un negozio online?
Il costo di avvio di un negozio online dipende dal vostro piano aziendale e dal vostro budget. Con il nostro link, potete iniziare con Bluehost per 1,99 dollari al mese e affidarvi a plugin e temi gratuiti per limitare i costi.
Consigliamo un modello di business in cui si inizia con poco e si spende man mano che l’attività cresce.
Per un’analisi dettagliata dei costi, consultate il nostro articolo su quanto costa costruire un sito di e-commerce.
4. Posso creare un negozio online senza spedire prodotti?
Sì, è possibile. Ad esempio, potete creare un negozio online utilizzando plugin per il dropshipping, creare un negozio affiliato ad Amazon o un marketplace simile ad eBay. È anche possibile utilizzare lo stesso negozio online per vendere prodotti esterni e prodotti propri.
5. Come gestire i costi di spedizione e le tasse per il mio negozio online?
A seconda della regione, potrebbe essere necessario aggiungere l’imposta sulle vendite, l’IVA o altre imposte. WooCommerce consente di aggiungere le imposte abilitandole nella pagina “Impostazioni” di WooCommerce.
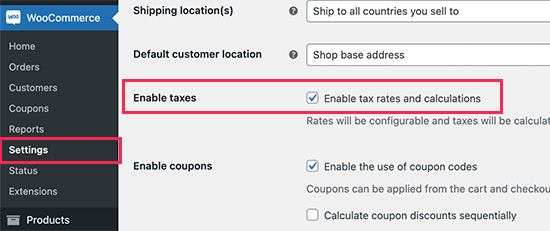
Da qui si può anche passare alla scheda Spedizione e creare diverse zone di spedizione, aggiungere tariffe di spedizione, impostare tariffe di spedizione forfettarie e altro ancora.
Speriamo che questo tutorial vi abbia aiutato a capire come costruire un negozio online. Potreste anche voler vedere questi consigli pratici per portare traffico al vostro nuovo sito WordPress o vedere il nostro confronto dei migliori servizi di telefonia aziendale per le piccole imprese.
Se questo articolo vi è piaciuto, iscrivetevi al nostro canale YouTube per le esercitazioni video su WordPress. Potete trovarci anche su Twitter e Facebook.


Roman
Is it possible to create an online shop on the free wordpress.com website?
I just need it for a short time to know that it works, and then create my own website.
Editorial Staff
Hi Roman, no it’s not possible to create an online shop on the free wordpress.com site.
Admin
Todd Peterson
I followed your tutorial, and when I changed the http:// to https:// I now can’t log into word press, it says my connection isn’t secure, and I can’t even get back in to change it back to what it was previously……..
Debra Fear
changed my settings to https:// and now locked out of my dashboard which is locally hosted aka on my iMac
Safari error page says that it can not establish a secure connection with the localhost
newbie to wordpress.org and now end of day of learning getting a bit freaked out so any suggestions to get it back to http i.e I can get back in?
Thanks
Zahid
The article is good and detailed. However it would help in creating a website for international customers. How to create a website which is focused on pakistani customers only and in which payment methods are in place that are practical in pakistan. pay pal and others cannot be used for pakistani customers. Moreover kindly tell us whats the benefit of having an affiliate business like being Ali Express Plugin affiliate?
WPBeginner Support
Hi Zahid,
Once you have your store setup, you can go about adding different payment methods available to your customers.
For affiliate business, please take a look at our affiliate marketing guide.
Admin
James
I have approximately 100 products in a category. I would like to provide price breaks at every 5. For example
1 to 5 = $25 each
5 to 10 = $20 each
Etc.
Is it possible to do in Woocommerce
Camy
Hi there!
This article is very helpful. However, I’m wondering: After you set up the plugin and online store, what are options for delivery methods? I’m specifically wondering about paid PDF downloads. Are there companies that will automatically deliver the digital download? Or is this done by yourself?
Thanks!
WPBeginner Support
Hi Camy,
You can upload the digital download and your users will be able to download it after making the payment.
Admin
Efi
Hi ! I would like to ask you! I have already installed the woocommerce and I am seeing that needs update. Should I update it to 4.9.8? also, how we can build the communication with the customer? welcome email, confirmation email etc?
WPBeginner Support
Hi Efi,
Yes, you need to update. There are different ways to communicate with customers. You can ask customers to make an account before they checkout. You can also start an email list and ask your customers to subscribe your newsletter.
Admin
Henni
Hi there,
I already have a website (webhost and domain) running that was built and wrote by our partner. I think he uses joomla, sorry i am a newbie. Somehow we had issues, and he left.
I plan to rebuild the website using wordpress after reading all your helpful articles.
My question: can I install wordpress in my webhosting but still leave the old website running while I am working on the wordpress one?
Your help would be much appreciated.
Thank you in advance.
WPBeginner Support
Hi Henni,
Yes, you can do that.
Admin
Tina
Excellent post. Which themes do you recommend for an online marketplace with blog? Thank you!
Shoaib Akhtar Nadeem
Hello sir,How are you?
I want to open an online shopping store in which other sellers sell their products on my store and some of them are commission mine, how it is possible.
WPBeginner Support
Hi Shoaib,
Please see our article on how to create an online marketplace using WordPress.
Admin
Nick
Hi WP Beginner,
Thank for the clear and concise tutorial.
I was able to complete the set up for my existing WP site but ever since I changed the address of my site (as per your tutorial) I can’t login in.
When I log in to blue host everything is fine. I then click on the “Log in to WordPress” button on the home page I get a “Not Found” page:
Not Found
The requested URL /~flaregea/wp-admin/admin-ajax.php was not found on this server.
Additionally, a 404 Not Found error was encountered while trying to use an ErrorDocument to handle the request.
Apache Server at Port 443
I can still access my site if I just enter the URL into a browser and I can still access the wp-admin “back end” of my site but nothing to do with Blue Host.
Any thoughts on how I should proceed?
WPBeginner Support
Hi Nick,
Try backing up and then deleting your website’s .htaccess file using FTP.
Admin
Rebecca
And then is the website not https? Is there a reason some people have this problem? (I did as well and had to jump through hoops to fix)
WPBeginner Support
It would depend on your SSL certificate for if the site is able to use HTTPS or is limited to HTTP. If you’re not able to use HTTPS then you can normally reach out to your host to help fix your SSL.
t. redwood
Hello,
Thank you for the video it was super helpful and informative. My question is that:
I already have wordpress.org installed, will I be installing wordpress again by using blue host? Also does blue host install wordpress.org or .com ? thanks again!
WPBeginner Support
Hello,
If you already have a WordPress.org website, then you can move it to Bluehost. See our guide on how to move WordPress to new host.
Bluehost installs self-hosted WordPress.org.
Admin
Vanessa
Hi there!!! Thank you so much for such an amazing page! You have boosted my motivation to learn to use WordPress after some people told me to forget the idea because it is “too complicated”, so thank you!
I have just one question before I embarked on this experience. I would like check with you if the propose I am looking to have is possible with WordPress. I would like to create an online store to promote the products I sell on amazon. Can I have an plug in “buy with amazon” instead of the common purchasing/delivery options?
Any information about this I would highly appreciate it!
Cheers,
Vanessa
WPBeginner Support
Hi Vanessa,
Please see our article on how to build an amazon affiliate store using WordPress.
Admin
Min
You guys are awesome! Thanks for the wonderful information and tips <3 <3
Edward
The scope of my business licence is Canada-wide.
1) Can I still sell products, both digital ebooks(my major business items) and physical goods(my minor and potential business items) to non-Canada regions, e.g. USA, UK, China, etc.?
2) My bank account that is to be linked to Woocommerce is in Canada Dollar. If my ebooks and goods are purchased by non-Canada region customers, can Woocommerce convert the C$ product amount to the customer region’s currency, and show it on the client webpage ahead before the customer make the transaction? Also can Woocommerce do the opposite when processing returns and refunds?
Thank you very much.
WPBeginner Support
Hi Edward,
1. Yes.
2. WooCommerce itself does not process payments. It depends on the payment method you choose (Stripe or PayPal), and your bank. For example, Stripe allows Canada based users to receive payouts in Canadian or US dollars. If you have a local currency account, then you can select your local currency as your settlement currency.
Admin
Natasha
I purchased a theme with WP+WooCommerce on Envato Market. They say the theme is only good to use with WP.org and not compatible with WP.com Is it anyway I can still install it on WP.com host or I just wasted my money? What should I do now? Look for another theme which is compatible with commercial host? If I switch to BlueHost from my current host, can they make use of this theme so I don’t loose money? My current host does not help beginners like BlueHost does. In fact, I have no help at all, unless I always pay them for every little thing. If I transfer my existing domain to Bluehost, will it be free of charge? Thanks a lot for your quick reply.
WPBeginner Support
Hi Natasha,
Yes, if you switch to Bluehost then you can use the theme you have purchased. To learn more, see our guide on the difference between self hosted WordPress.org vs free WordPress.com blog.
Admin
Bolaji
Hello. Please, is it compulsory to do the plan for 36 months or we can pay per month?
Kindly respond because I was about to start the process but noticed that it only had the $6.95 for 36 months which defeats the affordability, to be honest.
Kindly respond. Thank you.
WPBeginner Support
Hi Bolaji,
Yes, this gives you the maximum discount on the offer.
Admin
Remi
When I put my payment info, will I get charged per month ( $14.95) or per year ($ 179.40)?
WPBeginner Support
Hi Remi,
You will be charged anually and you will be able to select the duration during the sign up. It will also show you the total amount you will be charged when you are entering your payment info.
Admin
Fanya
Hi!!!
Thank you so much for the information! I took the leap of faith and got the hosting through your affiliate link (to make sure you get the referral fees because you’re worth it!)
Yay to you! LOL
WPBeginner Support
Hey Fanya,
Thank you, we are glad you found this information helpful.
Admin
Ik
How do i create and connect database/database table in wordpress(form)
Jacob
1.Is it a Multi Address extension to collect shipping addresses for each basket purchases?
2. How can i use my own graphics for the site?
George Nikoff
Hello,
Thanks for the useful information though I have a question as a future online seller. I’m an artist currently working on my website and I’ll be selling my artworks on it through Woocommerce using Paypal. When selling do I need to be a registered business in the country I’m residing and pay taxes, or everything is handled by Paypal tax invoice system?
Thank you in advance!
Suraj Barai
Can you please explain. How to ship products?
WPBeginner Support
Hi Suraj,
It depends on your location, size of products, and delivery methods available. Many small businesses process their orders by getting them picked up by a delivery service.
Admin
Suraj Barai
Can you explain… What is shipping? And how to ship.
Liberty
I have two questions
1) I am wanting to set up an online store that includes my blog. Is this possible using wordpress and/or Woocommerce?
2) I already have a domain that is not through WordPress. Can I use this domain still, or do I have to get one through WordPress in order to use your services?
Thank you!
WPBeginner Support
Hey Liberty,
1. Yes, you can create a WordPress website and run a WooCommerce store and a blog on it.
2. There are two types of WordPress websites. WordPress.com which is a hosted solution. You will need at least business plan to install WooCommerce on WordPress.com.
Then there is WordPress.org, which is a self-hosted solution. You will need a domain name and hosting for that. In both cases, you can use the domain name you already have.
Please see our guide on the difference between self hosted WordPress.org vs free WordPress.com blog.
Admin
mercy
Hi,
I got a theme with built in WOO Commerce.
I wanna sell my EBook through my BLOG.
Pls tell me a way by which it will be delivered to the user automatically who buys it.
MK
rana
So glad to come across your website, thank you. I have two questions.
1- How do I prevent a person I add to wordpress to see information on my woocommerce with client and sales?
2-I set up the store but cannot seem to sort products in the order I want. How do I do that?
WPBeginner Support
Hi Rana,
Make sure that the person you add has appropriate user role and permissions.
You can sort products by visiting WooCommerce > Settings page. Under the Products tab you will see the default product sorting option.
Admin
Alisha
Someone asked this question in an earlier post and I don’t see a reply for it. I also want to know your reply to this question:
“How do I get manufacturers and suppliers to sell products on my store? Basically I don’t wanna sell my products. I want to open a store like Amazon which sells other’s products”
WPBeginner Support
Hi Alisha,
Please see our article on how to create an online marketplace using WordPress.
Admin
ELMOKHTAR
thank you for the tutorial. I want to ask is it work for Morroco
WPBeginner Support
Hi ElMokhtar,
Yes, it would. All you need is a credit card to purchase your hosting.
Admin
Jennelyn Barja
Is this working here in Philippines?
Editorial Staff
Hey Jennelyn,
Yes, it should be working in Philippines and every other country
Admin
Kennie
Hi, thank you for your article. I’ve actually bought a domain from bluehost, and i want to build a web that both contain my blog/article and the online shop. Is it possible for me to set “Shop” as 1 page of my blog that my viewers can click and link to online shop?
WPBeginner Support
Hi Kennie,
Yes you can have a blog and a shop page on your site.
Admin
Jaime Rodea
Hello,
I am looking at opening my own online shop as well. I have a few questions.
1. Do you have to get a small business license before setting up online?
2. How do you know if you need to charge taxed?
3. When someone makes a purchase, does this automatically give you an invoice to print off for each order?
Thanks for your time.
WPBeginner Support
Hi Jaime,
First, good luck with your online shop Now to answer your questions:
1. It depends on where you are located. You can usually find this out by typing this question with your location (city, county, state, or country) next to it.
2. This too can be found out online. Once you know the figures you can add enable taxes option in WooCommerce to calculate taxes.
3. You can enable invoices and print them.
Admin
Soumi
That’s a great guide. I will buy a domain here and connect with woo commerce.
But I have a question.
How do I get manufacturers and suppliers to sell products on my store? Basically I don’t wanna sell my products. I want to open a store like Amazon which sells other’s products.
Braile
Hi. Your blog was very helpful. Just one question. Does database automatically created when you install wordpress on bluehost?
WPBeginner Support
Hi Braile,
Yes. Their automated setup takes care of it.
Admin
Kabir khan
Hi I just have a question!
If I want to make a website for my client who will be responsible for buying domain name, web hosting service and SSL certificate?
Also will I have to ask for PayPal account of the client?
Saroj Meher
Hello sir
I am an artist from India. Recently buy a wordpress hosting plan. I want to built a website just to welcome other artist also to show their artworks. How can it bw possible. The woocommerce, Dokan, Wp marketplace plugin shows the vendor forms that is not suitable for artists. I need to built artist registration, login, dashboard, uplord artwork forms for this websites. Can you help me plz.
Ana
hi
is this working in france too?
thanks
WPBeginner Support
Hi Ana,
Yes, it works in France too.
Admin
Akshay
Hi sir,
i am facing problem in woo commerce shipping setting
your guidance is amazing.
Dagmar
Hi. I have Personal plan for WP. Do I have to upgrade before setting up the store following this tutorial? Thank you.
WPBeginner Support
Hi Dagmar,
Seems like you are using WordPress.com. Please see our guide on the difference between self hosted WordPress.org vs free WordPress.com blog.
Admin
Gayle
I would love to learn how to have a page dedicated to Amazon. I want to do a bookstore through Amazon. I can’t find any plugins that work and I don’t want a dedicated site, just a page. How can I do this?
Danielle
Hi, may I know how long does it take to set up SSL? I have followed your instruction and changed “http” to “https”. However, the changes are still not reflected. My site is still not secured. Any advice for this?
Sonia
Hi there,
I recently bought a domain name on Shopify and haven’t subscribed to anything yet and still running on the trial phase for the next few days but after reading your article I’m much more interested in following these steps explained above. Am I gonna have to buy another domain name or will I be able to use the one I just purchased?
Thank you
Sonia
WPBeginner Support
Hi Sonia,
You can use the same domain. You will need to change its DNS settings and point them to Bluehost.
Admin
Esther
Hi there,
I have an onlive store with Shopify but want to move to wordpress and woocommerce. How do I change the DNS setting to move my domain to bluehost. Also, can i just buy the $2.95 Hosting and install free woocommerce? Or does it need to be the plan you mentioned, 6.95? What about backup? Would I need to purchase that as well? Thanks.
WPBeginner Support
Hi Esther,
You can change your domain name settings in Shopify by visiting Online Store > Domains and then under Shopify Managed Domains section click on your domain name. Next click on DNS settings to edit them.
WooCommerce is a bit more resource intensive than a typical starter WordPress blog. That’s we recommend their eCommerce plan it is optimized for WooCommerce hosting.
Patrick Thomas
Good tips really nice. I tried following your steps i select $6.95 per month and chose a domain name….on getting to paying with my credit card I received a message ” insufficient fund on my account ” of which I do know I have more than $6.95 on my account. Please is this a familiar error message , are there other hidden charges or am I missing something? Please I really need your advice. Doing this is so important to me. Thanks
WPBeginner Support
Hi Patrick,
This could be a temporary error. If your card wasn’t charged, you can retry again. If the same error occurs again, please contact their support staff.
Admin
Vishal Mittal
Hi, read your article and found the article very informative. But still have one query how can we add a login and register feature(just like a seller in flipkart) who can have these own market place.
Hoping for answers
Thanks and best regards
Beth
Hello, I want to create an online store but I just bought a domain and hosting plan on another platform. Does my domain have to be with WordPress, do I have to transfer it or I can go ahead with the already made domain
WPBeginner Support
Hi Beth,
If your hosting provider supports WordPress then you can start there. Othwerwise, you may want to consider moving your site.
Admin
Mohamed Ramadan
I want to know the difference between using normal wordpress bluehost, then install woocommerce plugins for free and using bluehost wordpress + woocommerce. isn’t the first option more affordable and cheaper?
WPBeginner Support
Hi Mohamed Ramadan,
Yes, and WooCommerce would probably run too. However, resources on shared servers are very low and WooCommerce is a very transactional app. If you start getting more customers your site will slow down, shared host may block your processes to save other sites from slowing down, and transactions may not complete due to slow site or server interruptions. That’s why we recommend using Bluehost‘s eCommerce plan.
Admin
Jenny
Thanks for this great WooCommerce tutorial! I’ve installed the plugin and started setting everything up but I noticed that WooCommerce has automatically pulled products from my existing /products page. This is incorrect and these items should not be populated on my WooCommerce /shop page. But when I delete these items from the WooCommerce products tab, it actually deletes them from my /products page as well. I absolutely don’t want WooCommerce automatically populating their /store page with information from any of my other pages and can’t seem to find a way to prevent this from happening. Do you have any advice for me?
WPBeginner Support
Hi Jenny,
It seems like your product pages have the same post type as WooCommerce products. One thing that you can try is switching your older products to a different post type. See our article on how to switch post types in WordPress. However, this could have adverse consequences like broken links. Make sure you create a complete WordPress backup before you try this.
Admin
sham khan
hi i want to make onlinestore in which there is every thing including gift items also what can i have to do?
bamidele
Hello, why does checkout, basket…… appear on the menu list. I thinks thats abnormal; please how do i make them invisible to my site visitors.
Also on my site (customizr pro theme) submenus do not appear under their parent menus (I mean sub menus are supposed to be invisible until you hover or click the parent) how do i resolve this.
Thanks.
Yomi
Hello, weldone.Pls i am interested in settling up a blog for job/vacancies advertisement and online store like WooCommerce.pls how do i get started?
WPBeginner Support
Hi Yomi,
For an online store please follow the instructions above. For vacancies and jobs you may want to checkout our article on how to add a job board in WordPress.
Admin