Do you want to create a contact info widget in WordPress?
Adding a contact info widget will let you display your email address, phone number, address, and social media profiles. This will make it super easy for visitors to reach out to you.
In this article, we will show you how to easily create a contact info widget in WordPress, step by step.

Why Add a Contact Info Widget in WordPress?
When building a WordPress website, providing contact information is crucial to creating an email list, generating leads, and growing your small business.
A contact info widget allows you to display your email address, phone number, and social media profiles in your preferred widget section.
This way, visitors can easily approach you if they want to place an order, need support, or have any questions.
Having your contact info in a widget area can also improve your website rankings. This is because Google considers contact information as one of the factors when ranking websites in search results.
That being said, let’s see how you can easily create a contact info widget on your WordPress site.
How to Create a Contact Info Widget in WordPress
First, you need to install and activate the Contact Information Widget plugin. For more details, please see our beginner’s guide on how to install a WordPress plugin.
With this plugin, you can add the contact info block in any of the widget-enabled areas.
Upon activation, simply head over to the Appearance » Widgets page in the WordPress admin dashboard.
Once you are there, select where you want to add the widget, including the sidebar, navigation, or footer.
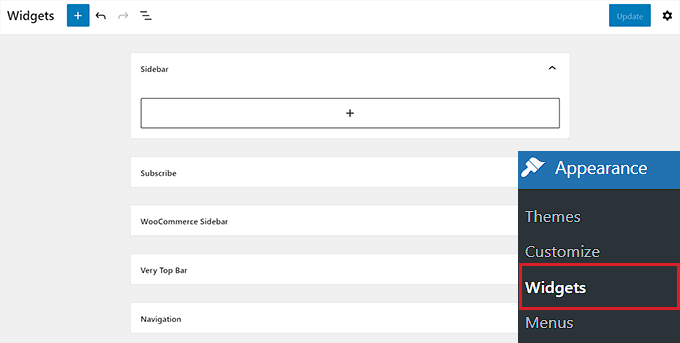
Keep in mind that the areas you can place widgets in are defined by your theme, so it could look different depending on the theme you are using.
If you are not sure about your theme, then you can check out our article on the Most Popular and Best WordPress Themes. We will be using Hestia in this article and adding the contact info widget in the sidebar.
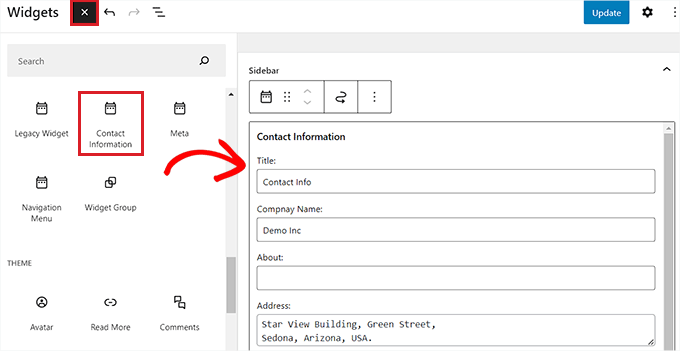
To do this, click the add block (+) button in the top left corner of the screen to open the block menu.
From here, locate and add the ‘Contact Information’ widget to your sidebar.
Now, simply fill in all the contact information that you want to share with your readers, such as your business phone number, address, fax, name, and more.
Then, just click on the ‘Update’ button to save your changes.
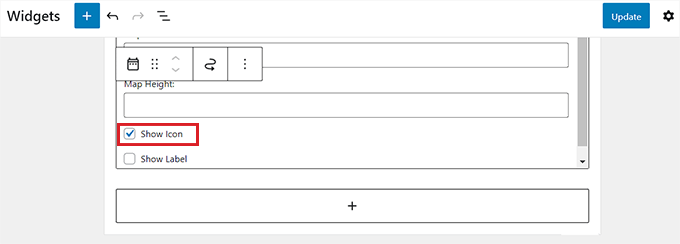
If you want, then you can also show icons next to your contact details.
To do this, scroll down to the bottom of the ‘Contact Information’ widget and check the ‘Show Icon’ box.
The icons that will be displayed next to the contact info will be automatically selected based on the type of information you’ve entered.
After that, simply click on the ‘Update’ button to save changes.
Now, when you exit the WordPress dashboard and visit your site, you will see the icon displayed beside your contact info.
For example, you will see a telephone handset next to a phone number or an envelope next to your business email address.

Final Thoughts and Next Steps
The challenge with a contact information widget is that this will be visible on all pages of your website. Typically, this information is best when added in the footer areas of your website.
Often, when creating a business website, you may only want to display this information on your contact page. Some website owners don’t want to reveal their business email addresses at all to reduce spam.
In those cases, you will need to create a contact page and then add a contact form on your site using a plugin like WPForms. It is the best WordPress contact form plugin that comes with a drag-and-drop builder, 1500+ premade templates, and complete spam protection.

You can also embed your location with Google Maps and other details on that page. This is what most business websites end up doing.
We hope this article helped you learn how to add a contact info widget in WordPress. You may also want to see our guide on how to create an email newsletter and our expert pick of the best live chat software.
If you liked this article, then please subscribe to our YouTube Channel for WordPress video tutorials. You can also find us on Twitter and Facebook.


Samuel
I’ve implemented contact info widgets on several sites, and I’ve seen a noticeable increase in user engagement and inquiries. Making contact information readily available and easily accessible can encourage visitors to reach out, which is essential for building customer relationships and driving business growth.
Jiří Vaněk
Is it possible to create something similar using the SeedProd or elementor site builder if I’m not using the block editor?
WPBeginner Support
Yes, both can help create something similar.
Admin
Jiří Vaněk
Thank you for the advice. I only use Elementor or SeedProd, so I’ll probably stick with them. Thanks for confirming that it can be done this way as well.