
Do you want to automatically post to Facebook from your WordPress website?
Facebook is one of the largest social media sites in the world, with almost 3 billion active users. By sharing your blog posts on Facebook, you can drive more visitors to your site and get more pageviews.
In this article, we will show you how to automatically post to Facebook every time you publish a new WordPress blog post.
Why Automatically Share WordPress Posts on Facebook?
There are lots of ways to stay in touch with your audience, such as building an email list and sending out a regular email newsletter. Still, you can’t ignore the huge user base of social media websites like Facebook.
As the largest social media website, Facebook can be a big source of traffic for your WordPress website.
To build a strong following, it’s important to engage with your Facebook audience. This means answering comments, sharing content, and posting regular updates on Facebook.
This can become overwhelming, so we have put together a complete social media cheat sheet for WordPress to help you get started. You can also save time and effort by automating your social media activities.
That being said, let’s see how you can automatically post to Facebook every time you publish a new WordPress post.
Video Tutorial
If you’d prefer written instructions, then just keep reading.
Automatically Post to Facebook From WordPress Using Uncanny Automator
The best way to automatically post to Facebook is by using Uncanny Automator. It is the best WordPress automation plugin on the market and lets you create powerful workflows that will save you time, provide a better user experience, and grow your business.
Even better, it integrates with over 150+ plugins, apps, and services, including Google Drive, Slack, Asana, Facebook, and more.

In this guide, we will be using the Pro version of Uncanny Automator.
Note: There is also a free Uncanny Automator plugin that gives you 1,000 credits to use with Facebook, so you can try the plugin before you buy. Once you have used those credits, you will need to upgrade to a Pro account or higher to continue posting to Facebook automatically.
The steps will be mostly the same if you are using the free plugin.
First, you need to install and activate the Uncanny Automator plugin. For more details, see our step-by-step guide on how to install a WordPress plugin.
Upon activation, you will also be asked to install the free version of Uncanny Automator. This light version of the plugin is used as the base for the Pro plan.
Upon activation, visit the Automator » Settings page and enter your license key into the ‘Uncanny Automator Pro license key’ field.

You can find this information in your account on the Uncanny Automator website.
With that done, click on the ‘Activate license’ button.
Connecting Your Facebook Page to Uncanny Automator
Before you can create an automated workflow for Facebook, you will need to connect your Facebook page to Uncanny Automator.
To make this connection, visit the Automator » App Integrations page and switch to the ‘Facebook Pages’ tab from the left column.
Here, select ‘Connect Facebook account.’

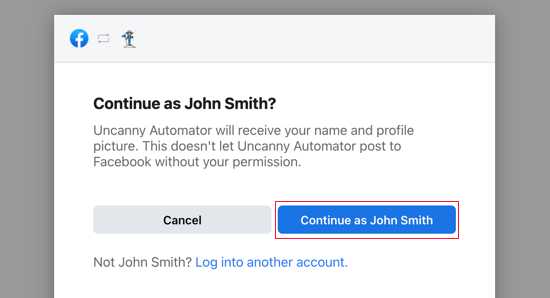
After you click this button, a popup will appear where you can log in to your Facebook account. If you have enabled two-factor authentication, then you will also need to pass this additional check to connect Facebook to Uncanny Automator.
Once you are logged in, Facebook will ask if you want to give Uncanny Automator access to your name and profile picture. If you are happy to do this, then click the ‘Continue as’ button.
Next, you will be asked whether you want to let Uncanny Automator post on Facebook.
You can go ahead and click on ‘Continue.’

Once you have done that, you will be taken back to the Uncanny Automator dashboard.
You will now see all the pages that are linked to your Facebook account. These are the pages that Uncanny Automator can post to automatically.

Automatically Posting to Facebook from Uncanny Automator
Now, you are ready to create a recipe that will automatically post a Facebook status every time you publish a new WordPress blog post.
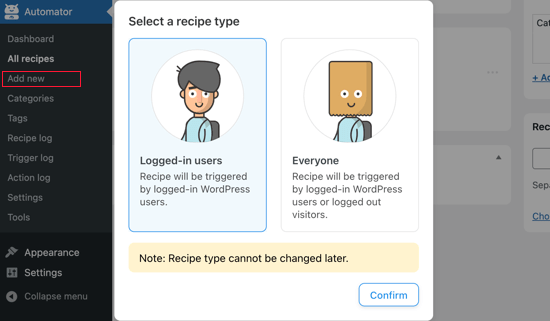
Simply go to Automator » Add new in your WordPress dashboard
You can now choose whether to create a ‘Logged-in’ recipe or an ‘Everyone’ recipe. For this recipe, go ahead and select ‘Logged-in users’ and then click the ‘Confirm’ button.
Next, you can give the recipe a name by typing it into the ‘Title’ field.
This is just for your reference, so you can use anything you want.

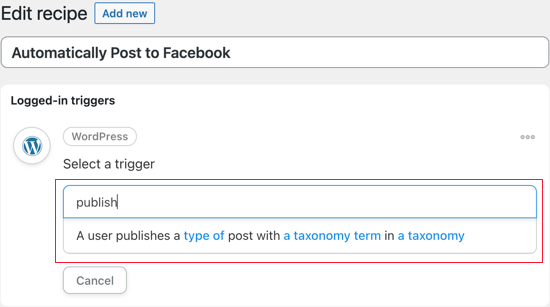
After that, you must define the condition that will trigger the action.
We want to post to Facebook every time we publish a WordPress blog, so click on ‘WordPress’ under ‘Select an integration.’

You will now see all the triggers you can use on your WordPress website.
You should search for ‘publish’ and choose the trigger called ‘A user publishes a type of post with a taxonomy term in a taxonomy‘.
In this example, we only want to update Facebook when we publish a post and not a page. With that in mind, open the ‘Post Type’ dropdown and select ‘Post.’
You can then decide if you are going to share posts from a particular category or tag by changing the ‘Taxonomy’ settings.
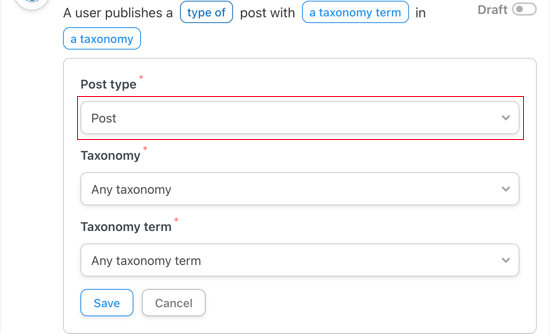
Don’t forget to click on ‘Save’ to store your changes.
Next, you will need to choose the action that Uncanny Automator will perform every time you publish a post. Start by clicking the ‘Add action’ button.
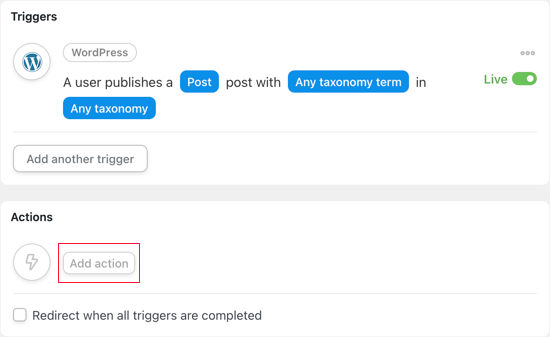
Uncanny Automator will now show all the integrations you can use. For example, there’s an integration that lets you automatically tweet when you publish a new post in WordPress.
Since we want to post to Facebook, go ahead and click the ‘Facebook Pages’ button.

You will now see all the different Facebook actions.
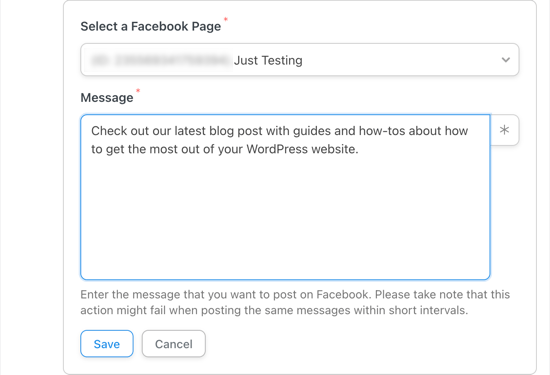
If your posts have a featured image, then it’s a good idea to select ‘Publish a post with an image.’ However, if you don’t want to add an image to your Facebook posts, then you can select ‘Publish a post to a Facebook page’ instead.

If you own more than one Facebook page, then select the one you want to post to using the ‘Facebook Page’ dropdown.
After that, you can create the status that you want to post by typing it into the ‘Message’ box.
When writing the status, you will need to add the post title and URL to the message using tokens. When Uncanny Automator posts your status, it will replace these tokens with real information from the post.
To add a token, click on the ‘*’ button.

Then, click on the arrow next to ‘A user publishes a Post…’
This shows you all the different tokens for the post.

You can add any token to your Facebook status.
However, you will typically want to select ‘Post Title’ and ‘Post URL’ so that people can visit the blog post.

If you selected ‘Publish a post with an image’ as your action, then you will need to let Uncanny Automator know where it can find that image.
Find the ‘Image URL or Media library ID’ field and click on its ‘*’ button.

Then, click to expand the ‘A user publishes a post…’ trigger.
Here, click on ‘Post featured image URL.’

When you are happy with how the action is set up, don’t forget to click on ‘Save.’
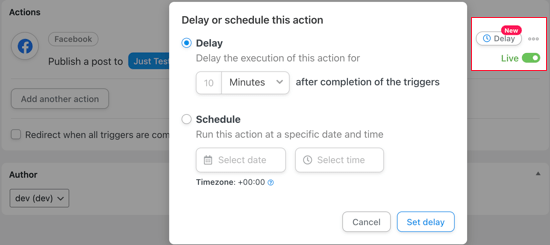
At this point, you may want to add a delay so that Uncanny Automator doesn’t post to Facebook as soon as you publish the blog.
To do this, hover your mouse over the ‘Publish a post to…’ action and click on ‘Delay’ when it appears.

Now, you can choose whether to trigger the Uncanny Automator action after a delay or at a specific date or time.
This allows you to post to Facebook when your audience is most likely to be online.
Now that you have set the trigger and action, it is time to publish the recipe.
To do this, click the ‘Draft’ switch so that it shows ‘Live’ instead.
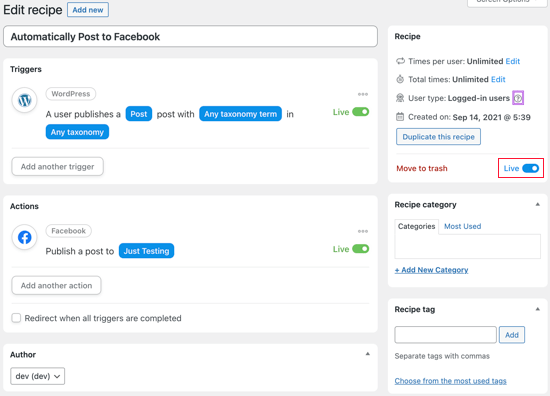
Once the recipe is live, Uncanny Automator will post a new Facebook status every time you publish a post.
We published a new blog post on our test site, and this is how the post appeared on our Facebook page.

If the right thumbnail image doesn’t appear in the Facebook status, then you can see our guide on how to fix the incorrect Facebook thumbnail issue in WordPress.
We hope this tutorial helped you learn how to automatically post to Facebook from WordPress. You may also want to learn how to embed a Facebook video in WordPress and see our expert picks for the best WordPress Facebook plugins to grow your blog.
If you liked this article, then please subscribe to our YouTube Channel for WordPress video tutorials. You can also find us on Twitter and Facebook.

 in 2024")


Syed Balkhi says
Hey WPBeginner readers,
Did you know you can win exciting prizes by commenting on WPBeginner?
Every month, our top blog commenters will win HUGE rewards, including premium WordPress plugin licenses and cash prizes.
You can get more details about the contest from here.
Start sharing your thoughts below to stand a chance to win!
Jiří Vaněk says
This will save me a relatively large amount of time with the number of articles. I manually posted articles to Facebook after they were published.
WPBeginner Support says
Glad we could help simplify the process for you
Admin
Terje Pettersen says
Hi. I want to enable all my users to be able, in an easy way, so that all new WordPress blogs automatically be posted on their own private facebook wall. Is that possible?
WPBeginner Support says
We do not have a method we would recommend for that at the moment as there would not be an easy way for your users to disable the automated sharing. For the time being, you would want to take a look at plugins to add a share button to your posts.
Admin
G says
Thanks for sharing. This has been helpful.
WPBeginner Support says
Glad the guide was helpful
Admin
Beth Younker says
Thanks for the info, however you fail to mention that some of these options may come at a price. For example, with WordPress you can no longer use plug-ins unless you upgrade to a business account. I find that really frustrating, as I used to be able to easily link to my FB page, but now I can’t unless I pay more money? Thanks a lot.
WPBeginner Support says
For the cost of WordPress, our guides are for WordPress.org not, WordPress.com which would be part of the confusion. You can see our guide below on the differences between the two:
https://www.wpbeginner.com/beginners-guide/self-hosted-wordpress-org-vs-free-wordpress-com-infograph/
Admin
morgan kane says
Does any of this methods auto-post to facebook GROUPS?
WPBeginner Support says
These are for Facebook pages, Facebook limits automation for their groups at the moment.
Admin
Eduardo Rivera says
Hi guys, great info as always! You should really update the 3rd option, the graph API has been deprecated and now Facebook uses another method, very intuitive and self explanatory.
WPBeginner Support says
Thank you for letting us know, we will look into updating our article as soon as we are able.
Admin
ebenezer says
I cant find new applet from the drop-down menu when I clicked on my username
WPBeginner Support says
They may have changed their interface since this article was last updated you should still be able to use their search feature at the top of the page to find an applet.
Admin
Darlington says
Please, I seem not to find your Facebook group again. Or has it been closed down?
WPBeginner Support says
Our Facebook group is still active. If you visit our Facebook page and go to the groups tab on the side, you should be able to see the group there
Admin
Amanda says
I found the process for Buffer much easier than described in this post. You just need to sign up for Buffer and connect your social media account(s) there, then install the WP to Buffer plugin, then hit the “Authorize” button in the plugin settings. That’s it. No access token, no callback URL, no creating an app. That is all automated with the Authorize button now, I suppose.
WPBeginner Support says
Thank you for letting us know, the plugin’s authors likely updated their method to authorize since the last update of this article
Admin
M kose says
I just want to learn, does this method automatically post our wordpress posts as we publish?
WPBeginner Support says
Yes
Admin
Anthony says
Thanks a million for the tips
Marius says
This post is out-of-date after FB removed publishing to profile timeline from their API.
WPBeginner Support says
Thank you for letting us know, we’ll be sure to take a look at this article
Admin
Daniel says
Hi,
I tried using IFTTT but it kept telling me invalid WordPress URL. after numerous crosschecks i could see that the URL is correct.
Please, what can i do about this?
WPBeginner Support says
Hi Daniel,
Make sure XML-RPC is enabled on your website. It is a WordPress feature that allows third-party services like IFTTT to connect. Some WordPress security plugins may disable it. See your security plugin settings.
Admin
Charlie says
Can I use the ITTT method to link WordPress to more than one of my facebook pages??
WPBeginner Support says
Hey Charlie,
Yes, you can do that.
Admin
Mariano says
How can I include the post updates on ifttt? Because when is new post the notification send normal. But when is a post update it don’t send anything.
waynedpj says
i am also looking for a way to update the corresponding Facebook post when an update is made to the original post on WordPress. unfortunately most options seem to only allow new posts as triggers. did you ever find a solution?
thanks.
Kylie says
When I follow the steps for AccessPress Facebook Autopost (which I’ve successfully used before), and I click the box ‘Public’ to make the review public, I now get a dialogue box that asks for a Privacy Policy URL. I’ve only found sites for privacy policy URL development that cost. Is there something general that can be added for free?
Stefan says
There’s now an option in WordPress for “Privacy policy”. You can find it in the administrator panel in the “Settings” submenu and than “Privacy”.
Joe says
I was able to use IFTTT to share my post to Facebook. But the new issue with this, is that Facebook shows description of website, instead of the post description.
Facebook also used another image thumbnail, instead of the image I used for the post. Please how can I resolve this??
Francois says
This didn’t work. When I click authorize I get this error below, even after I added my domain and page where I do my posts to the App Domain.
Can’t Load URL: The domain of this URL isn’t included in the app’s domains. To be able to load this URL, add all domains and subdomains of your app to the App Domains field in your app settings.
Samuel says
Is there a way that when someone comments on our post that we share to facebook, it displays on our site.
I know we can have a facebook comment plugin that allows users to comment on post using their facebook account.
What i don’t know is, If we share our post to facebook, and someone comments on that post on facebook, how can we display that comment on our site
Nikhil says
Hi. is there any plugin that uploads the posts automatically to different fb pages according to different categories . for eg: if a particular post is of category tech then it should be shared on fb tech page and if its category is of health that post should be shared on fb page corresponding to it
Sue says
I have gone through the setup and posted my blog, but it’s not showing up on f.b. Just wondering what I did wrong, or is there a delay to it posting. I posted about 10 minutes ago. Thanks!
Ed says
If it’s your very first post using IFTTT it will take UP TO an hour. This is stated in small print on the applet.
teslim says
i am trying to use the facebook App method by i am finding it difficult to authorize my account, facebook says (Can’t Load URL: The domain of this URL isn’t included in the app’s domains. To be able to load this URL, add all domains and subdomains of your app to the App Domains field in your app settings.). please help soonest thanks..
Daniel says
How do you change the post on Facebook that says…
“John Doe published an article on WordPress”
so that ‘WordPress” says something else, like your site’s URL or name?
Karen says
Hello. I followed the directions to the “T” using the WordPress Plug-In method and see absolutely no postings to my FB page. I even updated a post (thinking any previous posts may not appear), and that didn’t work either. I went to my timeline and feed areas of my FB page and don’t see anything.
Please assist or I will have no other option but to deactivate this plug-in and start over.
Thank you.
isah says
hey nice article i just tried this now on my site using the IFTTT method and it works like a charm. thanks for the tip
naresh says
Thank a lot for creating such a very useful post.
JM Koh says
Thanks for the tutorial. Does anyone know of a way to post to both the FB profile and FB page (that is joined to 1 FB account as required by FB)? Noted that the IFTTT method requires you to choose to post either to the profile or page, which is the same as Jetpack. Thanks!
Miso says
Hi,
on plugin there is now an error and the account can not be authorized.
Someone told me that giving admin credentials to website is not so good idea,
so the user which posts website can not be administrator.
Sandra K says
Do any of these methods work for Facebook Groups? I’m the administrator for a Closed Facebook Group and I want automate postings news and events on our website to our Facebook Group. Is that do-able?
Lori says
So what is the BEST one to choose?
WPBeginner Support says
IFTTT is the easiest and fastest.
Admin
Marc says
However, IFTTT posts a link, not the entire post text including image, right?
WPBeginner Support says
Yes, Facebook does the rest and automatically fetches a thumbnail, post title, and a short description of your post. Users will still have to visit your website to read the complete article.
iostar says
Hi! I am using Zapier to post automatically on facebook and another social media based on RSS technology.
Hope it helps.
Claudio says
When I try and enter my hosted wordpress info, it prompts me that I need to enable XML-RPC under my wordpress “Settings/Writing”, but I don’t see a checkbox for this.
Tâm Hoàng says
Thanks
Sufyan says
thank u so much for this wonderful tutorial
Pankaj Dhawan says
People talk about using Buffer more and it is very famous. Never used any such technique since I am not getting enough time so I suppose IFTTT for someone like me would be ideal.
I wasnt aware of this before so, thank you for sharing this useful info.