Do you want to expire posts or partial post content in WordPress?
Over the life of your site, there may be occasions when you want to publish limited-time content with better controls on who can access that content.
In this article, we’ll show you how to easily expire posts or partial post content in WordPress.

Why Expire Posts or Expire Partial Post Content in WordPress?
Let’s say you run a WordPress website where you want to give specific users access to exclusive content during a specific period.
Normally, you can just schedule the post to be published at a specific time, and then later update it with an old post notification that it has expired.
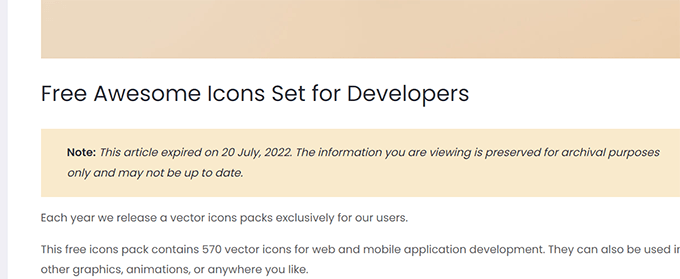
However, this doesn’t give you access control. Anyone can view and access the content during that time.
Even if you don’t need access control, you’ll still have to manually make the changes at specific times.
However, what if you could automate the whole process? For example, you could set an expiration date for your post, define what happens to it after that date, and who can access it.
Let’s look at how to easily expire posts and partial content in WordPress and how to make money from it.
We’ll show you two different approaches. The first one gives you more control and allows you to make money from your content.
The second method doesn’t give you access control or monetization options but can let you change content after it has expired.
Let’s get started.
Method 1. Expire Posts and Partial Post Content with MemberPress
This method is recommended for all users. It gives you more powerful tools to expire content and control access to your website.
For this method, we’ll be using MemberPress.
It is the best WordPress membership plugin that gives you powerful controls on who can access content on your website.
With MemberPress, you can sell membership plans and only make content available to paid users. Plus, you can set up drip content to automatically release content gradually and expire after a set period.
Sounds good? Let’s see how to set this up.
1. Setting up MemberPress
First, you need to install and activate the MemberPress plugin. For more details, see our step-by-step guide on how to install a WordPress plugin.
Upon activation, you need to go to MemberPress » Settings and click on the ‘License’ tab to enter your license key. You can find this information under your account on the MemberPress website.

Copy and paste your license key, and then click on the ‘Activate License Key’ button.
After that, switch to the ‘Payments’ tab to set up payment methods.

By default, MemberPress supports Stripe and Paypal payment gateways.
Select a payment provider from the dropdown and follow the on-screen instructions to complete the setup.

2. Creating a Membership Plan
Next, you need to create a membership plan for your website.
Go to the MemberPress » Memberships page and click on the ‘Add New’ button at the top.

On the next screen, enter a title for this membership plan and then provide the plan details in the post editor.
You will need to set the pricing and expiration for this plan under the ‘Membership Terms’ section.
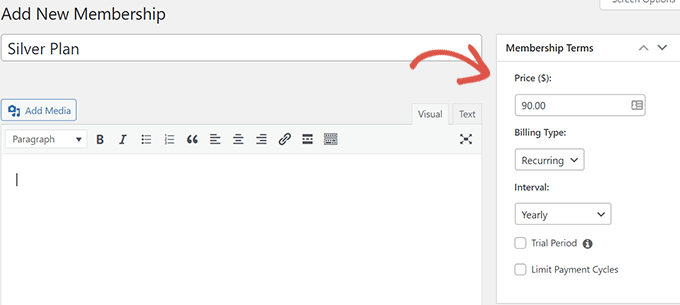
Note: You can also create a free plan by setting the price to zero.
Don’t forget to click on the ‘Publish’ button to save your changes.
3. Creating Access Rules for Your Expiring Content
Now that our membership plans are set up, the next step is to create some access rules.
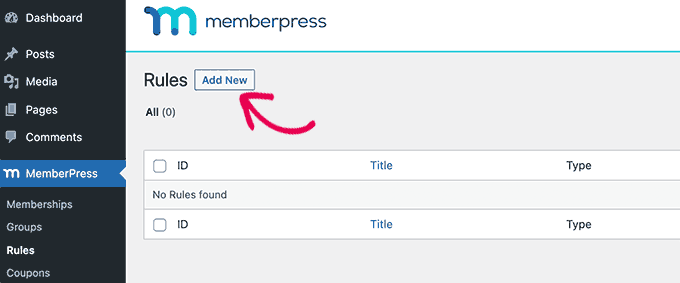
Access rules allow you to control which content you want users to see. Go to MemberPress » Rules page and click on the ‘Add New ‘button at the top.
On the next screen, select the content you want to protect under the ‘Protected Content’ option.
You can restrict access by tags, categories, specific posts or pages, partial content on a post or page, and more.
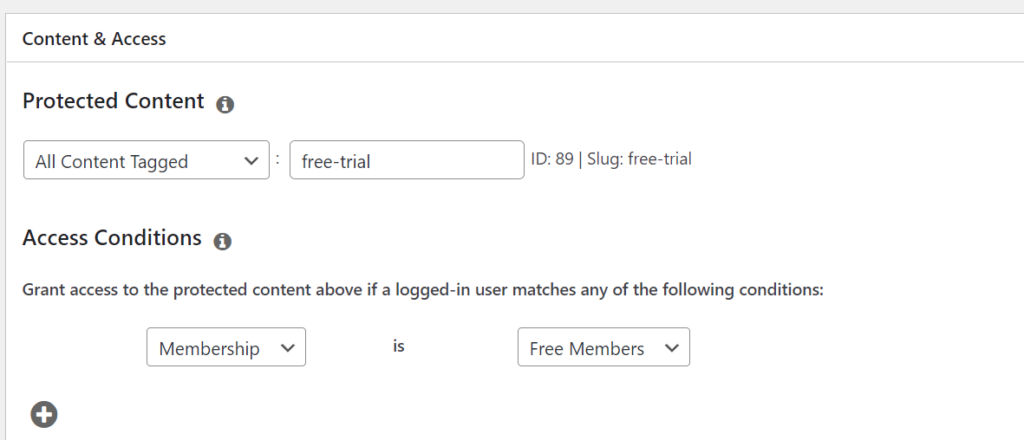
Below that, you need to choose the access conditions.
For instance, in the above example, we have protected all content that has a free-trial tag and given access to free members.
Next, scroll down to the ‘Drip/Expiration’ section. From here, you can choose when to show or expire this content.

For example, we have set this access to expire 30 days after a user signs up for our free plan.
If you want to drip this content, then check the ‘Enable Drip’ option. After that, you can choose when this content will be visible to the user and when it will expire.
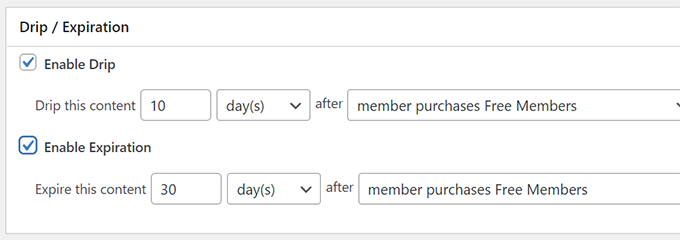
Finally, don’t forget to click on the ‘Save’ button to store your settings.
4. Preparing Expiring Content
Now, based on the rules you have set, you can just edit the posts or pages you want to expire and set them, so they are protected.
For instance, we have set a rule for protecting all content tagged ‘free-trial.’
To protect content under that rule, we need to add the tag ‘free-trial’ to the post or page we want to expire.
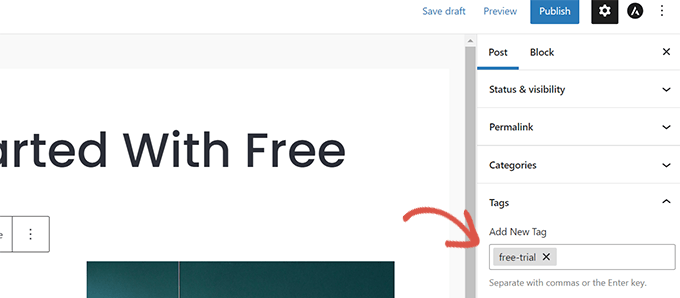
After making sure that the content you want to expire or protect matches the access rules, you can save or publish your changes.
Don’t forget to visit the post or page in an Incognito tab to make sure everything is working. Visiting the page or post as a logged-out user, you’ll see the login form instead of post content.
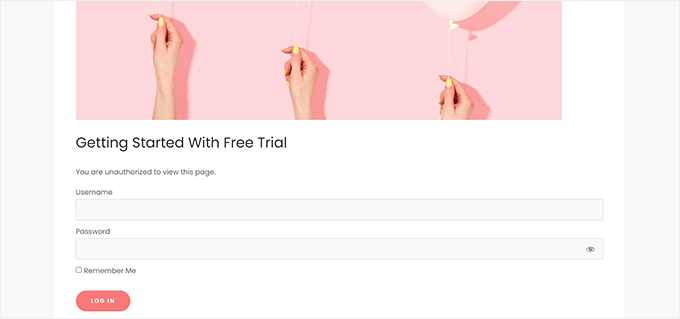
After the user account matches the content expiration rule, they will not be able to see the content.
5. Expiring Partial Content
MemberPress also allows you to expire partial content on a post or page.
To create partial content expiration, go to the MemberPress » Rules page and click on the ‘Add New’ button.

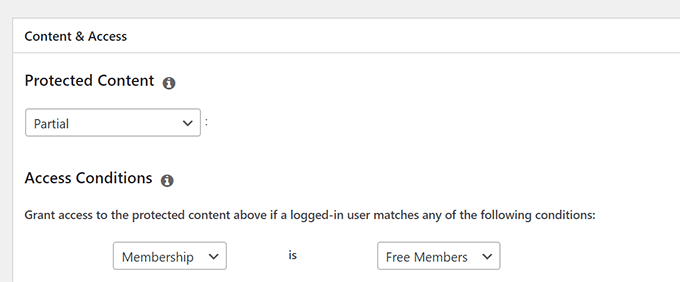
Next, you need to select ‘Partial’ under the ‘Protected Content’ option.
After that, select the conditions where this rule will apply. For instance, we only want to apply it to users who signed up for our Free Members plan.
Next, scroll down to the Drip/Expiration section.
Select when you want this access rule to expire or become available.

Finally, click on the ‘Save Rule’ button to store your settings.
You can now edit the post or page where you want to add the expiring content.
On the post edit screen, simply add the ‘Protected’ block to the content editor.
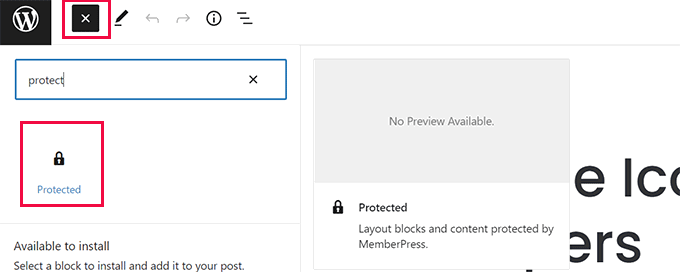
Inside the Protected block, you can add the content you want to hide from non-members and the content you want to expire.
Tip: You can use any blocks you want inside the Protected block. It works similarly to the Groups block in the block editor.
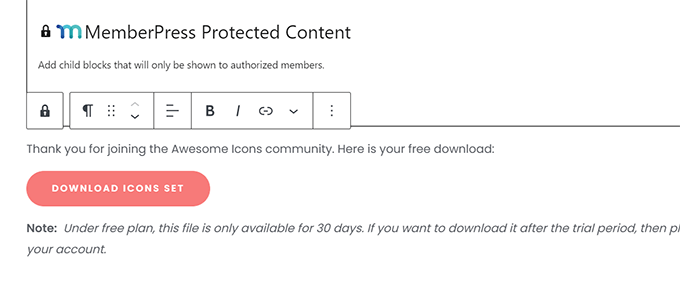
After adding the content, you need to set up the access rules for this block.
Simply look under the block settings in the right panel. From here, you need find the ‘Access Rule’ section and choose the ‘Partial’ rule that you created earlier.
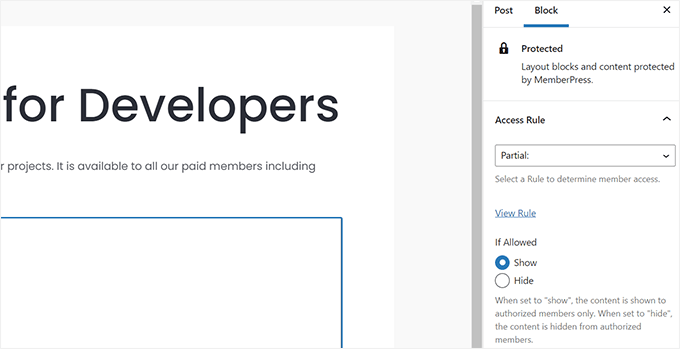
After selecting the rule, you need to select ‘Show’ under the ‘If Allowed’ option.
This tells MemberPress to show the content inside the protected block if the user matches the conditions in the ‘Rule’ selected above.
You can now click on ‘Update’ or ‘Publish’ in the editor and view your post or page in an Incognito browser tab.

Now, as you can see that the plugin doesn’t show a login form or any clue that the post content is restricted or contains expiring content.
Let’s change that.
Go back and edit the post, and this time add another ‘Protected’ block above the one you added earlier.
Select the ‘Partial’ access rule under the block settings. This time we are going to select ‘Hide’ under the option ‘If Allowed’.
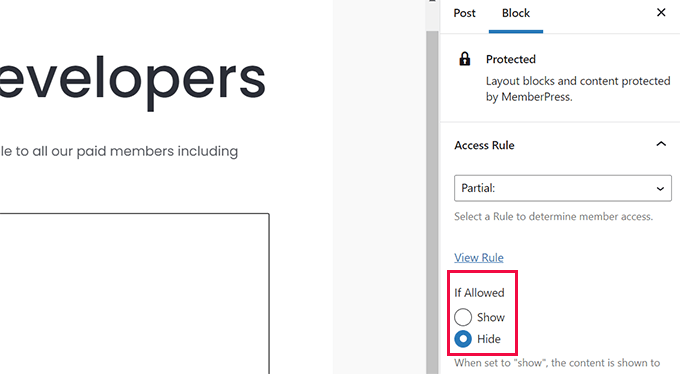
We want this block to be visible to non-logged-in users and the users who don’t match our access rules.
Now you can add hints for users that this content is protected, and that they will need to login to their account to continue.
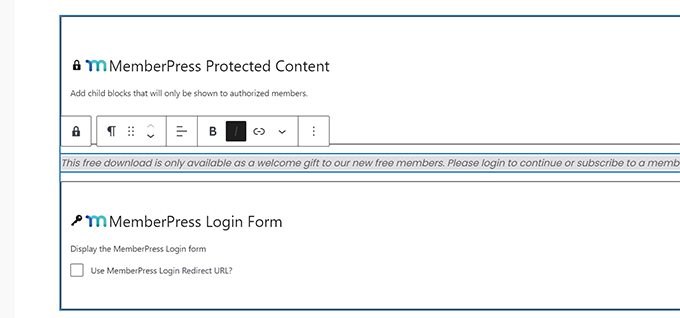
After that, you can add the ‘Login’ block as well.
Once you are satisfied with your changes, go ahead and click ‘Update or ‘Publish’ to save your changes.
You can now visit this post in a new browser tab to see your access rules in action.
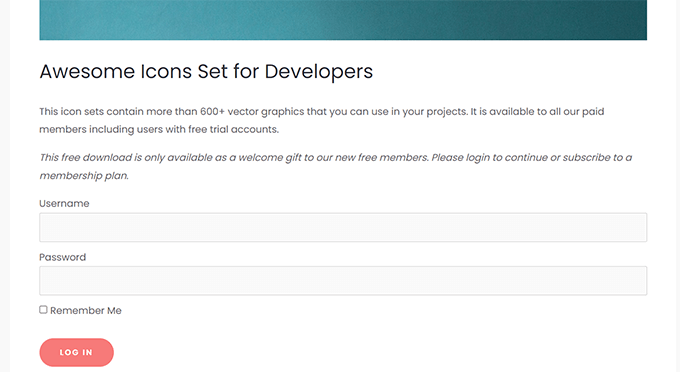
It will show your custom message with the login form to the non-logged in users.
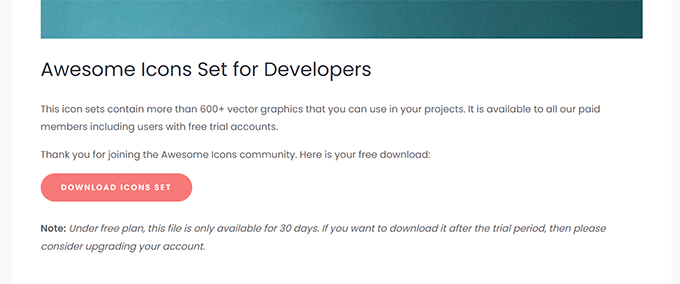
Users can log in to their account, and if the content hasn’t expired yet, then they will be able to see it.
Method 2. Expire Post Content with PublishPress
This method doesn’t give you as powerful access-control features or let you set up paid memberships.
However, it does allow you to easily expire posts in WordPress or change post content after a specific date.
There are two ways you can do this. The first only allows you to expire posts and show a notice about expiration, while the second approach will let you change content before and after the expiration date.
1. Expire Posts in WordPress with PublishPress Future
You can use this method if you only want to expire a post after a specific time.
First, you need to install and activate the PublishPress Future plugin. For more details, see our step by step guide on how to install a WordPress plugin.
PublishPress Pro members will have access to the Future plugin as part of your membership.
Upon activation, you need to click on Future menu item in your WordPress admin sidebar. This will bring you to plugin’s settings page.
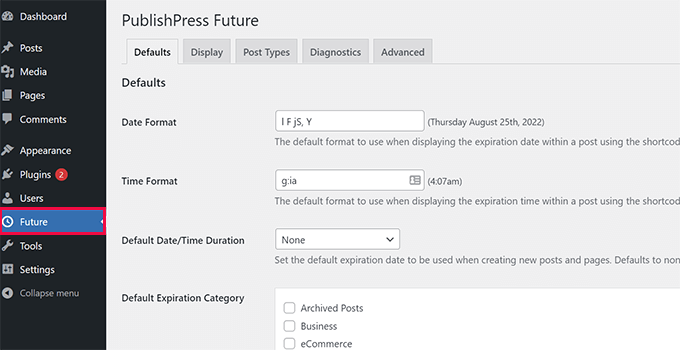
First, you need to set the plugin default settings. These include date and time format, default expiration date duration, expiration category, and email notifications.
You can review these settings and change them if needed. The default settings will work for most users.
Next, switch to the ‘Display’ tab and Enable the ‘Post Footer Display’ option. Below it, you’ll see the text that the plugin will show for posts that are going to expire soon.
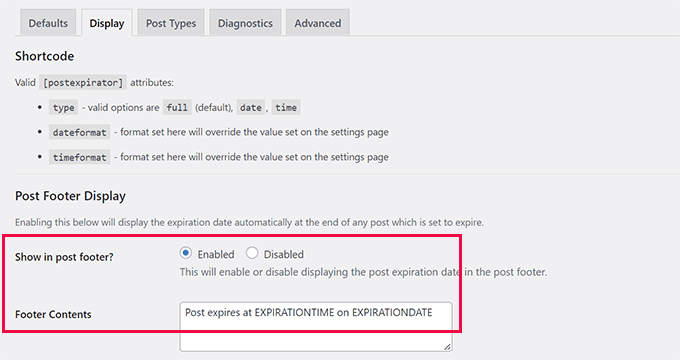
After that, you can switch to the ‘Post Types’ tab. From here, you can select default actions you want to take for posts, pages, and other post types.
Make sure that you click the radio button beside ‘Active’ so that the feature is available for that post type.
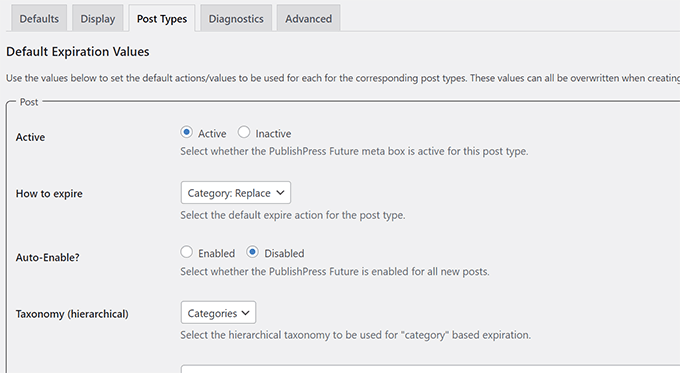
Finally, don’t forget to click on the ‘Save changes’ button to store your settings.
You can now edit a post or page that you want to expire. On the post edit screen, you’ll see a new ‘PublishPress Future’ tab under the Post panel.
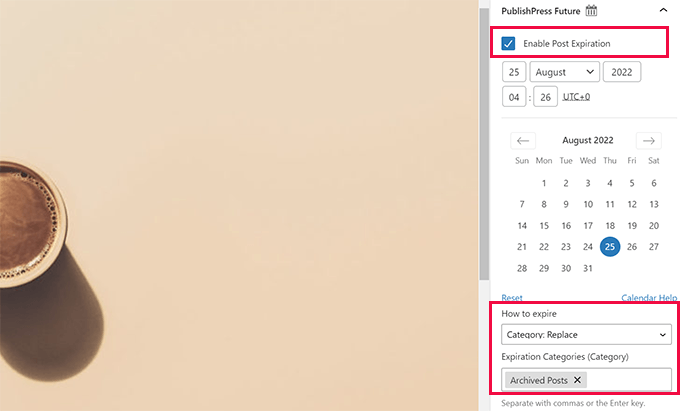
First, check the box next to the ‘Enable Post Expiration’ option. Then, choose the date and time when you want this post to expire.
Under ‘How to Expire’ section, you can choose which action you want to perform when expiring a post. There are a number of options available.
You can set a post to draft, change categories, add new categories, make a post sticky, or make a post unsticky, and more.
For the sake of this tutorial we have chosen the ‘Category: Replace’ option and set the replacement category to be ‘Archived Posts.’
Once you are satisfied with your changes, you can click ‘Update’ or ‘Publish.’ Don’t forget to visit it in a new browser tab, where you’ll see a notification about the post expiration in the footer.
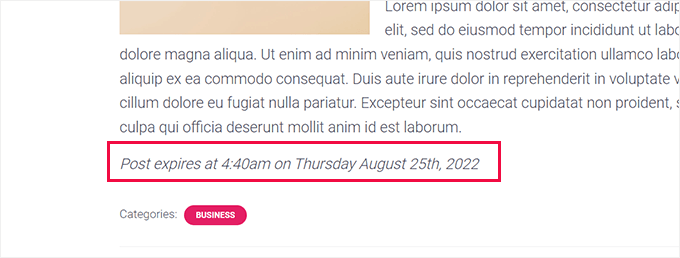
Once the post expires, the plugin will perform the action you have set for this post. For instance, in this example, it will move our post from the Business category to Archived Posts.
2. Expire Post Content or Partial Content with PublishPress Revisions
Unlike the previous method, this approach will give you a little more flexibility.
Basically, you will be able to create two or more versions of your posts that will automatically become public on the set schedule.
First, you need to install and activate the PublishPress Revisions plugin. For more details, see our step by step guide on how to install a WordPress plugin.
PublishPress Pro members will also have access to this plugin as part of their subscription, as well.
Upon activation, go to Posts » All Posts page and locate the post that you want to expire. Take your mouse to the post title and then click on the ‘New Revision’ link.
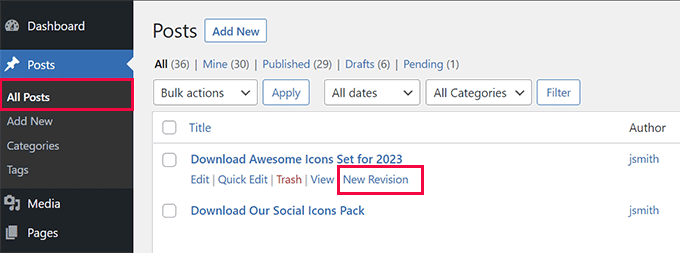
The plugin will then create a duplicate draft for your post and open it in the post editor.
From here, you can make changes to the post. For instance, you can add a notice that this post is expired.
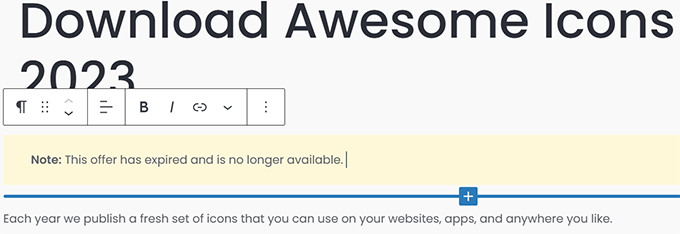
Similarly, you can also replacing partial content with something else after the experiation date.
For example, we had a download button in this article which have replaced with the text that this download is no longer available.

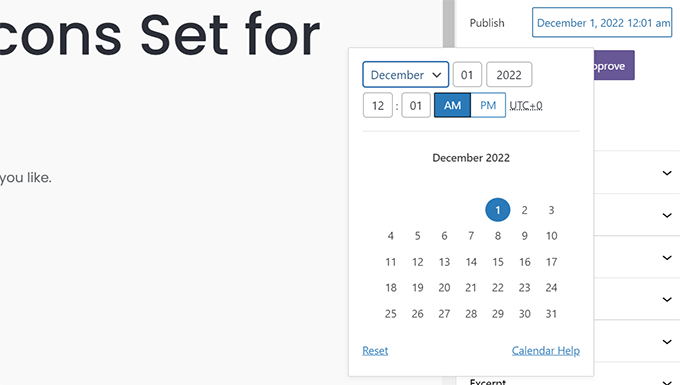
Once you are done editing, click on the ‘Immediately’ button next to the ‘Publish’ option under the ‘Post’ settings.
A calendar will now pop up on the screen.
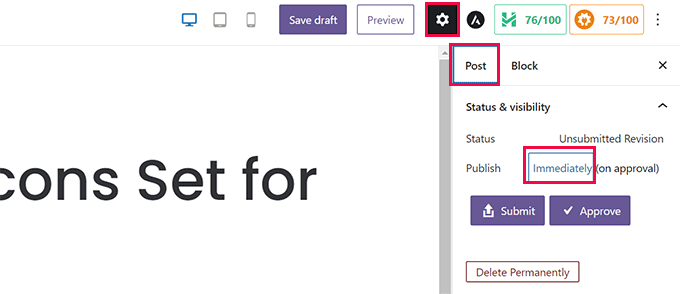
From here, you can set the date and time when you want the old post to expire and be replaced by your new draft.
Once you have set the scheduled date and time, you are ready to save the revision.
Now, when you click on the ‘Submit’ button, the draft will be submitted for review. It needs to be approved before it’s actually scheduled.
However, if you are responsible for publishing content on your website and don’t need approval from anyone else, then you can simply click the ‘Approve’ button to continue.
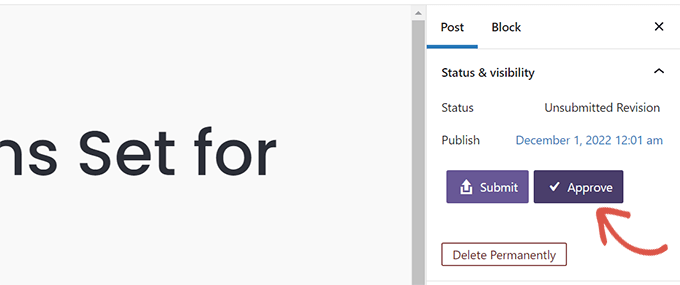
The plugin will now schedule this revision that will be published at your chosen time.
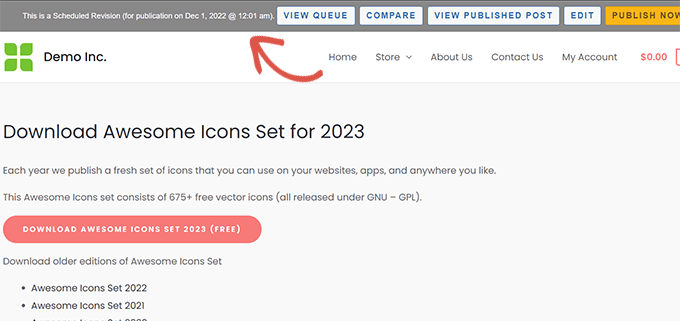
After that, you’ll be redirected to see a preview of the draft.
At the top of the screen, you’ll see a notification bar with the date and time this draft will go live.
For more details, see our tutorial on how to automatically schedule content updates in WordPress.
We hope this article helped you learn how to easily expire posts or partial post content in WordPress. You may also want to see our guide on how to sell digital downloads in WordPress or how to manage file downloads on your WordPress website.
If you liked this article, then please subscribe to our YouTube Channel for WordPress video tutorials. You can also find us on Twitter and Facebook.


Syed Balkhi says
Hey WPBeginner readers,
Did you know you can win exciting prizes by commenting on WPBeginner?
Every month, our top blog commenters will win HUGE rewards, including premium WordPress plugin licenses and cash prizes.
You can get more details about the contest from here.
Start sharing your thoughts below to stand a chance to win!
Jazzper says
Apparently this plugin is no longer supporter by its developer. Are there any plugins available that ARE supported which expire posts?
WPBeginner Support says
We will be sure to look for an alternative we would recommend and update this article when we are able.
Admin
Andreas S says
Hi! Do you know any plugins where I can make limited content and spread around my page with shortcodes? I have a website with different online stores that often have limited offers. It would be great to have a database of all the stores… Store1, Store2, Store3…. and then I apply a store specific shortcode in all the stores… and a database of text portions with dates I can change whenever new campaigns come out.. Sorry for the very bad explanation…. I tried the Timed Content plugin but it didn’t work exactly as I wanted.
WPBeginner Support says
It sounds like you’re wanting to use reusable blocks. We have a tutorial on how to use those here: https://www.wpbeginner.com/beginners-guide/how-to-create-a-reusable-block-in-wordpress/
Admin
Syaifuddin says
Hello,
I just bump into this post while looking for a solution where WP can automatically draft all posts after certain period. For instance if I publish the post on 1st January, it will automatically unpublish (status change to draft or expired) on 31st January. If the post was published on 4 March, it will expires on 5 May.
I need this feature because I want to set specific time for my subscriber to read the post within allowable time before it’s hidden/unpublish from front end.
Please help.
WPBeginner Support says
From the sound of what you’re wanting, you would want to use the plugin in the article.
Admin
David says
Hey WPbeginner: How can we do this NOW? The plugin in the article hasn’t been updated in more than 2 years…
Stacey says
@David, Did you find an updated way to do this? I’m also looking for a way to expire posts without using an abandoned plugin!
WPBeginner Support says
We will certainly take a look at other plugin options but the plugin should still be working for the moment.
Admin
Stacey says
I tried for days to get this plugin to work and never could. I ended up finding the plugin “WP Content Scheduler With Range”. Even with trying out abandoned plugins, this is the only one I could get to work.
Andrew Norton says
This plugin works like a dream however i want the same thing or functionality for posts in widgets. any ideas?
Thembelani says
Hi. We are trying to build a mobile app that pulls content from a WordPress page as JSON using a url. The page in WordPress uses Advanced Custom Fields as its underlying structure. None of the content expiry plugins I have tried thus far are able to show/hide content on this page.
Any suggestions ?
Yazmin says
Is there a new alternative to Post Expirator? It is failing on our site all of a sudden and we rely on it heavily.
Thanks!
Michaelsbote says
Sorry – The Post Expirator does not work with WP 4.4.2.
John Bowden says
Just replaced a plugin that no longer worked with Post Expirator. Working like a champ on my site. Thank you!
george pal says
I have tested Post Expirator plugin on a multisite installation.
The plugin DOES NOT work.
As soon as it gets enabled there is a php message telling:
Strict Standards: Declaration of Walker_PostExpirator_Category_Checklist::start_lvl() should be compatible with Walker::start_lvl(&$output, $depth = 0, $args = Array) in /volume1/web/wp-content/plugins/post-expirator/post-expirator.php on line 0
Strict Standards: Declaration of Walker_PostExpirator_Category_Checklist::end_lvl() should be compatible with Walker::end_lvl(&$output, $depth = 0, $args = Array) in /volume1/web/wp-content/plugins/post-expirator/post-expirator.php on line 0
Strict Standards: Declaration of Walker_PostExpirator_Category_Checklist::start_el() should be compatible with Walker::start_el(&$output, $object, $depth = 0, $args = Array, $current_object_id = 0) in /volume1/web/wp-content/plugins/post-expirator/post-expirator.php on line 0
Strict Standards: Declaration of Walker_PostExpirator_Category_Checklist::end_el() should be compatible with Walker::end_el(&$output, $object, $depth = 0, $args = Array) in /volume1/web/wp-content/plugins/post-expirator/post-expirator.php on line 0
Except from that, the metabox on wordpress backend admin breaks the responsive layout, see what I mean here: and here:
Leslie Nicole says
Thank you! I’ve been reluctant to post “news” as you end up having your archives peppered with out-dated posts. This is plug-in should be really handy!