Do you want to limit access by IP address to your wp-login.php file in WordPress?
The WordPress login page is often attacked by DDoS attacks and hackers to gain access to your website. Limiting access to specific IP addresses can effectively block such attempts.
In this article, we’ll show you how to easily limit access by IP to your wp-login.php file in WordPress.
Why Limit Access to wp-login.php by IP Address?
The login page for a WordPress website (typically, wp-login.php), is where users go to log in to your site.
As a website owner, it gives you access to the WordPress admin area where you can perform website maintenance, write content, and manage your website.
However, common brute force attacks on the internet are known to target the wp-login.php page to gain access to websites. Even if they fail to get in, they may still be able to slow down your website or even crash it.
One way to deal with this situation is to block the IP addresses where attacks are coming from (We’ll talk about this later in the article).
An IP address is like a phone number that identifies a specific computer on the internet. Hackers can use software to change their IP addresses.
However, more sophisticated attacks use a larger pool of IP addresses and it may not be possible to block all of them.
In that case, you can limit the access to specific IP addresses used by yourself and other users on your website.
That being said, let’s take a look at how to easily limit access to wp-login.php file by specific IP addresses using 3 different ways including cloud security firewall.
1. Limit Access to WordPress Login Page by IP Address
For this method, you’ll need to add some code to the .htaccess file.
The .htaccess file is a special server configuration file that is in the root folder of your website and can be accessed using FTP or the File Manager app on your WordPress hosting control panel.
Simply connect to your WordPress site using an FTP client and edit your .htaccess file by adding the following code at the top.
<Files wp-login.php>
        order deny,allow
        Deny from all

# whitelist Your own IP address
allow from xx.xxx.xx.xx

#whitelist some other user's IP Address
allow from xx.xxx.xx.xx

</Files>
Don’t forget to replace XXs with your own IP addresses. You can easily find your IP address by visiting the SupportAlly page.
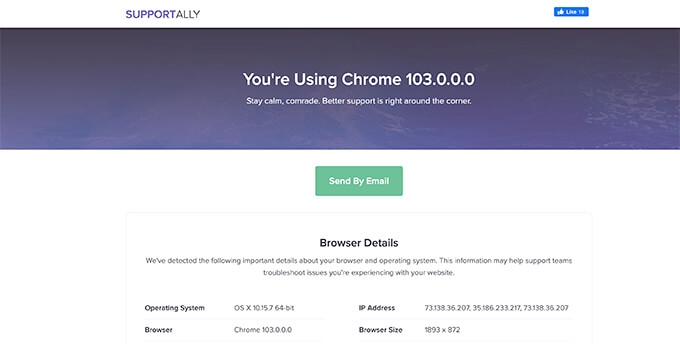
If you have other users who also need to log in to your website, then you can ask them to provide their IP addresses. You can then add those to the .htaccess file as well.
Here is another example of the above-mentioned code.
<Files wp-login.php>
        order deny,allow
        Deny from all

# Whitelist John as website administrator
allow from 35.199.128.0

#Whitelist Tina as Editor
allow from 108.59.80.0

# Whitelist Ali as moderator
allow from 216.239.32.0

</Files>
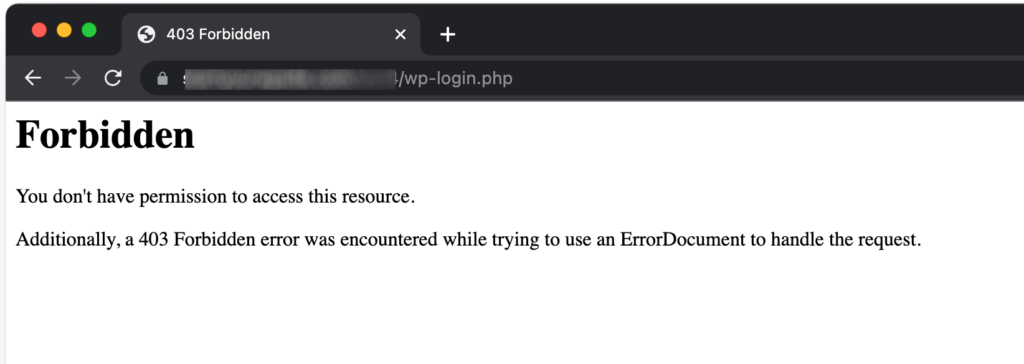
Now, users with these IP addresses will be able to view the wp-login.php file and login to your website. Other users will see the following error message:
2. Blocking Specific IP Addresses from Accessing Your Website
This method is totally the opposite of the first method.
Instead of limiting WordPress login page access to specific IP addresses, you’ll be able to block IP addresses used to attack your website.
This method is particularly useful for WordPress membership websites, eCommerce stores, or other websites where multiple users need to login in order to access their accounts.
The disadvantage of this method is that hackers can change their IP addresses and continue attacking your website.
Fortunately, many of the common WordPress hacking attempts use a fixed set of IP addresses which makes this method effective in most cases.
Step 1: Finding the Offending IP Addresses You Want to Block
First, you need to find the IP addresses used to attack your website.
The easiest way to find the offending IP addresses is by looking at your server logs. Simply head over to your hosting account control panel and click on the ‘Raw Access’ logs icon.
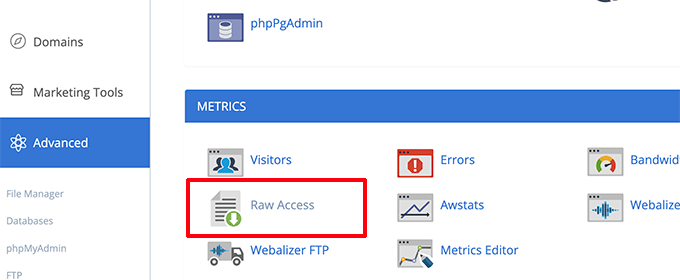
On the next page, click on your domain name to download the access logs. This will download a file with gz extension.
You will need to extract the file and open it with a text editor like Notepad or TextEdit.
From here you will find the IP addresses that are repeatedly hitting the wp-login.php page.

Copy and paste the IP addresses into a separate text file on your computer.
Step 2. Blocking Suspicious IP Addresses
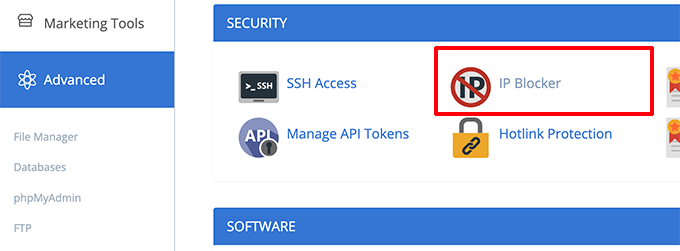
Next, you need to log in to your WordPress hosting control panel and click on the ‘IP Blocker’ icon.
On the next screen, simply copy and paste the IP addresses you want to block and click on the ‘Add’ button.
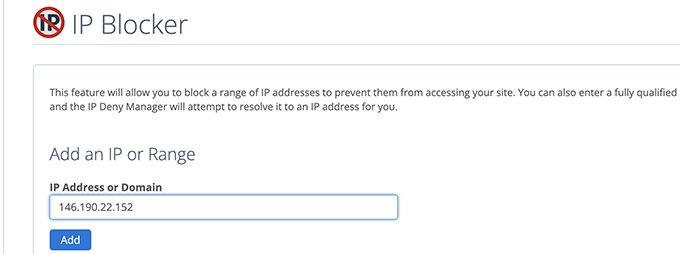
Repeat the process to block any other suspicious IP addresses you want.
That’s all! You have successfully blocked suspicious IP addresses from accessing your website completely.
Later on, if you need to unblock one of these IP addresses, you can simply do so from the IP blocker app.

3. Protecting WordPress Login with Website Firewall
As a website administrator, you may not want to spend too much time managing IP addresses that can access your WordPress login page.
The easiest way to protect your WordPress login pages is by using Sucuri. It is the best WordPress firewall that accompanies a comprehensive WordPress security plugin.
Sucuri’s website firewall automatically filters suspicious IP addresses from accessing important WordPress core files without them ever reaching your website.
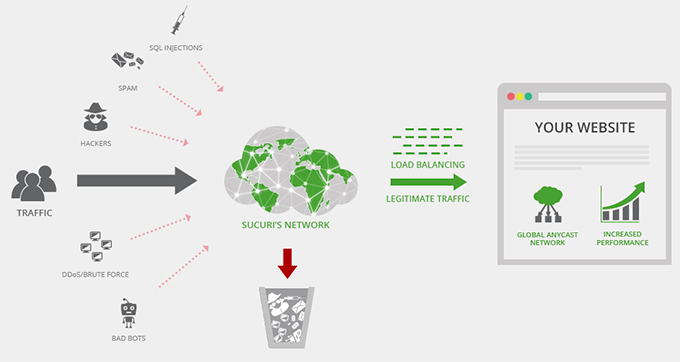
This method also improves your WordPress performance and speed as it blocks suspicious activities from slowing down your server.
On top of that, Sucuri also comes with a built-in CDN network. It would automatically serve static files like images, stylesheets, and JavaScript from a server closer to your users.
You can easily whitelist the IP addresses of users if they are unable to access WordPress login pages.

Alternatives: MalCare or Cloudflare Free CDN
We hope this article helped you learn how to limit access by IP address to your wp-login.php file. You may also want to see our complete WordPress security guide or see these additional tips for protecting the WordPress admin area.
If you liked this article, then please subscribe to our YouTube Channel for WordPress video tutorials. You can also find us on Twitter and Facebook.


Syed Balkhi says
Hey WPBeginner readers,
Did you know you can win exciting prizes by commenting on WPBeginner?
Every month, our top blog commenters will win HUGE rewards, including premium WordPress plugin licenses and cash prizes.
You can get more details about the contest from here.
Start sharing your thoughts below to stand a chance to win!
Jiří Vaněk says
I copied the directives to the website, adjusted the IP addresses, and placed them in the .htaccess file. It works perfectly for both IP addresses that are now set in the .htaccess.
Av says
in regards to a woocommerce site, is this function useful?
login can be done from my-account page.
WPBeginner Support says
If you have multiple users logging in to your site for something like WooCommerce then this would not be something you would use. This would normally be for a site with a limited number of users.
Admin
Michael Pepper says
Thanks for the article, helpful!
WPBeginner Support says
Glad our article was helpful
Admin
Mick says
For some reason when I use this the whitelisted ip is blocked too.
any idea why?
WPBeginner Support says
You may want to ensure you set the correct IP and if you are using a VPN or something similar that may be the root of the issue
Admin
Bahar Ali says
I used the above code and it somehow apply’s to every page of the site for example my home even shows prohibited.
WPBeginner Support says
You may first want to check with your hosting provider to ensure there isn’t a conflicting setup on their end.
Admin
Unni Krishnan says
Good One guys,
As you stated in the last section, I do have dynamic IPs for my mobile connection. Though I have white listed my Broadband IP, getting stuck while accessing on the go.
Do you know if any plugins help to solve this ?
Unni Krishnan says
Also, such requests to wp-login.php are getting redirected to the homepage. Is this normal ?
FrancescoElzy says
Hmm it seems like your blog ate my first comment (it was super long) so I guess I’ll just sum it up what I wrote and say, I’m thoroughly enjoying your blog. I too am an aspiring blog blogger but I’m still new to the whole thing. Do you have any helpful hints for newbie blog writers? I’d genuinely appreciate it.
Stéfano Willig says
We have made our ftp accessable only by certain IP.
Now I can’t install or update wordpress directly via wordpress…
What can I do?
Jobbatam says
Great tips and works for me.
But, Can i redirect wp-login to error 404?
If can, what code i add into code above?
thanks
MargaretMacnamar says
It’s very simple to find out any matter on net as compared to textbooks, as I found this post at this website.
EQHRaymond says
Thank you for the function. Post aided me a whole lot
Rex Wickham says
If you want to add more than one IP you can do this:
1. you can use a partial IP:
Allow from 145.50.39
This will allow IP from 145.50.39.0 to 145.50.39.255
2. you can use a netmask or a CIDR:
Allow from 145.50.39.0/255.255.255.224
or
Allow from 145.50.39.0/27
This will allow IP from 145.50.39.0 to 145.50.39.31.
Julius Musembi says
This is a great workaround.
David Swanson says
I added the code to my .htaccess but when my users logout they receive Error 403.
When they click logout the link is /wp-login.php?action=logout
Anyway to fix this?
Brijesh says
Great Tip! But i got a problem. It locks admin login from others ips, but if a registered user sign out from site, code also restricts that. I mean when user click sign out, it gives forbidden message. How to solve it?
Rafaqat says
Thanks for your quick guideline to protect from excessive and illegal log in attempts. Actually there is a free plugin “better wp security” that can manage nearly all security issues regarding,login attempts,wp.config file,.htaccess file and many more. I think one should give it a try.
Kris says
To get around the dynamic IP issue you can reference an htpasswd.
Baptiste Legrand says
Thanks for this great tip ! But i’m a but confused : should I paste this snippet in my root .htacess file, or into my wordpress/.htaccess file ?
Cheers (and btw, I just LOVE wpbegginer.com, keep up the good work !)
Editorial Staff says
Paste it in your wordpress/.htaccess
Admin
Editorial Staff says
With dynamic IPs this can be a pain. You can set Apache Protect on it, but that is a bit more complex. #whitelist line is just to let me know which IP is which.
Admin
Steve Pringle says
You should mention that plugins (like JetPack) may have issues when you limit access.