Do you want to create a WordPress popup based on the location of your visitors?
Creating WordPress popups based on location helps you deliver the right marketing message to the right people at the right time. This means a better user experience and more revenue for your WordPress site.
In this tutorial, we will show you how to create popups based on a user’s location and add them to WordPress.
What Are Location-Based Popups?
Location-based popups are similar to standard popups, but they only display for visitors from specific locations.
For example, visitors from the US will be shown different popups than visitors from the UK or Spain.
You can narrow down your location targeting even further, and target specific states and cities. This way visitors in Florida can be shown a different popup than visitors in California.
This process is known as geotargeting, and it lets you encourage your visitors to take specific actions on your site based on where they live.
Why Add WordPress Popups Based on Location?
Using location-based popups in WordPress gives your visitors a highly relevant experience. It shows your visitors that you understand their needs and can lead to better conversions.
This level of personalization can help you reach your website goals, like growing your email list or making money online.
Using geolocation popups can help your business website in a lot of ways, like:
- Boost website credibility by showing visitors you’re aware of their location.
- Run eCommerce coupons and specials for visitors in certain areas.
- Promote local events and conferences to your visitors.
- Highlight products that are relevant to visitors in different locations.
How to Create a WordPress Location-Based Popup
The easiest way to add popups to your WordPress website is by using a plugin.
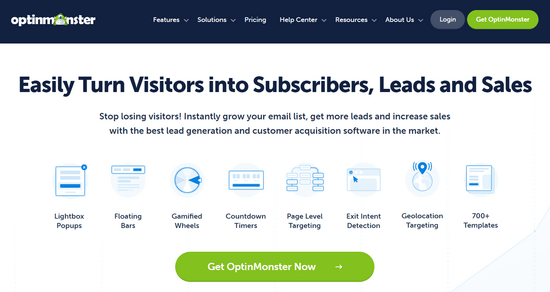
We recommend using OptinMonster. It’s the best WordPress popup plugin on the market that lets you generate leads, grow your email list, and boost conversions.
You can use the OptinMonster drag-and-drop editor to simply create a popup campaign in minutes. Plus, you can easily personalize your popups based on what page they’re viewing, actions they’ve taken on your site, and more.
For more information, see our complete OptinMonster review.
First, you’ll need to visit the OptinMonster website and sign up for an account. You will need the Growth plan because it includes Geolocation targeting.
Next, you’ll need to do is install and activate the plugin. For more details, see our guide on how to install a plugin in WordPress.
The OptinMonster plugin acts as a link between your WordPress site and the OptinMonster software.
Once the plugin is activated, you’ll see the OptinMonster setup wizard. Go ahead and click the ‘Connect Your Existing Account’ button. You can also create a new free account if you haven’t signed up yet.
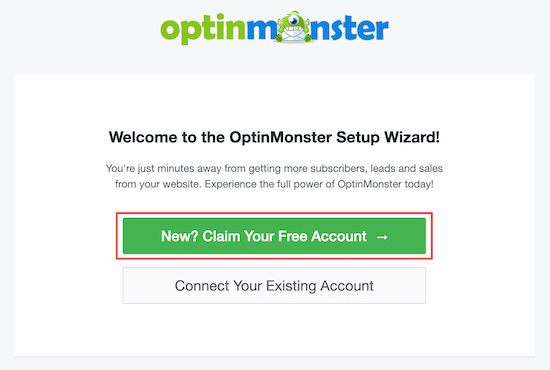
After you’re done going through the setup wizard, your WordPress website will now be connected to OptinMonster.
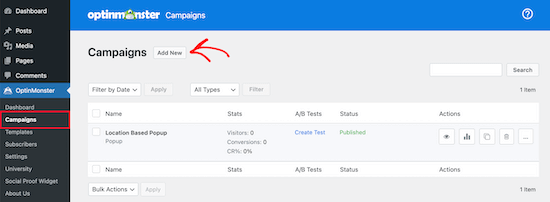
To create your location-based popup, navigate to OptinMonster » Campaigns.
Then, click ‘Add New’ to create a new popup campaign.
OptinMonster will show you different campaign types to choose from.
Go ahead and select the ‘Popup’ campaign type.
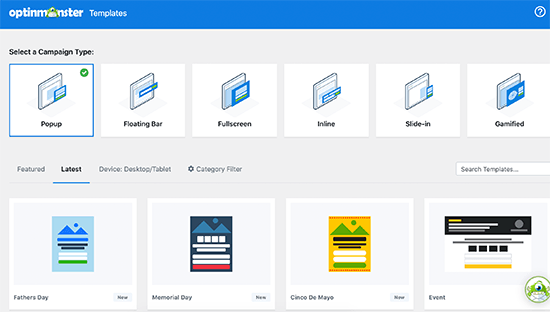
Next, you’ll select the campaign template. Your template forms the foundation for the design of your popup. So, choose a template that closely resembles the design you want.
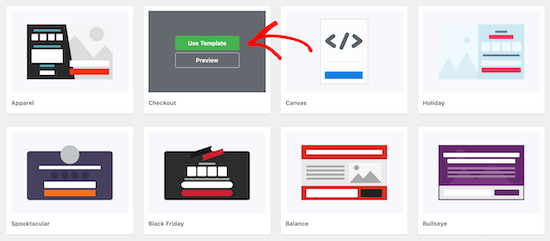
For this tutorial, we’ll select the Checkout template. Once you find a template you like, hover over it and click ‘Use Template’.
Then, you’ll need to name your campaign.
This name won’t appear in your design. Instead, it’s to help you remember what kind of campaign you created.
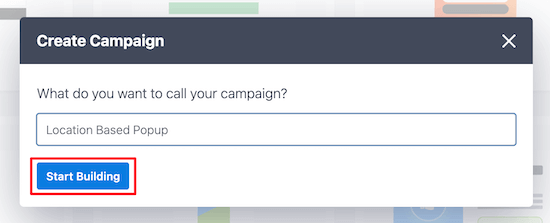
Next, click ‘Start Building’.
This will bring you to the OptinMonster app, where you can customize the appearance of your popup.
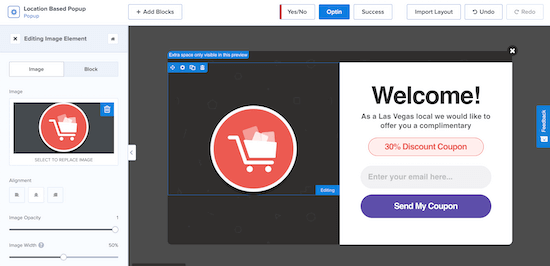
You can totally customize your popup by adding new blocks, text, headings, and more. Just click on the element you want to edit and the options menu will appear on the left.
Once you’re satisfied with how your location-based popup looks, click ‘Save’ and then click the ‘Display Rules’ tab at the top of the screen.
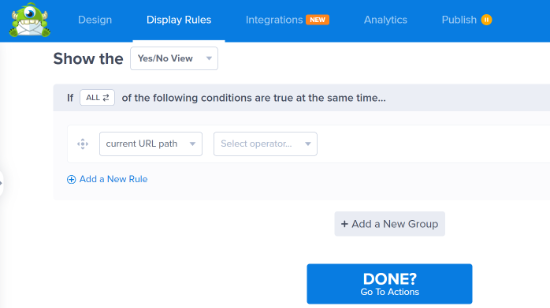
This is where you’ll set your location triggers.
The default rule is your popup will appear on any page after a visitor is on the site for 5 seconds.
You’ll need to change the first rule to the visitor’s physical location. To do this, click on the ‘time on page’ display rule, then select ‘Physical Location.’
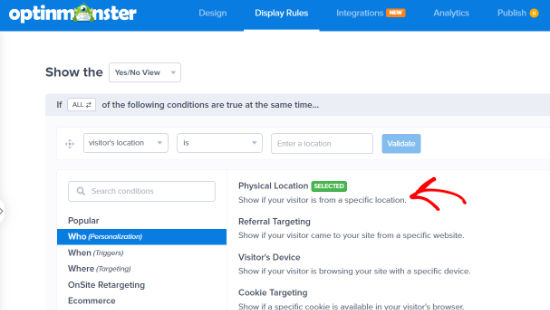
Now, you can set the popup to display for visitors who are in a specific location.
You also have the option to include or exclude visitors who are in an EU country.
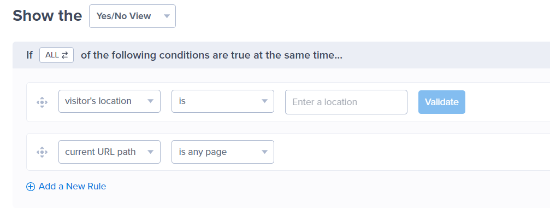
We’re going to set the rule so the popup will show when a visitor is in Las Vegas, NV.
Next, you can click the ‘Validate’ button.
Now, a popup will appear that lists available locations based on what you entered. Simply select the location you want and then click ‘Next Step’.
OptinMonster also allows you to add an animated effect or sound on the next screen, but we’ll leave the default settings.
Once you’ve done that, click ‘Next Step’ again, and you’ll be taken to the summary page where you can review your location popup settings.
If your settings are correct, then navigate to the ‘Publish’ tab and switch the ‘Publish Status’ from Draft to Publish.
Next, click ‘Save’ and exit the screen.

Your popup based on your user’s location will now be live on your site.
If you want to create multiple popups based on location, then follow the same process above and change the ‘Display’ rules to the new user location.
With OptinMonster, you can have multiple popup campaigns running at once and provide a targeted experience for all your visitors.
We hope this article helped you add a WordPress popup based on location to WordPress. You may also want to see our list of the best email marketing services and best live chat software to boost your sales.
If you liked this article, then please subscribe to our YouTube Channel for WordPress video tutorials. You can also find us on Twitter and Facebook.


Syed Balkhi says
Hey WPBeginner readers,
Did you know you can win exciting prizes by commenting on WPBeginner?
Every month, our top blog commenters will win HUGE rewards, including premium WordPress plugin licenses and cash prizes.
You can get more details about the contest from here.
Start sharing your thoughts below to stand a chance to win!
Dennis Muthomi says
OptinMonster is a game-changer for location-based marketing!
I’ve had great success using it for seasonal campaigns.
For instance, last Halloween, I created a “spooky” popup featuring deals exclusively for US visitors.
It’s amazing how much more engaging and effective your promotions become when they’re tailored to specific locations and events.