WordPress sometimes crops post thumbnails in a way that doesn’t look great. Automatic cropping can cut off important parts of the image. By manually cropping and editing thumbnails, you can create better visuals.
In this guide, we’ll show you how to crop and edit WordPress post thumbnails. These tips will help ensure your images look perfect on your site.
Manual editing allows you to control the focus and composition of your thumbnails. This way, your content always looks its best.
Why Crop and Edit WordPress Post Thumbnails or Featured Images?
Adding a thumbnail or featured image is the easiest way to make a new blog post more appealing. In our experience, a well-cropped and properly edited thumbnail has a huge impact on user engagement.
Most WordPress themes support featured images and display them beautifully across your site. For detailed steps, see our expert guide on how to add featured images or post thumbnails in WordPress.
Depending on your theme, WordPress may automatically crop your post thumbnail, sometimes cutting off essential parts and leaving a poor impression. Based on our extensive experience, we recommend manual cropping to ensure the best results.
Let’s explore how to manually crop your WordPress post thumbnails. We will also share advanced tips for editing thumbnails effectively.
Cropping and Editing Post Thumbnails From WordPress
Did you know that you can do basic image editing in WordPress? The WordPress ‘edit image’ feature allows you to crop, rotate, flip, and scale images.
This is handy for quick editing jobs, especially when you can’t access the more powerful image editing software on your main computer.
To start, open the post with the thumbnail you wish to edit. On the right, scroll down to the Featured Image panel and click the image.
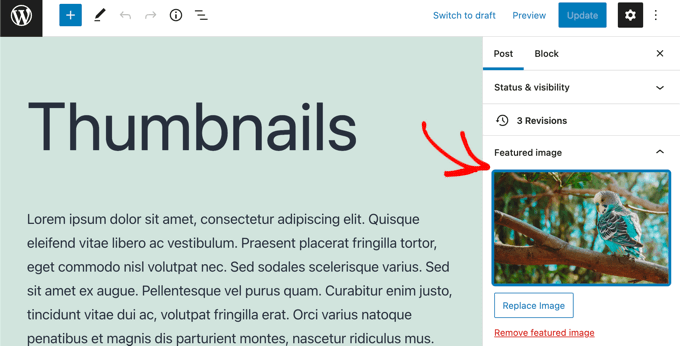
This will open the WordPress Media Library with your featured image selected. On the right is an area where you can add alt text, a title, a caption, and a description for your image.
You will also find an ‘Edit Image’ link at the top, under’ Attachment Details’.
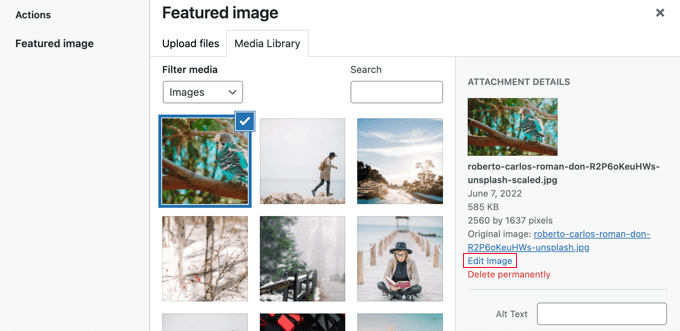
When you click that link, you’ll be taken to the ‘Edit image’ page.
Here, you’ll find a preview of the image, buttons to crop and edit it in different ways, and several other useful options for scaling or cropping the image.
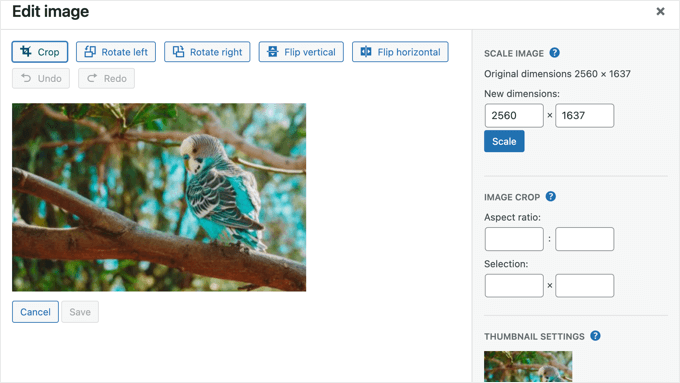
First, you should look at the ‘Thumbnail Settings’ section. Here, you can select whether to apply your changes to all image sizes, just the thumbnail, or all sizes except the thumbnail.
Remember that this thumbnail setting is for the smallest image size created by WordPress for this image, such as when you use the ‘Latest Posts’ block. It is not the same as the featured image or post thumbnail.
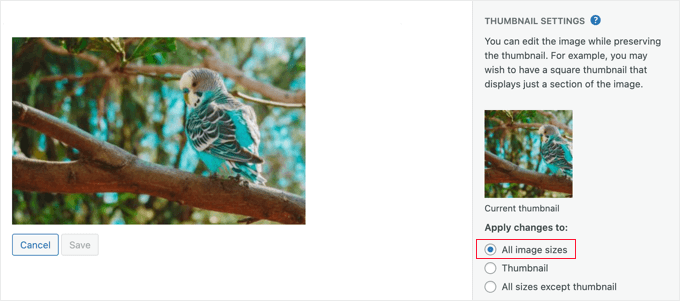
These settings make it possible to create one version of the image for your featured image or post thumbnail and another for the small thumbnail.
For this tutorial, we will stay with the default ‘All image sizes’ option.
Cropping WordPress Post Thumbnails
To crop the image, you need to click the ‘Crop’ button at the top of the screen.
You will now see handles at each corner and edge of the image. You can drag these handles to select the part of the image that should remain after it is cropped.
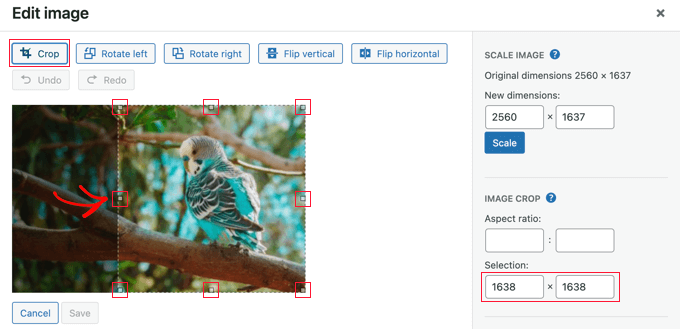
As you drag the handles, you can watch the ‘Selection’ fields on the right under ‘Image Crop’ to monitor the dimensions the image will be cropped to.
Once you are happy, simply click the ‘Crop’ button again to crop the image.
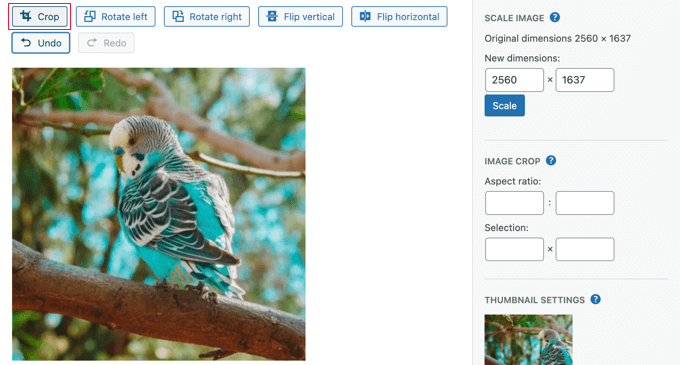
A common reason for cropping a post thumbnail image in WordPress is to make sure it has the correct aspect ratio for your theme, such as 1:1 (square) or 16:9. You can use the ‘Aspect ratio’ settings to make it easier to select an area with the correct ratio.
You simply enter the aspect ratio you need, and your selection will be kept at that ratio.
For example, we will enter an aspect ratio of 1:1 to ensure a square image. When you drag the mouse over the image, the shape will always be square.
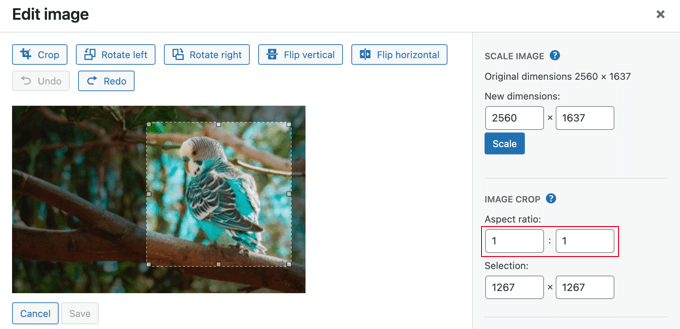
When you are happy with the selection, click the ‘Crop’ button again.
After that, you need to click the ‘Save’ button to store the changed image.
Scaling WordPress Post Thumbnails
It’s important not to use images that are too large, or they will affect the performance of your website. You can learn more in our guide on how to optimize images for web performance.
When you import a photo from your phone or a digital camera, it will have a very high resolution. Reducing the dimensions to something more reasonable will make it load faster.
Our image has a resolution of 2560×1637 pixels, which is larger than we need for a post thumbnail. However, by typing in the first ‘Scale Image’ field, we can reduce it to a width of 1200 pixels.
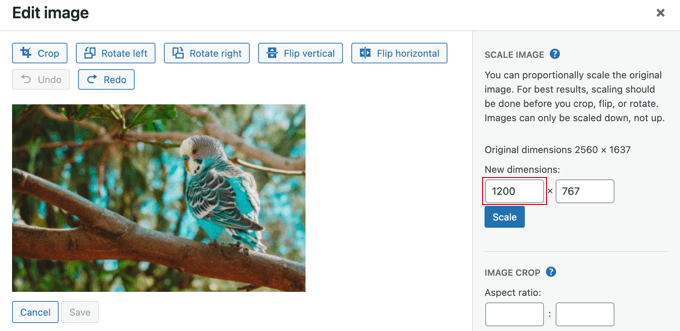
Notice that the image’s height automatically changes to keep the image in proportion.
Next, click the ‘Scale’ button to change the image’s resolution. Then, remember to click the ‘Save’ button to save your changes.
Note that you can only scale an image down in WordPress. You cannot make images larger by increasing the image dimensions.
However, you can use other image editing software to make an image larger without losing quality.
Rotating WordPress Post Thumbnails
If your post thumbnail looks wrong because it is rotated sideways, then you can fix it using the WordPress image editor.
You’ll find two buttons that rotate your image. ‘Rotate left’ will rotate it in a counter-clockwise direction, and ‘Rotate right’ will rotate it in a clockwise direction.
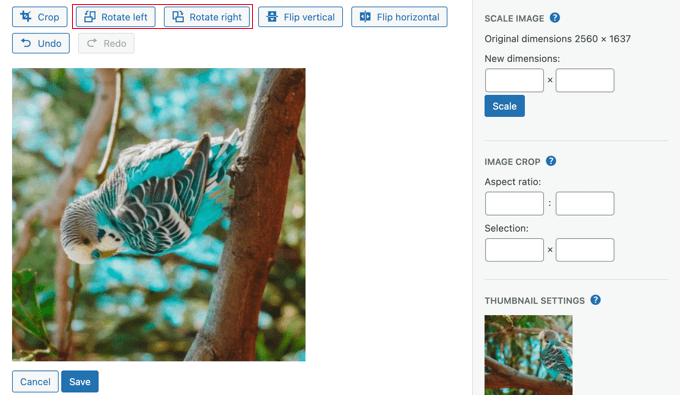
Make sure you click the ‘Save’ button to store your changes.
Flipping WordPress Post Thumbnails
You can also flip your image. This is useful, for example, if there is writing on an image that appears reversed.
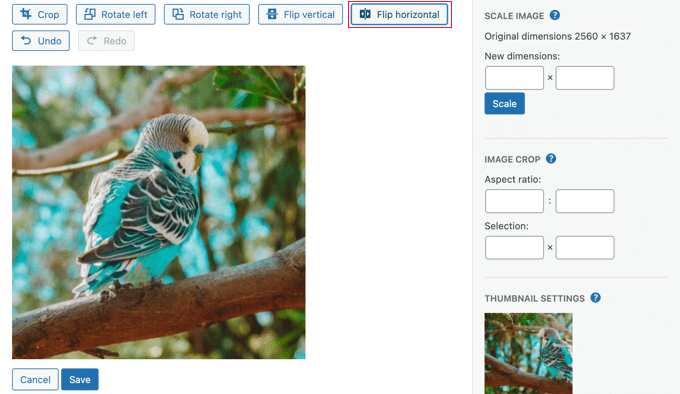
Clicking the ‘Flip horizontal’ button will instantly create a mirror image.
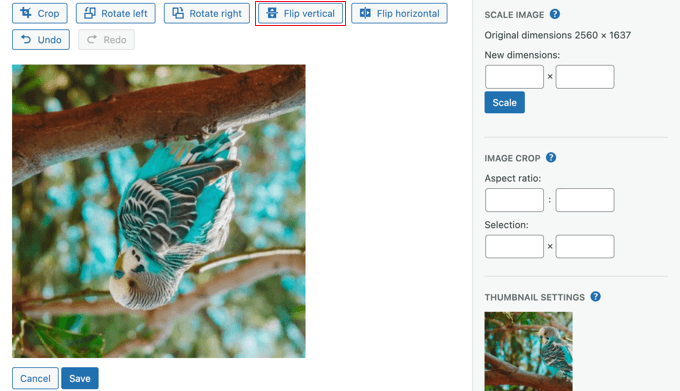
Clicking the ‘Flip vertical’ button will flip the image upside down.
Once you are finished, you can store your changes by clicking the ‘Save’ button.
Restoring WordPress Post Thumbnails
WordPress keeps a copy of the original image when you save changes to an image. You can restore that image at any time.
Simply return to the WordPress’ Edit image’ screen, and you will see a new panel labeled ‘Restore Original Image’.

You need to click the down arrow button to expand this section. You will now see a button labeled ‘Restore image’.
When you click that button, all of your changes will be discarded, and the original image will be restored.
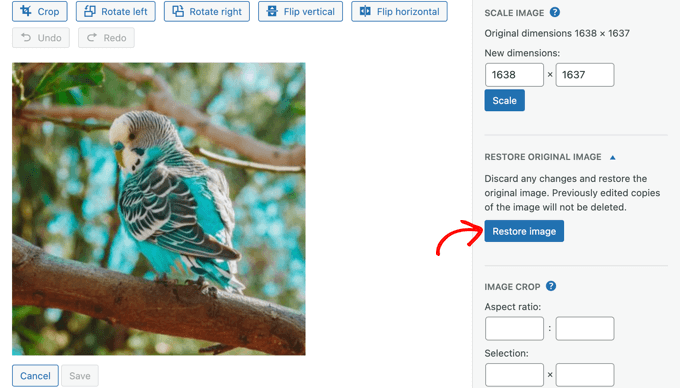
You don’t need to save your changes in this case, as the image has already been restored.
Cropping and Editing WordPress Thumbnails on Your Computer
While the WordPress image editor is handy, you’ll normally find it easier to crop and edit it using third-party image editing software on your computer.
Adobe Photoshop is a premium software application for creating and editing images.
It’s more than you need to edit a post thumbnail, but it’s a good option if you’re familiar with it and it’s already installed on your computer.
Alternatively, you can also use one of the many affordable Photoshop alternatives. Affinity Photo, Pixelmator Pro, and GIMP all offer comprehensive tools for cropping and editing images.
A third option is to use a photo viewer. These applications are easy to use and often have basic cropping and editing features. Some good free options are:
- Irfanview for Windows (Free)
- Photos app comes built-in with the Windows operating system (Free).
- Apple Photos for Mac (Free with MacOS)
Although these tools are similar, they work in different ways. Once you choose an application, you will need to become familiar with its tools.
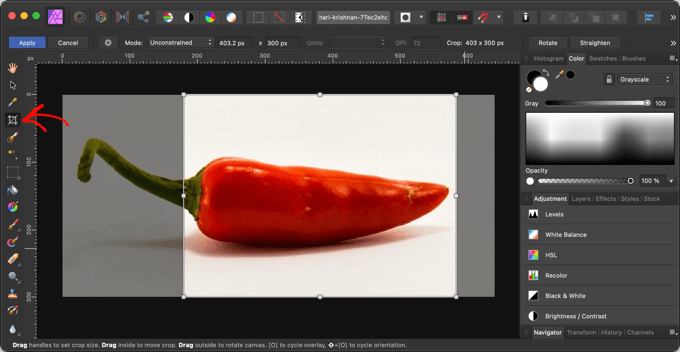
For example, here’s a screenshot of using Affinity Paint’s crop tool.
Creating Blog Post Thumbnails and Featured Images From Scratch
Many beginners struggle to find images that they can use on their blogs.
You cannot just download images from Google Search, as those images may be copyrighted, and you may be infringing the original creator’s rights.
Luckily, there are several places where you can find copyright-free images.
Once you have found an image, you can edit it on your computer to fit your theme’s featured image sizes.
Alternatively, you can also use AI tools to generate images for your blog posts and featured images.
For more details, see our pick of the best tools to create better images for your blog posts (many are free).
We hope this tutorial helped you learn how to crop and edit WordPress post thumbnails. You may also want to learn how to create a contact form in WordPress or check out our list of the best social media plugins.
If you liked this article, then please subscribe to our YouTube Channel for WordPress video tutorials. You can also find us on Twitter and Facebook.


Syed Balkhi says
Hey WPBeginner readers,
Did you know you can win exciting prizes by commenting on WPBeginner?
Every month, our top blog commenters will win HUGE rewards, including premium WordPress plugin licenses and cash prizes.
You can get more details about the contest from here.
Start sharing your thoughts below to stand a chance to win!
Javier says
It is possible to do this without a plugin?
WPBeginner Support says
If you would like to do it before you upload to WordPress, you could use an image editor such as one from our list here: https://www.wpbeginner.com/showcase/tools-to-create-better-images-for-your-blog-posts/
Admin
NIcole says
This might be so dumb but, I have a image that is showing when I type my website it is a image I use to tell possible clients I am a member of this elite group. However I would so much rather have a image I took when I type out my website. I am with word press and could use guidance please.
Rosa Bosma says
Yay! Thank you so much! This is exactly what I’ve been looking for, since yesterday. I’m very grateful – the plugin does a perfect job.
Gurpreet says
Hi,
Love that this plugin exists however, I’m still unsure how to determine how to change the image being used for the featured image on the home page.
Help?
Thank ou!!
Deb says
I downloaded, but when I crop, I’m only seeing a “crop” button; not a “crop and save” … did I miss something? (thanks in advance for whatever insight you might have.)
Donovan says
Is there any way to modify the default image size options on the plugin?
Umer says
Hi i want To Add A little image On thumbnail on top right Corner on homepage,….
can you help me..