
When readers kept asking us how we learned WordPress, we realized that we needed a better way to share our knowledge beyond just blog posts. That’s why we created WPBeginner’s free video course website – to help people learn WordPress step by step.
Creating that first course taught us something important: you don’t need expensive platforms or technical skills to build a successful online course. With the right WordPress tools and strategy, anyone can do it.
We’ve spent years testing different course creation methods and helping other business owners launch their own courses. Today, we’ll walk you through the exact process we use at WPBeginner to create engaging online courses that students love.

Why Use WordPress to Create Your Online Courses?
We’ve launched several online courses, and choosing the right platform has been a key factor in their success.
A good platform needs to be flexible, affordable, and offer plenty of support. After trying different online course platforms, we highly recommend WordPress, combined with the MemberPress plugin, as our go-to solution.
Here’s why:
- Complete Control: WordPress gives you full control over your course website’s design, branding, pricing, and payment options. This allows you to tailor the learning experience to your students’ needs.
- Own Your Content: You keep ownership of your course content and student data, unlike some platforms that have restrictions or revenue sharing.
- Cost-Effective: While there are initial costs like hosting and a domain name, WordPress avoids ongoing platform fees, making it more affordable in the long run.
- MemberPress Integration: The MemberPress plugin seamlessly integrates with WordPress to provide all the tools you need for selling courses, managing memberships, and protecting your content.
- Supportive Community: Both WordPress and MemberPress have large, helpful communities that offer resources and support when you need them.
In the tutorial below, we’ll explain how we use WordPress and MemberPress to create our online courses. You’ll see how easy it is to get your own course up and running.
What Do You Need to Create / Sell an Online Course?
You will need the following things to create an online course:
- A course idea (something you’re passionate about teaching!)
- A domain name. This will be your website’s address (For example, wpbeginner.com).
- A WordPress hosting account. This is where your website’s files are stored.
- An eLearning management addon (also known as an LMS plugin) to create and manage courses.
- Your undivided attention for the next 45 minutes.
You can build an online course with WordPress in less than an hour, and we will walk you through the process. Here’s a quick overview of all the steps we will cover to help you create an online course with WordPress:
- Step 1: Setting Up Your WordPress Website
- Step 2: Installing and Setting Up the MemberPress Plugin
- Step 3: Creating Your First Online Course
- Step 4: Developing Your Course's Sections and Lessons
- Step 5: Adding Quizzes to Your Lessons
- Step 6: Enabling Project Assignments in Your Course
- Step 7: Uploading Extra Resources to Your Courses
- Step 8: Configuring the Course Certificate Settings
- Step 9: Tracking Students' Performances Using Gradebook
- Step 10: Creating Course Membership Subscriptions
- Step 11: Restricting Course Access to Membership Plans
- Step 12: Adding a Link to the Course Signup and Register Page
- Step 13: Previewing & Customizing Your Online Course
- Step 14: Selling Your Online Course With More Powerful Features
- Step 15: Promoting Your Online Course
- Frequently Asked Questions About Creating an Online Course (FAQs)
- Video Tutorial
Step 1: Setting Up Your WordPress Website
There are plenty of website builders and online course platforms that you can use to build your own website.
However, we recommend WordPress because it offers you maximum flexibility and freedom. We use WordPress for all our websites, including our free WordPress training course site.
There are two types of WordPress, and beginners often end up confusing them.
First, there is WordPress.com, a hosting service, and then there is the original WordPress.org, also known as self-hosted WordPress. See our guide on the difference between WordPress.com and WordPress.org.
We recommend using WordPress.org because it gives you access to all the WordPress features that you’ll need.
To start a self-hosted WordPress.org website, you’ll need a domain name ($14.99 / year), WordPress hosting ($7.99 / month), and an SSL certificate to accept online payments ($69.99 / year).
This is quite a lot of startup money.
Luckily, Bluehost, an officially recommended WordPress hosting provider, has agreed to offer our users a free domain name, a free SSL certificate, and a huge discount on web hosting.
Basically, you can get started for $2.99 per month.

We’ve used Bluehost to host several of our websites over the years, and we’ve always had a great experience. For details, see our Bluehost review.
Need more hosting suggestions? We also recommend Hostinger. They offer a discounted price for WPBeginner readers with a free domain and SSL. Alternatively, you can look at our pick of the best WordPress hosting companies.
After purchasing hosting, just head over to our guide on how to create a WordPress website for step-by-step setup instructions.
Step 2: Installing and Setting Up the MemberPress Plugin
Now that your WordPress website is ready, it’s time to set up a Learning Management System (LMS). This will allow you to create and add your online course to your website.
MemberPress is the best LMS plugin for WordPress. It is an all-in-one solution with complete course management, lesson plans, subscriptions, access control, payment management, and more.
We use it ourselves on our free WordPress video courses, and you can read about our experience with it in our MemberPress review.
First, let’s sign up for a MemberPress account by clicking the ‘Get MemberPress for WordPress’ button on the MemberPress website.

On the next screen, you’ll see MemberPress plans.
You can just go ahead and choose a plan that suits your needs. For example, here, we’ll select the Pro plan to unlock all the LMS features, including quizzes, certificates, and the gradebooks feature.

After that, you can simply follow the process by filling out your information and making the payment.
With that done, you’ll have a My Account page. This is where you can find the MemberPress .zip file and license key, along with all your plan details.

From here, you can install and activate the MemberPress plugin. For more details, see our step-by-step guide on how to install a WordPress plugin.
Course creators around the world use MemberPress to create profitable courses and earn over $400 million every year.
Upon activation, you need to visit the MemberPress » Settings page to enter your license key. You can find this information in your account on the MemberPress website.

Once you have entered the information, click the ‘Activate License Key’ button to store your settings.
Next, you need to switch to the ‘Payments’ tab and click the ‘+’ add button to set up a payment gateway.

MemberPress supports PayPal and Stripe (Authorize.net support is included in the Pro and Plus plans).
Simply select your payment gateway and then fill in the required information. You can also set up multiple payment methods by clicking on the ‘+’ button again and repeating the process.
Don’t forget to click on the ‘Update Options’ button to save your payment settings.
Step 3: Creating Your First Online Course
The course creation process in MemberPress makes it super easy to create and manage online courses. It comes with a very easy-to-use course builder that allows you to create courses, add sections, edit lessons, and more.
First, you need to visit the MemberPress » Courses page, where you’ll see a button to install and activate the Courses addon.

Clicking on it will automatically install and activate the MemberPress Courses addon. Depending on your plan, it may also include the Quizzes, Assignments, and Gradebook addons.
Upon installation, you’ll then be redirected to the courses page.

Click the ‘Add New’ button at the top to create your first course.
This will launch the MemberPress course builder screen.

First, you’ll see the ‘Course Page’ where you need to provide a course topic, title, and description.
MemberPress course builder uses the default WordPress block editor, so you can get creative and make an impressive course page layout.
You can also add ‘Course Categories’ and ‘Course Tags,’ set a featured image, and provide a course page excerpt under the course page settings.

Step 4: Developing Your Course’s Sections and Lessons
MemberPress also makes it easy to quickly start adding content for each course without switching to a different page.
Simply switch to the ‘Curriculum’ tab and click on the ‘Add Section’ button to create your course outline.
A section is like a course module for your new course; you can include multiple sections or modules in your course.

You need to provide a title for a section.
After that, click on the ‘Add Lesson’ button under the section to add lessons.

Simply enter a title for your lesson to add it.
After adding a lesson, you can start adding lesson content by clicking on the edit button next to each lesson.

You will now be asked to save your changes.
After that, your lesson will open up with the familiar block editor screen.

You can add your lesson content here with the full advantage of the block editor.
This allows you to upload images, embed video content, add text, and offer downloadable digital products such as PowerPoint presentations, PDF eBooks, actionable worksheets, checklists, and other course materials.
The goal here is to make your course interactive. You can use some of this content later in your content marketing efforts or on social digital marketing platforms like Instagram, YouTube, and TikTok.
Don’t forget to click on the ‘Update’ button to save your lesson.
You can return to the Course by clicking on the ‘Back’ link at the top of the editor.

Repeat the process to add more lessons to your course.
Once you have finished adding course content, remember to click the ‘Publish’ button to make your course accessible to eligible users.
Step 5: Adding Quizzes to Your Lessons
MemberPress also allows you to add quizzes to your lessons.
Go back to edit your course, and then switch to the Curriculum tab. From here, you can click on the ‘Add Quiz’ option below any lesson or section.

Next, give your quiz a name.
After that, click on the edit button next to the quiz to edit and add questions.

This will bring you to the Quiz Builder page.
Add any of the Quiz Questions blocks to the Quiz builder and then enter the questions and their answers (depending on which type of question you ask).
MemberPress Course will also force you to indicate the correct answer by selecting it.

You can now check out the quiz settings on the right panel. Here, you can set up:
- The passing score. Feel free to define the minimum score users need to pass, making the quiz as easy or challenging as you like.
- A custom failed attempt message. Add a personalized message to guide or encourage users who don’t pass.
- Retake options. You can allow users to retake the quiz and set limits on the number of attempts if needed.

Once satisfied with the quiz, simply click ‘Update’ to save your changes.
Require Users to Take The Quiz Before The Next Lesson
You made it a requirement for users to take the quiz before they can move to the next section or lesson.
To make sure of this, you need to go to the course’s ‘Settings’ tab.
From here, let’s check if the switch next to the ‘Require Previous Lesson/Quiz’ option is enabled.

Step 6: Enabling Project Assignments in Your Course
With the Assignments addon, you can easily assign tasks and let students submit their work directly through your course. It supports file uploads and link sharing, making it perfect for multimedia projects.
To add an assignment to a lesson, you can click on the ‘Add Assignments…’ link on the course builder and give it a name.
After that, hover over the assignment title and click the ‘Edit’ icon.

This will open the assignment editor screen.
Here, you’ll see that MemberPress Assignments allows students to upload files or share links from the web, such as Google Docs, Dropbox, and more.
🧑💻 Pro Tip: You can mix media types for more engaging project submissions!

You can write a short description to explain the assignment’s purpose and what’s expected.
Additionally, you can add simple instructions to make everything clearer.

Once done customizing, don’t forget to click the ‘Save’ button to keep your changes.
Step 7: Uploading Extra Resources to Your Courses
Next up, you can add extra resources if needed.
On the course builder, let’s switch to the ‘Resources’ tab to add learning materials. Here, you can easily upload downloadable files such as PDFs, worksheets, or slideshows that your students can access.
Simply click on the ‘Add Media’ section in ‘Download’ to start uploading your files.
Then, you can also insert links to external resources or websites that complement your course content. Go ahead and click ‘Add Link’ under ‘Links’ to do this.

Additionally, if you prefer, you can add text-based materials directly in the text editor.
This allows you to provide written instructions, lesson notes, or explanations directly within the course page, giving your students a seamless learning experience without having to leave the platform.
Step 8: Configuring the Course Certificate Settings
Finally, if you’d like to offer certificates, you can easily enable them in the ‘Certificates’ tab and customize the options.

MemberPress Courses lets you choose between 2 certificate paper sizes: A4 and Letter. You also get 3 different certificate designs to choose from, so you can pick the style that fits your course.
Then, you can make the certificate more personal by adding your logo at the top, a logo at the bottom, and even the instructor’s signature. Plus, you can edit the certificate text, including the title and footer message, to make it feel more unique.

You can also add a completion date and set an expiration date for the certificate at the bottom. So, students know how long it’s valid.
This gives you the ability to create a professional, customized certificate for your learners.

Once everything is set, click ‘Publish’ to make your course live.
Step 9: Tracking Students’ Performances Using Gradebook
Once everything is in place, it’s time to enable grade tracking for your online course.
The MemberPress Gradebook addon makes it easy to monitor how students are doing. It automatically pulls in scores from quizzes and assignments, giving you a centralized view of each student’s performance, all tied to individual courses.
To track students’ performance, go to MP Courses » Gradebook in your admin area. On the next screen, you can view grades by course and keep everything organized in one place.

Step 10: Creating Course Membership Subscriptions
MemberPress allows you to easily sell online courses with subscription plans. You can create as many membership plans as you like, and users can select a plan to pay for your online course.
You can also sell all your courses under a single membership, offer free courses, or add different courses for each plan. It depends on how you plan to structure your sales funnel.
A lot of people use a combination of free courses and paid courses to build their audience and maximize passive income.
To add a membership, go to the MemberPress » Memberships page and click on the ‘Add New’ button.

Next, you will reach the ‘Add New Membership’ page.
From here, you first need to provide a title for this membership plan and then add a description.

After that, you can enter the membership pricing under the ‘Membership Terms’ box on the right. You can also choose the access duration from lifetime, expire (recurring), or fixed expire.
This will be your course price or the price users will pay to take one or more courses from your website.
To create a profitable online course, you need to choose a pricing strategy that helps you grow your business and is attractive to the learners as well.
Next, you need to scroll down to the Membership Options section.
This is where you can configure advanced membership options, such as a sign-up button, welcome email, pricing box, and more.

Once you are finished, you can click on the ‘Publish’ button to save your changes.
Just repeat the process if you need to create more membership plans.
Step 11: Restricting Course Access to Membership Plans
The best thing about using MemberPress is its powerful access control rules. They allow you to decide who gets access to your online course.
Simply go to the MemberPress » Rules page and click on the ‘Add New’ button.

This will bring you to the Rule Wizard page.
First, select the content you want to protect under the ‘Protected’ content section.

For instance, here, we have chosen a single course under the protected content.
Below, you need to select the conditions that need to be matched for users to access that content. For instance, we have chosen our membership plan here.
Don’t forget to click the ‘Save Rule’ button to save your settings.
Step 12: Adding a Link to the Course Signup and Register Page
MemberPress makes it easy to send users to the page where they can register and sign up for your course by purchasing a membership plan.
It automatically generates a link for each membership plan that you can add anywhere on your site.
Simply edit a membership plan, and you’ll see the link below the membership title. You can also manually type in your domain name, followed by /register/your-membership-title/

You can add this link anywhere on your website in a post, page, or navigation menu.
It will take users to the registration page.

You can even share this link on your sales pages, webinars, podcasts, Facebook groups, social media, and other traffic channels.
🧑💻 Pro Tip: We recommend using PrettyLinks to create memorable short links to share in podcasts, webinars, and social media.
Step 13: Previewing & Customizing Your Online Course
MemberPress allows you to use the classroom mode by default, which means your course pages and content will always look good regardless of which WordPress theme you use.
You can go to view a course by visiting:
https://example.com/courses/
Don’t forget to replace example.com with your domain name.
You’ll see all your courses listed there. You can click on the ‘Preview as’ menu to see how it would look to logged-out users.

Clicking on a course will open the course, and you will be able to see the course overview, sections, and lessons.
It is super easy to navigate and keeps track of users’ progress so they can continue where they left off.

You can also customize the course page templates by visiting the Appearance » Customize page.
Then, you can just click on the ‘MemberPress Classroom’ tab.

Here, you can upload your brand logo and change colors to match the rest of your website.
Don’t forget to click the ‘Publish’ button to save your changes.
Step 14: Selling Your Online Course With More Powerful Features
One of the biggest advantages of using WordPress and MemberPress is that you can expand your course site with tools that boost sales and engagement. Let’s explore a few ways you can do that using plugins.
Create a Student Community With BuddyBoss
Want to build a learning community around your course? You can use BuddyBoss to add a members-only forum, discussion threads, private messaging, and social networking features — all in one platform.
We’ve explored all of its features, which you can check out in our full BuddyBoss review.

This helps learners share progress, ask questions, and stay engaged outside of lessons. You can even gamify your forum with badges and achievements!
For step-by-step instructions, please see our guide on how to create a private community in WordPress.
🔗 Alternative: You can also spark student engagement by adding an online forum where users can connect and share their learning experiences. See our article on how to add a forum in WordPress for details.
Sell Physical Products With WooCommerce
If you want to offer merch, books, or physical resources alongside your course, you can install WooCommerce. It’s the most popular eCommerce plugin for WordPress and works great with MemberPress.
You’ll be able to:
- Set up a full-featured store
- Manage inventory and orders
- Accept multiple payment methods
For details, you can refer to our ultimate WooCommerce guide.
Add Live Chat Support to Increase Conversions
Want to answer questions from potential students in real time? You can add a live chat plugin like LiveChat or Tidio to your site.
This gives visitors an easy way to ask questions before enrolling, which can help you close more sales.

Live chat not only helps you convert more visitors into paying students. It’s also a handy tool for supporting enrolled learners who may have quick questions during the course.
If you need help setting it up, you can see our guide on how to add LiveChat to WordPress sites.
Step 15: Promoting Your Online Course
The other advantage of the WordPress + MemberPress combo is that it also makes promoting your online course easier.
You can use third-party integrations and marketing tools to boost your marketing efforts.
Let’s examine a few ways to promote your online course, attract your target audience, and make it successful.
1. Create Landing Pages for Your Online Courses
Your WordPress theme would help you create a highly engaging website. However, you may need to quickly create landing pages to describe course details, showcase instructors, show testimonials, highlight special offers, etc.
Custom landing pages and sales pages are proven to increase course sales.
They can be in-depth, breaking down learning objectives, or simpler, highlighting advantages for potential customers.
We recommend using SeedProd, which we also use across our brand site.
It’s the best WordPress page builder and allows you to create professional landing page layouts without writing any code. You can read our complete SeedProd review for more information on our experience with it.

For detailed instructions, see our guide on how to create a custom page in WordPress.
2. Learn the SEO Basics
Search engines are the #1 traffic source for most websites on the internet. This is why you’ll need to learn how to make your online course website rank higher in search engines.
With the help of WordPress plugins and some basic SEO best practices, you’ll be easily able to compete with the big guys.
If you’re curious about what tool we use, it’s All in One SEO (AIOSEO).
We use it for various SEO tasks, including managing XML sitemaps, on-page SEO like meta descriptions and title tags, and the OpenGraph settings for Facebook and X. Feel free to check out our full AIOSEO review for details.

And to learn more about SEO, you can see our complete WordPress SEO guide for beginners with step-by-step instructions.
3. Track Marketing Data
A lot of beginners develop their marketing strategy based on guesswork. You don’t have to do that when you can get actual data to make informed decisions.
You’ll need MonsterInsights for that. It’s the best analytics solution out there, and is used by more than 3 million websites, including us!
At WPBeginner, in addition to collecting general website statistics, we use it to track conversions on our forms, CTA buttons, marketing campaigns, and referral links, among other things.
Get more information about it in our extensive MonsterInsights review!

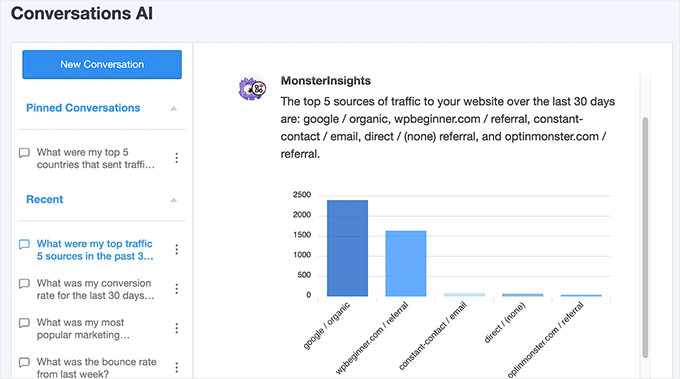
MonsterInsights brings your Google Analytics data directly into your WordPress dashboard and presents it in clear, easy-to-understand reports.
You can instantly see where your visitors come from, what actions they take on your site, your top-performing pages, and much more. With this data at your fingertips, you can make smart improvements to increase conversions and grow your sales.
Now, with MonsterInsights Conversations AI, accessing your Google Analytics data is easier than ever.
This AI-powered tool lets you interact with your analytics by asking simple questions. So, there’s no need to navigate through multiple reports. You can ask Conversations AI about user behavior, traffic trends, or conversion rates and get relevant insights quickly.
4. Start Building an Email List
After a while, you will notice that most visitors who visit your website don’t sign up for your online course. The problem is that you cannot reach out to those users once they leave your website.
To address this, you need to start an email newsletter. This will allow you to collect email addresses, reach out to users, and bring them back to your website.
We recommend using Constant Contact, Brevo, or HubSpot for email marketing.
If you are looking for alternatives, then see our comparison of the best email marketing services.
5. Convert Website Visitors into Subscribers and Customers
Most visitors to your website will leave without enrolling in your online course. This is why converting those abandoning visitors into subscribers or paying customers is important.
This is called conversion optimization.
The best tool for the job is OptinMonster. It’s the best conversion optimization software on the market and helps you grow your business with more leads and sales.
We it ourselves on our site to promote special offers using popups, slide-ins, and header banners. So, we’re confident in recommending it. You can also get more details on this software on our OptinMonster review.

Additionally, OptinMonster includes tools you will need to upsell, cross-sell, generate lead magnets, and nudge users into signing up. For more details, see our guide on how to convert website visitors into customers.
Need even more tools? Then, you can go through our complete list of the best tools to grow your WordPress website like a pro.
Frequently Asked Questions About Creating an Online Course (FAQs)
Over the last 14 years, we have helped thousands of entrepreneurs create their online courses. Below are the answers to the most frequently asked questions about creating an online course.
How can I create high-quality videos for my course?
If you want to take your video quality up a notch, we recommend:
- 🎥 Sony Alpha ZV-E10 – Our video team’s top pick for course creators. It offers sharp autofocus, 4K recording, and no time limits — perfect for high-quality lessons or tutorials. You can even use it as a plug-and-play webcam via USB-C.
- 🎤 Hollyland Lark M1 – A budget-friendly wireless microphone with noise cancellation. It ensures crystal-clear sound and works with most cameras and smartphones. Great for both solo teachers and co-hosted sessions.
- 💻 Camtasia – One of the best video editors for educators. It’s beginner-friendly yet packed with powerful features like screen recording, animations, and interactive quizzes. It even includes AI tools to speed up your workflow.
Can I use other online learning platforms with WordPress?
There are many online course platforms that you can use to build and sell courses.
These include Teachable, Thinkific, Kajabi, Udemy, Skillshare, LinkedIn Learning, and more.
You can use any of them alongside your WordPress website. Depending on your needs, these platforms may offer an easier online course creation solution.
However, they’re generally more expensive and/or take a revenue share from your course sales.
Which is the best webinar platform for course creators?
Nothing beats live webinars when it comes to online education. You can use it to boost your audience engagement and improve membership retention.
We have compared the best webinar platforms here.
Most of these solutions will let you create live webinars and automated evergreen webinars, and come up with tons of webinar engagement features.
Video Tutorial
Before you go, be sure to watch our video tutorial on how to create and sell online courses.
We hope this article helped you easily create a successful online course in WordPress. You may also want to see our guide on how to offer WordPress group learning and our expert picks of the best WordPress LMS plugins compared.
If you liked this article, then please subscribe to our YouTube Channel for WordPress video tutorials. You can also find us on Twitter and Facebook.

")
")

Moinuddin Waheed
Online courses are one of the best ways to monetize ones expertise online.
Earlier it used to be tough task getting large users base.
But thanks to the powerful features rich plugins that has made the task of creating online courses and smooth experience.
I am using memberpress for quite some time and I can’t emphasise enough of usability of this plugin.
Memberpress has all the features to make any kind of subscription based website where you can create content and give access to according to different plans and rules.
I would highly recommend for anyone who wish to create courses.
Mrteesurez
Also, concerning validating idea, I want to try asking my audience directly which course or content they wish I should create for. I want to make it an open conversation in a group.
Does this make sense ??
Thanks
WPBeginner Support
For what you want you have a few options, we would recommend taking a look at our article below:
https://www.wpbeginner.com/plugins/how-to-create-a-survey-in-wordpress-with-beautiful-reports/
Admin
Mrteesurez
Thanks for the recommendation, I have checked the guide you shared and I found it better to create a survey for it. I initially used WhatsApp group but had little engagement. thanks for your guidance.
odeta bruce
wat i am doing wrong. watch video twice now. and did it twice now but when i am trying to add rule and choose a single course it is saying There is not yet any content to select for this rule type.
WPBeginner Support
If you haven’t done so already, publish the course so it is not a draft to see if that is the reason you are unable to select it.
Admin
Nicole
Hi! Do you know a way to have an application process for a course on Wordpress course so people apply before they do anything like pay? Thank you so much!
WPBeginner Support
For what it sounds like you’re wanting, you would not add a page to your navigation for purchasing your plans and have a contact form for users to request to be a part of your courses.
Admin
Dashen
Good day. I am not a course creator. How ever I would like to build a website and lms that where I can link pre built courses from another otganisation that sells these courses. Is it possible.
WPBeginner Support
You certainly can, you shouldn’t need a plugin to do that either
Admin
Pat
Please I would like to know if it is advisable I create the course in the same place as my blog or should I create a subdirectory for it?
WPBeginner Support
That heavily depends on how your content is organized and your personal preference, there is no wrong answer as to if you should or should not place the content on your primary domain or a subdomain.
Admin
Ben
Do I need a special hosting service to hold the big video files and to support larger amount of traffic?
Thanks.
WPBeginner Support
It would depend on how much traffic you’re getting on your site but you can embed videos from another site.
Admin
Mike
I have a Wordpress art website and want to produce an online course as part of an art consulting business. Would it be best to just add the LearnDash Plug in to my current website or should a completely new website be built? Or would a sub account be sufficient?
WPBeginner Support
That would be a question of personal preference, you can do any of those options.
Admin
Nona
Can’t find LearnDash in the Plugin area of Wordpress. Does one have to pay for the subscription via the LearnDash website prior to getting a direct link?
WPBeginner Support
Yes, you would need to purchase the plugin before you can download it from their site.
Admin
Ahmed Ali
is this plugin and theme support RTL Arabic?
WPBeginner Support
You would need to reach out to the plugin’s support for what they currently support for languages.
Admin
Nora
This is great info! I already have a domain and website with a different theme. Can I use the same domain for making a course just change the theme to astra? Or should I get a new domain/host for this course?
WPBeginner Support
You can use your existing site or if you wanted to test you can look at our guide below for how to create a staging site:
https://www.wpbeginner.com/wp-tutorials/how-to-create-staging-environment-for-a-wordpress-site/
Admin
Blessing
What is the approximate cost for all this
WPBeginner Support
For finding the cost of creating a site you would want to take a look at our article below:
https://www.wpbeginner.com/beginners-guide/how-much-does-it-cost-to-build-a-wordpress-website/
Admin
Dorothy
Hi,
I am a yoga teacher and want to start offering paid online classes. I have an already established website for my yoga retreats and community classes. Do you think the above info applies to me? Or is there something else you would suggest?
Look forward to hearing from you.
Dorothy
WPBeginner Support
You can use our guide to add courses to your site if you wanted.
Admin
Malik
i have a website set up already, Can I add my courses on a learn page with LMS plugin? only available to those who have bought my course?
WPBeginner Support
You could certainly do that should you want to
Admin
Omolara
This is awesome. Thank you. All these are just giving me ideas on how to build my website for maximum value adding.
Thank you so much.
WPBeginner Support
You’re welcome, glad our guide was helpful
Admin
Gideon Manuel
You did not explain the instructor setup aspect for aspiring instructors for LMS website
WPBeginner Support
There are many different ways to set up the courses depending on the end goal but thank you for your feedback.
Admin
Debe
Looking forward to learning this. Thanks so much.
WPBeginner Support
You’re welcome
Admin
Janice Morris-Harvey
This post has been very informative as well as inspiring for me, I have all intentions of getting started as soon as possible. Absolutely great article…
WPBeginner Support
Glad you found our guide helpful
Admin
Joshua
Very detailed information… I really love this
WPBeginner Support
Thank you, glad you like our content
Admin
kelvin Clint Quinto
I’m currently creating my own online course on wordpress and this post is a big help! Thank’s a lot!
WPBeginner Support
You’re welcome
Admin
mbretitregut
Amazing step by step article.
I am finishing my course website, so this came just in time to check if I’ve set up everything.
WPBeginner Support
Glad you liked our article
Admin
Samantha
Thank you for this it’s exactly what I’ve been looking for as this is next on my to do list.
WPBeginner Support
You’re welcome
Admin
Les
Thanks for this information. I’m not doing classes yet, but it’s something I’m considering. Very informative!
WPBeginner Support
Glad you liked our article
Admin
Sunjay
Thanks for providing this awesome article with us. You are always helping people. Best of luck
WPBeginner Support
Glad you like our article
Admin
Treasure
How do I get the learnDash LMS licence key
WPBeginner Support
You would need to log in to LearnDash’s website with your information or they should have also sent you an email with your purchase
Admin
Amara Aniche
Nice post. Keep up the good work.
However, I noticed you didn’t mention theme installation or is not needed with learndash?
WPBeginner Support
We did not include setting up a theme to keep the article a manageable length. You would need a theme for your WordPress site.
Admin
Ljubomir
I’d like to create this type of website for my friend. It will be online course with video tutorials. How to avoid server storage and bandwidth problem? He have 100GB of video material for course.
WPBeginner Support
We do not recommend uploading videos to your site at the moment. Our recommendations for this can be found here: https://www.wpbeginner.com/beginners-guide/why-you-should-never-upload-a-video-to-wordpress/
Admin
Benjamin Bulus Kugong
Wow! I’m building a site and want to have “online courses” featured in the site. I was thinking of how to go about it but, THANKS FOR THIS!!!
IT’S AWESOME.
WPBeginner Support
You’re welcome, glad our guide was helpful
Admin
cai
really great useful information. i have a question. do i start to creat the courses first or write blog to attact visitors first ? i am worried if i finish the courses first, there is no any traffic to buy. it is also easy to have visitors with free learning knowlage in blogging articles. wait your reply.
WPBeginner Support
That would be a personal choice question rather than a which is best question.
Admin
Savannah Taylor
Can I use the payment option on video course, or is this just for a written course?
WPBeginner Support
You can use the option for a video course as well
Admin
Dennis Campbell
Can I use voiced over power points as part of the lesson with learn dash
WPBeginner Support
It should be able to but you would want to reach out to learndash’s support for specific files and if you can use them
Admin
Rachael
Is it possible to install LearnDash on a website sub-domain only so that people can still access your main business/sales website as usual, but they can navigate to a specific sub-domain for the training and then need to login to access the course content once they have navigated to the subdomain eg. mainwebsite.com/training ?? OR are we better off to set up LearnDash on a separate website dedicated to the training??
WPBeginner Support
The plugin should be able to work on a subdomain if you wanted it to, it would be personal preference for how you set it up.
Admin
Jovani etienne
Can learndash be used to build a udemy-like or eduonix-like website? With all the functionalities?
I am a web developer and want to build such a website with lme
WPBeginner Support
If there is a specific feature you’re wanting similar to those sites, you would want to reach out to LearnDash directly for what is available.
Admin
Sam k
Thanks! Super helpful article. I’m currently building an online course site with wordpress, divi, and Learndash. I have two questions!
1) I’ve signed up on mailchimp. Is it a good alternative to convert kit?
2) I am super worried about the thought of the website crashing at some point once I launch it. Cause users will be interacting with the site at all times once they enroll. Are crashes common? I have very little knowledge of web dev and just learning as I go, so I wouldn’t know what to do in case of a crash. Just keen to hear your thoughts
WPBeginner Support
Depending on your needs MailChimp is a good alternative. Website crashes are not normally common and you can create backups of your site for safety in case one does happen.
Admin
David Glabais
Nice post guys. Greatly appreciated the info. I’ve been looking at different ways to incorporate an online store for my lesson content as courses and for the interactive epubs, Pdf’s, audio podcasts and video content I’m currently building. There’s a lot to learn for sure and a ton of options. I have a great WP website which I built and now I’m onto tackling the online sales. Cheers my WP Gurus.
WPBeginner Support
Thank you, glad our guide could help get you started
Admin
Ige
Nice post, thanks.
WPBeginner Support
Glad you liked our post
Admin
Suzie Wayne
Thanks for your useful lesson! I can follow the screenshots and take action easily.
I’m about to create an online course for my product. Are there any other great plugins to create courses, apart from LearnDash LMS? I want to have multiple options to compare and choose from.
WPBeginner Support
There are a few options available depending on your needs, we have a list of other options that you can take a look at here: https://www.wpbeginner.com/plugins/best-wordpress-lms-plugins-compared/
Admin
Duncan McCormack
Can you run LearnDash for free?
WPBeginner Support
At the moment, LearnDash is not free
Admin
Corey wilkinson
Thank you for this lesson on how to start on online course. It was very informative and helpful. I was thinking about doing this and didnt know how to start. I saw the email in my inbox and I’m very glad you sent it to me. Thanks again
WPBeginner Support
You’re welcome, glad our content could be helpful
Admin
Dilpreet Singh
nice post thank you!
WPBeginner Support
You’re welcome
Admin