Do you want to create an online poll on your WordPress site?
Polls are an interactive way to engage your audience while getting useful information from them. You can get feedback from your users and find out what they like.
In this article, we will show you how to easily create and add a poll in your WordPress.
Which Tool to Choose for Adding a Poll in WordPress?
Adding interactive polls to your website is a great way to engage users, as they instantly grab their attention. You can generate leads using polls and collect valuable feedback from your audience at the same time.
That said, there are plenty of plugins and online tools that allow you to embed polls on your WordPress site. Many of them require you to create an account, some store data on their own servers, and others have a terrible user experience.
If you are looking for a good user experience with full control of poll data, then you’ll need WPForms. It is the best WordPress form builder plugin and includes powerful surveys and polls addon.
With WPForms, you’ll be able to do the following:
- Create polls in WordPress using a drag-and-drop form builder
- Gather poll results on your own websites
- Show votes count when user submit their vote
- Display poll anywhere on your website
- Show poll results anywhere on your website
With that, let’s look at how to easily create online polls in WordPress using WPForms.
Creating Online Polls in WordPress
The first thing you need to do is install and activate the WPForms plugin. For more details, see our step-by-step guide on how to install a WordPress plugin.
You will need the WPForms Pro plan because it includes the survey and polls addon. WPBeginner users get an additional discount by using the WPForms coupon code. There is also a WPForms Lite version you can try for free.
Upon activation, you need to visit the WPForms » Settings page to enter your license key. You can find this information in your WPForms account.
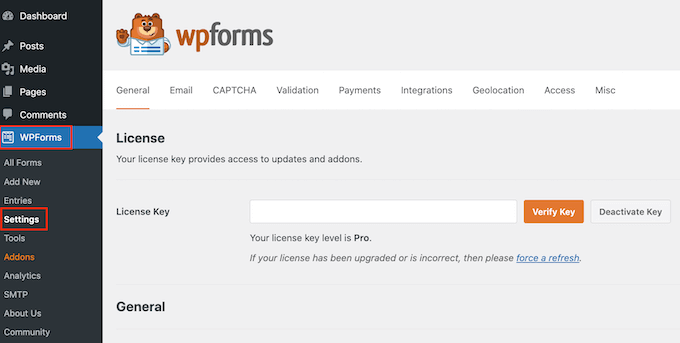
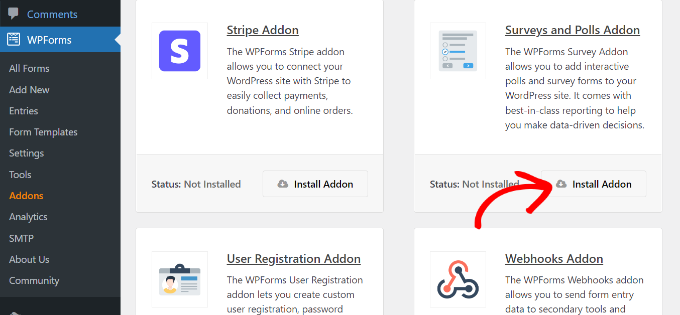
Next, you need to visit the WPForms » Addons page and scroll down to the Surveys and Polls addon.
Go ahead and click on the ‘Install’ addon button.
Now, you are ready to create an online poll.
You can start by going to WPForms » Add New page to create a new form. First, you need to provide a title for your poll form and then select the ‘Poll Form’ template.
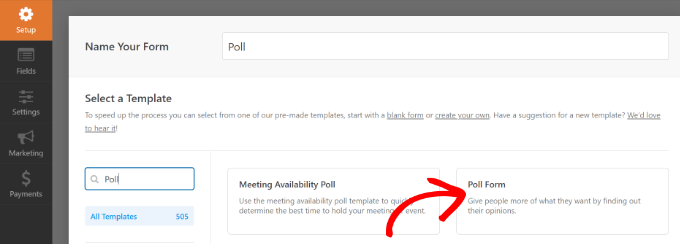
This will launch the WPForms drag-and-drop form builder interface.
You will see a pre-made poll form template with example fields already added to the form.
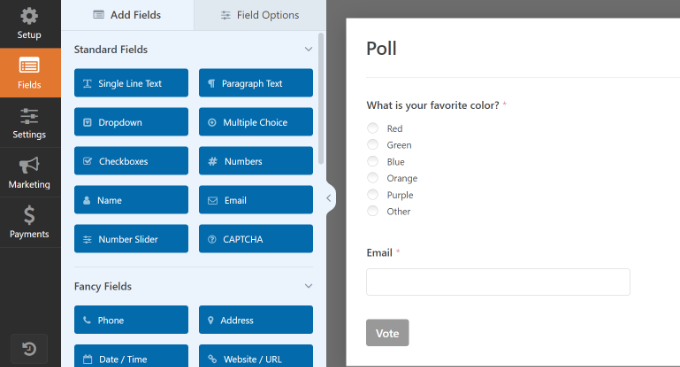
There are options to add new form fields from the left column. All you have to do is drag and drop the field you’d like to add to the form.
Besides that, you can just point and click to edit any field, rearrange them, or remove them.
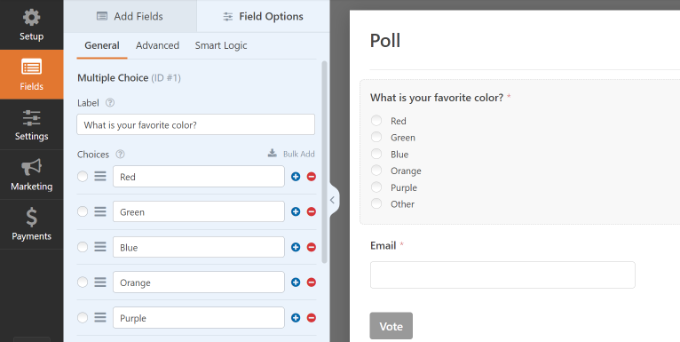
For example, if you click the poll question in the template, then you will see more options in the menu on your left. Simply rearrange the order, and edit their titles, labels, and more.
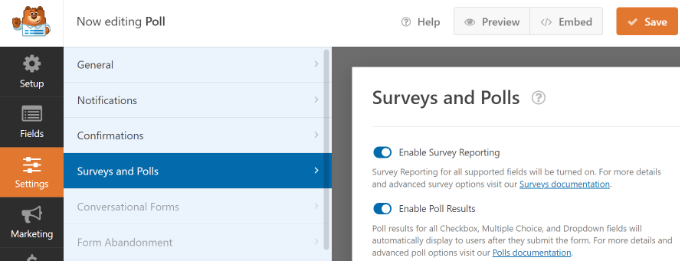
Next, you need to click on the Settings button from the left menu and then go to the ‘Surveys and Polls’ tab. Here you can enable or disable the poll results option.
By default, the WPForms poll template will display poll results to users after they submit their votes. If you disable this option, then users will not see the poll results.
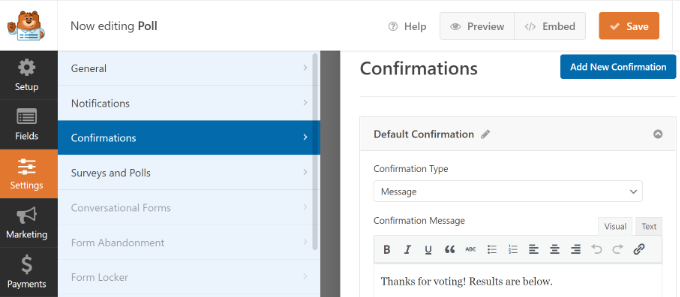
On the other hand, you can show users a custom message or redirect them to another page or URL.
Simply go to the ‘Confirmation’ tab. Here, you can choose the Confirmation Type from the dropdown menu.
Once you have created the poll form, go ahead and click on the ‘Save’ button to store your form settings.
Adding The Poll to Your WordPress Website
WPForms makes it easy to add your online poll anywhere on your website, including posts, pages, custom post types, and sidebar widgets.
You can click the ‘Embed’ button in the form builder to add your poll form. Once you do that, a new popup window will open. You can select an existing page or create a new one to embed your form.
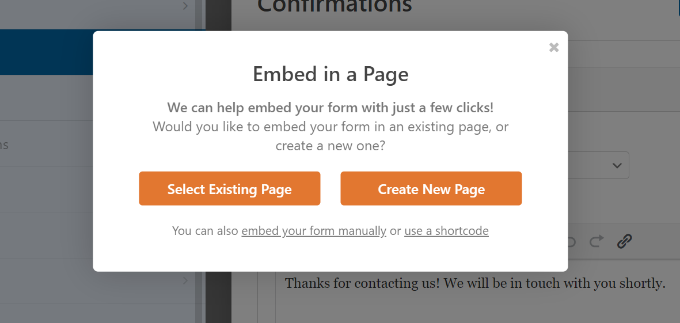
Let’s select the ‘Create New Page’ button for this tutorial.
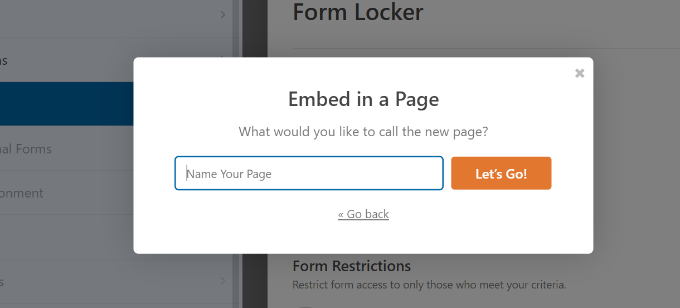
In the next step, you’ll need to enter a name for your page. After that, you can click the ‘Let’s Go’ button.
You should now see your poll form embedded in the WordPress content editor.
Another way of adding your form is by using the WPForms block. Simply click the ‘+’ button to add the WPForms and select your form from the dropdown menu.
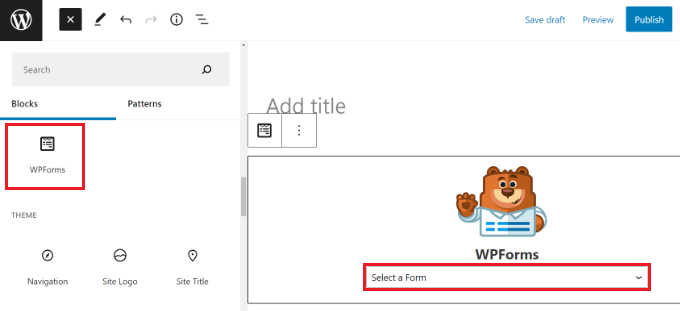
Next, you’ll see a preview of your form.
You can save or publish your post/page and visit your website to see your poll in action.
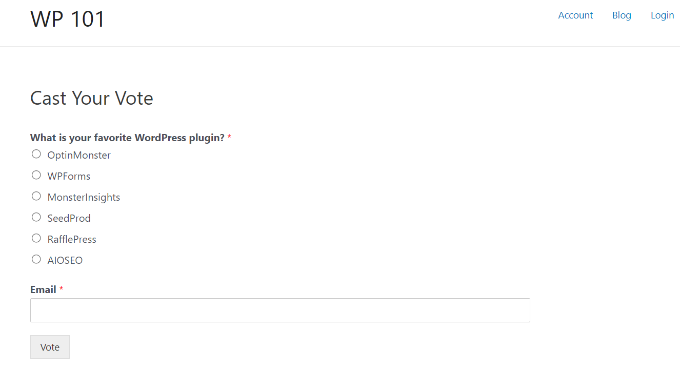
You can also add your poll to a sidebar or widget-ready area.
To do that, you need to go to the Appearance » Widgets page and add the WPForms widget block to a sidebar where you want to display the poll.
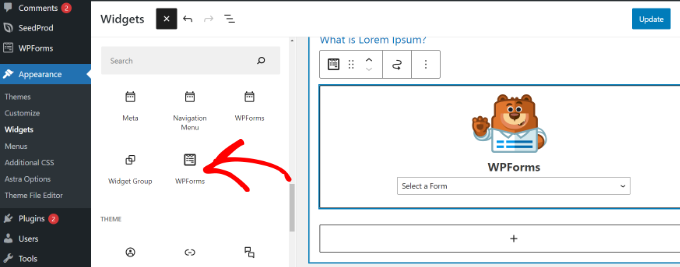
In the WPForms widget block, you need to select the poll form you created earlier.
Don’t forget to click the ‘Update’ button to store your widget settings. You can now visit your website to see your online poll displayed in a sidebar or another widget-ready area.
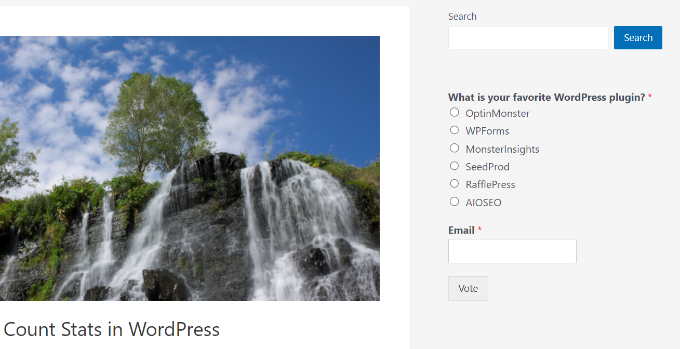
Viewing Live Poll Results
If you have enabled poll results, then your users will see the results after submitting their votes.
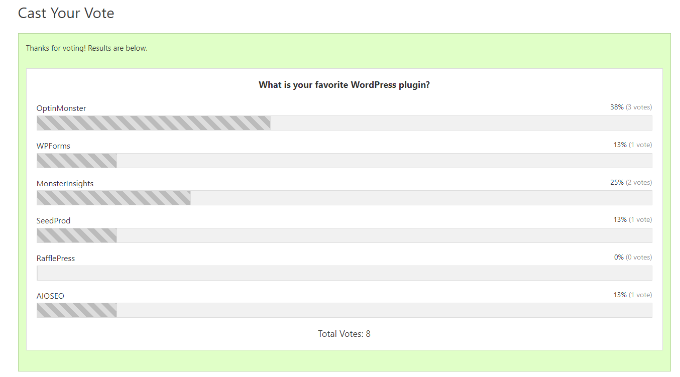
You can also view poll results at any time without submitting a vote.
Simply visit WPForms » All Forms page and click on the ‘Survey Results’ link below your poll form.
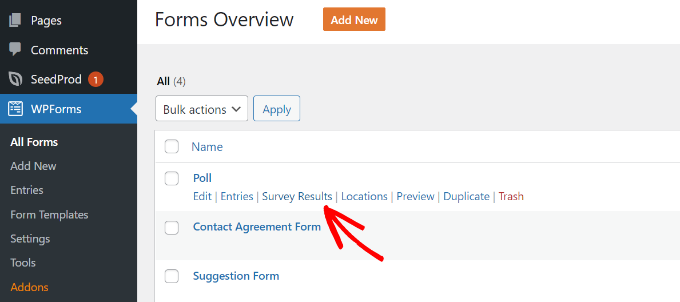
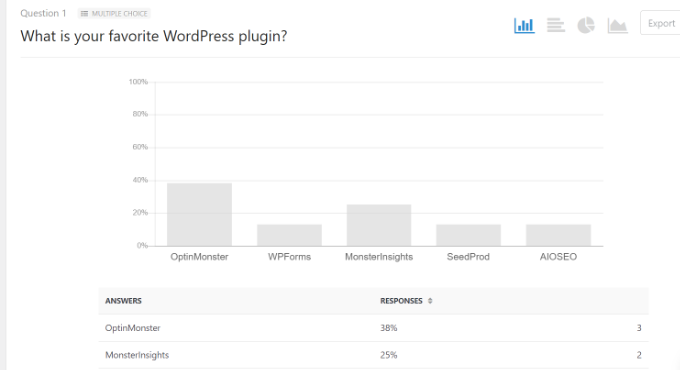
This will take you to the poll results page, where you will see poll responses in an interactive chart.
You can change the charge type and export the results in JPEG, PDF, and print formats.
Embed Poll Results Anywhere in WordPress
WPForms also allows you to easily embed your online poll results anywhere on your website. This is particularly useful if you have disabled poll results and want to share them later.
First, you will need to find out your poll form’s ID. You can do this by going to WPForms » All Forms page and looking for the shortcode next to your poll form.
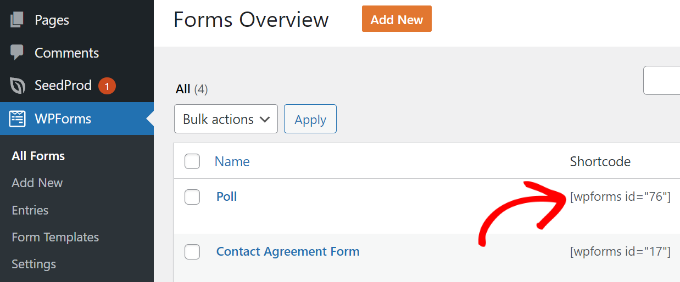
In the shortcode, you will find your poll’s ID number. For example, our test poll’s ID is 76, as shown in the screenshot above.
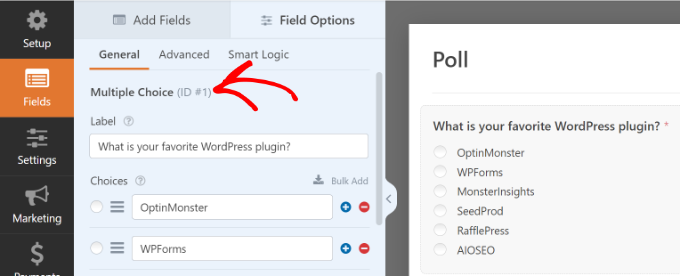
Next, you need to find out the field ID. This is the field in your form for which you want to show the results.
Simply edit your poll form and click on the poll field. You will find the field ID in the left column.
Now that you have both required IDs, you can go ahead and add the poll results shortcode like this:
[wpforms_poll form_id="171" field_id="1" label="true" counts="true"]
Don’t forget to replace the form ID and field ID values with your own. You can use this shortcode in WordPress posts, pages, and text widgets.
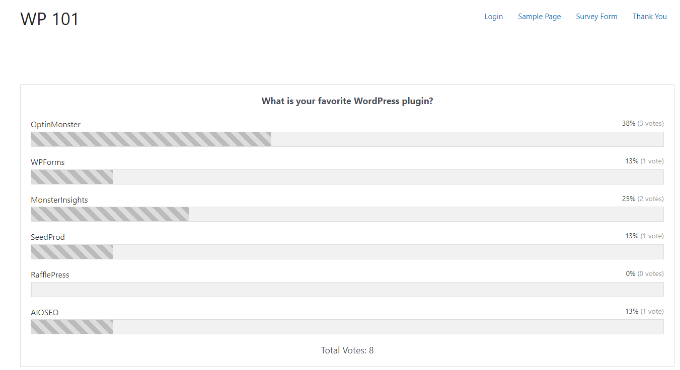
Here’s a preview of what your poll results will look like:
Bonus: Add a Polling Widget with UserFeedback
You can also add an interactive polling widget in WordPress with the UserFeedback plugin.
UserFeedback is one of the best WordPress poll plugins for easily collecting feedback from your website visitors in real time. You can create unlimited popup polls and receive unlimited responses, which will give you valuable insights on how to grow your business.
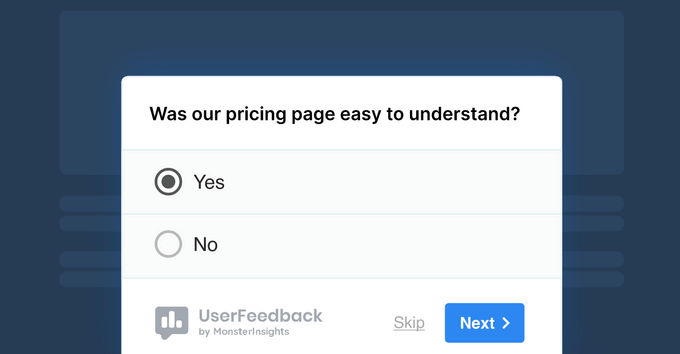
The pro version of UserFeedback comes with powerful features like page-level targeting, custom branding, premium templates, and more. There’s also a free version of UserFeedback that has everything you need to create polling widgets.
For more details, check out this tutorial on how to collect user feedback in WordPress.
We hope this article helped you create an interactive poll in WordPress. You may also want to see our guide on how to start a WordPress blog and the best email marketing services.
If you liked this article, then please subscribe to our YouTube Channel for WordPress video tutorials. You can also find us on Twitter and Facebook.


Syed Balkhi says
Hey WPBeginner readers,
Did you know you can win exciting prizes by commenting on WPBeginner?
Every month, our top blog commenters will win HUGE rewards, including premium WordPress plugin licenses and cash prizes.
You can get more details about the contest from here.
Start sharing your thoughts below to stand a chance to win!
Chris Pauly says
I bought the basic package for polling but it now says that that is a”Pro” version. Is this correct?
WPBeginner Support says
The polls are currently a part of the Pro plan that we mention in the article itself. If you’re looking to upgrade you can reach out to their support and they can assist
Admin
Ula says
Hi,
are there any precautions in wp poll and survey forms to prevent user to vote more than once? Do voters have to give their e-mail to submit form? If I buy pro version, where there are poll and survey forms do I have a possibility to control and prevent one person to vote more than once? Will be grateful for your answer!
WPBeginner Support says
The form locker addon would be able to help prevent duplicate entries and if you wanted you could remove the email requirement, we normally recommend keeping it to have a way to contact the user.
Admin
Detra says
In WPForms is there an option to add an image to each selection of a poll? For instance, I want people to vote on a favorite book and I would like to show the book covers.
WPBeginner Support says
You would want to reach out to WPForms directly and they can let you know what options are available
Admin
Tim says
Hello all,
Looking for the code please, as of right now the article doesn’t show it.
There is no code showing.
Will search your YouTube for now.
Thank you
WPBeginner Support says
Thank you for letting us know about this, the article should be fixed now
Admin
Tim White says
You’re welcome and thank YOU!
I love WPForms and WP Beginner!
Stay happy and healthy!
Deepak says
I need to add poll at the end of each of my blog. This poll will also act as QnA to help assess readers evaluate their understanding of the article. How do I do it?
Please help.
WPBeginner Support says
Depending on what you’re specifically looking for, you would want to take a look at LMS plugins like the ones in our article below:
https://www.wpbeginner.com/plugins/best-wordpress-lms-plugins-compared/
Admin
Cathy Novaresi says
I need to create a poll/ballot where I can insert videos to vote on. Where I can show the videos numbered 1 – 10 for example and then have a drop down check box where they vote for their favorite video. The poll feature on Facebook does not allow specific videos, survey monkey and doodle cannot accommodate my needs. Any help is appreciated!
WPBeginner Support says
Unless I hear otherwise we don’t have a recommended setup for what it sounds like you’re wanting sadly but we will be sure to keep an eye out
Admin
Omaye Daniel says
Thank you for sharing this really helpful information. I’ve learnt a lot.
WPBeginner Support says
You’re welcome
Admin
sazia says
Hi, Great information shared about interactive poll in wordpress. Thanks for sharing this useful information with us.