Do you want to add tooltips to your WordPress posts and pages?
Tooltips are additional pieces of information that show when your mouse hovers over certain words. It’s a helpful way to clarify your content.
In this article, we’ll show you how to add WordPress tooltips in your posts and pages.

Why Display Tooltips in Your WordPress Posts and Pages?
Tooltips display useful information in small boxes that pop up when you hover over an area on your WordPress site. They’re a great way to add clarity to your content.
You can use tooltips to add definitions of difficult words, highlight important facts, and reveal the sources of your information. Like footnotes, they can improve user experience and help build trust with your visitors.
However, tooltips should never be used for essential information. Your post should contain everything your readers need even if they don’t read the tooltip, just in case they don’t see them.
You should also make sure you do not overuse tooltips, or they can become a distraction to your website visitors, which can ruin the user experience.
That being said, let’s look at how you can add tooltips to your WordPress posts and pages.
How to Add Tooltips in Your WordPress Posts and Pages
The first thing you need to do is install and activate the WordPress Tooltips plugin. To learn more, see our step-by-step guide on how to install a WordPress plugin.
Once the plugin is activated, there are several ways to add tooltips to your posts and pages. The first is to automatically add tooltips to certain keywords.
Adding Tooltips to Keywords Automatically
All you have to do is navigate to Tooltips » Add New to create a new tooltip. You need to start by adding a title.
This title is a keyword, and the tooltip will be automatically displayed everywhere the keyword appears in your posts and pages. This can save you a lot of time since you don’t need to manually add the tooltip in multiple locations across your site.
If you would like other words to also display the tooltip, then you can enter them in the synonyms section on the right of the screen. If you enter multiple synonyms, then they should be separated by the pipe symbol |.
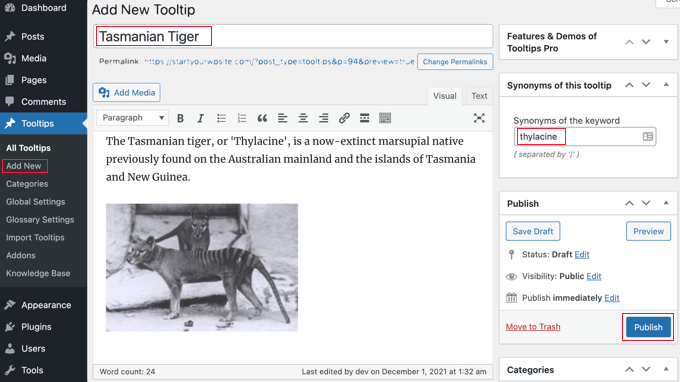
Now, in the content section, add your tooltip. A tooltip might be only a few words long, or it could be several paragraphs of rich content with images and other media. However, keep in mind that you are writing content for a tooltip, not a full post, so keep it as brief as possible so it’s easily readable on any screen.
Once you’ve finished, you should click the ‘Publish’ button on the right of the screen. Now tooltips will be automatically displayed on your posts and pages wherever the tooltip’s title and synonyms are found.

Adding Tooltips Using Shortcode
Another way to add tooltips is to add a shortcode to the content of your posts and pages.
This method is suitable for shorter tooltips, or when you want to display the tooltip just once instead of on every matching keyword on your website.
If you’re new to shortcodes, then you can learn more in our beginner’s guide on how to add a shortcode in WordPress.
To add your tooltip shortcode, first, you need to open the post or page where you wish to add the tooltip in the content editor. Then you should add this shortcode where you wish the tooltip to be displayed:
[tooltips keyword="YOURKEYWORD" content="YOURTOOLTIPCONTENT"]
Simply replace YOURKEYWORD with the word or phrase you want to add the tooltip to, and replace YOURTOOLTIPCONTENT with the text you want to add to the tooltip. Be sure to leave the quotes in the shortcode so that it works properly.
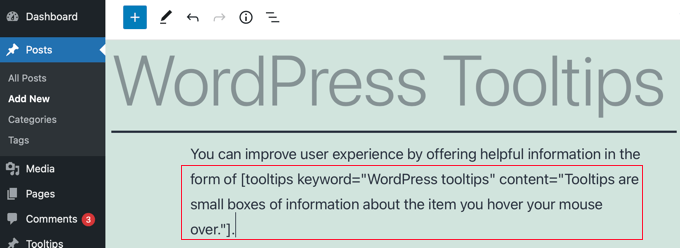
You can preview the page to see the tooltip in action.
This is how it appears on our demo site.

Building a Glossary From Your Tooltips
Each tooltip is a description of a keyword, similar to what you would find in a dictionary or glossary. As you go on adding tooltips, it is as if you are building a basic glossary.
This is why the WordPress Tooltips plugin allows you to display a glossary of tooltips on your website. Simply add the [glossary] shortcode to the post or page where you want it to appear.
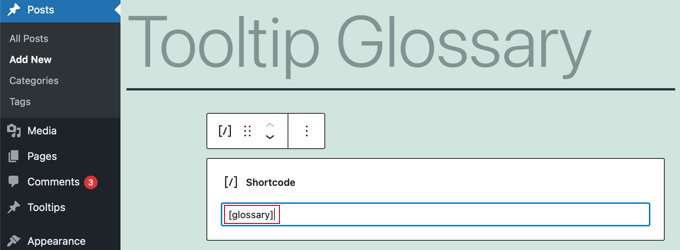
After you have published the post or page, you can visit your website to see the glossary.
This is how it appears on our demo site. It includes the tooltips we added to the plugin’s tooltips list, but not the tooltips we created using shortcode.
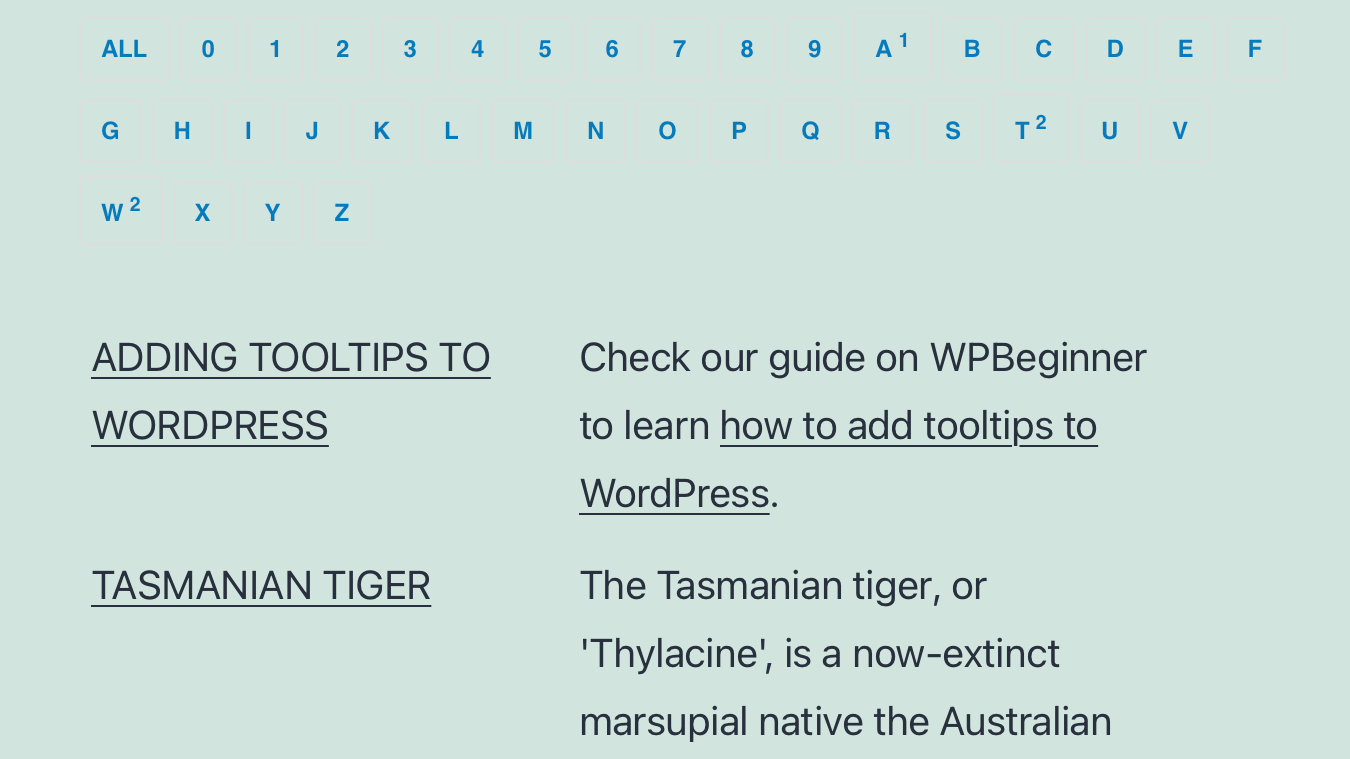
If you want to customize the glossary, then you can do so from the Tooltips » Glossary Settings menu in your WordPress dashboard.
Here you will find a number of options you can tweak on how the glossary will be displayed and what will be included.
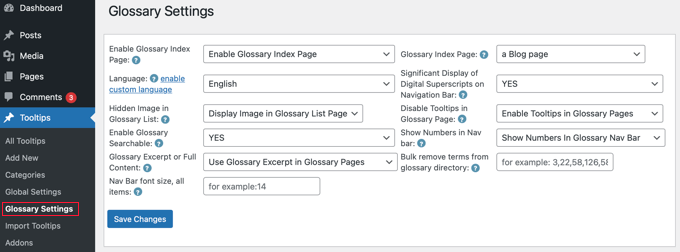
For example, you can choose whether or not to display images in the glossary, and you can list the ID of any tooltips you don’t want to include.
We hope this tutorial helped you learn how to add tooltips to your WordPress posts and pages. You may also want to see our guide on how to create an email newsletter, or our expert comparison of the best free website hosting.
If you liked this article, then please subscribe to our YouTube Channel for WordPress video tutorials. You can also find us on Twitter and Facebook.


Syed Balkhi says
Hey WPBeginner readers,
Did you know you can win exciting prizes by commenting on WPBeginner?
Every month, our top blog commenters will win HUGE rewards, including premium WordPress plugin licenses and cash prizes.
You can get more details about the contest from here.
Start sharing your thoughts below to stand a chance to win!
sasa says
I installed plugin and add new tooltip, entered content and now i dont know how to add it on a link
jawadhyder15 says
The plugin don’t work for me,
But when i do this manually, it works!
wpbeginner says
@shovan It works.
shovan says
I dont think the plugin works on WP 3
netcaststudio says
After installing the plugin the import of comments didn’t complete after 6 hours of running. Any thoughts?
wpbeginner says
That twitter icon is a Twitter Follow Button PRO – http://wpbeg.in/jMT3IT
wpbeginner says
@dbroadaway the twitter icon is another plugin. Floating bar is the smart sharing plugin.
dbroadaway says
Thanks for the write-up, but I have two unrelated questions:
1: What is that Twitter icon next the Tooltip icon?
2: I love your left-hand floating/static social media shares. Is that custom or a plugin/service?
Thanks.
wpbeginner says
@Jaxov An article is due for that.
Jaxov says
@wpbeginner Offtopic: How happy are you with livefire comment system?
How is it compared to other solutions? Also does it allow guest comments without registration?
wpbeginner says
@mharis @Jaxov @Crysislevel Thank you Haris for posting this.
mharis says
@Jaxov @Crysislevel Here’s the demo screenshot http://i.imgur.com/m7l10.png
Jaxov says
@Crysislevel I agree! Thanks for this.
Btw you should maybe create an example page or preview in such posts so that we can see how it actually looks live.
Crysislevel says
nice tutorial! thanx for this…i never knew how to do that!