Voulez-vous ajouter des styles personnalisés dans l’éditeur visuel de WordPress ? L’ajout de styles personnalisés vous permet d’appliquer rapidement une mise en forme sans basculer dans l’éditeur de texte. Dans cet article, nous allons vous afficher comment ajouter des styles personnalisés dans l’éditeur visuel de WordPress.
Note : Ce tutoriel nécessite des connaissances de base en CSS.
Pourquoi et quand avez-vous besoin de styles personnalisés pour l’éditeur visuel de WordPress ?
Par défaut, l’éditeur visuel de WordPress est livré avec quelques options de mise en forme et de style de base. Cependant, il peut arriver que vous ayez besoin de styles personnalisés pour ajouter des boutons CSS, des blocs de contenu, des slogans, etc.
Vous pouvez toujours passer de l’éditeur visuel à l’éditeur de texte et ajouter du HTML et du CSS personnalisés. Mais si vous utilisez régulièrement certains styles, il serait préférable de les ajouter à l’éditeur visuel afin de pouvoir les réutiliser facilement.
Cela vous permettra d’enregistrer le temps passé à passer de l’éditeur de texte à l’éditeur visuel. Cela vous permettra également d’utiliser systématiquement les mêmes styles sur l’ensemble de votre site.
Plus important encore, vous pouvez facilement ajuster ou mettre à jour les styles sans avoir à modifier les publications sur votre site.
Ceci étant dit, voyons comment ajouter des styles personnalisés dans l’éditeur visuel de WordPress.
Méthode 1 : Ajouter des styles personnalisés dans l’éditeur visuel à l’aide d’une extension
La première chose à faire est d’installer et d’activer l’extension TinyMCE Custom Styles. Pour plus de détails, consultez notre guide étape par étape sur l’installation d’une extension WordPress.
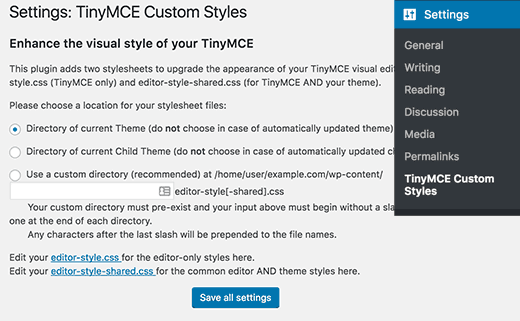
Une fois activé, vous devez vous rendre sur la page » Réglage » TinyMCE Custom Styles pour définir les paramètres de l’extension.
L’extension vous permet de choisir l’emplacement des feuilles de style. Il peut utiliser les feuilles de style de votre thème ou de votre client/cliente, ou vous pouvez choisir un emplacement personnalisé qui vous est propre.
Après cela, vous devez cliquer sur le bouton » Enregistrer tous les réglages » pour stocker vos modifications.
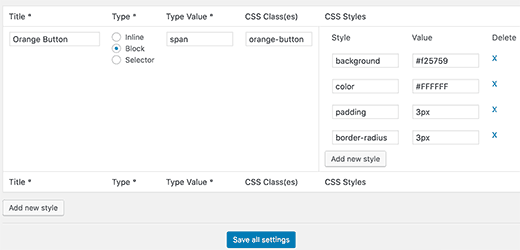
Vous pouvez maintenant ajouter vos styles personnalisés. Vous devez défiler un peu vers le bas jusqu’à la section des styles et cliquer sur le bouton Ajouter un nouveau style.
Vous devez d’abord saisir un titre pour le style. Ce titre sera affiché dans le menu déroulant. Ensuite, vous devez choisir s’il s’agit d’un élément en ligne, d’un bloc ou d’un sélecteur.
Ensuite, ajoutez une classe CSS, puis ajoutez vos règles CSS comme affiché dans la capture d’écran ci-dessous.
Une fois que vous avez ajouté un style CSS, il vous suffit de cliquer sur le bouton » Enregistrer tous les réglages » pour stocker vos modifications.
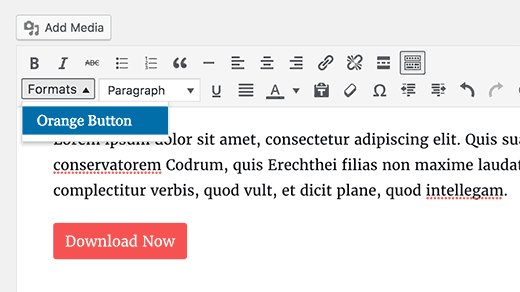
Vous pouvez maintenant modifier une publication existante ou en créer une nouvelle. Vous remarquerez un menu déroulant Format dans la deuxième ligne de l’éditeur/éditrices visuel de WordPress.
Il vous suffit de sélectionner du texte dans l’éditeur, puis de sélectionner votre style personnalisé dans le menu déroulant Formats pour l’appliquer.
Vous pouvez maintenant prévisualiser votre publication pour vérifier que vos styles personnalisés sont appliqués correctement.
Méthode 2 : Ajouter manuellement des styles personnalisés à l’éditeur visuel de WordPress
Cette méthode nécessite que vous ajoutiez manuellement du code à vos fichiers WordPress. Si c’est la première fois que vous ajoutez du code à WordPress, veuillez consulter notre guide sur l’ajout d’extraits de code depuis le web dans WordPress.
Étape par étape : Ajouter un menu déroulant de styles personnalisés dans l’éditeur visuel de WordPress
Tout d’abord, nous allons ajouter un menu déroulant Formats dans l’éditeur visuel de WordPress. Ce menu déroulant nous permettra ensuite de sélectionner et d’appliquer nos styles personnalisés.
Vous devez ajouter le code suivant au fichier functions.php de votre thème ou à une extension spécifique à votre site.
function wpb_mce_buttons_2($buttons) {
	array_unshift($buttons, 'styleselect');
	return $buttons;
}
add_filter('mce_buttons_2', 'wpb_mce_buttons_2');
Étape par étape : Ajouter des options sélectionnées au menu dérou lant
Vous devez maintenant ajouter les options au menu déroulant que vous venez de créer. Vous pourrez alors sélectionner et appliquer ces options à partir du menu déroulant Formats.
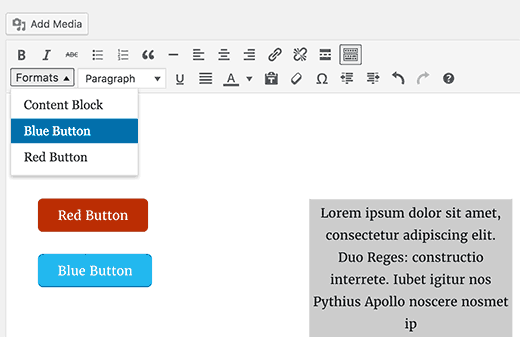
Pour les besoins de ce tutoriel, nous ajoutons trois styles personnalisés pour créer des blocs de contenu et des boutons.
Vous devrez ajouter le code suivant au fichier functions.php de votre thème ou à une extension spécifique à votre site.
/*
* Callback function to filter the MCE settings
*/

function my_mce_before_init_insert_formats( $init_array ) {

// Define the style_formats array

	$style_formats = array(
/*
* Each array child is a format with it's own settings
* Notice that each array has title, block, classes, and wrapper arguments
* Title is the label which will be visible in Formats menu
* Block defines whether it is a span, div, selector, or inline style
* Classes allows you to define CSS classes
* Wrapper whether or not to add a new block-level element around any selected elements
*/
		array(
			'title' => 'Content Block',
			'block' => 'span',
			'classes' => 'content-block',
			'wrapper' => true,

		),
		array(
			'title' => 'Blue Button',
			'block' => 'span',
			'classes' => 'blue-button',
			'wrapper' => true,
		),
		array(
			'title' => 'Red Button',
			'block' => 'span',
			'classes' => 'red-button',
			'wrapper' => true,
		),
	);
	// Insert the array, JSON ENCODED, into 'style_formats'
	$init_array['style_formats'] = json_encode( $style_formats );

	return $init_array;

}
// Attach callback to 'tiny_mce_before_init'
add_filter( 'tiny_mce_before_init', 'my_mce_before_init_insert_formats' );
Vous pouvez maintenant ajouter une nouvelle publication dans WordPress et cliquer sur le menu déroulant Formats dans l’éditeur visuel. Vous remarquerez que vos styles personnalisés sont maintenant visibles sous formats.
Cependant, les sélectionner ne fait aucune différence dans l’éditeur de l’article pour le moment.
Étape par étape : Ajouter des styles CSS
La dernière étape consiste à ajouter des règles de style CSS pour vos styles personnalisés.
Vous devrez ajouter ce CSS dans les fichiers style.css et éditeurs/éditrices.css de votre thème ou thème enfant.
.content-block {
    border:1px solid #eee;
    padding:3px;
    background:#ccc;
    max-width:250px;
    float:right;
    text-align:center;
}
.content-block:after {
    clear:both;
}
.blue-button {
	background-color:#33bdef;
	-moz-border-radius:6px;
	-webkit-border-radius:6px;
	border-radius:6px;
	border:1px solid #057fd0;
	display:inline-block;
	cursor:pointer;
	color:#ffffff;
	padding:6px 24px;
	text-decoration:none;
}

.red-button {
	background-color:#bc3315;
	-moz-border-radius:6px;
	-webkit-border-radius:6px;
	border-radius:6px;
	border:1px solid #942911;
	display:inline-block;
	cursor:pointer;
	color:#ffffff;
	padding:6px 24px;
	text-decoration:none;
}
La feuille de style de l’éditeur contrôle l’Apparence de votre contenu dans l’éditeur visuel. Consultez la documentation de votre thème pour trouver l’Emplacement de ce fichier.
Si votre thème ne possède pas de feuille de style de l’éditeur, vous pouvez toujours en créer une. Il vous suffit de créer un nouveau fichier CSS et de le nommer custom-editor-style.css.
Vous devez téléverser ce fichier dans le répertoire racine de votre thème, puis ajouter ce code dans le fichier functions.php de votre thème.
function my_theme_add_editor_styles() {
    add_editor_style( 'custom-editor-style.css' );
}
add_action( 'init', 'my_theme_add_editor_styles' );
C’est tout. Vous avez bien ajouté vos styles personnalisés dans l’éditeur visuel de WordPress. N’hésitez pas à jouer avec le code en ajoutant vos propres éléments et styles.
Nous espérons que cet article vous a aidé à apprendre comment ajouter des styles personnalisés dans l’éditeur visuel de WordPress. Vous pouvez également consulter notre guide sur la façon d’ajouter des styles personnalisés aux widgets WordPress.
Si vous avez aimé cet article, veuillez vous abonner à notre chaîne YouTube pour obtenir des tutoriels vidéo WordPress. Vous pouvez également nous trouver sur Twitter et Facebook.



Syed Balkhi says
Hey WPBeginner readers,
Did you know you can win exciting prizes by commenting on WPBeginner?
Every month, our top blog commenters will win HUGE rewards, including premium WordPress plugin licenses and cash prizes.
You can get more details about the contest from here.
Start sharing your thoughts below to stand a chance to win!
Toufic Ahemmed says
This guys are awesome. they help me most of the time. thank you very very much.
WPBeginner Support says
Glad we could help
Administrateur
Aslan French says
This article should be updated with Gutenberg in mind, as this kind of functionality has been added to the Rich Text API recently.
WPBeginner Support says
Hi Aslan,
Thanks for the suggestion. We will definitely look into older articles once Gutenberg is out.
Administrateur
Mehrdad says
Thanks a lot.
This article really helped me.
sabbi says
This adds classes to a p-tag doesnt it?
Is there a way to even create own tags?
Or another thing:will a chosen custom Format overwrite a previously chosen h-tag with a p? Would be necessary to prevent a client from getting in trouble when hes clicking around in the default AND custom styles.
Britany says
Unfortunately this didn’t help me at all. Is there an article that explains what each of the fields you have to fill in mean?
All I need is a way to apply the same formatting to quotes on my podcast show notes pages. Each quote is the the same font (that I have set-up as a headline style), bolded, and centered.
I get tired of manually applying each part of the format to every quote and just a way to click one button and be done.
Syams says
Please, tell me how to add a new font to WP visual editor.
Moya Nicholson says
Thank you. Really helpful.
stanley says
I need to modify my theme WP
hell me please
Sandy Connolly says
THANK YOU FOR THIS!!! OMG!!!! How helpful upon handing a site over to a client who wants to be able to add his/her own content based on our design!
Marcin says
Hi, I develop WordPresses every day and do everything with WP but this piece of code is one of the most useful I’ve seen for long time… It is exactly what default WYSIWYG is (now I can say: was) missing! It allows to do some stunnig things inside content field. Thank You for sharing!
Foxglove says
I have been using this plugin for a while now, but it is no longer available from wordpress.org — apparently no longer updated or supported. Is anyone aware of any alternatives other than the manual method you describe?
Lisa McMahon says
Here’s an updated/forked version of the original plugin mentioned in the article: TinyMCE Custom Styles
WPBeginner Support says
Hey Lisa, thanks for pointing this out. We have updated the article with the updated/forked version.
Administrateur
Shubha Das says
I want to add p instead of span. But when I change block name span to p, it doesn’t work.
‘title’ => ‘Note’,
‘block’ => ‘p’,
‘classes’ => ‘note’,
‘wrapper’ => true,
MacKenzie says
I found this really helpful and I feel like I almost have it but it isn’t quite working yet. My text gets properly tagged with the span and class tags in the editor when selected – but none of the styles I put in the style sheet are being applied to the published note.
Frank says
I always become nervous and feel like vomiting if some customer needs wordpress tweaks. Coll, this style pulldown BUT, as someone said before, completely useless if styles cannot be withdrawn afterwards and only add up, add up, add up…
I’m used to these half baked sulotions in wordpress – normally there’s also a complementary half-baked solutions to half repair the first one. But here?
Now HOW would you suggest TO REMOVE CUSTOM STYLES added via the styles pulldown. Code view is in no way acceptable for my client?
I’d be unbelievably lucky if someone has found a way to do that and would share this knowledge (and for putting the catastrophe called wordpress out of my reach for( i hope) a very long time).
Thanks a lot in advance!
Frank
Chris says
Click on the style in the pulldown again. Done.
Shafi ken says
Thanks for the helpful tutorial. Thanks
K Shazzad says
Whole tutorial worked flawlessly for me. Thanks a bunch
Stef says
I tried out this plugin but realized, that when you change a custom style, It won’t update those you inserted already. You have to go back and reinsert them, because the feature adds the style inline and not via stylesheet
Phil says
Thanks for the helpful tutorial. Is there any performance penalty in using the plugin rather than hand-coding it? Thanks,
WPBeginner Support says
No, but for reusing elements this method is quite handy. It is also useful, if you are building a site for a client and want them to be able to add things from the visual editor.
Administrateur
Sei says
Thanks for the tutorial!
Is there a way to add two markups at once? Like, getting something like text
Sei says
Okay, your comments converts HTML. I mean, I’d like to get both ‘h1’ and ‘span’ markups around my text by clicking on only one style.
Lily says
I’ve managed to do the custom classes and the elements do show with the right classes in the text editor and on the page, but the class isn’t applied in the visual editor which makes it very unclear whether it’s worked or not for the user. Is there any way to fix that?
Bonnie Dasher-Andersen says
I’ve added two custom styles. When I go to edit a page, I have two Format menus, each one with the same entries (the two styles that I created). When I try to apply these styles, nothing happens. I can see the tag in the Text view, but when I view the page – the style hasn’t been applied.
Any suggestions? Need to figure this out for a client who will be updated this WP site and is not very savvy.
Marcello says
I had the same problem, where the tags weren’t applied to code. Fixed it by setting ‘wrapper’ to ‘false’. I don’t know the technical reasons, just tested and it worked. Hope it helps!
hugotom says
I had the same problem that the style sheet is not recorded.
Solution
If you already have this recording style sheets in the functions.php file should add right there stylesheet custom-editor-style.css
Example:
function styles_theme(){
wp_enqueue_style(‘bootstrap_css’, get_template_directory_uri() . ‘/sources/bootstrap/bootstrap.min.css’);
wp_enqueue_style(‘main_css’, get_template_directory_uri() . ‘/style.css’);
wp_enqueue_style(‘theme_css’, get_template_directory_uri() . ‘/custom/css/theme.css’);
wp_enqueue_style(‘editor_css’, get_template_directory_uri() . ‘/custom-editor-style.css’); // HERE
};
Raphael Landau says
I’ve used this and also had the issue where the style/class is implemented to the entire Paragraph. This is because you set the style format as « block ». (‘block’ => ‘span’,).
Quickly visiting the official WordPress codex, discovers much more options for style formatting.
http://codex.wordpress.org/TinyMCE_Custom_Styles
Since span is an inline style be default, you should replace ‘block’ with ‘inline’, and viola! You’re styling should work as expected.
so in short:
array(
‘title’ => ‘Your Title’,
‘inline’ => ‘span’,
‘classes’ => ‘your-class’,
‘wrapper’ => true,
),
nemaha says
Hi,
great tutorial, thanks for that! I, too, have the problem, that style (a span) is applied to the whole paragraph. What I intend to do: Write a headline and format it as heading 1, then mark only one specific word within that headline to add a custom style. Any update on how to fix this? Thanks!
bekee says
i, too, have the problem where it applies the style to the whole paragraph, not just the selected element. any update on this? thanks!
Debbie says
Having the same issue. Highlight one word, but takes effect on entire paragraph.
James says
I find a couple of problems. It does seem to work, but not as expected. Will not do for someone who does not know code.
1. Highlight a single word in a paragraph to add a but the is added to the entire paragraph, not just the highlighted word.
2. No way to remove the css without editing code. My client does not do code! Even tried to make a class of .nothing but the new class is only added to any others, does not replace existing class.
WPBeginner Staff says
See our guide on how to fix common image issues in WordPress.
Sheikh Zuhaib Siddiqui says
Hey I have an error in add media. When I try to upload any media, there is only continue loading and not showing up any media and can upload media……………Let me know what the mistake here???
But this is working fine …………just error in media uploader. please provide me this solution.
Marlice says
Hi. Thank you for this great tutorial. I have a problem with content that is already in the editor. If I mark a word or a part of text and choose a style (for example « blue button » – from your code) it wraps not only the marked word or part of text. Instead it marks the whole content and put a span with the class .blue button on it. I tried it several times with other pages and posts – always the same: if the content was already there and I marked it, then the whole content get the span class. This does not happen if I wrap a new edited text in the page/post – than everything works fine. Does anybody has this phenomen too?
Thank you,
Ute
John-Henry Ross says
Hi. I tried this method and it works like a charm, exactly what I was looking for, thank you. I just want to find out if there is a way to add styles to a subfolder instead of just adding it under a format button. E.g. add a headings subfolder with all heading stylings, add div submenu with div stylings, etc.
dave says
Thanks!
It’s great to show 2 methods, too… my clients cower in fear at handling any code.
I will sometimes use custom fields to « force » safe additional styles, but the TinyMCE can be handled by some people, so I’ll kee that in mind.
Ciao, Dave
WPBeginner Staff says
you do not need to add the dot in
classes’ => ‘.alert-blue’,
It should be
classes’ => ‘alert-blue’,
Jeff Gaudette says
Sadly, this didn’t work. I removed the period, but still nothing applies in the editor. I know you’re not a help desk, but here’s a screenshot if you’re interested: http://screencast.com/t/JI0zMvcH
Thanks for all the great stuff you put out!
WPBeginner Staff says
Can you paste the code you added in your functions.php file. Also paste the CSS you are using for these buttons.
Jeff Gaudette says
Sure. Functions:
/*
* Callback function to filter the MCE settings
*/
function my_mce_before_init_insert_formats( $init_array ) {
// Define the style_formats array
$style_formats = array(
// Each array child is a format with it’s own settings
array(
‘title’ => ‘Alert’,
‘block’ => ‘span’,
‘classes’ => ‘entry p.alert-blue’,
‘wrapper’ => true,
),
array(
‘title’ => ‘Alert Blue’,
‘block’ => ‘p’,
‘classes’ => ‘alert-blue’,
‘wrapper’ => true,
),
array(
‘title’ => ‘Blue Button’,
‘block’ => ‘span’,
‘classes’ => ‘alert-blue-button’,
‘wrapper’ => true,
),
);
// Insert the array, JSON ENCODED, into ‘style_formats’
$init_array[‘style_formats’] = json_encode( $style_formats );
return $init_array;
}
// Attach callback to ‘tiny_mce_before_init’
add_filter( ‘tiny_mce_before_init’, ‘my_mce_before_init_insert_formats’ );
CSS
.alert-blue{
background: none repeat scroll 0 0 #E7F4FD;
border: 1px solid #C5D7E3;
color: #3A5971;
font-size: 18px;
line-height: 24px;
text-align: center;
margin: 0 0 15px !important;
padding: 15px 25px;
width: auto;
}
WPBeginner Staff says
Did you add the CSS in your stylesheet?
Make sure that the style rules you add in your CSS match the classes you add in the Callback function to filter the MCE settings.
Kemi O says
TinyMCE Advanced Professsional Formats and Styles is only supported up to WP version 3.6.1
Keely Worth says
I avoid the Visual Editor like the plague! Only use it if I have to switch to it to use a theme’s built-in shortcode button. Otherwise – never use it.
Blair2004 says
I have tried first method, new style are available but, while i’m selecting one, nothing happens…
Jeff Gaudette says
I am trying to do this with a block and having no luck. Code is:
array(
‘title’ => ‘Alert Blue’,
‘block’ => ‘p’,
‘classes’ => ‘.alert-blue’,
‘wrapper’ => true,
),
It works when I use span, but this necessitates a span class, which I can’t use.
When i use the above code, nothing happens in the wp editor. I select the text, click the Alert Blue formatting option and nothing happens: http://screencast.com/t/dijujZ2ZdqBy
Any advice?