Möchten Sie im visuellen Editor von WordPress benutzerdefinierte Stile hinzufügen? Durch das Hinzufügen von benutzerdefinierten Stilen können Sie schnell Formatierungen anwenden, ohne zum Texteditor zu wechseln. In diesem Artikel zeigen wir Ihnen, wie Sie benutzerdefinierte Stile zum visuellen Editor von WordPress hinzufügen.
Hinweis: Dieses Tutorial erfordert grundlegende Kenntnisse in CSS.
Warum und wann Sie benutzerdefinierte Stile für den visuellen Editor von WordPress benötigen
Standardmäßig verfügt der visuelle Editor von WordPress über einige grundlegende Formatierungs- und Stiloptionen. Manchmal benötigen Sie jedoch eigene benutzerdefinierte Stile, um CSS-Schaltflächen, Inhaltsblöcke, Taglines usw. hinzuzufügen.
Sie können jederzeit vom visuellen Editor zum Texteditor wechseln und benutzerdefiniertes HTML und CSS hinzufügen. Wenn Sie jedoch einige Stile regelmäßig verwenden, sollten Sie sie am besten in den visuellen Editor einfügen, damit Sie sie leicht wiederverwenden können.
So sparen Sie Zeit, die Sie für das Hin- und Herwechseln zwischen Text- und visuellem Editor benötigen. Außerdem können Sie so auf Ihrer gesamten Website einheitlich dieselben Stile verwenden.
Vor allem aber können Sie die Stile leicht anpassen oder aktualisieren, ohne die Beiträge auf Ihrer Website bearbeiten zu müssen.
Schauen wir uns nun an, wie man im visuellen Editor von WordPress benutzerdefinierte Stile hinzufügen kann.
Methode 1: Hinzufügen von benutzerdefinierten Stilen im visuellen Editor mithilfe eines Plugins
Als erstes müssen Sie das TinyMCE Custom Styles Plugin installieren und aktivieren. Weitere Details finden Sie in unserer Schritt-für-Schritt-Anleitung für die Installation eines WordPress-Plugins.
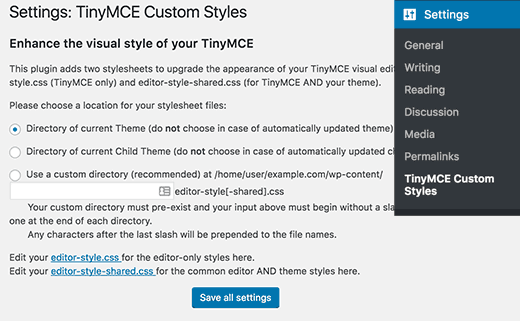
Nach der Aktivierung müssen Sie die Seite Einstellungen “ TinyMCE Custom Styles besuchen, um die Einstellungen des Plugins zu konfigurieren.
Das Plugin ermöglicht es Ihnen, den Speicherort der Stylesheet-Dateien zu wählen. Es kann die Stylesheets Ihres Themes oder Child-Themesverwenden, oder Sie können einen eigenen Speicherort wählen.
Danach müssen Sie auf die Schaltfläche „Alle Einstellungen speichern“ klicken, um Ihre Änderungen zu speichern.
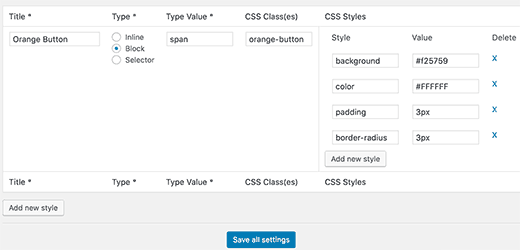
Jetzt können Sie Ihre eigenen Stile hinzufügen. Scrollen Sie dazu ein wenig nach unten zum Abschnitt „Stile“ und klicken Sie auf die Schaltfläche „Neuen Stil hinzufügen“.
Zuerst müssen Sie einen Titel für den Stil eingeben. Dieser Titel wird dann im Dropdown-Menü angezeigt. Als Nächstes müssen Sie wählen, ob es sich um ein Inline-, Block- oder Selektorelement handelt.
Danach fügen Sie eine CSS-Klasse und dann Ihre CSS-Regeln hinzu, wie im Screenshot unten gezeigt.
Sobald Sie einen CSS-Stil hinzugefügt haben, klicken Sie einfach auf die Schaltfläche „Alle Einstellungen speichern“, um Ihre Änderungen zu speichern.
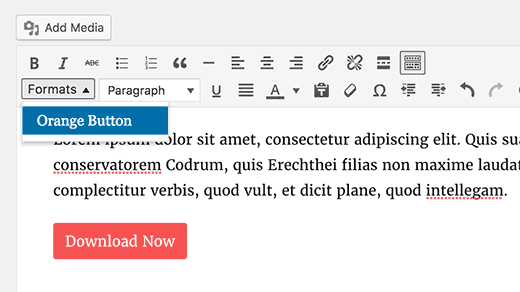
Sie können nun einen bestehenden Beitrag bearbeiten oder einen neuen Beitrag erstellen. In der zweiten Zeile des visuellen Editors von WordPress finden Sie ein Dropdown-Menü „Format“.
Wählen Sie einfach einen Text im Editor aus und wählen Sie dann Ihren benutzerdefinierten Stil aus dem Dropdown-Menü „Formate“, um ihn anzuwenden.
Sie können nun eine Vorschau Ihres Beitrags anzeigen, um zu sehen, ob Ihre benutzerdefinierten Stile korrekt angewendet wurden.
Methode 2: Manuelles Hinzufügen von benutzerdefinierten Stilen zum visuellen Editor von WordPress
Bei dieser Methode müssen Sie manuell Code zu Ihren WordPress-Dateien hinzufügen. Wenn Sie zum ersten Mal Code zu WordPress hinzufügen, lesen Sie bitte unsere Anleitung zum Hinzufügen von Codeschnipseln aus dem Web in WordPress.
Schritt 1: Hinzufügen eines Dropdown-Menüs für benutzerdefinierte Stile im visuellen Editor von WordPress
Zunächst fügen wir ein Dropdown-Menü Formate im visuellen Editor von WordPress hinzu. Mit diesem Dropdown-Menü können wir dann unsere benutzerdefinierten Stile auswählen und anwenden.
Sie müssen den folgenden Code in die Datei functions.php Ihres Themes oder in ein site-spezifisches Plugin einfügen.
function wpb_mce_buttons_2($buttons) {
	array_unshift($buttons, 'styleselect');
	return $buttons;
}
add_filter('mce_buttons_2', 'wpb_mce_buttons_2');
Schritt 2: Auswahloptionen zum Dropdown-Menü hinzufügen
Nun müssen Sie dem soeben erstellten Dropdown-Menü die Optionen hinzufügen. Anschließend können Sie diese Optionen im Dropdown-Menü „Formate“ auswählen und anwenden.
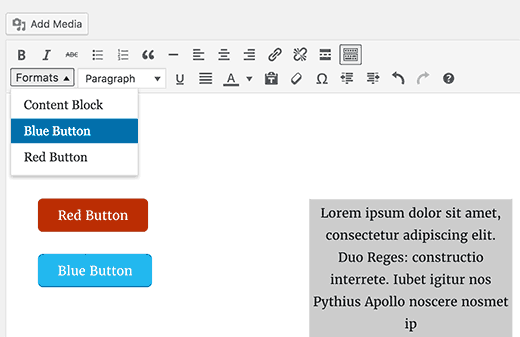
Für dieses Tutorial fügen wir drei benutzerdefinierte Stile hinzu, um Inhaltsblöcke und Schaltflächen zu erstellen.
Sie müssen den folgenden Code in die Datei functions.php Ihres Themes oder in ein Site-spezifisches Plugin einfügen.
/*
* Callback function to filter the MCE settings
*/

function my_mce_before_init_insert_formats( $init_array ) {

// Define the style_formats array

	$style_formats = array(
/*
* Each array child is a format with it's own settings
* Notice that each array has title, block, classes, and wrapper arguments
* Title is the label which will be visible in Formats menu
* Block defines whether it is a span, div, selector, or inline style
* Classes allows you to define CSS classes
* Wrapper whether or not to add a new block-level element around any selected elements
*/
		array(
			'title' => 'Content Block',
			'block' => 'span',
			'classes' => 'content-block',
			'wrapper' => true,

		),
		array(
			'title' => 'Blue Button',
			'block' => 'span',
			'classes' => 'blue-button',
			'wrapper' => true,
		),
		array(
			'title' => 'Red Button',
			'block' => 'span',
			'classes' => 'red-button',
			'wrapper' => true,
		),
	);
	// Insert the array, JSON ENCODED, into 'style_formats'
	$init_array['style_formats'] = json_encode( $style_formats );

	return $init_array;

}
// Attach callback to 'tiny_mce_before_init'
add_filter( 'tiny_mce_before_init', 'my_mce_before_init_insert_formats' );
Sie können nun einen neuen Beitrag in WordPress erstellen und auf das Dropdown-Menü Formate im visuellen Editor klicken. Sie werden feststellen, dass Ihre benutzerdefinierten Stile jetzt unter Formate sichtbar sind.
Wenn Sie sie auswählen, ändert sich im Beitragseditor jedoch noch nichts.
Schritt 3: CSS-Stile hinzufügen
Der letzte Schritt besteht nun darin, CSS-Stilregeln für Ihre benutzerdefinierten Stile hinzuzufügen.
Sie müssen diese CSS in die Dateien style.css und editor-style.css Ihres Themes oder Child-Themes einfügen.
.content-block {
    border:1px solid #eee;
    padding:3px;
    background:#ccc;
    max-width:250px;
    float:right;
    text-align:center;
}
.content-block:after {
    clear:both;
}
.blue-button {
	background-color:#33bdef;
	-moz-border-radius:6px;
	-webkit-border-radius:6px;
	border-radius:6px;
	border:1px solid #057fd0;
	display:inline-block;
	cursor:pointer;
	color:#ffffff;
	padding:6px 24px;
	text-decoration:none;
}

.red-button {
	background-color:#bc3315;
	-moz-border-radius:6px;
	-webkit-border-radius:6px;
	border-radius:6px;
	border:1px solid #942911;
	display:inline-block;
	cursor:pointer;
	color:#ffffff;
	padding:6px 24px;
	text-decoration:none;
}
Das Editor-Stylesheet steuert das Aussehen Ihres Inhalts im visuellen Editor. Schauen Sie in der Dokumentation Ihres Themas nach, wo diese Datei zu finden ist.
Wenn Ihr Thema keine Editor-Stylesheet-Datei hat, können Sie jederzeit eine erstellen. Erstellen Sie einfach eine neue CSS-Datei und nennen Sie sie custom-editor-style.css.
Laden Sie diese Datei in das Stammverzeichnis Ihres Themes hoch und fügen Sie diesen Code in die Datei functions.php Ihres Themes ein.
function my_theme_add_editor_styles() {
    add_editor_style( 'custom-editor-style.css' );
}
add_action( 'init', 'my_theme_add_editor_styles' );
Das war’s schon. Sie haben Ihre benutzerdefinierten Stile erfolgreich in den visuellen Editor von WordPress eingefügt. Fühlen Sie sich frei, mit dem Code herumzuspielen, indem Sie Ihre eigenen Elemente und Stile hinzufügen.
Wir hoffen, dass dieser Artikel Ihnen geholfen hat zu lernen, wie man benutzerdefinierte Stile in den visuellen Editor von WordPress einfügt. Vielleicht interessiert Sie auch unsere Anleitung zum Hinzufügen benutzerdefinierter Stile zu WordPress-Widgets.
Wenn Ihnen dieser Artikel gefallen hat, dann abonnieren Sie bitte unseren YouTube-Kanal für WordPress-Videotutorials. Sie können uns auch auf Twitter und Facebook finden.



Syed Balkhi says
Hey WPBeginner readers,
Did you know you can win exciting prizes by commenting on WPBeginner?
Every month, our top blog commenters will win HUGE rewards, including premium WordPress plugin licenses and cash prizes.
You can get more details about the contest from here.
Start sharing your thoughts below to stand a chance to win!
Toufic Ahemmed says
This guys are awesome. they help me most of the time. thank you very very much.
WPBeginner Support says
Glad we could help
Admin
Aslan French says
This article should be updated with Gutenberg in mind, as this kind of functionality has been added to the Rich Text API recently.
WPBeginner Support says
Hi Aslan,
Thanks for the suggestion. We will definitely look into older articles once Gutenberg is out.
Admin
Mehrdad says
Thanks a lot.
This article really helped me.
sabbi says
This adds classes to a p-tag doesnt it?
Is there a way to even create own tags?
Or another thing:will a chosen custom Format overwrite a previously chosen h-tag with a p? Would be necessary to prevent a client from getting in trouble when hes clicking around in the default AND custom styles.
Britany says
Unfortunately this didn’t help me at all. Is there an article that explains what each of the fields you have to fill in mean?
All I need is a way to apply the same formatting to quotes on my podcast show notes pages. Each quote is the the same font (that I have set-up as a headline style), bolded, and centered.
I get tired of manually applying each part of the format to every quote and just a way to click one button and be done.
Syams says
Please, tell me how to add a new font to WP visual editor.
Moya Nicholson says
Thank you. Really helpful.
stanley says
I need to modify my theme WP
hell me please
Sandy Connolly says
THANK YOU FOR THIS!!! OMG!!!! How helpful upon handing a site over to a client who wants to be able to add his/her own content based on our design!
Marcin says
Hi, I develop WordPresses every day and do everything with WP but this piece of code is one of the most useful I’ve seen for long time… It is exactly what default WYSIWYG is (now I can say: was) missing! It allows to do some stunnig things inside content field. Thank You for sharing!
Foxglove says
I have been using this plugin for a while now, but it is no longer available from wordpress.org — apparently no longer updated or supported. Is anyone aware of any alternatives other than the manual method you describe?
Lisa McMahon says
Here’s an updated/forked version of the original plugin mentioned in the article: TinyMCE Custom Styles
WPBeginner Support says
Hey Lisa, thanks for pointing this out. We have updated the article with the updated/forked version.
Admin
Shubha Das says
I want to add p instead of span. But when I change block name span to p, it doesn’t work.
‚title‘ => ‚Note‘,
‚block‘ => ‚p‘,
‚classes‘ => ’note‘,
‚wrapper‘ => true,
MacKenzie says
I found this really helpful and I feel like I almost have it but it isn’t quite working yet. My text gets properly tagged with the span and class tags in the editor when selected – but none of the styles I put in the style sheet are being applied to the published note.
Frank says
I always become nervous and feel like vomiting if some customer needs wordpress tweaks. Coll, this style pulldown BUT, as someone said before, completely useless if styles cannot be withdrawn afterwards and only add up, add up, add up…
I’m used to these half baked sulotions in wordpress – normally there’s also a complementary half-baked solutions to half repair the first one. But here?
Now HOW would you suggest TO REMOVE CUSTOM STYLES added via the styles pulldown. Code view is in no way acceptable for my client?
I’d be unbelievably lucky if someone has found a way to do that and would share this knowledge (and for putting the catastrophe called wordpress out of my reach for( i hope) a very long time).
Thanks a lot in advance!
Frank
Chris says
Click on the style in the pulldown again. Done.
Shafi ken says
Thanks for the helpful tutorial. Thanks
K Shazzad says
Whole tutorial worked flawlessly for me. Thanks a bunch
Stef says
I tried out this plugin but realized, that when you change a custom style, It won’t update those you inserted already. You have to go back and reinsert them, because the feature adds the style inline and not via stylesheet
Phil says
Thanks for the helpful tutorial. Is there any performance penalty in using the plugin rather than hand-coding it? Thanks,
WPBeginner Support says
No, but for reusing elements this method is quite handy. It is also useful, if you are building a site for a client and want them to be able to add things from the visual editor.
Admin
Sei says
Thanks for the tutorial!
Is there a way to add two markups at once? Like, getting something like text
Sei says
Okay, your comments converts HTML. I mean, I’d like to get both ‚h1′ and ’span‘ markups around my text by clicking on only one style.
Lily says
I’ve managed to do the custom classes and the elements do show with the right classes in the text editor and on the page, but the class isn’t applied in the visual editor which makes it very unclear whether it’s worked or not for the user. Is there any way to fix that?
Bonnie Dasher-Andersen says
I’ve added two custom styles. When I go to edit a page, I have two Format menus, each one with the same entries (the two styles that I created). When I try to apply these styles, nothing happens. I can see the tag in the Text view, but when I view the page – the style hasn’t been applied.
Any suggestions? Need to figure this out for a client who will be updated this WP site and is not very savvy.
Marcello says
I had the same problem, where the tags weren’t applied to code. Fixed it by setting ‚wrapper‘ to ‚false‘. I don’t know the technical reasons, just tested and it worked. Hope it helps!
hugotom says
I had the same problem that the style sheet is not recorded.
Solution
If you already have this recording style sheets in the functions.php file should add right there stylesheet custom-editor-style.css
Example:
function styles_theme(){
wp_enqueue_style(‚bootstrap_css‘, get_template_directory_uri() . ‚/sources/bootstrap/bootstrap.min.css‘);
wp_enqueue_style(‚main_css‘, get_template_directory_uri() . ‚/style.css‘);
wp_enqueue_style(‚theme_css‘, get_template_directory_uri() . ‚/custom/css/theme.css‘);
wp_enqueue_style(‚editor_css‘, get_template_directory_uri() . ‚/custom-editor-style.css‘); // HERE
};
Raphael Landau says
I’ve used this and also had the issue where the style/class is implemented to the entire Paragraph. This is because you set the style format as „block“. (‚block‘ => ’span‘,).
Quickly visiting the official WordPress codex, discovers much more options for style formatting.
http://codex.wordpress.org/TinyMCE_Custom_Styles
Since span is an inline style be default, you should replace ‚block‘ with ‚inline‘, and viola! You’re styling should work as expected.
so in short:
array(
‚title‘ => ‚Your Title‘,
‚inline‘ => ’span‘,
‚classes‘ => ‚your-class‘,
‚wrapper‘ => true,
),
nemaha says
Hi,
great tutorial, thanks for that! I, too, have the problem, that style (a span) is applied to the whole paragraph. What I intend to do: Write a headline and format it as heading 1, then mark only one specific word within that headline to add a custom style. Any update on how to fix this? Thanks!
bekee says
i, too, have the problem where it applies the style to the whole paragraph, not just the selected element. any update on this? thanks!
Debbie says
Having the same issue. Highlight one word, but takes effect on entire paragraph.
James says
I find a couple of problems. It does seem to work, but not as expected. Will not do for someone who does not know code.
1. Highlight a single word in a paragraph to add a but the is added to the entire paragraph, not just the highlighted word.
2. No way to remove the css without editing code. My client does not do code! Even tried to make a class of .nothing but the new class is only added to any others, does not replace existing class.
WPBeginner Staff says
See our guide on how to fix common image issues in WordPress.
Sheikh Zuhaib Siddiqui says
Hey I have an error in add media. When I try to upload any media, there is only continue loading and not showing up any media and can upload media……………Let me know what the mistake here???
But this is working fine …………just error in media uploader. please provide me this solution.
Marlice says
Hi. Thank you for this great tutorial. I have a problem with content that is already in the editor. If I mark a word or a part of text and choose a style (for example „blue button“ – from your code) it wraps not only the marked word or part of text. Instead it marks the whole content and put a span with the class .blue button on it. I tried it several times with other pages and posts – always the same: if the content was already there and I marked it, then the whole content get the span class. This does not happen if I wrap a new edited text in the page/post – than everything works fine. Does anybody has this phenomen too?
Thank you,
Ute
John-Henry Ross says
Hi. I tried this method and it works like a charm, exactly what I was looking for, thank you. I just want to find out if there is a way to add styles to a subfolder instead of just adding it under a format button. E.g. add a headings subfolder with all heading stylings, add div submenu with div stylings, etc.
dave says
Thanks!
It’s great to show 2 methods, too… my clients cower in fear at handling any code.
I will sometimes use custom fields to „force“ safe additional styles, but the TinyMCE can be handled by some people, so I’ll kee that in mind.
Ciao, Dave
WPBeginner Staff says
you do not need to add the dot in
classes‘ => ‚.alert-blue‘,
It should be
classes‘ => ‚alert-blue‘,
Jeff Gaudette says
Sadly, this didn’t work. I removed the period, but still nothing applies in the editor. I know you’re not a help desk, but here’s a screenshot if you’re interested: http://screencast.com/t/JI0zMvcH
Thanks for all the great stuff you put out!
WPBeginner Staff says
Can you paste the code you added in your functions.php file. Also paste the CSS you are using for these buttons.
Jeff Gaudette says
Sure. Functions:
/*
* Callback function to filter the MCE settings
*/
function my_mce_before_init_insert_formats( $init_array ) {
// Define the style_formats array
$style_formats = array(
// Each array child is a format with it’s own settings
array(
‚title‘ => ‚Alert‘,
‚block‘ => ’span‘,
‚classes‘ => ‚entry p.alert-blue‘,
‚wrapper‘ => true,
),
array(
‚title‘ => ‚Alert Blue‘,
‚block‘ => ‚p‘,
‚classes‘ => ‚alert-blue‘,
‚wrapper‘ => true,
),
array(
‚title‘ => ‚Blue Button‘,
‚block‘ => ’span‘,
‚classes‘ => ‚alert-blue-button‘,
‚wrapper‘ => true,
),
);
// Insert the array, JSON ENCODED, into ’style_formats‘
$init_array[’style_formats‘] = json_encode( $style_formats );
return $init_array;
}
// Attach callback to ‚tiny_mce_before_init‘
add_filter( ‚tiny_mce_before_init‘, ‚my_mce_before_init_insert_formats‘ );
CSS
.alert-blue{
background: none repeat scroll 0 0 #E7F4FD;
border: 1px solid #C5D7E3;
color: #3A5971;
font-size: 18px;
line-height: 24px;
text-align: center;
margin: 0 0 15px !important;
padding: 15px 25px;
width: auto;
}
WPBeginner Staff says
Did you add the CSS in your stylesheet?
Make sure that the style rules you add in your CSS match the classes you add in the Callback function to filter the MCE settings.
Kemi O says
TinyMCE Advanced Professsional Formats and Styles is only supported up to WP version 3.6.1
Keely Worth says
I avoid the Visual Editor like the plague! Only use it if I have to switch to it to use a theme’s built-in shortcode button. Otherwise – never use it.
Blair2004 says
I have tried first method, new style are available but, while i’m selecting one, nothing happens…
Jeff Gaudette says
I am trying to do this with a block and having no luck. Code is:
array(
‚title‘ => ‚Alert Blue‘,
‚block‘ => ‚p‘,
‚classes‘ => ‚.alert-blue‘,
‚wrapper‘ => true,
),
It works when I use span, but this necessitates a span class, which I can’t use.
When i use the above code, nothing happens in the wp editor. I select the text, click the Alert Blue formatting option and nothing happens: http://screencast.com/t/dijujZ2ZdqBy
Any advice?