Vous souhaitez ajouter une extension spécifique à votre site à votre site WordPress ?
Une extension spécifique à un site vous permet d’ajouter facilement des extraits de code à votre site WordPress sans dépendre de votre thème.
Dans cet article, nous allons vous expliquer comment créer une extension WordPress spécifique à un site et pourquoi c’est important.

Qu’est-ce qu’une extension WordPress spécifique à un site ?
Un plugin WordPress spécifique à un site est une extension autonome que vous pouvez utiliser pour ajouter tous les extraits de personnalisation qui ne dépendent pas du thème.
Lorsque vous travaillez sur votre site web, vous trouverez souvent des tutoriels WordPress vous demandant d’ajouter du code au fichier functions.php de votre thème ou à une extension spécifique à votre site.
WordPress n’est pas livré avec une extension spécifique au site. Vous devrez créer le vôtre, puis l’installer et l’activer.
Pourquoi créer une extension WordPress spécifique à un site ?
Comme nous l’avons mentionné précédemment, vous trouverez souvent des tutoriels affichant un code que vous pouvez ajouter au fichier functions.php de votre thème ou à une extension spécifique à votre site.
Ces codes personnalisés peuvent être utilisés pour ajouter de nouveaux types de publications, des taxonomies, des codes courts et des tonnes de hacks pour améliorer votre site.
Si vous ajoutez le code personnalisé au fichier de fonctions de votre thème, il disparaîtra si vous mettez à jour ou changez de thème.
Vous pouvez créer un thème enfant et utiliser le fichier de fonctions du thème enfant pour enregistrer votre code. Cependant, votre code disparaîtra toujours si vous changez de thème.
Un plugin WordPress spécifique à un site vous autorise à ajouter facilement des extraits de code personnalisés à votre site WordPress et à vous assurer qu’ils sont indépendants du thème. Il s’agit d’une extension WordPress autonome, ce qui signifie qu’elle ne dépend pas de votre thème et que vous êtes libre de mettre à jour ou de changer de thème.
Cela étant dit, voyons comment ajouter facilement du code personnalisé à l’aide d’une extension spécifique au site. Nous allons vous afficher deux façons de le faire, et vous pouvez choisir la méthode qui fonctionne le mieux pour vous (Conseil : la méthode #2 est plus facile pour les débutants).
Méthode 1 : Créer manuellement une extension WordPress spécifique au site
Nous savons que cela peut sembler un peu compliqué pour les débutants, mais nous allons essayer de rendre les choses aussi simples que possible pour vous.
Tout d’abord, vous devez créer un nouveau dossier sur votre bureau et lui donner le nom de votre site. Par exemple : mywebsite-plugin.
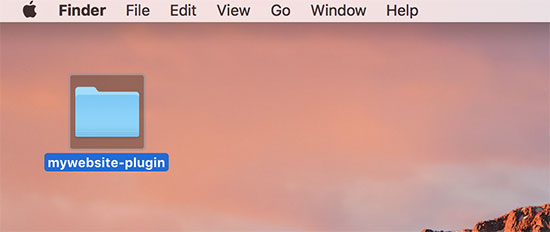
Ouvrez un éditeur de texte sur votre ordinateur, comme Notepad ou TextEdit.
Vous devez créer un nouveau fichier et l’enregistrer sous mywebsite-plugin.php dans le dossier de l’extension sur votre ordinateur.
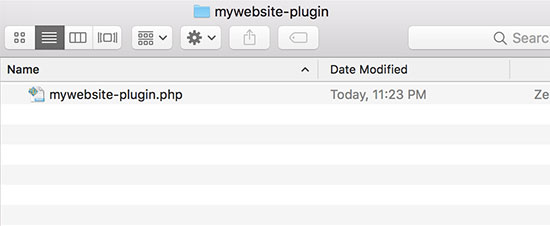
Votre fichier d’extension a besoin d’un code d’en-tête spécifique pour que WordPress puisse le reconnaître en tant qu’extension. Allez-y et ajoutez le code suivant à votre fichier mywebsite-plugin.php :
<?php
/*
Plugin Name: Site Plugin for example.com
Description: Site specific code changes for example.com
*/
/* Start Adding Functions Below this Line */

/* Stop Adding Functions Below this Line */
?>
Vous pouvez remplacer exemple.com par votre propre nom de domaine. Une fois que vous avez fait cela, votre extension spécifique au site est prête.
Il existe deux façons de téléverser votre extension spécifique à votre site. Vous pouvez soit le téléverser via votre panneau d’administration WordPress, soit utiliser le protocole FTP.
1. Installer l’extension spécifique au site depuis la zone d’administration de WordPress (recommandé)
Cette méthode est plus simple et recommandée pour toutes les utilisatrices/utilisateurs.
Tout d’abord, vous devez créer un fichier zip du dossier de votre extension spécifique au site.
Les utilisateurs/utilisatrices de Windows peuvent simplement cliquer avec le bouton droit de la souris sur le dossier de l’extension et sélectionner Send to » Compressed (zip) folder.
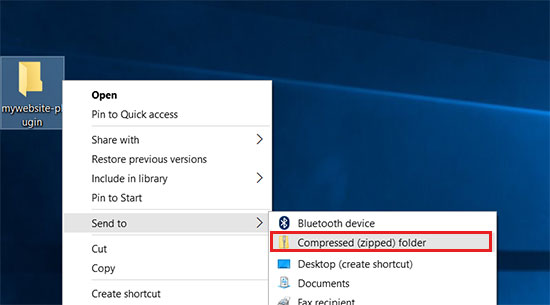
Les utilisateurs/utilisatrices Mac doivent cliquer avec le bouton droit de la souris.
Sélectionnez ensuite « Compresser mywebsite-plugin ».
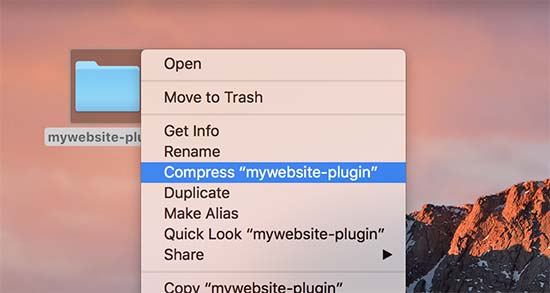
Une fois que vous avez le fichier zip de l’extension, allez sur la page » Plugins » Ajouter une nouvelle dans votre zone d’administration WordPress.
Cliquez ensuite sur le bouton « Téléverser l’extension » en haut de la page.
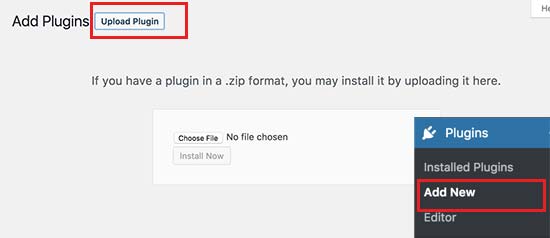
Ensuite, cliquez sur le bouton « Choisissez un fichier » pour sélectionner le fichier zip que vous avez créé plus tôt, puis cliquez sur le bouton « Installer maintenant ».
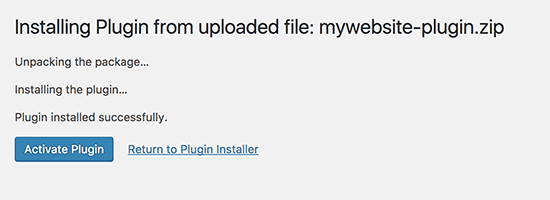
WordPress va maintenant téléverser et installer l’extension pour vous. Une fois téléversé, vous devez cliquer sur le bouton « Activer le plugin » pour commencer à utiliser l’extension spécifique à votre site.
2. Téléverser le plugin WordPress spécifique à votre site via FTP
Pour cette méthode, vous n’avez pas besoin de créer un fichier zip. Vous téléverserez l’extension via FTP.
Tout d’abord, vous devrez vous connecter à votre site à l’aide d’un client FTP.
Une fois connecté, rendez-vous dans le dossier /wp-content/plugins/ dans la colonne du site distant. Sélectionné, vous devez sélectionner le dossier de votre extension spécifique au site et le téléverser sur votre site.
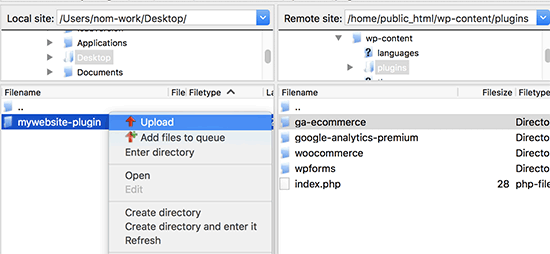
Votre client FTP va maintenant transférer le dossier de l’extension spécifique à votre site sur votre site WordPress. L’extension sera ainsi installée sur votre site.
Cependant, vous devrez toujours activer l’extension pour commencer à l’utiliser. Vous pouvez le faire en allant sur la page « Plugins » dans votre zone d’administration WordPress et en cliquant sur le lien « Activer » sous le plugin spécifique à votre site.

C’est tout. Votre extension spécifique au site est maintenant prête à être utilisée.
Ajout d’extraits de code personnalisés à votre extension spécifique au site
Il existe deux façons de modifier votre extension et d’y ajouter des extraits de code personnalisés.
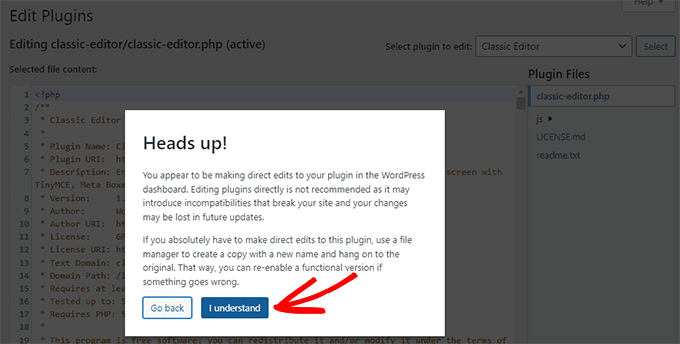
La première méthode consiste à le faire via la zone d’administration de WordPress. Vous pouvez vous rendre sur la page » Éditeurs/éditrices » des extensions.
Un message d’avertissement s’affiche et vous devez cliquer sur le bouton « Je comprends » pour continuer. Si vous souhaitez modifier les fichiers de manière plus sûre, passez à la deuxième méthode ci-dessous.
Ensuite, vous devez sélectionner l’extension spécifique à votre site dans le menu déroulant libellé « Sélectionner l’extension à modifier ».
L’éditeur chargera votre fichier d’extension et vous pourrez y ajouter des extraits de code.
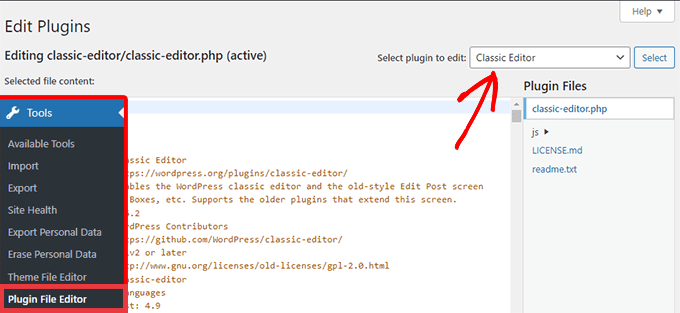
Une fois que vous avez terminé, cliquez sur le bouton « Mettre à jour le fichier » pour enregistrer vos modifications.
S’il manque quelque chose dans votre code ou si cela risque de casser votre site, l’éditeur/éditrices de l’extension annulera automatiquement vos modifications.
Toutefois, si l’éditeur échoue et que vous voyez l’écran blanc de la mort, vous pouvez utiliser le FTP pour modifier votre fichier d’extension et annuler ces modifications.
La seconde méthode consiste à modifier directement le fichier de l’extension en utilisant le protocole FTP. Allez simplement dans le dossier de l’extension en utilisant votre client FTP. Cliquez avec le bouton droit de la souris sur le fichier d’extension et sélectionnez « Voir/Modifier ».
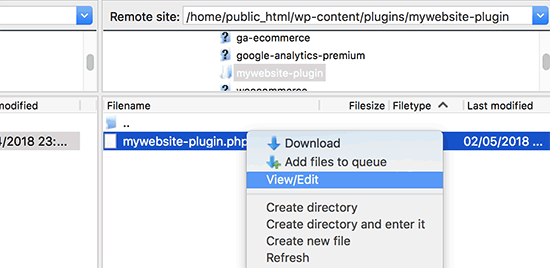
Vous pouvez également télécharger le fichier de l’extension sur votre ordinateur, le modifier, puis le téléverser à nouveau.
Méthode 2 : Ajouter du code personnalisé à l’aide de WPCode (Recommandé)
Cette méthode est beaucoup plus simple et vous permet de mieux gérer vos extraits de code individuels dans WordPress à l’aide de WPCode.
La première chose à faire est d’installer et d’activer l’extension gratuite WPCode sur votre site. Pour plus de détails, consultez notre guide étape par étape sur l’installation d’une extension WordPress.
Une fois activé, le plugin ajoutera un nouvel élément de menu libellé » Extraits de code » dans votre menu d’administration WordPress. En cliquant dessus, vous accéderez à une page où vous pourrez gérer tous vos codes personnalisés.
Pour ajouter votre premier extrait de code, cliquez sur le bouton « Ajouter une nouvelle ».
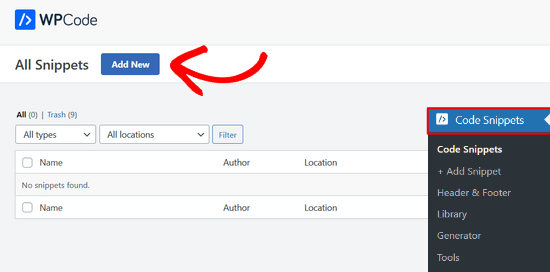
Vous accédez alors à la page « Ajouter un extrait ». Vous pouvez choisir un extrait de code dans la bibliothèque prédéfinie ou ajouter votre code personnalisé.
Pour ajouter un code personnalisé, accédez à l’option « Ajouter votre code personnalisé (nouvel extrait) » et cliquez sur le bouton « Utiliser l’extrait ».
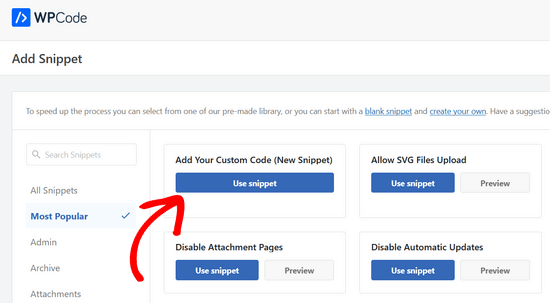
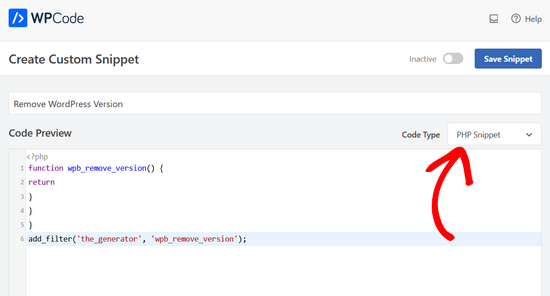
Vous pouvez maintenant saisir un titre pour votre extrait de code personnalisé. Il peut s’agir de n’importe quel élément qui vous aide à identifier le code.
Vous pouvez ensuite coller votre extrait de code dans la boîte de code. Vous devez également sélectionner le type « extrait de code PHP » dans la liste déroulante « Type de code » sur la droite.
Vous pouvez également ajouter des notes pour le code dans la section « Informations de base ».
Vous devriez utiliser cette zone pour écrire ce que fait ce code, où vous l’avez trouvé et pourquoi vous l’ajoutez à votre site. Cela aidera le « futur vous » à se souvenir de la raison pour laquelle le « passé vous » a ajouté ce code.
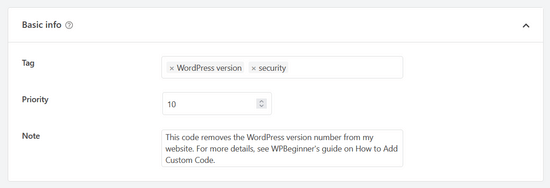
Vous avez également l’option d’assigner des identifiants à vos extraits de code, ce qui peut aider à organiser les extraits de code par sujet et par fonctionnalité.
L’extension vous permet également de sélectionner le mode d’exécution de l’extrait de code. Dans la section » Insertion « , vous pouvez sélectionner la méthode » Insertion automatique » pour insérer et exécuter automatiquement le code sur votre site.
Vous pouvez choisir parmi les options suivantes : zone d’administration, interface publique ou partout. Si vous n’êtes pas sûr, conservez l’option par défaut « Exécuter partout ».

Vous pouvez également choisir la méthode du « code court ». Avec cette méthode, l’extrait n’est pas inséré automatiquement. Une fois l’extrait enregistré, vous obtiendrez un code court que vous pourrez insérer manuellement n’importe où sur votre site.
Vous pouvez également utiliser la section « Logique conditionnelle intelligente » pour afficher ou masquer les extraits insérés automatiquement en fonction d’un ensemble de règles.
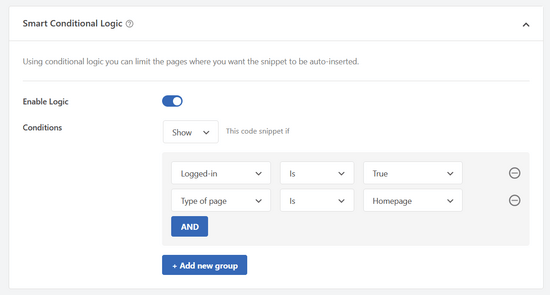
Par exemple, vous pouvez charger des extraits de code uniquement pour les utilisateurs/utilisatrices connectés, charger des extraits de code PHP uniquement sur des URL de pages spécifiques, afficher des extraits de code en fonction du type de page, etc.
Enfin, vous pouvez permuter le commutateur de « Inactif » à « Actif », puis cliquer sur le bouton « Enregistrer l’extrait ».
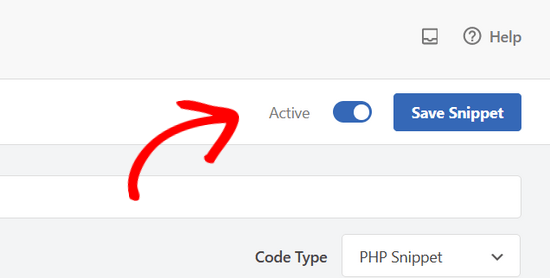
Si vous souhaitez enregistrer l’extrait de code sans l’activer, cliquez uniquement sur le bouton « Enregistrer l’extrait ».
Une fois que vous avez enregistré et activé un extrait de code, celui-ci devient automatiquement effectif sur votre site si c’est la méthode d’insertion que vous avez choisie.
Pour plus de détails, consultez notre guide sur la façon d’ajouter facilement des extraits de code personnalisés dans WordPress.
Nous espérons que cet article vous a aidé à apprendre pourquoi et comment créer une extension WordPress spécifique à un site. Vous pouvez également consulter notre liste d’astuces utiles sur les fichiers de fonctions et les hacks WordPress les plus recherchés pour utiliser au mieux votre extension spécifique à un site.
Si vous avez aimé cet article, veuillez alors vous abonner à notre chaîne YouTube pour obtenir des tutoriels vidéo sur WordPress. Vous pouvez également nous trouver sur Twitter et Facebook.


Syed Balkhi says
Hey WPBeginner readers,
Did you know you can win exciting prizes by commenting on WPBeginner?
Every month, our top blog commenters will win HUGE rewards, including premium WordPress plugin licenses and cash prizes.
You can get more details about the contest from here.
Start sharing your thoughts below to stand a chance to win!
BSubra says
Is it possible to add code snippets like Google Analytics Code, Adsense code in Site Specific Pliugin. Or only possible to add codes we generally put in functions.php file.
I mean, is it possible to add codes in site-specific plugin what we generally put in Header.php file.
WPBeginner Support says
You can do that if you would like, you can also use the insert headers and footers plugin.
Administrateur
Bola Oussou says
hi
Thanks for this tuto
however is there a way to make this plugging(not to be visible) not in plugging list and also in a specific folder (not wp-content folder) ?
Thanls
Tor-Bjorn Fjellner says
Actually yes, there is:
Instead of placing the plugin in …/wp-content/plugins/ you put it in …/wp-content/mu-plugins/ (You may have to create that directory, if it’s not there yet.
Plugins that are placed in mu-plugins are ALWAYS run, so the only way to deactivate a MU plugin (MU currently is construed as « must use ») is to delete it (or remain the directly mu-plugins to something else…).
Judith says
Hi I tried to do the Site-specific plugin, but it is not working, I get this message « The package could not be installed. No valid plugins were found.
Plugin installation failed. »
What do I do?
WPBeginner Support says
Hi Judith,
This usually means that the plugin header information is incorrect. You can try again and make sure that your plugin header is exactly in the format displayed in the tutorial.
Administrateur
Jonathan Manheim says
I get this same error. I have tried maybe 10 times. Uploaded through admin and on FTP. Cannot get it to upload. I am using TextEditor to paste the code. Notice several things you don’t mention in the post that I wonder could be an issue. First, won’t let me save the file as .php. I have to save it as .php.rtf OR .rtf then go back and rename the file after it is saved.
Second, not sure what you mean by making sure the format for the plugin header is exactly the same. Should the line number be in there? If so, I can’t get that to work. If I copy and paste with the line numbers, the green vertical line doesn’t show up and there is no space between the line numbers and the code. Or am I supposed to just copy the code (without the line numbers)? Either way, I’ve tried everything I can with my current Textedit application and it will not work.
Any ideas? I can send you screen shots of exactly what I have if you would like
WPBeginner Support says
Hi Jonathan,
You will need to save file as .php. Please use a different text editor on Windows you can use Notepad or download Notepad++. On Mac, you can use TextEdit or download and install TextWrangler.
You don’t need to copy and paste line numbers.
Kacper says
In my case the issue was that the file had Unicode encoding. Changing it to ANSI fixed the issue.
Ikram says
Hi,
Good day!
Would like to know how to set a white paper in my blog post article to download it with add email address from the visitor.
Thanks, Ikram
WPBeginner Support says
Hi Ikram,
You can do that with the pro version of WPForms. You will need at least Plus plan for that. After users enter their email address and click submit you can redirect them to the download page.
Administrateur
Alain Fradette says
Great info! Thanks so much. I have been using WordPress for years and this little gem made it so much easier!
Abhijeet says
I have edited some code in Style.css . Will it be overwritten if i update a theme?
is it possible to create style css file in this site specific plugin?
LFreitas says
Yes, they will.
You should create a child theme and put your modifications there instead of in the original theme.
Read more: https://www.wpbeginner.com/glossary/child-theme/
dave says
White screen on publishing pages.
The code works to show child pages on a parent page using the shortcode however I am getting white screen. Anyone know why?
Tommy says
The plugin generated 3 characters of unexpected output during activation. If you notice “headers already sent” messages, problems with syndication feeds or other issues, try deactivating or removing this plugin.
Saurin says
I believe best approach to add custom code to site is child theme. No matter if we need to customize theme or not. I mad a practice to always use child theme even if there is no customization. This habit saved my time & effort many times. I dont think it is good to create extra plugin for such customization.
I believe in minimum use of plugin no matter how simple you created one.
Jason says
Which is better, site-specific plugin or Child Theme? or both?
I need to create a custom post type to add some major functionality to my site so is the plugin better or the child theme and its functions.php?
Thanks!
Josh says
The thing is, is that you’re creating the plug-in yourself, using the functions the same exact way. So the answer to your question would be that neither is better, because you should be using them WITH each other.
Josh says
Think of the site-specific plug-ins as functions that are independent of your theme.
Vickey says
How would I create a create a new plugin directory in Azure? I have WordPress running on Azure using MS SQL Server, which I activated using Project NAMI.
vishal says
not working on multisite with publisher theme can you help me this is my site and also tell me how can i remove featured image inside the post not from front page latest post
Nadia Khan says
Hi there,
You WP Beginners are rock. and I want to thank you for your Struggles for us.
Now come to the point. I have installed an theme and in that theme, there is an function that is showing wp toolbar for guests, I have tried so many times to find this function in theme files to remove this, but i can’t. So please help me to remove that toolbar, that is showing to every visitor with wordpress logo and wordpress’s own link to their website. Screen Shot is attached.
Manuel says
Does something like this work for plugins too? Im finding that I am making a few changes to plugins that I add to my site….many times deleting certain lines of code I dont want. I’m assuming that after I update that plugin, all my changes will be erased. How can I avoid this?
Elizabeth says
Hi, thanks for the post. I’m getting an error when I activate the plugin for some reason:
Parse error: syntax error, unexpected ‘*’, expecting identifier (T_STRING) on line 9
Any ideas what I’ve done wrong?
Thanks!
WPBeginner Support says
Hi Elizabeth,
There is an unexpected asterisk sign in the code on line 9 which is blocking the php script. Edit the file again and copy the code exactly as it is shown above. Make sure that you don’t copy line numbers in the code click on the Copy button at the top right corner of the code snippet box
.
Administrateur
Steven Denger says
I tried naming the new folder as you did in the example but I got an error that said something in the way of you cannot use a name like this. This Instruction may be helpful to some – but it is very difficult and confusing to me and does not help at all. As I said – you need to explain this down to the fine details or otherwise these tutorals will not help. The name of this site is wp BEGINNER – and that is what I am. You project these tutorals to the more experienced.
I guess I will have to start going elswhere to get beginners instructiions because, most of time, wp beginner is not helpful – it is more like a techs only club.
Steven Denger says
How do you get to the /wp-content/plugins/yoursitename-plugin/ in wordpress and upload a file there? I am lost on the first line of instruction. You guys always assume that we know these things in your instructions but they are not clear enough.
I went to cpanel and opened up the wpcontent > plugins – and it shows a list of plugins – but I am lost from this point. How do I go about uploading a file in here? I am a beginner – and you guys seem to always explain things like your instructing experienced techs. I am not but I go to WP Beginner to try to learn. It is usually difficult to follow your instructions and I end up having to go somewhere else in google search to find things explained down to a beginners level.
If you want to be more helpful try breaking things down a little more simple.
Manuel says
Hey Steven,
I know the feeling! I’m far from a expert with wordpress and I pretty much live on google searches and this site trying to learn. I know a little bit and was able to get this to work. Send me your email and I’ll send you the steps with screenshots. I havent tested putting actual code into the plugin so we’ll see if that works….but I was able to see the newly created plugin on my admin page
Steven Denger says
thank you manuel
NiceRazer says
Hello, can you please tell me how to do that to? I’ve tried finding posts that would help me with this same prob but still didnt found it.
JoAnn Chateau says
Thank you for the great advice and simple how-to instructions. I easily created a Site-Specific WordPress Plugin for my site and enabled shortcodes for widgets. Now I have less worry when changing themes, and I didn’t need to install another plugin. Again, thanks!
george says
hi i followed the instruction on how to make a site plugin for my site. ive uploaded it but cant see it in my list of plugins.
any ideas why?
Dawn says
I cannot find where the folders live in the plug in directory. I tried searching for: /wp-content/plugins/yoursitename-plugin/ (with my site name).
Kara says
Never mind, I figured it out and got it activated. My hosting server was acting up, must have timed out or something…cheers!
Kara says
I followed your instructions but i don’t know how to activate it. It doesn’t show in my list of plugind in my wp-admin. Can you help?
Sheyejinkazama says
Thank you. Thank you so so much.
Molly says
How do you get the plugin to « Network Activate » on a multi-site?
Stephanie says
I’m getting the same error as Sonya above. Does anyone have a fix?
Parse error: syntax error, unexpected T_LNUMBER in /home/statisu0/public_html/wp-content/plugins/statisticshowto-plugin/statisticshowto.com-plugin.php on line 10
WPBeginner Support says
your plugin file name contains .com in it. It should be statisticshowto.php instead.
Administrateur
Susan says
Hi again. I’ve been reading through all of the comments above and, while some show your answer and resolution to the problem, many don’t. So it’s hard for me to learn from how others resolved their problems! Anyway, here’s what I’m wondering: if by following the instructions in this post to create a folder within my « plugins » folder, how will I be able to see my new site-specific plugin file?
For example, I followed the instructions to create a folder called susansinthegarden-plugin. Then I put my plugin code in a file called susansinthegarden-plugin.php. I can’t see the plugin when I go to plugins on my dashboard.
Is this because the new plugin text file exists in a sub-folder under « plugins »? I can’t figure out what I’m missing but really need to resolve this. Is there anyone out there who can help me? Thanks so much!
WPBeginner Support says
No. Please make sure that your plugin’s header area is properly formatted.
Administrateur
emy says
Hi,
What is a plugin header and how do I format it?
WPBeginner Support says
Hey Emy,
The plugin header is the part that tells WordPress that this file should be treated as a plugin. It also tells WordPress the name of the plugin, version, and other information.
In the code shown above, the header part begins right after the first line and ends at line 5. It contains plugin’s title and description.
Susan says
OK, I resolved my program. Not being a code-writer, I didn’t realize that there was a separate header to wrap around the code I was borrowing. Duh. Thanks for your help.
Susan says
I followed your instructions to create a folder under wp-content/plugins etc. and put the file containing the code into that folder but I can’t see my new plugin when I go to my dashboard and look under plugins. Did I miss a step? Thanks in advance for your help!
Edgar Ramirez says
Hello
I created the directory and the php file but i cannot see the plugin at all
/wp-content/plugins/yoursitename-plugin/
Open a blank file and save it as “yoursitename-plugin.php”
dont see it on the dashboard plugin list and neither in the Plugin>editor
Can you please help me
Sonia Lacasse says
Never mind! Looks like I found the problem. Thanks for your awesome work!
Sonia Lacasse says
When I try to activate the plugin, I get the following error message:
Plugin could not be activated because it triggered a fatal error.
Parse error: syntax error, unexpected ’06’ (T_LNUMBER) in /var/www/domain/wp-content/plugins/ETK-PLUGIN/ETK-PLUGIN.php on line 10
Can you please help?
Thanks!
Catherine Argyros says
hi there, when i put this in the directory
I received this error message
The plugin generated 2 characters of unexpected output during activation. If you notice “headers already sent” messages, problems with syndication feeds or other issues, try deactivating or removing this plugin.
but my plug in is activated….. please help me understand what is going on?
thank you
WPBeginner Support says
Most probable cause for this error could be an empty space after the last ?> closing tag.
Administrateur
error message says
wonderful, thats exactly what the problem was. Thank you for helping me create my first plugin!
WPBeginner Support says
Glad to help
xin a day says
« All you have to do is create a new folder in the plugins directory. Example: /wp-content/plugins/yoursitename-plugin/
Open a blank file and save it as “yoursitename-plugin.php”
Put the following code in the file: »
i hv few question on these .
1. i can’t create a folder onthe plugin directory.
2. where to open a blank file ?
3. the plugin diretory cant install that file.
thank you
Sacha says
Awesome idea! I’ve always found functions.php a pain, so this method works great!
Alan Shapiro says
This is a really useful post–thank you! Perhaps someone else asked this and I just missed it in all the comments, but: will a site-specific plugin override a function that is in the theme’s functions.php? For instance, if there is a « remove_action » in the functions.php, will the same « add_action » in the plugin take precedence?
WPBeginner Support says
Both functions.php file and site-specific plugin are treated as plugins. Functions.php file loads after plugins but they do not have precedence over eachother. This is why using the same function in both files can cause unexpected results. The best way to override pluggable code is by using hooks and filters.
Administrateur
Robert Masters says
I’m building a plugin at the moment for a multisite network and I need certain functionality available only in specific sites, so this is a perfect article for me right now.
I have one question though…..how do I name the site plugin folder for a site that is created as a subdomain? Example: subdomain.mainsite.com would it be subdomain-mainsite-plugin or just subdomain-plugin?
Hope this makes sense, question based on your tutorial.
hans says
very good. when you create a second instance don’t forget do give the « register and load » function an own name, like i did
Eric Ellis says
That’s great. I always figured it was pretty simple. Thank you for the information.
Jide says
Nice one there. Kindly update the post to inform readers that after activating the plugin, they will have to click on the « edit » link on the plugins page, to add their codes.
Most newbies might not know this…
WPBeginner Support says
Actually we do not recommend editing plugins and themes from WordPress admin area. Instead, we would recommend editing your plugins in a text editor via FTP client. This way in case of an error you would be able to quickly fix it without losing access to admin area for too long.
Administrateur
Mark Holland says
Thank you thank you thank you!! This has solved an issue that’s been puzzling me for weeks – and now solved in less than 1 minute.
Can’t express how grateful I am for you sharing your knowledge – thanks again!
Luca says
Thank you for the advice! But now I’m confused: what’s the difference between this method and the plugin « Code Snippet »? Is the result the same? Or do they accomplish the same thing in a different way?
Malcolm says
Three years later this post is still giving – It’s changed the way I think about customising wordpress – Thank you!
I tried this today and created a a site-specific-plugin with code to hide the wordpress menu bar for non-admins, and to add my latest post to a ‘Current issue’ menu item. Both worked perfectly.
But the third snippet I added to the plugin failed to work. When I copied the code to the child theme’s functions.php it worked as expected.
Can you explain why this would happen?
I’m trying to modify the effect of the plugin « Restricted Site Access » by allowing access to more than a single page. The code I tried in my site specific plugin and the functions.php was:
//
add_filter( ‘restricted_site_access_is_restricted’, ‘my_restricted_check’ );
function my_restricted_check( $is_restricted ) {
global $wp;
if (
$wp->query_vars[‘pagename’] == ‘contact’ ||
$wp->query_vars[‘pagename’] == ‘subscribe’ ||
$wp->query_vars[‘name’] == ‘aplr-2013-volume-21-number-2’
)
$is_restricted = false;
return $is_restricted;
}
Any advice or comment would be welcome. I’m confused!
harklord says
after trying this. My site is opening blank… Please help.. Av tried deleting the files i created but still blank
WPBeginner Staff says
Make sure that your stored the plugin’s php file in /wp-content/plugins/ folder and not in your theme directory.
Mohammed Amine says
Fixed, actually it is necessary to add that php comment in the php file, or else it wont appear on the admin panel.
That php comment is used to show the discription of the plugin in the admin panel.
Paolo Bergomi says
Hello,
This is Paolo, i am building my website and theme with WP last edition 4.1.1.
i Am trying to learn custom type fields and I found your website very useful. i hav ea issue, though: even if following this post i created the folder my theme plugin and with the related file .php you mentioned here, for the site specific plugin, copy all in localhost using WAMP server. i opened then my dashboard, went to plugins but my new plugin dont appear. what is going on? did i miss anything? thanks
paolo
WPBeginner Staff says
You can try and fit your modifications in site-specific plugin by using filters. However, since you had to edit specific files we doubt that all your edits can be implemented in a site-specific plugin using filters. In that case you should make those changes into a child theme. All your custom CSS should also go into your child theme’s stylesheet. You can also use your site-specific plugin to enqueue a custom stylesheet.
Bas van der Linden says
Hmm, looks like my last post went missing while registering for this annoying disqus plugin.
Anyways:
At first I’d like to thank you for sharing this information.
Secondly I do have several questions regarding this post.
1) Is it possible to also make site specific plugins for other .php’s where I’ve added some codes?
Such as front-page.php post-page.php and post-archives.php
2) Is it possible to do something like this for .css codes?
I run genesis as framework(Parent theme) and a child-theme that I’ve downloaded.
Now since there are no grand-child theme’s in wordpress I’ve made my alterations in the child-theme’s folder
This includes a lot of different .css edits, Is there a way to make site specific .css files/plugins like this, so I can maintain the origional child-theme (and perform an update if any updates are released)?
3) When I create a site-specific plugin to change the footer and activate it, I will see both the origional footer and my own footer on the site.
Is there a way to go around this?
My plugin looks like this:
Once again thank you for sharing this information on site-specific plugins, and I hope to hear soon from you guys.
Chelsey says
Thank you for your patience… I’m still trying to figure out how to ‘create a new folder to plugins directory’
Rodney Lacambra says
Hi Chelsey. Consider this guide:
Go to « File Manager ». It will take you to « /public_html » directory. Click on « wp-content >> plugins » . This is where you will « create » a folder called « yoursitename-plugin ». After that, create a file using some text editor(notepad++), paste the code given above and save the file as « yoursitename-plugin.php ». Upload it to « yoursitename-plugin » folder and activate it in your wordpress admin area. Easy as that!
Hope it helps you a lot.
Regards,
NomadTech
Benjamin Mukasa says
This is a great post. I followed the instructions but the plugin is not appearing in my plugin list.
Paolo Bergomi says
me same..where did we make wrong? thanks in advance for any tips to solve this
WPBeginner Staff says
yes you can use it for multiple functions.
WPBeginner Staff says
Your code seems to be correct. Here is what you can do:
Make sure you have saved the plugin file in the /wp-content/plugins/ directory.
Make sure that your plugin file name is correct. We recommend using yoursitename.php format. For example if your domain name is black-circles then your plugin file name should be black-circles.php
SteveMTNO says
I originally had the plugin file (bc-plugin.php) in its own directory called blackcircles/wp-content/plugins/bc-plugins. That didn’t work.
Then I tried moving the bc-plugin.php file from that folder to the blackcircles/wp-content/plugins folder. Still doesn’t show up in my admin panel.
Do I have to « enable » it first before it shows up or something?
Confused….
WPBeginner Staff says
If the file is correctly placed in your plugins folder then you will see it in your WordPress admin area under Plugins. If you see your plugin there, then you will have to click on the activate link below the file to activate the plugin.
Did you try renaming the file to something else?
SteveMTNO says
Tried renaming it 3 times – none of them show up….
I must be doing something wrong (or not doing something that I should be doing)…
SteveMTNO says
So can I use this one site-specific plugin for multiple functions, or is it best to do something similar to this for each one?
Michael Cuomo says
I’m having a similar issue with mine. I’ve created a site specific plugin to create a custom content type, but the custom content type is not showing up in my admin panel underneath pages like it should.
SteveMTNO says
I posted this yesterday, but it seems to have vanished…
Anyway, I followed the instructions above, but can’t see the site-specific plugin in my admin panel.
Here’s a link to my code:
http://pastebin.com/fbeGr8gh