¿Quieres mostrar información acerca de tus autores en tus entradas de WordPress? Esta es una buena forma de presentar tu equipo a los lectores y además potenciará tus señales E-E-A-T de Google, lo que es estupendo para el SEO.
Puede mostrar información sobre el autor de cada entrada en un cuadro de biografía. Esta pequeña sección presenta al autor, destaca sus conocimientos y experiencia y enlaza con los medios sociales. Sin embargo, algunos temas de WordPress no tienen esta característica incorporada, o es posible que desee personalizarla.
En este artículo, le mostraremos cómo escribir una biografía de autor que potencie sus señales E-E-A-T de Google y cómo añadir fácilmente un cuadro de información de autor a su blog de WordPress.

Escribir una biografía de autor que impulse Google E-E-A-T
Mostrar a la persona real que está detrás de su contenido en WordPress ayuda a crear credibilidad entre los lectores y puede reforzar la autoridad de su sitio.
Esto se debe a que las directrices E-E-A-T de Google tienen en cuenta los conocimientos, la experiencia, la autoridad y la fiabilidad a la hora de seleccionar fuentes de información fiables. A continuación, clasifican este contenido en las primeras posiciones de los resultados de búsqueda.

He aquí cómo escribir una biografía de autor que contribuya a cada factor E-E-A-T:
Experiencia
La biografía permite demostrar el profundo conocimiento del tema por parte del autor, así como su formación y cualificaciones en la materia.
Asegúrese de que enumera los títulos, certificaciones o afiliaciones profesionales pertinentes que demuestren sus conocimientos y cualificaciones en su campo.
También debe mencionar brevemente los premios y reconocimientos que demuestren o verifiquen la experiencia del autor.
Experiencia
La biografía permite resumir la experiencia de primera mano del autor acerca de los temas sobre los que suele escribir, incluidos sus logros y perfiles más importantes. El objetivo es dar una idea de cómo su experiencia le ha capacitado para escribir contenidos autorizados sobre el debate elegido:
- Utilice un número concreto de años para mostrar la experiencia del autor.
- En lugar de limitarse a mencionar su sector, enumere áreas específicas de experiencia dentro de ese campo en las que haya mejorado sus habilidades.
- Mencione brevemente la experiencia laboral, los proyectos o el trabajo voluntario relevantes que demuestren cómo han adquirido sus conocimientos.
Autoritatividad
Una biografía permite destacar el reconocimiento del autor por parte de expertos en la materia, como los premios que ha recibido y las publicaciones en las que ha aparecido.
Mencione las publicaciones en las que ha colaborado, las entradas que ha escrito como invitado para sitios web de prestigio o las charlas en las que ha participado. Esto demuestra su prestigio dentro de su nicho.
También querrá mencionar brevemente su participación en organizaciones o comunidades del sector. Esto indica que participan activamente en el sector.
Fiabilidad
Una biografía le permite ser transparente acerca de quién está escribiendo su contenido. He aquí algunos consejos:
- Mantenga un estilo de redacción profesional e informativo en las biografías de sus autores.
- Explique brevemente cómo el contenido, las ideas y la perspectiva de su autor benefician a los lectores.
- Considere la posibilidad de enlazar con sus perfiles en los medios sociales, donde se relacionan con el público, para que parezcan personas reales.
Consejos: La biografía debe ser informativa pero concisa, idealmente de 3 a 5 frases. Asegúrese de escribir en tercera persona para dar un tono más profesional. Por último, incluya un retrato profesional para añadir un toque personal y hacer la biografía visualmente atractiva.
Aviso de cómo hemos optimizado esta biografía de autor de WPBeginner para Google E-E-A-T:
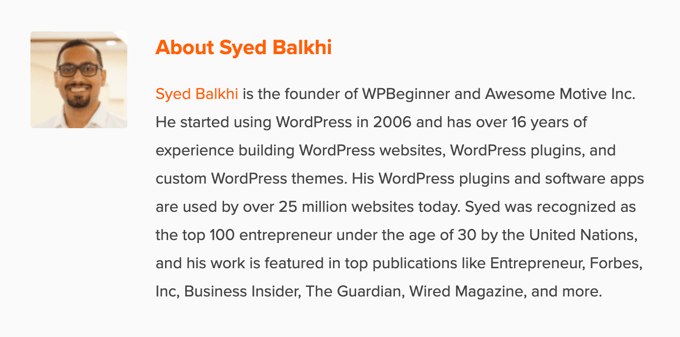
Aquí tienes una plantilla de biografía de autor que puedes adaptar a tu sitio web:
[Name] is a [Job Title/Area of Expertise] with over [Number] years of experience in [Industry]. [He/She/They] has a strong background in [specific areas of experience] gained through [relevant work experience, projects, or volunteer work]. [He/She/They] holds a [Degree] in [Field of Study] from [University Name] and is a certified [Certification] professional. [He/She/They] has [briefly mention achievements or publications]. [Name] is passionate about [area of interest] and enjoys helping readers by [explain how your content benefits them].
Ahora que ha escrito su biografía de autor, debe mostrarla en su sitio web de WordPress.
Mostrar la biografía del autor en WordPress
Por defecto, la mayoría de los temas de WordPress muestran el nombre del autor en una entrada de blog, pero ninguna otra información acerca de él.
Aunque puede presentar a sus autores en la página “Acerca de” de su sitio, no todos los lectores la visitarán.
Recomendamos mostrar un cuadro de información sobre el autor en cada entrada del blog que haya escrito el autor. Esto permitirá a sus lectores saber más acerca de la persona que está detrás de cada entrada en un sitio WordPress con varios autores.
También es una buena forma de atraer a nuevos escritores y animarles a que envíen contenidos a su sitio.
Vamos a echar un vistazo a una serie de métodos que puede utilizar para añadir una biografía de autor o cuadro de información en WordPress. Simplemente usa los enlaces rápidos de abajo para saltar directamente al método que quieras usar:
- Adding Author Info Box Using Your WordPress Theme Settings
- Adding Author Info Box in WordPress Using a Free WordPress Plugin
- Display Author Info Box in WordPress Sidebar Widget Area
- Adding Author Info Box by Adding Code to WordPress
- Adding Author Info Box in WordPress With AIOSEO's Author SEO (Recommended)
- Displaying Author Info Box With a WordPress Page Builder
1. Cómo añadir el cuadro de información del autor utilizando los ajustes de su tema de WordPress
Algunos de los mejores temas de WordPress vienen con un cuadro de información del autor que se muestra automáticamente debajo de cada artículo.
En primer lugar, deberás comprobar si tu tema actual es compatible con / da soporte a un cuadro de información del autor.
Para ello, vaya a Usuarios ” Todos los usuarios en su panel de administrador de WordPress.
A continuación, pase el cursor sobre el perfil de usuario que desee modificar y haga clic en el enlace “Editar”.
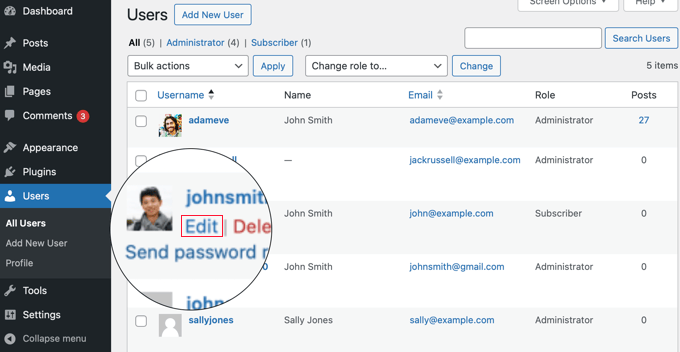
Accederá a la pantalla de edición de perfiles.
Desplácese por la página hasta la sección “Información biográfica” para añadir la biografía del autor. También puede utilizar HTML en este campo para añadir manualmente enlaces a los perfiles de medios sociales del autor.
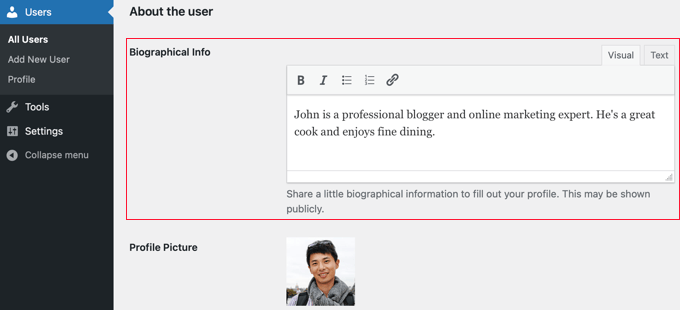
La foto de perfil del autor se obtiene automáticamente del servicio Gravatar. Si el autor ya ha establecido una cuenta, se mostrará automáticamente.
Una vez que haya terminado, asegúrese de hacer clic en el botón “Actualizar perfil” situado en la parte inferior de la página para guardar los cambios.
Ahora, puede ver cualquier artículo en su sitio web escrito por ese autor, y su cuadro de biografía de autor estará activo.

2. Cómo añadir el cuadro de información del autor en WordPress usando un plugin gratuito de WordPress
Si tu tema no tiene la opción de mostrar un cuadro de biografía del autor o quieres personalizar su aspecto, entonces este método es para ti.
Para ello, vamos a utilizar el plugin Simple Author Box. Es uno de los mejores plugins de biografía de autor para WordPress que te permite añadir una biografía de autor personalizable a tu sitio.
Nota: También existe una versión pro que ofrece características adicionales como mostrar un cuadro de autor antes o después del contenido, enlazar sitios web, incluir invitados y coautores, estilos adicionales de iconos sociales, etc.
Lo primero que tienes que hacer es instalar y activar el plugin. Para más detalles, consulte nuestra guía para principiantes sobre cómo instalar un plugin de WordPress.
Una vez activado, debe visitar Apariencia ” Caja de Autor Simple para establecer los ajustes del plugin.
Aquí puedes elegir la visibilidad, los colores, la tipografía, el estilo gravatar para la foto del autor y mucho más.
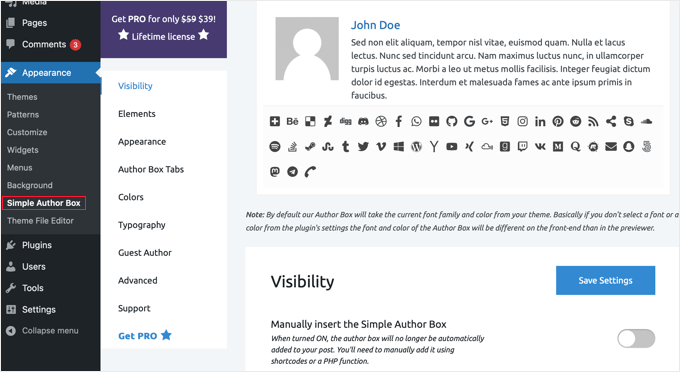
Cuando hayas terminado, asegúrate de hacer clic en el botón “Guardar ajustes” para guardar los cambios.
A continuación, visite Usuarios ” Todos los usuarios y haga clic en el enlace “Editar” situado debajo del usuario al que desea añadir una biografía.

Ahora puedes añadir la biografía del usuario a su perfil.
Simplemente desplázate hasta la sección “Acerca del usuario” y pega la biografía en el campo “Información biográfica”.

También puede utilizar HTML en este campo para añadir enlaces manualmente o utilizar las opciones básicas de formato HTML.
A continuación, busque la sección “Enlaces a medios sociales (cuadro de autor simple)” en la parte inferior de la página.
Aquí puedes añadir enlaces a medios sociales para los perfiles de redes sociales de tus autores. El plugin solo mostrará los iconos de las redes sociales en las que introduzcas una URL.
Debe seleccionar el perfil de medios sociales que desea añadir en el menú desplegable y, a continuación, añadir la URL correcta.
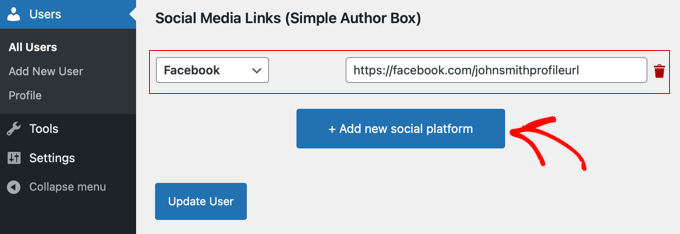
Puede añadir más enlaces sociales al hacer clic en el botón “+ Añadir nueva plataforma social”.
Una vez que haya terminado, asegúrese de hacer clic en el botón “Actualizar perfil” para guardar los cambios en su perfil de usuario.
Ahora puede visitar cualquier artículo escrito por ese usuario para ver el cuadro de información del autor en acción.

3. Mostrar cuadro de información de autor en WordPress Sidebar Widget Area
¿Quieres mostrar la información del autor en la barra lateral o en la zona de widgets en lugar de debajo del artículo? Si es así, este método es para ti porque te permite mostrar la caja de información del autor en un widget de la barra lateral.
Para este método, necesitarás instalar y activar el plugin Simple Author Box que usamos en el método anterior. Para más detalles, consulta nuestra guía paso a paso sobre cómo instalar un plugin de WordPress.
Sugerencia: El plugin Simple Author Box proporciona un widget para temas clásicos y un bloque para temas de bloques en el editor de bloques de WordPress y en el editor completo del sitio.
En esta guía práctica te mostraremos cómo añadir rápidamente el widget Simple Author Block al área de widgets de un tema clásico.
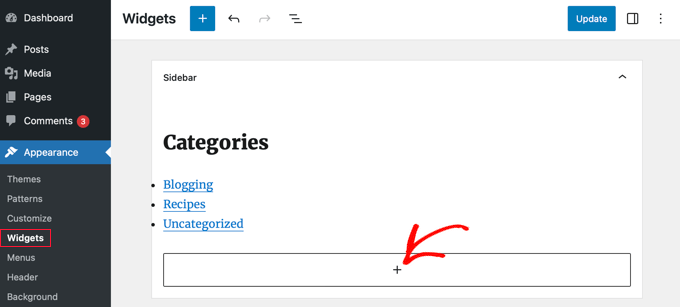
Para activarlo, visite Apariencia ” Widgets en su escritorio de WordPress.
A continuación, haga clic en el icono “+” para añadir un bloque en la zona del widget “Barra lateral”.
Nota: Si no ves la opción del menú Widgets, entonces tu sitio web está usando un tema de bloque. Puedes ver nuestro tutorial sobre cómo usar el editor de sitios completo de WordPress para más detalles.

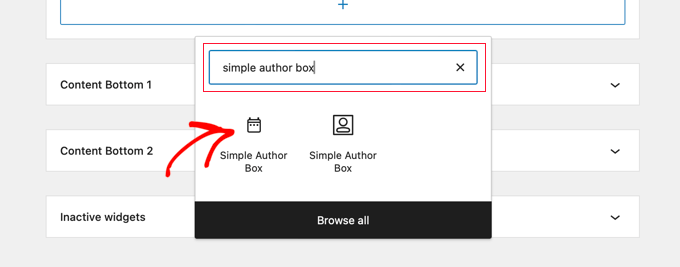
A continuación, busque “Simple Author Box”. Verás dos iconos: el widget Simple Author Box y el bloque.
A continuación, haga clic en el primer icono para seleccionar el widget Bloque de autor simple.
El widget incluye varias opciones para personalizar su visualización.
Es importante asegurarse de que la opción “Autodetectar” está seleccionada en el menú desplegable “Elegir autor/usuario”. Esta es la opción por defecto, y se asegurará de que la biografía del autor de la entrada se muestra automáticamente.
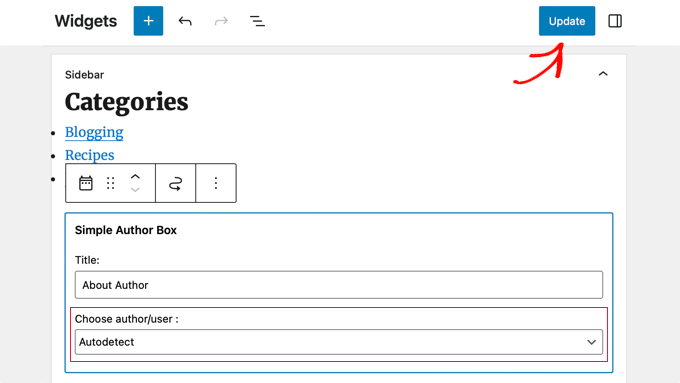
A continuación, haga clic en el botón “Actualizar” de la parte superior de la pantalla para establecer los ajustes del widget.
Ya puedes visitar tu sitio web para ver el widget de biografía del autor en acción.

Este plugin obtiene la información del usuario de su perfil de WordPress. Tú o tus autores tenéis que rellenar la información de sus biografías editando sus perfiles, como hemos mostrado anteriormente.
Para saber más acerca de la edición de perfiles de usuario, consulte nuestra guía sobre cómo añadir nuevos usuarios y autores a su blog de WordPress.
4. Añadir cuadro de información del autor añadiendo código a WordPress
Este método es para usuarios más avanzados porque requiere editar los archivos de su tema de WordPress. Si no lo has hecho antes, consulta nuestra guía sobre cómo copiar y pegar código en WordPress.
A continuación, puede añadir el siguiente fragmento de código a su archivo functions. php o utilizando un plugin de fragmentos de código:
function wpb_author_info_box( $content ) {

global $post;

// Detect if it is a single post with a post author
if ( is_single() && isset( $post->post_author ) ) {

// Get author's display name
$display_name = get_the_author_meta( 'display_name', $post->post_author );

// If display name is not available then use nickname as display name
if ( empty( $display_name ) )
$display_name = get_the_author_meta( 'nickname', $post->post_author );

// Get author's biographical information or description
$user_description = get_the_author_meta( 'user_description', $post->post_author );

// Get author's website URL
$user_website = get_the_author_meta('url', $post->post_author);

// Get link to the author archive page
$user_posts = get_author_posts_url( get_the_author_meta( 'ID' , $post->post_author));

if ( ! empty( $display_name ) )

$author_details = '<p class="author_name">About ' . $display_name . '</p>';

if ( ! empty( $user_description ) )
// Author avatar and bio

$author_details .= '<p class="author_details">' . get_avatar( get_the_author_meta('user_email') , 90 ) . nl2br( $user_description ). '</p>';

$author_details .= '<p class="author_links"><a href="'. $user_posts .'">View all posts by ' . $display_name . '</a>';

// Check if author has a website in their profile
if ( ! empty( $user_website ) ) {

// Display author website link
$author_details .= ' | <a href="' . $user_website .'" target="_blank" rel="nofollow">Website</a></p>';

} else {
// if there is no author website then just close the paragraph
$author_details .= '</p>';
}

// Pass all this info to post content
$content = $content . '<footer class="author_bio_section" >' . $author_details . '</footer>';
}
return $content;
}

// Add our function to the post content filter
add_action( 'the_content', 'wpb_author_info_box' );

// Allow HTML in author bio section
remove_filter('pre_user_description', 'wp_filter_kses');
Este código simplemente obtiene la información del autor y la muestra debajo de las entradas de WordPress.
Recomendamos añadir este código con WPCode, que es el mejor plugin de fragmentos de código para WordPress. Hace que sea seguro y fácil de añadir código personalizado en WordPress sin necesidad de editar el archivo functions.php de su tema.
Para empezar, necesitas instalar y activar el plugin gratuito WPCode. Si necesitas ayuda, consulta este tutorial sobre cómo instalar un plugin de WordPress.
Una vez activado, vaya a la página Fragmentos de código ” + Añadir fragmento desde su escritorio de WordPress.
Desde allí, busque la opción “Añadir su código personalizado (nuevo fragmento)” y haga clic en el botón “Usar fragmento” situado debajo.

A continuación, añada un título a su fragmento de código y pegue el código anterior en el cuadro “Vista previa del código”.
No olvide elegir “Fragmento de código PHP” como tipo de código en la lista desplegable de la parte derecha de la pantalla.
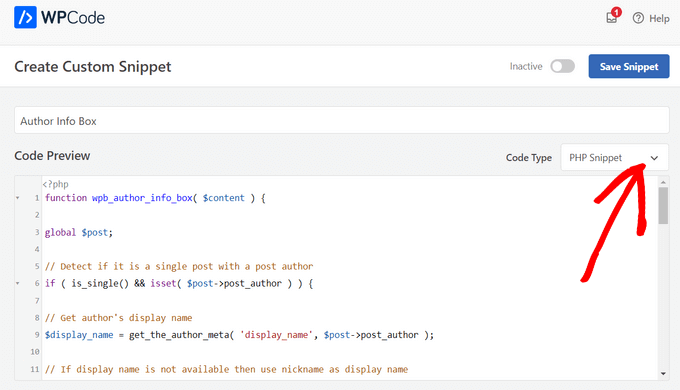
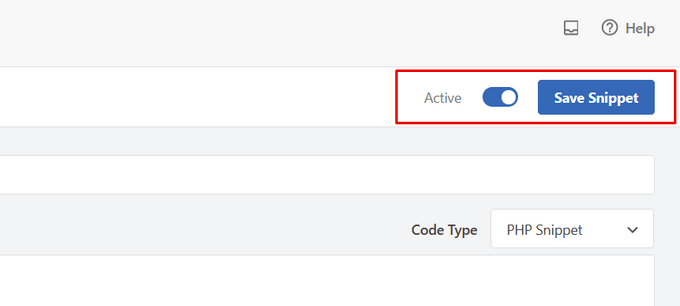
Después, basta con activar el conmutador de “Inactivo” a “Activo”.
Pulse el botón “Guardar fragmento de código”.
Ahora, necesitas darle estilo a esta caja de información del autor para que se vea bien y combine con tu tema de WordPress. Si no conoce CSS, consulte nuestra guía sobre cómo añadir fácilmente CSS personalizado a su sitio de WordPress.
A continuación, vaya a Apariencia ” Personalizador en su panel de administrador de WordPress.
Aparecerá el panel Personalizador del tema de WordPress. Debe hacer clic en la pestaña “CSS adicional”.
Si no encuentra el personalizador de temas, consulte nuestro tutorial sobre cómo corregir la falta del personalizador de temas en WordPress.
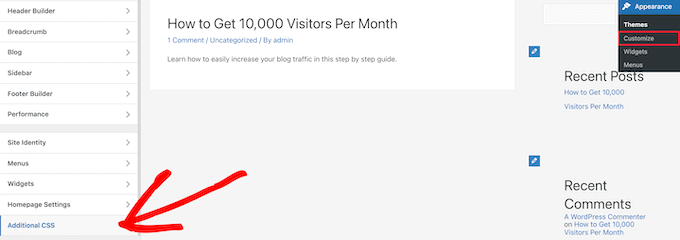
Esto le permite añadir código CSS personalizado directamente a su tema de WordPress y ver los cambios en vivo.
Aquí tienes algunos ejemplos de código CSS que te ayudarán a empezar:
.author_bio_section{
background-color: #F5F5F5;
padding: 15px;
border: 1px solid #ccc;
}

.author_name{
font-size:16px;
font-weight: bold;
}

.author_details img {
border: 1px solid #D8D8D8;
border-radius: 50%;
float: left;
margin: 0 10px 10px 0;
}
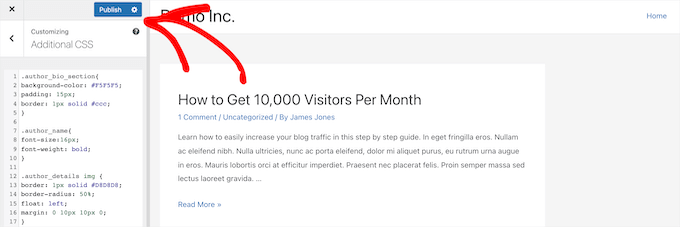
A continuación, añada el código directamente en el cuadro “CSS adicional”.
A continuación, haga clic en el botón “Publicar” para aplicar los cambios.
Ahora, puede visitar una de las entradas de su blog de WordPress y ver su nuevo cuadro de información de autor.
Este es el aspecto de la biografía del autor en nuestro tema.

5. Cómo añadir un cuadro de información sobre el autor en WordPress con la extensión SEO para autores de AIOSEO
All in One SEO (AIOSEO) es el mejor plugin SEO para WordPress del mercado, con más de 3 millones de usuarios. También puedes utilizarlo para añadir cuadros de información detallada sobre el autor en cualquier entrada o página de WordPress.
Este método utiliza la potente extensión SEO para autores de AIOSEO y puede mejorar su SEO más que los otros métodos.
Para empezar, necesitas instalar y activar el plugin All in One SEO. Si necesitas ayuda, consulta nuestro tutorial sobre cómo instalar un plugin de WordPress.
Nota: Existe una versión gratuita de All in One SEO que puede utilizar. Sin embargo, para acceder a las características de SEO para autores, necesitas el plan AIOSEO Pro.
Una vez que el plugin esté activado y establecido, vaya a Usuarios ” Todos los usuarios desde el escritorio de WordPress.
A continuación, haga clic en el nombre del autor o en el enlace “Editar” situado debajo.
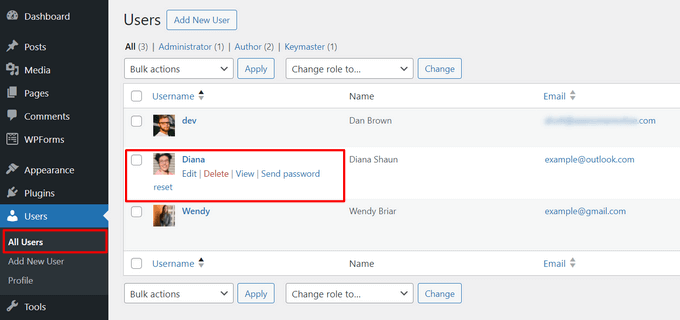
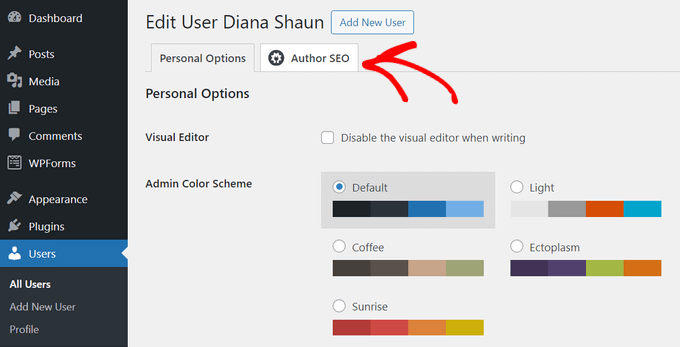
Se abrirá la página “Editar usuario” de ese autor.
En esta página, debe hacer clic en la pestaña “SEO del autor”.
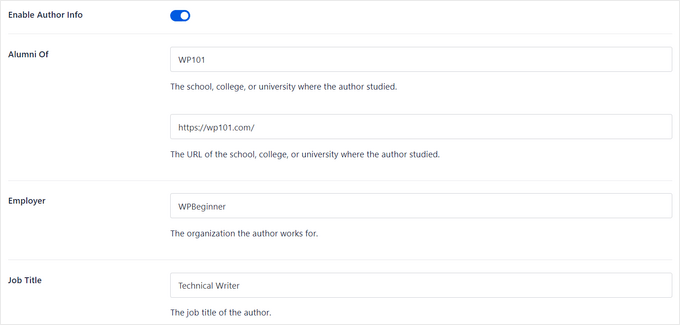
En la sección SEO del autor, puede añadir información como formación, empleador y cargo.
Esta información ayudará a validar sus señales E-E-A-T.
También puede añadir categorías de debate.
De este modo, los motores de búsqueda y los lectores conocerán las áreas de especialización del autor.

Nota: Estas categorías de temas primero necesitan ser introducidas yendo al panel de ajustes de Apariencia de Búsqueda “ Avanzado “ Temas de Experiencia del Autor en SEO Todo en Uno.
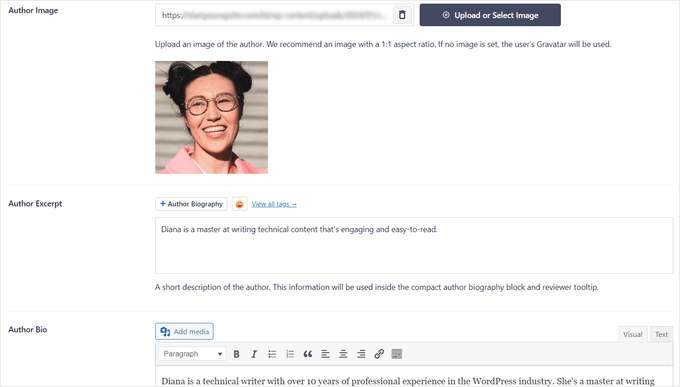
A continuación, puede desplazarse hacia abajo para añadir una imagen del autor, un extracto del autor y una biografía completa del autor.
También puede mostrar los perfiles sociales en el cuadro de información del autor.
Solo tienes que introducir las URL de los perfiles de Facebook, Instagram, Twitter, YouTube, etc.
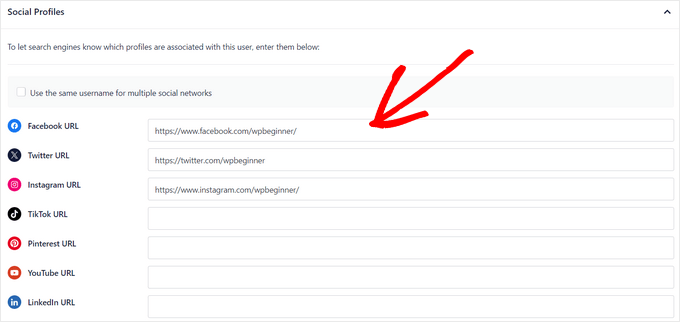
También hay un ajuste de “Añadir biografía del autor a las entradas” que puedes activar / desactivar.
Si este ajuste está activado, All in One SEO mostrará automáticamente una biografía compacta del autor en la parte inferior de sus entradas.

Puedes desactivar el ajuste si quieres añadir manualmente biografías de autor compactas o completas en la parte inferior de las entradas utilizando los bloques de biografía de autor de AIOSEO. Para más detalles, consulta esta guía sobre cómo añadir bloques de autor en tus entradas.
En este tutorial, dejaremos activados los ajustes para adjuntar automáticamente las biografías de los autores a las entradas.
Cuando haya terminado de rellenar los datos de autor, no olvide hacer clic en el botón “Actualizar usuario” para guardar los cambios.
Ahora, puede visitar una de sus entradas de WordPress para ver su nuevo cuadro de información de autor en acción.

Bonus: Mostrar el cuadro de información del autor con un maquetador de páginas de WordPress
Si desea crear un tema de WordPress completamente personalizado y mostrar fácilmente un cuadro de información del autor en cualquier parte de su sitio, le recomendamos que utilice SeedProd.
SeedProd es el mejor editor de arrastrar y soltar páginas para WordPress. Le permite crear fácilmente temas de WordPress personalizados y diseños de página, sin necesidad de código.
Incluye más de 320 plantillas de temas y páginas que puedes importar con un solo clic. Las plantillas de temas incluyen todas las partes de un sitio web, incluyendo una página de inicio, página única, entrada única, archivo de blog, página de contacto, y mucho más.
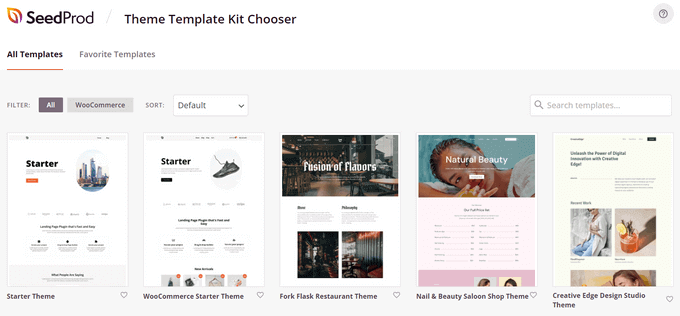
Puede personalizar su tema como desee utilizando el maquetador visual de temas.
SeedProd te lo pone fácil ofreciéndote más de 90 bloques listos para usar, incluido un bloque “Caja de autor”, que puedes arrastrar y soltar en cualquier página.

Después de añadir el bloque Cuadro de autor a su página, simplemente haga clic en él para editar los detalles.
Puedes cambiar la tipografía, el tamaño de letra, la alineación, el color de fondo y el borde, activar o desactivar la foto de perfil y mucho más.
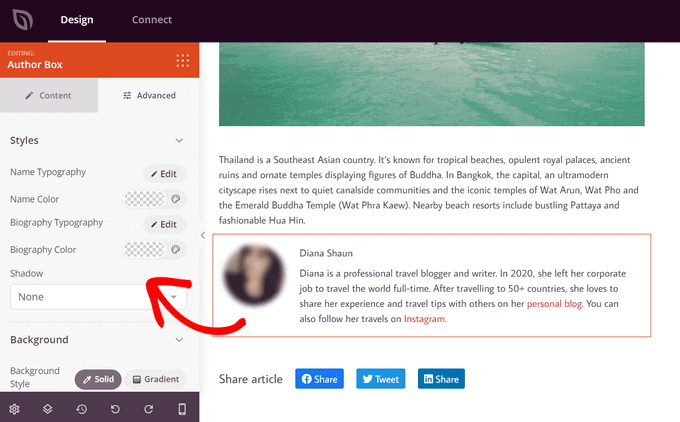
Una vez que haya terminado de personalizar, simplemente active su nuevo tema SeedProd.
Para ello, mueva el conmutador “Activar tema SeedProd” de la parte superior de la página a la posición Activado.

Enhorabuena, has añadido el cuadro de información del autor a tu tema.
Ahora, puede visitar su sitio WordPress y ver su cuadro de información de autor personalizado.

Para más detalles, consulte nuestro tutorial sobre cómo crear un tema de WordPress personalizado con SeedProd.
FAQ: Preguntas frecuentes acerca de Google E-E-A-T
Ahora que ya sabemos cómo escribir una biografía de autor y añadirla a tu sitio web de WordPress, vamos a responder a algunas preguntas frecuentes sobre Google E-E-A-T.
¿Qué es Google E-E-A-T?
E-E-A-T son las siglas de Experience (experiencia), Expertise (pericia), Authoritativeness (autoridad) y Trustworthiness (fiabilidad). Se trata de un marco que Google utiliza para evaluar la calidad y credibilidad de los contenidos web.
Cuanto más E-E-A-T demuestre una página, más probabilidades tendrá de ser considerada una fuente fiable y de aparecer mejor clasificada en los resultados de búsqueda.
El factor “experiencia” en E-E-A-T se introdujo en 2022. Antes de eso, el marco se conocía como E-A-T.
¿Por qué Google hace hincapié ahora en la experiencia?
La actualización destaca la importancia del conocimiento y la experiencia de primera mano para contenidos específicos. Google quiere asegurarse de que los usuarios encuentren información escrita por personas con experiencia práctica en el debate.
¿Cuánta experiencia necesito para tener un buen E-E-A-T?
No se necesitan necesariamente años de experiencia. Si no los tiene, céntrese en otros aspectos como la experiencia, la autoridad y la fiabilidad.
¿Y si mi sitio web es nuevo?
Crear E-E-A-T lleva tiempo. Debe centrarse en crear contenido valioso, mostrar la experiencia relevante de sus autores y establecer su sitio como una fuente de información fiable. Con el tiempo, ganará la confianza de Google y de su público.
¿Hay alguna forma garantizada de mejorar mi puntuación E-E-A-T?
No, no existe una fórmula mágica. E-E-A-T variará en función del contenido y la finalidad de su sitio.
Sin embargo, la creación de contenidos informativos, la demostración de experiencia y la creación de confianza con su público le mantendrán en el buen camino.
Esperamos que este artículo te haya ayudado a aprender cómo añadir un cuadro de información del autor a las entradas de WordPress. También puedes consultar nuestra guía detallada sobre Google E-E-A-T y nuestra selección de los mejores plugins para gestionar de forma eficiente los blogs de varios autores en WordPress.
If you liked this article, then please subscribe to our YouTube Channel for WordPress video tutorials. You can also find us on Twitter and Facebook.


Syed Balkhi says
Hey WPBeginner readers,
Did you know you can win exciting prizes by commenting on WPBeginner?
Every month, our top blog commenters will win HUGE rewards, including premium WordPress plugin licenses and cash prizes.
You can get more details about the contest from here.
Start sharing your thoughts below to stand a chance to win!
Michael says
Simple and perfect, thank yo!
WPBeginner Support says
You’re welcome
Administrador
Jiří Vaněk says
Thanks for providing the complete php code. In Elementor, I solve it with a widget, but outside of Elementor, I would very much like to use a ready-made solution from you.
Gleni says
This only works for posts. I usually post everything from pages, not posts. How can I get this sorted?
WPBeginner Support says
We don’t have a specific method we would recommend for pages at the moment but we will look into the possibilities in the future.
Administrador
Bojan says
Please, replace this code with this if you want to show only on blog posts:
// Detect if it is a single post with a post author
if ( is_single() && isset( $post->post_author ) ) {
with:
// Detect if it is a single post with a post author
if ( is_singular(‘post’) && isset( $post->post_author ) ) {
WPBeginner Support says
Thanks for sharing this for those looking for that customization
Administrador
Mark Beese says
I would like to add something like the option of related stories to the author box, but show a random selection of others posts/stories from that author. Is that possible?
WPBeginner Support says
For something like that, we would recommend taking a look at our guide below for showing related posts by the same author:
https://www.wpbeginner.com/wp-tutorials/how-to-display-related-posts-by-same-author-in-wordpress/
Administrador
Ramon says
This is excellent, works out of the box.
Keep in mind that you might want to add a “title” attribute to a href links ..
WPBeginner Support says
Thanks for sharing your recommendation.
Administrador
Kelly says
I came here for your opinion because my SEO teacher (paid class) says that even though my website/URL is my name, Google needs to know who wrote the posts. I write them (with the exception of guest writers from time to time). You said, “For a single-author WordPress blog, you can just add an about me page.” Do you mean just have an about me page on your blog? Or link to the about me page within the author box at the end of posts?
WPBeginner Support says
That would be a personal preference decision but having an about page publicly visible was what we recommended. It is not required in every article.
Administrador
Rozard says
I added the code in Theme function.php. It’s working better than a plugin. I just need little bit help if that is possible. My website is not in English, which is right to left. I added a css code that start paragraph from right to left, now the problem is that most of the author bios are in English, is there way to modify the alignment of bios to make left to right?
I really appreciate your help. Thank you
WPBeginner Support says
You would need to add in the CSS for the author box:
direction: ltr;
Administrador
Jerry says
I have an author info box that shows at the end of every blog post. I want it to be shown on my About me static page as well apart from the blog post. How can I enable this?
WPBeginner Support says
It would depend on what is adding the author box, if your theme is adding it you would want to reach out to your theme’s support for having it appear on a page.
Administrador
usef says
Hi. I used the method 4. It worked like a charm. Thank you for sharing this.
WPBeginner Support says
You’re welcome, glad you found our guide helpful
Administrador
Lauren Colquhoun says
Hello
Could you please tell me how to only display the author bio box for certain categories? Thank you
WPBeginner Support says
If you are using the widget method you can conditionally display the widget using the method from our guide here: https://www.wpbeginner.com/plugins/how-to-show-or-hide-widgets-on-specific-wordpress-pages/
Administrador
Gustavo Razzetti says
Hi I used the plugin and now it’s showing two bios–the one generated by the plugin and the one created by WordPress (which looks uglier and I don’t want to use). How I avoid having two bios?.
WPBeginner Support says
If your theme included its own author bio, you would need to reach out to the theme’s support for how to remove it
Administrador
Prajyot Kumbharjuvekar says
Looks like the Guerrilla’s Author Box plugin is no longer available… Do you can you suggest any alternatives? thank you
WPBeginner Support says
While we don’t have a recommended plugin at the moment, we will certainly look to update this article with an alternative
Administrador
Louis Chaussé says
Hi,
I have a problem with method #3
I added the php code to the functions.php file and the css to additonal css section in WP
Everything is working except that the bio is displaying twice on the page…
Once at the proper place at the bottom of the post, and it is also displaying at the top of the page (before header)
Any thoughts?
Warwick Levey says
Is there anyway to disable to author box for profiles which don’t have any info in the author bio?
We use a custom field to add authorship to guest posts, and we don’t have a bio for most of our guests, and the blank box at the bottom of the page is z bit of an eyesore for these posts.
Thanks in advance for any help
Elizabeth Thompson says
Does this mean I have to give them user access????
This doesn’t make sense for me? THey’re random people?
Thanks
re: Each author on your site will need to add their biographical information and links to their user profiles. They can do this by logging in to their WordPress account on your website and then click on the Profile link from the WordPress admin menu.
WPBeginner Support says
Hi Elizabeth,
Random people should not have access to your WordPress site. Please see our beginner’s guide about WordPress user roles and permissions.
Administrador
Morteza says
Hi to all!
How to add EDD vendor name in EDD receipt?
I add this to my downloads page by adding:
echo get_the_author_meta( ‘name_of_store’, $post->post_author );
and
echo get_the_author_meta( ‘display_name’, $post->post_author );
,
It seems in this case I need to hook this, BUT HOW?
thanks
Mick says
Thanks for this which is what I was looking for. Although now I see it with the bio in 2 places, what I would like is that the bio at the end of each post different to the bio down the side.
Is this possible or do I have to remove Meks and replace it with some other plugin?
Thanks
Wilson Lee says
Hey,
This was just what I was looking for. I think I will stick with installing a plug-in though.
Coding makes my head hurt.
Thanks for the great wordpress content!
Wilson
Matt Stephens says
hahaha! I thought exactly the same thing while reading through the post. Why go through the stress of coding, when there’s a plugin to get the job done?
Manjit Kumar says
It’s great and so much helpful…
ingresos pasivos says
Hi, I was wondering how I can add a margin higher than my box using the code that you left us.
My box shows very close to the letters of my post, I hope your answer.
A big greeting.
Vishal Rana says
very helpful thanks a lot
Hina Ilyas says
I have added the Guerrilla’s author box, but author details still don’t show on my posts. I can only see these three lines:
Author: Hina Ilyas
Filed Under: Weekly Rundown
Tags:
i don’t understand what is the issue!
Magnus says
If I use method 3, it only shows the author info box when viewing a post.
The post itself doesn´t show at all.
Any suggestions?
Thank you in advance.
Kingsford says
Please how can I add the author box to specific categories only?
Pls help.
Andy W. says
You may have found the answer for this already (it’s kind of disappointing someone makes this posts and doesn’t respond to the questions), but I used this to display the box on only certain categories.
If you want to display the author box only on single posts that are assigned to any category, change:
// Detect if it is a single post with a post author
if ( is_single() && isset( $post->post_author ) ) {
to
// Detect if it is a single post with a post author
if ( is_single() && isset( $post->post_author ) && has_category() ) {
If you want to display the box ONLY in a certain category, then change the above to:
// Detect if it is a single post with a post author
if ( is_single() && isset( $post->post_author ) && in_category(‘X’) ) {
Change “X” to the category ID.
To include more than one category, simply replay “X” with an array() of category IDs:
// Detect if it is a single post with a post author
if ( is_single() && isset( $post->post_author ) && in_category( array(‘X’, ‘X’) ) ) {
Joseph says
Hi andy can you help me, i-followed the method #3, how can i hide it to my wocommerce product page description here’s the site
Joseph says
i just solved it, i used this code of yours:
// Detect if it is a single post with a post author
if ( is_single() && isset( $post->post_author ) && has_category() ) {
thanks for this
Shraddha Kapoor says
Hi. I am facing a problem while adding hyperlink in the author bio. I tried add hyper link using anchor text at edumovlive.com but failed. Can anyone help me to get hyperlink in author bio.
Gabrielle says
Hi, i added custom admin column: thumbnail to all users table
, how can i print each user gravatar, by user id, inside this column?
I added sucessfully featured image column inside all post table,
that links each image to each post via edit link, is there a way to add gravatar column in all users that links to edit user?
Anis Chity says
How can I add links to my posts within the author box?
Nishat says
Thanks for the post, great help. Is it possible to make the author box interactive? Like the bottom of this page?
I would like something similar to the ‘as well as’ feature but I know nothing about CSS.
Agus Tamanuri says
Nice Post ..
Thanks for Your Article,
gagan says
I added author box using method 3 but it showing author box above sharing icons how to move this down near comment section??
Annie says
Do I need add links to social media profiles to the author, any idea?
Amir says
For method #3 which is really the simplest and the fastest (involves some php coding skills) I added a break tag on the line where it shows picture and text as follows. Because it looks odd when only the first line of the bio shows up next to the picture and the rest of the bio separately.
$author_details .= ” . get_avatar( get_the_author_meta(‘user_email’) , 90 ) . ” . nl2br( $user_description ). ”;
Deyo says
The hard coding worked perfectly with a little style tweaking, many thanks!
under the // Get author’s biographical information or description is the some kind of way to control the word or character count without having to edit the user bio itself? Maybe similar to controlling the excerpt length on a post page in functions?
King says
I dont know how to add codes via my functions.php i might get an error. Any plugin to add codes into functions.php?
Wajiha Rizvi says
You have to add it after the closing php tag that looks like this ( ?> ) in you child theme’s functions.php file.
Lorraine Reguly says
Hi. I have three sites. For some reason, my author box automatically shows up on one of them. I had to install the Guerilla plugin to get it to show up on the others.
Why would one site show it and not the other two???
Shafi Khan says
Hey There, Great article. The video attached to the post is not for instructions on “how to install a plugin” as written above it.
It it is a mistake, please correct it
sonja says
Hi there, having trouble with the picture for the author box. I’ve moved the author widget to the sidebar for it to appear and it has along with the text but scratching my head on what to do to get the picture to show up also. I’m using a WordPress theme. Thanks for all your help!
Christopher Simmons says
Heya… dealing with this today. Theme has a nice author box, but missing the socials at bottom.
Love your roll your own example, which we’re messing with “right now” — any chance you might expand on the example to include pulling in the “if socials” from the user meta, below the author’s website link ?
TIA ! Thanks for another great article
(12 year WP user — so not just for beginners! )
Peter Brown says
Did you ever figure this out Christopher? I’m having the same issue with my theme.
Natanael David says
Hi, thanks for this! I’m having a lot of help from you guys! For this and other functions.
One question: How can I set the max lenght in the Author description. Also, can I use a custom text for the box description in the single page and a full description in the Author page?
moon says
Hi,
Thanks for your helpful information.
I have a problem, but I don’t know how to describe it. I added a picture into article, and set it style=”float: right; margin-left: 20px;”
It can show the web page well upon browsed on desktop computer, left hand side is content, and right hand side show picture.
but it cannot show the web page well upon browsed on mobile phone, please refer below URL:
Is it possible to show text first, and the picture under the text not around the picture?
If so, how?
Please try to help me out.
Thanks in advance.
Best regards,
Mario says
Hi guys,
Do you know a way of inserting the author’s widget next to the post entry, but not in a sidebar? just as here:
thanks!
WPBeginner Support says
You may want to add a widget area right next to the content.
Administrador