¿Te has quedado fuera de tu sitio web WordPress?
A veces, los hackers te bloquean tu propio sitio web borrando tu cuenta de administrador de la base de datos.
En este artículo, le mostraremos cómo añadir un usuario administrador a la base de datos de WordPress a través de MySQL para que pueda recuperar su acceso.
¿Por qué añadir un usuario administrador a la base de datos de WordPress a través de MySQL?
Una vez nos encontramos con un problema en el que el sitio de un usuario fue hackeado, y su cuenta de administrador fue borrada de la base de datos. Esto bloqueó su sitio web WordPress.
Pudimos ayudarles a acceder a su sitio web creando un nuevo usuario administrador directamente en el sitio web de WordPress. Para ello, utilizamos phpMyAdmin, una herramienta web que permite gestionar bases de datos MySQL desde el navegador.
Si te encuentras bloqueado en tu área de administrador de WordPress debido a hackers o simplemente porque olvidaste tu contraseña, entonces puedes hacer lo mismo.
Sin embargo, siempre debe hacer una copia de seguridad de su base de datos antes de realizar cualquier edición de MySQL. A continuación, una vez que pueda acceder de nuevo a su sitio web, es posible que tenga que seguir nuestra guía para principiantes para la corrección de su sitio WordPress hackeado.
Dicho esto, veamos cómo añadir un usuario administrador a la base de datos de WordPress a través de MySQL.
Añadir un usuario administrador a la base de datos de WordPress con phpMyAdmin
phpMyAdmin viene preinstalado con la mayoría de las principales empresas de alojamiento de WordPress. Puede encontrarlo en la sección Bases de datos del Escritorio cPanel de su cuenta de alojamiento.
Aquí hay una captura de pantalla del panel de control de Bluehost:
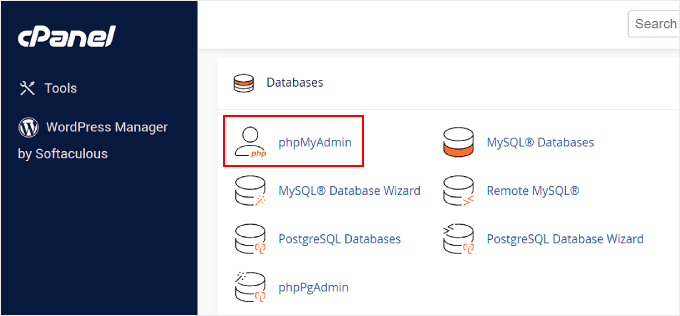
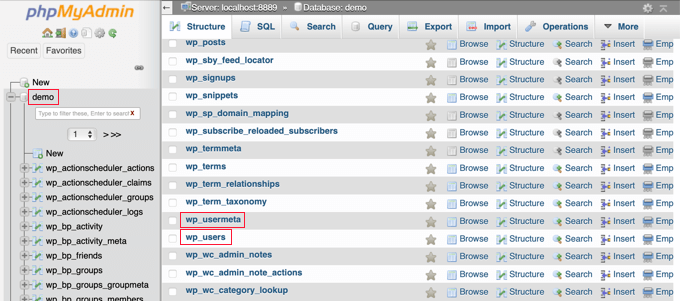
Al hacer clic en el icono se abrirá la interfaz de phpMyAdmin. Debe seleccionar su base de datos de WordPress en la columna de la izquierda.
Después de eso, phpMyAdmin mostrará todas las tablas de su base de datos de WordPress. Va a realizar cambios en las tablas wp_users y wp_usermeta.
Añadir un usuario a la tabla wp_users
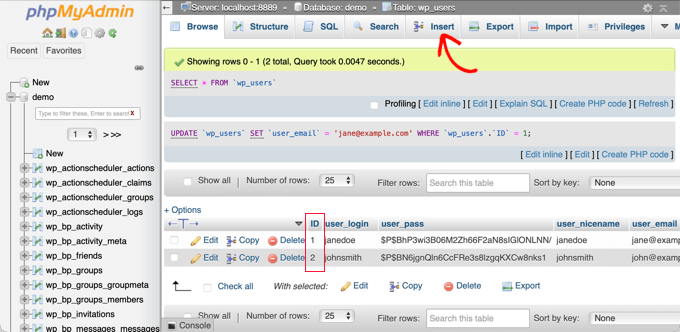
Primero, necesita encontrar la tabla wp_users y hacer clic en ella. Esto mostrará los usuarios que figuran actualmente en la tabla.
Observe en el siguiente aviso que hay dos ID de usuario en la tabla de nuestro sitio web de demostración, 1 y 2. Cuando creemos un nuevo usuario para nuestro sitio web de demostración, este ID debe ser único, por lo que escribiremos el número 3.
Debe hacer clic en la pestaña “Insertar” situada en la parte superior de la pantalla para poder insertar la información de un nuevo usuario administrador.
Añada la siguiente información a los campos del formulario de inserción:
ID: elija un número único (en nuestro ejemplo, utilizaremos 3)user_login: el nombre de usuario que se utilizará al acceder al sistemauser_pass: añade una contraseña, y asegúrate de seleccionar MD5 en el menú de funciones (mira la captura de pantalla de abajo).nombre_usuario: nombre completo o alias del usuariouser_email: dirección de correo electrónico del usuariouser_url: dirección de su sitio webuser_registered: seleccione la fecha y hora en que se registró el usuario mediante el calendariouser_activation_key: dejar en blancouser_status: establecer este valor en 0display_name: nombre completo o nombre para mostrar del usuario
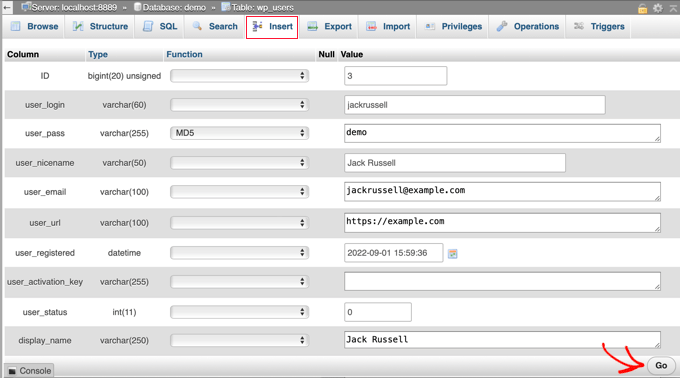
Una vez que haya terminado, asegúrese de hacer clic en el botón “Ir” para almacenar el nuevo usuario.
Añadir un usuario a la tabla wp_usermeta
Ahora, necesitas encontrar la tabla wp_usermeta y hacer clic en ella. Después de eso, usted debe hacer clic en la pestaña ‘Insertar’ como lo hizo en el paso anterior.
A continuación, debe añadir la siguiente información al formulario de inserción:
unmeta_id: déjelo en blanco (se generará automáticamente)user_id: el ID de usuario que utilizó en el paso anteriormeta_key: debe serwp_capabilitiesmeta_value: inserte esto:a:1:{s:13: "administrador";s:1: "1";}
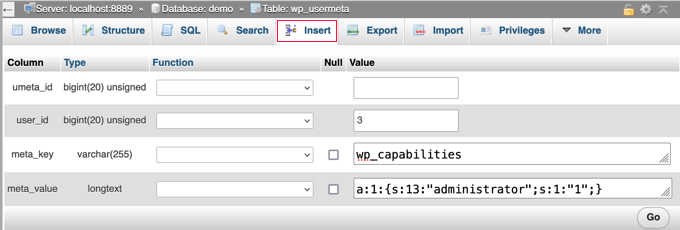
Después, cuando se desplace hacia abajo, debería encontrar campos para una segunda fila. Debe añadir la siguiente información:
unmeta_id: déjelo en blanco (se generará automáticamente)user_id: el identificador de usuario que utilizó en los pasos anteriores.meta_key: debe introducirwp_user_levelmeta_valor: 10

Cuando hayas terminado de introducir la información en los campos, tienes que hacer clic en el botón “Ir”. Enhorabuena, ha creado un nuevo nombre de usuario administrador.
Ahora debería poder acceder a su área de administrador de WordPress utilizando el nombre de usuario y la contraseña que especificó para este usuario.
En cuanto acceda, deberá ir a Usuarios ” Todos los usuarios y, a continuación, hacer clic en el nombre de usuario que acaba de crear.
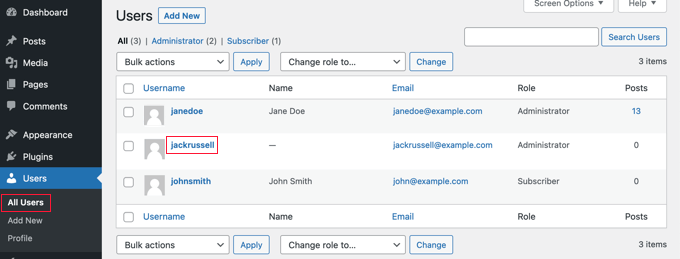
Ahora, sin cambiar nada, desplázate hasta el final de la página y haz clic en el botón “Guardar”.
Esto permitirá a WordPress limpiar el usuario que acaba de crear y añadir alguna información extra que sea necesaria.
Añadir un usuario administrador a la base de datos de WordPress mediante una consulta SQL
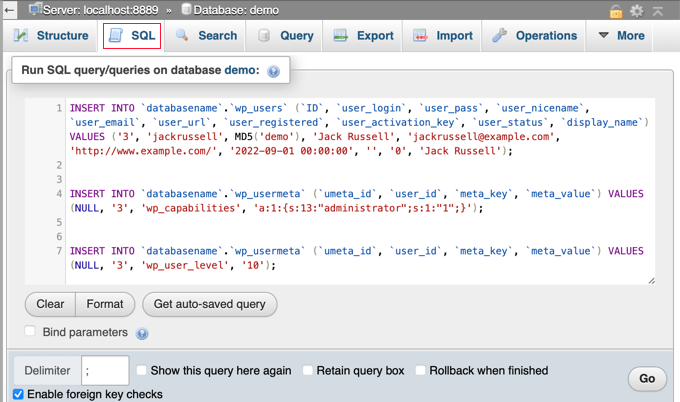
Si eres desarrollador, puedes acelerar el proceso utilizando código.
Sólo tienes que introducir esta consulta SQL en tu base de datos:
INSERT INTO `databasename`.`wp_users` (`ID`, `user_login`, `user_pass`, `user_nicename`, `user_email`, `user_url`, `user_registered`, `user_activation_key`, `user_status`, `display_name`) VALUES ('3', 'demo', MD5('demo'), 'Your Name', 'test@example.com', 'http://www.example.com/', '2022-09-01 00:00:00', '', '0', 'Your Name');


INSERT INTO `databasename`.`wp_usermeta` (`umeta_id`, `user_id`, `meta_key`, `meta_value`) VALUES (NULL, '3', 'wp_capabilities', 'a:1:{s:13:"administrator";s:1:"1";}');


INSERT INTO `databasename`.`wp_usermeta` (`umeta_id`, `user_id`, `meta_key`, `meta_value`) VALUES (NULL, '3', 'wp_user_level', '10');
Asegúrate de cambiar ‘databasename’ por la base de datos con la que estás trabajando.
Además, no olvides cambiar los demás valores por los que desees para el nuevo usuario, tal y como explicamos en el primer método.
Guías de expertos sobre qué hacer cuando se bloquea el acceso al administrador de WordPress
Ahora que ya sabe cómo añadir un usuario administrador a través de MySQL, puede que le interese ver algunos artículos sobre cómo corregir su sitio web cuando está bloqueado fuera del área de administración de WordPress.
- Qué hacer si no puede acceder al administrador de WordPress (wp-admin)
- Cómo utilizar el modo de recuperación de WordPress
- Cómo restablecer una contraseña de WordPress desde phpMyAdmin
- Cómo desbloquear el límite de intentos de acceso en WordPress
- Cómo desactivar todos los plugins cuando no se puede acceder a WP-Admin
- Cómo corregir la pantalla blanca de la muerte de WordPress (paso a paso)
- Cómo corregir el error crítico en WordPress (paso a paso)
- Cómo corregir el problema de actualización y redirección de la página de acceso de WordPress
- Cómo corregir el error al establecer una conexión de base de datos en WordPress
- Cómo corregir fácilmente el error This Site Can’t Be Reached en WordPress
Esperamos que este tutorial te haya ayudado a aprender cómo añadir un usuario administrador a la base de datos de WordPress a través de MySQL. Puede que también quieras ver nuestra guía definitiva sobre seguridad en WordPress o nuestra lista de errores comunes de WordPress y cómo corregirlos.
If you liked this article, then please subscribe to our YouTube Channel for WordPress video tutorials. You can also find us on Twitter and Facebook.


Syed Balkhi says
Hey WPBeginner readers,
Did you know you can win exciting prizes by commenting on WPBeginner?
Every month, our top blog commenters will win HUGE rewards, including premium WordPress plugin licenses and cash prizes.
You can get more details about the contest from here.
Start sharing your thoughts below to stand a chance to win!
zohaib says
Thanks a lot, Yes I got my problem solved and this was due to the the role assigned to my user name. Cheers
Bichir Mihail says
Thanks, really helpfull
Rastislav Nichta says
Really very simple and clear guide to how to create a user through MYSQL WordPress database, thank you.
Mary Janis says
This info is outdated cause HG format has all changed. Where the heck is wp_user?
Susan Marshall VA says
Thank you so much for this. Just had a client that locked herself out of her site and I was able to get her back in with these instructions.
Kumar Mritunjay says
I’ve used this on my websites. Works like a charm…very easy to follow!
Thank you for this amazing time saver technique.
sara asadiha says
i did everything u said, but it did not work what else should i do?
Peter Gough says
Thanks for this. Really helped when I was locked out of WordPress
Michael Sineni says
I have changed my admin access to editor because i was trying to change role capabilities to edit gravity forms. Suddenly i no longer see edit cornerstone or have access!! HELP!
Ayesi says
Really good, everything works perfect, thanks a million!!
Stella says
Thanks a lot! This saved my day. Whew!
Nilo Velez says
I don’t now if it is an update to WordPress data structure, but I’ve just encounter a site in which I’ve had to enter the wp_options meta_key values as:
[table_prefix]capabilities instead of wp_capabilities
[table_prefix]user_level instead of wp_user_level
I leave this here as it might be of help.
Takis Pan says
You sir are awesome!
I guess it uses the database prefix but in case the site has been moved, or someone changed the prefix from “wp_” to something else, capabilities and user_level should be changed accordingly.
Abraham Quilca says
Thanks, this comment helped a lot.
I had to double-check and get the exact table_prefix value from our wp-config.php file. Ours meta_key values were correct except for capitalization. I believe some hosting companies with single-click wordpress installs will set their own table_prefixes, so be sure to check for that as well.
Cheryl says
this worked for me too, thank you Abraham
Loren Helgeson says
I’ve used this on three different websites so far. Works like a charm!
Thank you for this amazing time saver.
Steve Day says
BRILLIANT!!!
Thank you – saved my day
Kirst says
It looks like there’s been a database change in the most recent version of WP, so this post may need to be updated.
I’s been an awesome resource, thank you!
Loren Helgeson says
I can’t verify this with previous versions of WordPress, but I just tested this with the latest version of WordPress, and it worked fine for me. Can anyone also confirm if this was a fluke?
Abid says
I have done same sql quires to make admin user. User created and logged but showing Sorry, you are not allowed to access this page error. Please help me about this.
Jade says
THANK YOU SO MUCH! I had an issue with WooCommerce Product Vendors, where I have applied as a vendor while logged in as admin. From that point on I couldn’t log in and I was receiving a message”You will be notified once your account has been approved” O_o
Previously I had to re-install WP because of this!!! Now I found your post and it was such a help!!! Thank you so much for sharing this x
x
Ben says
Didn’t work at all for me. I get a “ERROR: Incorrect username or password.”
Yeah yeah, I’ve check it. Password and user are correct.
So what now? I used to have admin access but now only have a lower basic level that doesn’t show the user settings.
Loren Helgeson says
This worked perfectly on the past two sites I’ve had to use it on.
SHAILENDRA RAJAVARAM says
Awesome….saved me tons of hardship like for other issues. I saw that for some reason all the administrators in my site became something else…
GREAT HELP !!
The guys who discussed about wp_prefixes…..perfect….
Ah !!!
Werner Ullrich says
For me it is a great helpful post. I have modified this SQL script and re-animated my door to the administrator entry of my wordpress homepage. Thanks.
Werner Ullrich
Smithg0 says
Okay this YouTube video is much enhanced than last one, this one has pleasant picture feature as well as audio.
Jerry L says
I wanted to change several “Nicename” entries to other values than that user’s Login ID. From within PhpMyAdmin, I exported the “wp_users” table.
Then I made the necessary changes in my code editor.
Then after saving a backup of the original users table and the entire database, I “Import”ed just the “wp_users” table back into the database using PhpMyAdmin.
Worked fine for me.
Brad says
Worked like a charm! Thanks!
kali says
I followed this and was able to login but cannot go to the dashboard. I get this error: You do not have sufficient permissions to access this page.
Oleg says
I have the same issue.
Eileen says
I had the same problem but in wp_usermeta where we are told to write:
meta_value – insert this: a:1:{s:13:”administrator”;s:1:”1″;}
I changed the value to:
a:1:{s:13:”administrator”;b:1;}
and it worked. I found this value in the corresponding value further up in the table for the original administrator account. Check your table and see if there are any other previous administrators, and copy the same value (just in case it differs to my value).
Mark P says
This worked for me thank you!
Ardestani says
It works , thank you , really thank you
Jason Coleman says
This didn’t work for me
Daniel Payne says
For this to work with the latest WordPress 4.4.2 I had to update the meta_key names because my WordPress install was using a table prefix of wp_brnq_ instead of the typical wp_ prefix.
Rose says
What do you mean? This is no working for me either.
Robert Drummond says
Thank you for this! It saved me from an errant plugin that over-wrote my admin record in the users table!
Nadia says
I am currently fixing the website of my mom for her own company and I am a kind of wordpress-dummy. I couldn’t properly log in because she sent me the wrong password. After three failed attempts it said I should look in the data. Message: ‘Username or password are not correct. Please check your data.’
I followed these steps here and I followed all of these steps very precisely, but still, with my new username and password, I am unable to log in. My prefix was different than wp_ what this article stated, so I changed the prefix as well – but can’t come through. Now I am locked out until tomorrow.
What happened, can someone maybe help me / explain me what I did wrong and how can I fix this. I really promised my mom to build her website, and it needs to be updated really soon!
Joe Harkins says
you were doing a great job of step by step until you got to
“meta_key – this should be wp_capabilities”
What does “should be” mean in this context? Does it mean that it should already say that that in that field, perhaps generated from something prior? If is not there what is required?
There’s a drop down field to the right of meta_key. That file name “wp_capabilities” does not exist as a selection. There’s a blank field to the right of that. Do I paste wp_capabilities into it? Is there a value of that name somewhere that I should be putting in that field?
And I see more trouble ahead. You say “insert another row.”
I take the word insert as a verb. Where and how do I do that? I am already on the Insert page. There is nothing on it says “Insert new row.”
Looking further down – all the way at thre bottom – skipping over the next section (which I an told to do) I see a field that says “Insert as a new row.”
But “insert a new row” and being told to go to a field that contains the phrase “Inert as a new row” are not all the same thing.
and there is a checked box that says “ignore” right above it. What’s the point of going further if that box is still checked ignore – and is “insert a new row” the same as “insert a new row?”
And I see the same “should be” confusion ahead again in the next set of instructions.
But I’m stuck back the first “should” because I am literal minded. Please clarify?
Jeff says
Hi Joe,
“meta_key – this should be wp_capabilities” means that the meta_key value (the textbox in phpmyadmin) should be wp_capabilities
When he refers to inserting a new row, you can do so by clicking insert from the navigation at the top of phpmyadmin this tutorial assumes you have already done the first insert and are on the browse tab.
Rich says
I had a multiple site setup. After doing this I can access both sites, however I have no Network Admin capability and not Plugin management… Under “My Sites” I see my two sites, but no “Network” option. On the vertical menu area for my site I seem to have everything other than “Plugins.”
Seems I do not have Administration over my WP Network for multiple sites?
sapere aude says
that was awesome! thanks.
Bouasone says
Many thank it very helpful
Russ says
Thanks for the great tutorial! I was able to successfully log in.
Arpan Das says
Thanks a lot. Working fine…
Rodolfo says
This saved my life today – thank you!
Phil says
This worked for me with the following modification: the wp_capabilities value had to be taken from another admin users row because it had additional permissions or whatever those are. copy the values in that case from an existing user if necessary
Reid Walley says
If you’ve gone through all of the steps and you’re STILL getting the “You do not have sufficient permissions to access this page” error message when trying to log in…
I had to replace the first example meta_key (wp_capabilities) with my own prefix: change wp_capabilities to whateveryourprefixis_capabilities
Same with the second meta_key example (wp_user_level). I changed it to my specific prefix: change wp_user_level to whateveryourprefixis_user_level
Yoana says
Thanks, that fixed it
Terry Hale says
Such a helpful article. Perfectly done, easy to understand. Thanks for the time you spent putting it together.
Andre says
This has been very helpful for me on several occasions. Thank you for putting this together!!!
2046 says
for those who still got the You do not have sufficient permissions to access this page.
you might want to check that the wp_capabilities adn stuff follows your db prefix name..
like if your normally wp_usersmeta has blab787_usersmeta the wp_capabilities will be blab787_capabilities etc.
Lydia B says
Thank you, your solution to the “you do not have sufficient permissions” error message worked perfectly for me.
Terry Hale says
Thanks for posting! I ran into that problem, and you solved it.
Cristian Deraco says
Thank you !!! it worked for me yeah!
Rony says
I can not see the table with user infomations, have any idea?
Denny says
Fantastic walk-through. This is spot on with multiple versions of phpmyadmin so ignore the differences in the screenshots. Thanks for the write-up!
-D
Denny says
WordPress 3.6.1. I will test this with 4 and confirm as well.
Ludwik C. Siadlak says
Same here, in September 2015 I get “You do not have sufficient permissions to access this page.” error after using the SQL code provided. Which is strange, since this article is only 6 months old!
Harm says
I followed your instructions to the letter but something went wrong (don’t know what) and now I don’t have access to my website. I get the message: database error.
Can I undo the changes I made? Please help.
Kiel says
all I had to do was revert the meta data back to admin and it worked great. Thanks for the article.
Matthew Galvin says
Pretty much useless in > version 3. Nice start tho.
Chris Hewlett says
Hello, I dug a little deeper into the problem and found that existing entries in the “usermeta” table had a prefix that was unique to my site. My wordpress tables all begin with ar_, and once I edited those 2 rows to reflect that, my login was complete, with all priveleges.
Regards,
Chris
Chris Hewlett says
Hello, and thank you for the above write-up on this subject. I have been locked out of my local site (XAMPP) and other articles I have read deal with changing the existing admin user password using phpMyAdmin. I did not have success with those methods.
I followed your instructions above and the login screen did accept the credentials.
Unfortunately I was redirected to domain//wp-admin/profile.php and the phrase “You do not have sufficient permissions to access this page”.
From the front end of the site, I can see I am logged in but when I click on Dashboard, the same phrase appears.
Do you have any suggestions that would allow me access?
Thanks in advance,
Chris
Abishai says
Hi, tried the fix by following it to the “T” yet when I try logging in: url/wp-admin takes me to a url/25/ page as before. Wonder what I did wrong. Please advice. Thanks in advance.