After installing WordPress, the first thing every beginner needs to learn is how to install a WordPress plugin. Mastering this skill is key to unlocking the full potential of your website.
In simple words, WordPress plugins are like apps for your WordPress website. They allow you to add new features, like a contact form, slideshow, shopping cart, and more.
With thousands of free and paid plugins available, the opportunities to supercharge your website are virtually limitless. In this step-by-step guide, we will show you how to install a WordPress plugin.
Before You Start
If you are using WordPress.com, then you cannot install plugins unless you upgrade to their business plan.
We often get complaints from users saying they can’t see the plugins menu in their WordPress dashboard. This happens because they’re using WordPress.com, which has its limitations.
On the other hand, you can install any plugin you want on your self-hosted WordPress.org website right out of the box.
If you still have any lingering questions, you might want to check out our article discussing self-hosted WordPress.org vs WordPress.com.
And if you want to switch from WordPress.com to WordPress.org, then read our tutorial on how to properly move from WordPress.com to WordPress.org.
How to Install a WordPress Plugin
To make it easy, we have created a video tutorial on how to install a WordPress plugin, which you can watch below.
If you want to follow written instructions, then keep reading. Here’s a quick overview of all the methods we will cover for installing a WordPress plugin on your website:
Ready? Let’s get started.
Need help installing a WordPress plugin? WPBeginner Pro Services can do it for you! With our affordable Emergency WordPress Support Services, you can hire experts to install a plugin, fix plugin errors, install a WordPress theme, and much more. Stop stressing over your site and get it taken care of. Schedule WordPress Support Services today!
Install a Plugin Using WordPress Plugin Search
The easiest way to install a WordPress plugin is to use the plugin search. The only downside of this option is that a plugin must be in the WordPress plugin directory, which is limited to free plugins.
The first thing you need to do is visit the Plugins » Add New page inside your WordPress admin area.
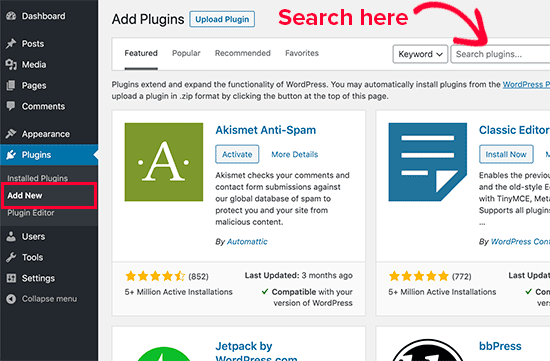
You will then see a screen like the one in the screenshot above.
Now, you can find the plugin you want to install by typing the name of the plugin or the functionality you need. For example, here we type ‘WPForms‘ into the search bar.
When the loading is complete, you will see a bunch of listings like the example below:
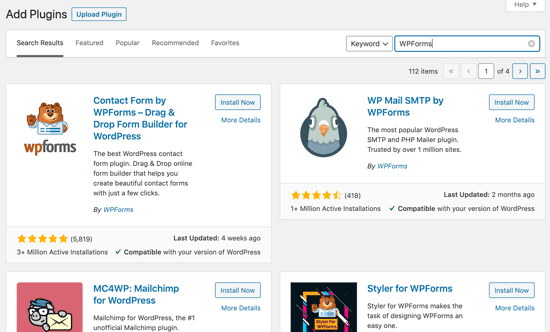
You can pick the plugin that is best for you. Since we were looking for WPForms, the best WordPress contact form plugin, we’ll click the ‘Install Now’ button next to it.
WordPress will now download and install the plugin for you. Once installation is done, you’ll notice that the ‘Install Now’ button changes to the ‘Activate’ button.
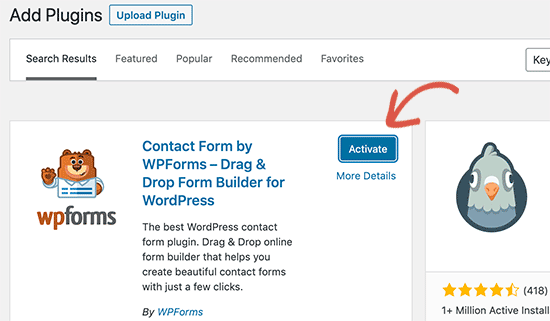
Now, note that a WordPress plugin won’t work until you activate it. So go ahead and click the ‘Activate’ button to start using the plugin on your WordPress site.
That’s all! You have successfully installed your first WordPress plugin.
The next step is to configure the plugin settings. Since these settings will vary for each plugin, we will not cover them in this post.
Install a Plugin Using the WordPress Admin Plugin Upload
Paid WordPress plugins are not listed in the WordPress plugin directory, and they cannot be installed using the first method.
That’s why WordPress comes with the upload method to install such plugins. In this section, we’ll show you how to install WordPress plugins using the upload option in the admin area.
First, you’ll need to download the plugin from the source, which will be a zip file. Once done, you can navigate to Plugins » Add New from the WordPress admin area.
After that, just click on the ‘Upload Plugin’ button at the top of the page.
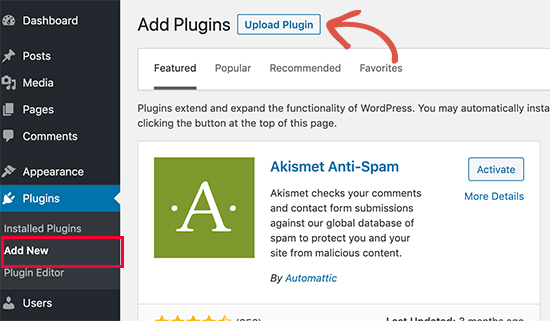
This will reveal the plugin upload form.
Here, you’ll want to click the ‘Choose File’ button and select the plugin file you downloaded earlier to your computer.
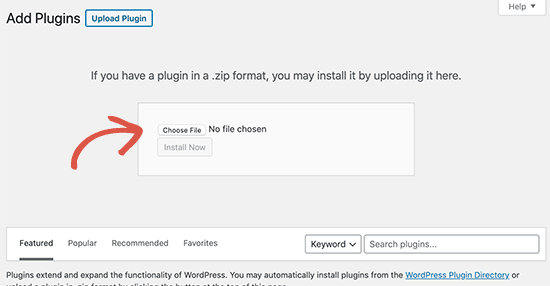
After you have selected the file, go ahead and click the ‘Install Now’ button.
WordPress will now upload the plugin file from your computer and install it for you. After the installation is finished, you will see a success message like this.
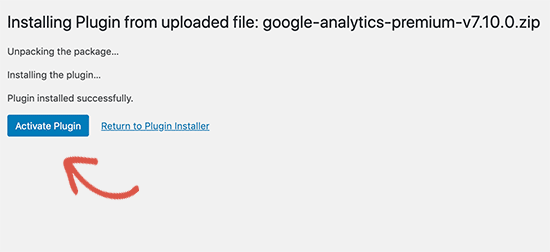
Then, all that’s left to do is click the ‘Activate Plugin’ button to start using the plugin.
The next step is to configure the plugin’s settings to fit your needs. Again, since these settings vary for each plugin, we will not cover that in this post.
Manually Install a WordPress Plugin Using FTP
In some rare cases, your WordPress hosting provider may have file restrictions that limit your ability to install a plugin from the admin area.
In this situation, your best bet is to install the plugin manually using FTP. However, the FTP manager method is the least friendly for beginners.
Before we get started, you’ll need to download the plugin’s zip file and extract it on your computer.
Extracting the plugin zip file creates a new folder with the same name. You need to manually install the WordPress plugin in this folder with an FTP client.
Now, let’s make sure you have access to your host through the FTP manager. If you do not have your FTP username and password, then you might want to contact your WordPress hosting provider and ask them.
When you have the extracted zip folder and FTP login details ready, you can open the FTP client on your computer.
The first thing you must do is connect to your website using the FTP login credentials provided by your web host. Once connected, you can head over to the /wp-content/plugins/ folder on your website.
Here, simply upload the folder you extracted from the zip file to the /wp-content/plugins/ folder on your web server.
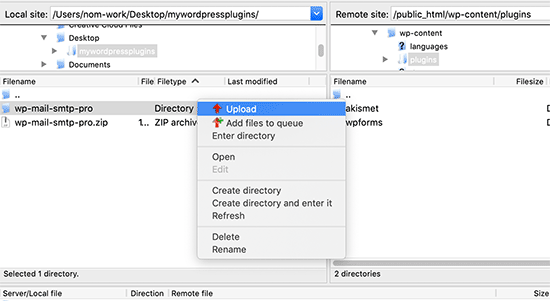
After uploading the files, you’ll need to visit the WordPress admin area and click the ‘Plugins’ menu item.
You should see that your plugin was successfully installed on the plugins page. To start using the plugin, go ahead and click the ‘Activate’ link in its section.
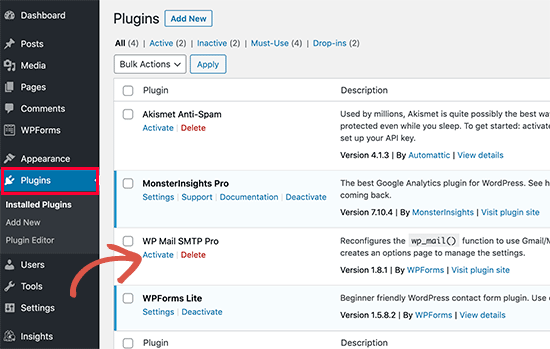
Upon activation, you may need to configure the plugin settings. WordPress plugins have their own settings, which differ from one plugin to another, so we will not describe them here.
FAQs About Installing WordPress Plugins
As a beginner, you may have a few questions about installing WordPress plugins. As the largest WordPress resource site, we’ve heard so many of them.
In this section, we’ll answer some of the most frequently asked questions about installing WordPress plugins.
1. How do I find the best WordPress plugins to install on my website?
There are more than 59,000 WordPress plugins in the free WordPress plugin directory alone, and many more are available as premium plugins. This makes it a bit difficult to find the best plugin for the feature they need.
We have compiled a list of all the essential WordPress plugins that most WordPress websites need. We also have a detailed tutorial on choosing the best WordPress plugin that shows you what to look for when researching plugins.
2. What is the difference between installed and active plugins?
WordPress allows you to install a plugin and not use it at all. To use a plugin on your site, you need to ‘Activate’ it.
You can see active plugins by visiting the ‘Plugins’ page in the WordPress admin area. They will be highlighted with a blue background.
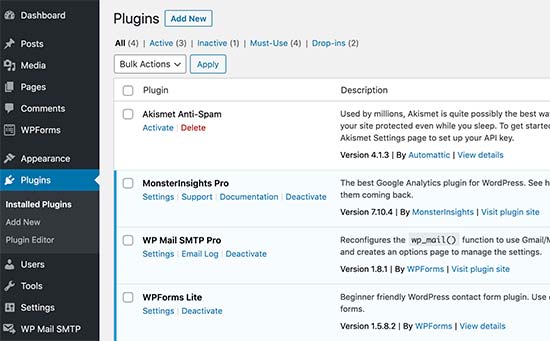
Plugins with a white background are installed on your website but are not active.
3. Should I delete inactive plugins?
If you are not using a plugin, then we recommend deleting it from your website. For more on this topic, you can read our article on why you should delete inactive plugins in WordPress.
4. How many plugins can I install in WordPress?
You can install as many WordPress plugins as you need. It is not the number of plugins that affect your website speed but the quality of those plugins. For more information, feel free to see our article on how many WordPress plugins you should install.
5. How do I uninstall a WordPress plugin?
You can uninstall a WordPress plugin by visiting the ‘Plugins’ page in the WordPress admin area.
If the plugin you want to remove is currently active, you’ll first need to deactivate it. After that, you can simply click the ‘Delete’ button to remove it from your website.
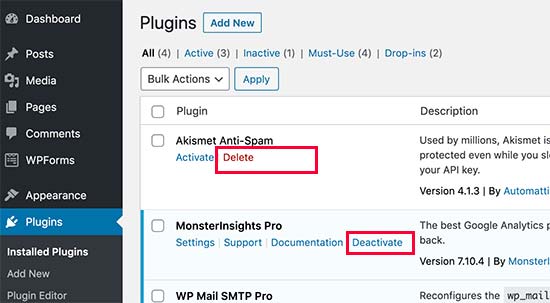
For more detailed instructions, you might want to check out our guide on how to properly uninstall a WordPress plugin.
We hope this helped you learn how to install WordPress plugins. Next, you may want to see our plugins category, where we write about the best WordPress plugins for accomplishing whatever you’re looking to do. Each of those articles comes with step-by-step instructions on how to set up individual plugins.
If you liked this article, then please subscribe to our YouTube Channel for WordPress video tutorials. You can also find us on Twitter and Facebook.


Syed Balkhi says
Hey WPBeginner readers,
Did you know you can win exciting prizes by commenting on WPBeginner?
Every month, our top blog commenters will win HUGE rewards, including premium WordPress plugin licenses and cash prizes.
You can get more details about the contest from here.
Start sharing your thoughts below to stand a chance to win!
Chris says
Thanks for explaining Faq 2. I did not realize that you can download a plugin but not use it. This article also mentioned that premium plugins are not allowed in the WordPress plugin repository. What about freemium plugins that offer the main functionalities for free but have you pay for extras? Are those allowed?
WPBeginner Support says
It would all depend on implementation for that.
Admin
Dayo Olobayo says
This is a great guide for beginners. I especially liked the step-by-step screenshots. However, I should add that before installing any plugin, it’s always a good idea to back up the WordPress site… just in case something goes wrong.
WPBeginner Support says
That is a good safety suggestion especially when installing larger plugins.
Admin
Jiří Vaněk says
WordPress plugins are a great thing, but I would totally disagree with the statement in the FAQ article that you can install as many plugins as you need. You are minimally limited by the memory limit, which is set on the hosting and which will eventually run out. I think that a reasonable solution is up to 20 plugins. Then the amount will start to show on the speed of the website. A combination of plugin and snippet is good. If not everything can be solved immediately with a plugin, and there is a snippet for many problems.
WPBeginner Support says
It heavily depends on the plugin for how much they would affect a site, we would recommend taking a look at our article below:
https://www.wpbeginner.com/opinion/how-many-wordpress-plugins-should-you-install-on-your-site/
Admin
Moinuddin Waheed says
Most often I use the first method by going through the plugin options and searching in the WordPress repository.
it does make a lot of sense in terms of knowing that the repository is always safe to use.
I have used upload methods as well mostly for premium plugins as they come directly from plugins own websites.
Much appreciated the efforts of wpbeginner to make even the simple things more simple.
Ahmed Omar says
A beginner-friendly, step-by-step guide on installing WordPress plugins.
Also, the video make it more easy and understandable.
Thanks for making the plugin installation journey smooth
WPBeginner Support says
Glad you found our content helpful
Admin
Lara Carter says
Thank you, this explained so well and clearly on how to install and start a plug in. Thank you for this resource.
WPBeginner Support says
You’re welcome, glad our guide was helpful!
Admin
Carlo says
I can’t see the Plugin section in the left column in the dashboard.
I’ve wordpress 4.8.14. Is this the problem?
WPBeginner Support says
You would want to take a look at the recommendations for troubleshooting in our article below:
https://www.wpbeginner.com/plugins/why-cant-i-add-or-install-plugins-in-wordpress/
Admin
Barbara says
Cant install any plugin. I receive the note instead: Installation failed: Download failed. Destination directory for file streaming does not exist or is not writable.
WPBeginner Support says
For that issue, you would want to go through the recommendations in our article below:
https://www.wpbeginner.com/beginners-guide/how-to-fix-file-and-folder-permissions-error-in-wordpress/
Admin
Dadi says
it seems you have to pay for Business subscription, to use your advice?
WPBeginner Support says
Our tutorials are for WordPress.org sites, you would want to take a look at our comparison article here: https://www.wpbeginner.com/beginners-guide/self-hosted-wordpress-org-vs-free-wordpress-com-infograph/
Admin
Hanghua Jin says
i just followed your tutorial step by step but wasn’t able to add a new plugin.
there is a max execution time exceed error.
i tried to increase that value from 30 to 180 but still couldn’t solve the problem.
Please help me out.
Thanks.
WPBeginner Support says
It sounds like you are either installing a massive plugin or there may be an issue with your hosting, we would recommend reaching out to your hosting provider to ensure there is no error from their end.
Admin
Peggy says
This is out of date.
WPBeginner Support says
The methods in this article are still correct. If you are unable to install plugins you are likely on WordPress.com: https://www.wpbeginner.com/beginners-guide/self-hosted-wordpress-org-vs-free-wordpress-com-infograph/
Admin
Shravan says
Hi,
For some reason any plugin I am trying to upload are not uploading fully. They get stuck at 58% or 74%. The same case with themes as well. How do I resolve this?
WPBeginner Support says
You may want to check with your hosting provider to ensure there are no errors on their end, but you would want to start troubleshooting using our guide here: https://www.wpbeginner.com/beginners-guide/beginners-guide-to-troubleshooting-wordpress-errors-step-by-step/
Admin
Karen Diebolt says
This article doesn’t help because I have to have a paid plan to get the plugin. Is there any help for those of us with a free blog site from WordPress?
WPBeginner Support says
Our articles are for WordPress.org sites, you may want to take a look at our article here: https://www.wpbeginner.com/beginners-guide/self-hosted-wordpress-org-vs-free-wordpress-com-infograph/
Admin