Are you wondering what you can do with sticky posts in WordPress?
Sticky posts are one of the least known features in WordPress, but they can really beneficial for your site. Using them can help keep important content visible to your audience, which can increase conversions and engagement.
In this article, we will show you 6 cool things you can do with sticky posts in WordPress.

What are Sticky Posts and Why Should You Use Them?
A sticky post is any content that sticks to the top of your site’s blog page. You can also show them on the homepage, category, archive, and other pages.
You might choose to sticky your WordPress website‘s pillar articles, top products, announcements, or discount offers so that you get more eyes on them.
Sticky posts are powerful because as you create more content over time, your older articles get buried underneath the new blog posts. As a result, users may not be aware of your top articles and will have difficulty finding these posts on your site.
However, many website owners don’t know how to make the most of the sticky posts feature in WordPress. Here are some cool things you can do with sticky posts.
You can click the links below to jump ahead to any section you’re interested in:
- Display Sticky Posts as Recent Articles on Sidebar
- Sticky Posts for Categories
- Display the Latest Sticky Posts
- Sticky Posts for Custom Post Types
- How to Hide Sticky Posts From WordPress Loop
- Styling Sticky Posts in WordPress
1. Display Sticky Posts as Recent Articles on Sidebar
WordPress shows your sticky posts at the top of the blog post page on your website. However, you can also display them in your website sidebar as the most recent articles.
First, you’ll need to install and activate the Recent Posts Widget With Thumbnails plugin. If you need help, then please see our guide on how to install a WordPress plugin.
Upon activation, you can head to Appearance » Widgets from your WordPress admin panel. Next, you can click the ‘+’ sign and add the ‘Recent Posts With Thumbnails’ widget block.
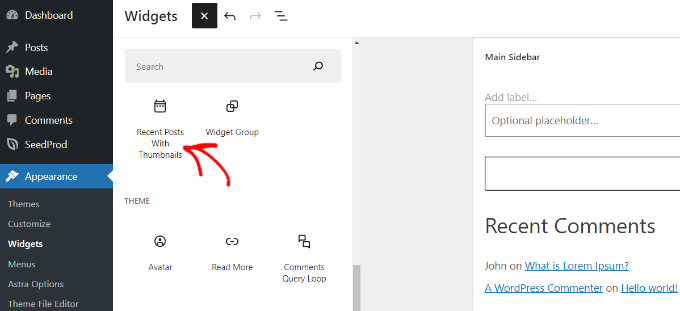
In the widget block settings, you can enter a title such as ‘recent posts’ and choose the number of posts to display.
Next, scroll down to the ‘Sticky’ section in the widget settings. Here, you can enable the option to show only sticky posts as recent posts and keep them on top of the list.
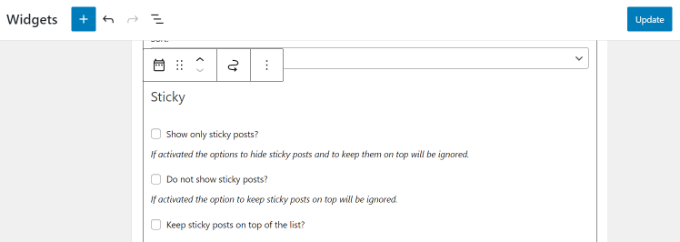
When you’re done, simply click the ‘Update’ button.
Now visit your website to see posts you’ve marked as ‘sticky’ showing as recent articles in your sidebar.
2. Sticky Posts for Categories
By default, sticky posts only appear on your WordPress blog‘s front page. But what if you want to display featured content on your category archive pages?
You can do that by using the Sticky Posts – Switch plugin.
First, you’ll need to install and activate the Sticky Posts – Switch plugin. For more details, please see our guide on how to install a WordPress plugin.
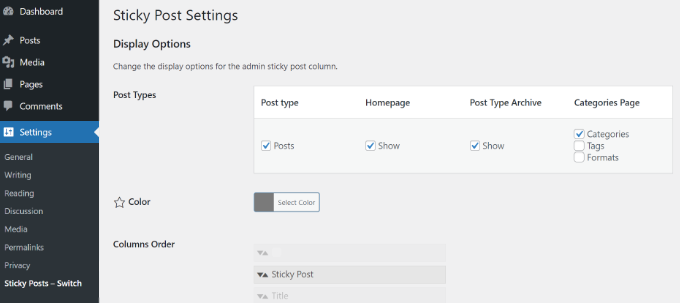
Upon activation, you can go to Settings » Sticky Posts – Switch from the WordPress admin menu. Simply check the ‘Categories’ box under the ‘Categories Page’ heading to show sticky posts.
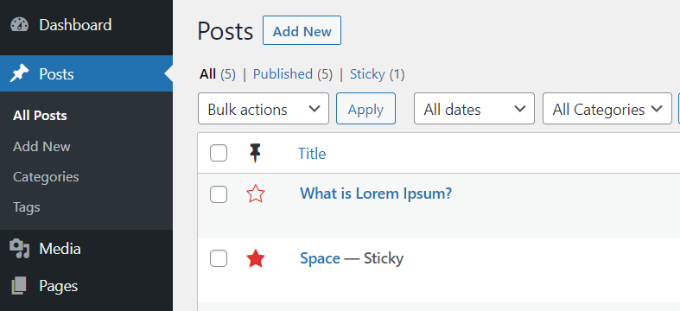
The plugin also adds a star icon on the Posts page in your WordPress dashboard.
This way, you can quickly make a post sticky by simply clicking the icon. You don’t have to open the content editor or view the quick edit settings.
For more detailed instructions, see our tutorial on how to add sticky posts for categories in WordPress.
3. Display the Latest Sticky Posts
Typically, sticky posts are used for featured posts to display your most prominent content.
After a while, your old featured posts disappear under the archives. You can bring back your old featured content to life by showing them on a custom archives page or anywhere else on your site.
We highly recommend that everyone use the WPCode plugin any time you need to deal with code snippets. Be sure to follow our guide on how to paste snippets from the web into WordPress.
If you’re an advanced user, you can also paste this code into your theme’s functions.php file. However, we do not recommend directly editing the theme files because the slightest mistake can break your site.
function wpb_latest_sticky() {

/* Get all sticky posts */
$sticky = get_option( 'sticky_posts' );

/* Sort the stickies with the newest ones at the top */
rsort( $sticky );

/* Get the 5 newest stickies (change 5 for a different number) */
$sticky = array_slice( $sticky, 0, 5 );

/* Query sticky posts */
$the_query = new WP_Query( array( 'post__in' => $sticky, 'ignore_sticky_posts' => 1 ) );
// The Loop
if ( $the_query->have_posts() ) {
	$return .= '<ul>';
	while ( $the_query->have_posts() ) {
		$the_query->the_post();
		$return .= '<li><a href="' .get_permalink(). '" title="'  . get_the_title() . '">' . get_the_title() . '</a><br />' . get_the_excerpt(). '</li>';

	}
	$return .= '</ul>';

} else {
	// no posts found
}
/* Restore original Post Data */
wp_reset_postdata();

return $return;

}
add_shortcode('latest_stickies', 'wpb_latest_sticky');
After adding this code, simply add the shortcode [latest_stickies] wherever you want to display your latest sticky posts. For detailed instructions, visit our article on how to display the latest sticky post in WordPress.
4. Sticky Posts for Custom Post Types
Did you know that you can make custom post types sticky in WordPress?
Typically, the sticky post feature is only available for default WordPress posts, but this does not mean that you cannot add this feature for other post types.
Using the Sticky Posts – Switch plugin, you can stick custom post types to your site. First, you can install and activate the plugin. Please see our guide on how to install a WordPress plugin if you need help.
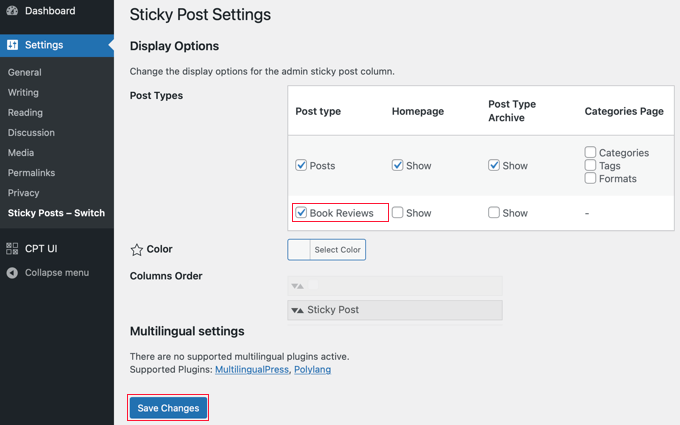
Upon activation, simply go to Settings » Sticky Posts – Switch from your WordPress dashboard. Under the ‘Post type’ column, you will see a list of all custom post types you have created on your site.
Next, you can click the checkbox for the custom post type you want to make sticky. In this example, we mark our ‘Book Reviews’ post type to be sticky.
For more detailed instructions, check out our tutorial on how to add sticky posts in WordPress custom post types.
5. How to Hide Sticky Posts From WordPress Loop
When using sticky posts, you will notice that WordPress displays your articles at the top of all your WordPress posts by default.
To exclude sticky posts from the WordPress loop and appear at the top, all you have to do is enter the following custom code on your WordPress website.
<?php

// The loop arguments
$args = array(
    'posts_per_page' => 10,
    'post__not_in' => get_option( 'sticky_posts' ) // do not display the sticky posts at all.
);

// The loop
$the_query = new WP_Query($args);
if ($the_query->have_posts()) {
    while ($the_query->have_posts()) {
        $the_query->the_post();

         }
}
This code will completely exclude sticky posts from the loop. See our tutorial on how to exclude sticky posts from the WordPress loop for more detailed instructions.
6. Styling Sticky Posts in WordPress
Next, do you want to add custom styling to your sticky posts?
Many WordPress themes use post_class() functions to automatically add post classes for each post. If your theme is already using post_class() function, then you will see a ‘sticky class’ added to your sticky posts.
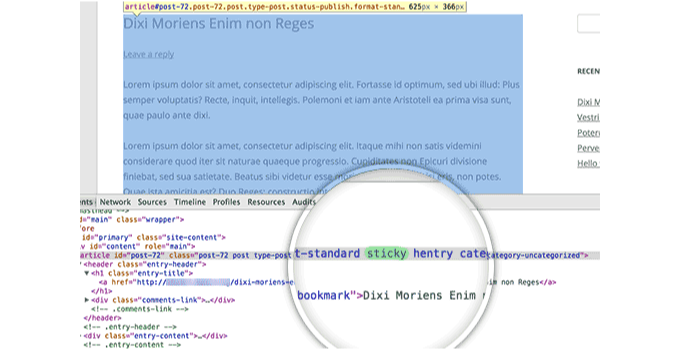
Now, you can use the.sticky CSS class in your WordPress theme. Here is some basic CSS to get you started:
.sticky {
background-color:#ededed;
border:1 px solid #f5f5f5;
color:#272727;
padding:5px;
}

.sticky:before {
  content: "Featured";
  color: #FFF;
  background: #f20000;
  padding: 10px;
  display: inline-block;
  text-align: right;
  float: right;
  font-weight: bold;
  text-transform: uppercase;
}
For more details, please see our guide on how to add custom CSS in WordPress.
We hope this article helped you learn some cool things to do with sticky posts on your WordPress site. You may also want to check out our guide on how to start an online store and the ultimate WordPress SEO guide for beginners.
If you liked this article, then please subscribe to our YouTube Channel for WordPress video tutorials. You can also find us on Twitter and Facebook.


Syed Balkhi says
Hey WPBeginner readers,
Did you know you can win exciting prizes by commenting on WPBeginner?
Every month, our top blog commenters will win HUGE rewards, including premium WordPress plugin licenses and cash prizes.
You can get more details about the contest from here.
Start sharing your thoughts below to stand a chance to win!
Tabish says
Is there any easy way to show sticky post or any specific post on homepage without any other post. I mean only sticky post
WPBeginner Support says
You have a few different options, you may want to take a look at our article below:
https://www.wpbeginner.com/wp-tutorials/how-to-display-recent-posts-in-wordpress/
Admin
Rachelle says
The sticky post plugin hasn’t been updated in over two years.
emiliano says
hi,
it’ possible to saves the notes in profile page of users ?
When the users saves a note is automatically saves on profile page
Yaamin says
Everything is involving plugins :/
WPBeginner Staff says
Yes you got the point. First you will install the plugin to enable sticky posts for categories. After that you can make posts sticky for specific categories. Later you can make it unsticky. Your post will remain live and will not give a 404 error.
Dave Gasser says
This site is an excellent source for all things WordPress. I just finished the article on sticky notes and instantly thought of product launches. Post your sticky note squeeze page and program it to auto expire once you are ready to get back to business as usual. Great article and great site.
Rich says
I was just tango-ing with sticky post customization this week. This is a very good overview of sticky post capabilities. Thanks!
Charlie Sasser says
So would some of this be helpful if I wanted to display in a dedicated area only the category “News” that were sticky?Then when the news was stale it would drop off but not be gone and prevent a 401 error? Or is there a better way or plugin to do this for non-coders?