Many WordPress users prefer to work on their websites using a local server on their computer before transferring it to a live hosting server.
It allows you to work on your website privately before making those changes available online.
Eventually, you’ll need to move it to a live server to make it available for online visitors.
In this article, we will show you step-by-step instructions on how to move WordPress from a local server to a live site.
Why Move WordPress From a Local Server to a Live Site?
Building your WordPress blog on a local server is a safe way to test changes on your website without affecting visitors.
When you have finished perfecting your website, the next step is to move from your local server to a live site.
Let’s show you two ways to move your site from a local server to a live site.
The first method uses a WordPress migration plugin and is recommended for beginners.
In the second method, we will show you how to manually move WordPress from a local server to a live site.
You can choose the method that works best for you:
Before You Migrate Your WordPress Site
To migrate WordPress from a local server to a live server, you need to have a few things in place.
First, we are assuming that you have a WordPress site running on a local server (also called localhost) on your computer and you have full access to it.
Next, you’ll need to have a domain name and web hosting.
To make your decision easier, we recommend using Bluehost. They are an officially recommended WordPress hosting company, and they are giving WPBeginner users an exclusive discount + free domain and SSL.
Basically, you can get started for as little as $1.99 per month.
If you want a great Bluehost alternative, you can look at Hostinger. They are also offering an exclusive discount to WPBeginner users with a free domain name.
If you can afford to pay a little more, then check out SiteGround. They also have a special deal for WPBeginner readers.
If you need help setting up your website, then follow our step-by-step guide on how to make a website.
Finally, you will need an FTP program and know how to use FTP to upload your local server site to the live site.
Ready? Let’s begin migrating your WordPress site.
Video Tutorial
If you’d prefer written instructions, then just keep reading.
Method 1: Transfer WordPress From The Local Server to Live Site Using a Migration Plugin (Recommended)
This method is easier and recommended for beginners. We will be using a WordPress migration plugin to move WordPress from localhost to a live site.
Step 1: Install and Set Up the Duplicator Plugin
First, you need to install and activate the Duplicator plugin on your local site. For more details, see our step-by-step guide on how to install a WordPress plugin.
Pro Tip: There is also a pro version of Duplicator that offers secure backups, cloud storage, easy site restore, and more.
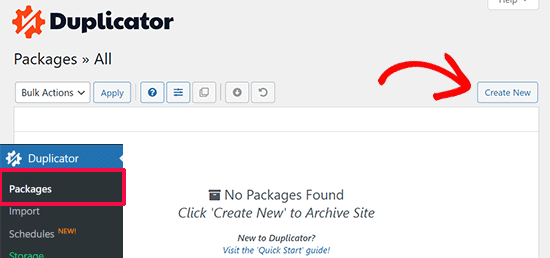
Upon activation, you need to go to the Duplicator » Packages page and click on the ‘Create New’ button.
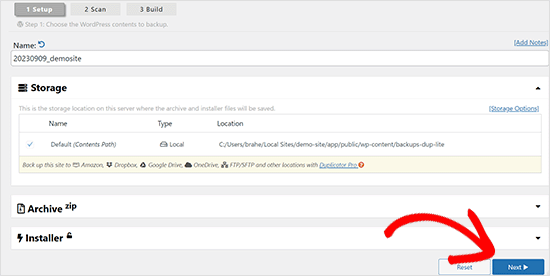
This brings you to a screen where you can give your backup a name.
Then, click the ‘Next’ button.
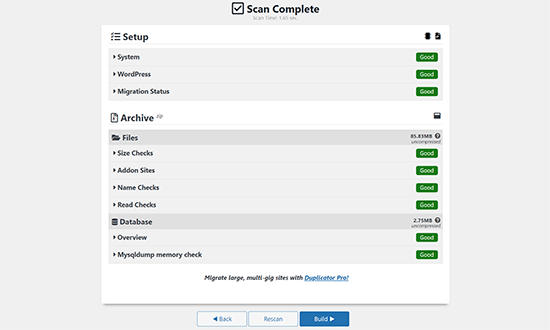
Duplicator will now run some tests to see if everything is in order.
If all items are marked ‘Good’, then click on the ‘Build’ button.
This process may take a few minutes, depending on the size of your website. You need to leave this tab open until the process is complete.
Once finished, you’ll see download options for ‘Installer’ and ‘Archive’ packages. You need to click on the ‘One-Click Download’ link to download both files to your computer.
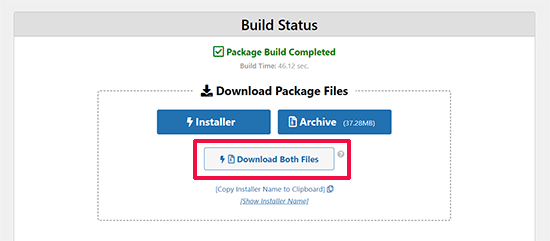
The ‘Archive’ file is a complete copy of your WordPress site. It includes all WordPress core files as well as your images, uploads, themes, plugins, and a backup of your WordPress database.
The ‘Installer’ file is a script that will automate the entire migration process by unpacking the archive file containing your website.
Step 2: Create a Database for Your Live WordPress Website
Before you can run the installer or upload the WordPress website from localhost to your hosting server, you need to create a MySQL database for your new live website.
If you have already created a MySQL database, then you can skip this step.
To create a database, you need to visit your hosting account’s cPanel dashboard. Then, locate the ‘Databases’ section and click on the ‘MySQL Database Wizard’ icon.
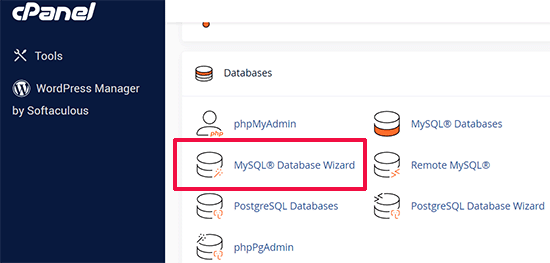
On the next screen, there’s a field to create a new database.
Simply provide a name for your database and click on the ‘Create Database’ button.

cPanel will now create a new database for you.
After that, you need to enter a username and password for your new user and then click the ‘Create User’ button.
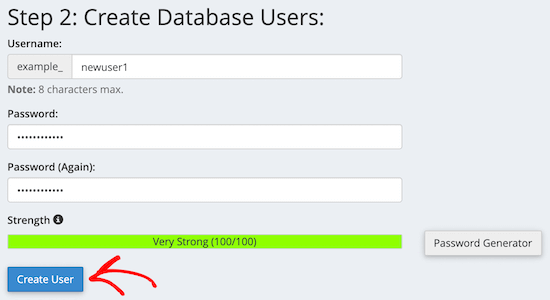
Next, you need to add the user you just created to the database.
First, click the ‘All Privileges’ checkbox.
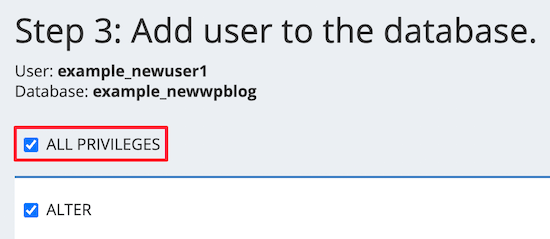
Then, scroll down and click the ‘Make Changes’ button to save your changes.
Your database is now ready to be used with your WordPress site. Make sure to note down the database name, username, and password. You’ll need this information in the next step.
Step 3: Upload Files from Local Server to Live WordPress Website
Now, you need to upload the archive and installer files from your local site to your hosting account.
First, connect to your live site using an FTP client. Once connected, make sure that the root directory of your website is completely empty.
Normally, the root directory is the /home/public_html/ folder.
Some WordPress hosting companies automatically install WordPress when you sign up. If you have WordPress files there, then you need to delete them.
After that, you can upload the archive.zip and installer.php files from Duplicator to your empty root directory.

Step 4: Running the Migration Script
After you have uploaded the migration files, you need to visit the following URL in your browser:
http://example.com/installer.php
Don’t forget to replace ‘example.com’ with your own domain name.
This will launch the Duplicator migration wizard.
The installer will run a few tests and will initialize the script.
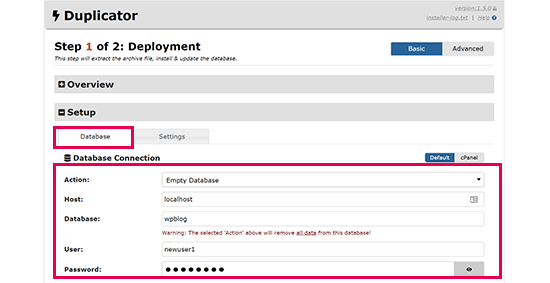
Under the Setup section, you will be asked to enter your MySQL host, database name, username, and password.
Your host will likely be localhost. After that, you will enter the details of the database you created in the earlier step.
Then, click on the ‘Validate’ button to make sure the details you entered are correct.
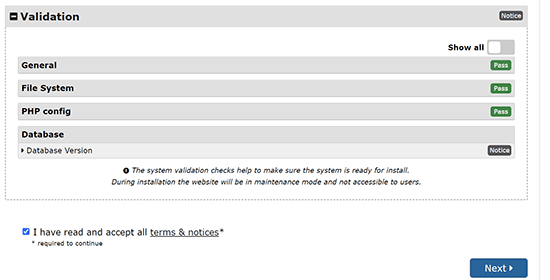
After that, click on the ‘Next’ button to continue.
Duplicator will now import your WordPress database backup from the archive into your new database.
It will also update URLs pointing to the local site to your new live site.
You can now click on the ‘Admin Login’ button to enter the WordPress admin area of your live site.

Once you log in to your live site, Duplicator will automatically clean up the installation files.
That’s all. You have successfully moved WordPress from the local server to your live site.
Method 2: Manually Transfer WordPress From the Local Server to the Live Site
In this method, we will show you how to manually move WordPress from the local server to your live site. It will be useful if the first method doesn’t work or if you prefer to do it manually.
Step 1: Export Local WordPress Database
The first thing you need to do is export your local WordPress database. We will be using phpMyAdmin to do that.
If you are unfamiliar with it, then you might want to take a look at our guide to WordPress database management using phpMyAdmin.
Simply go to http://localhost/phpmyadmin/ and click on your WordPress database. Next, click on the ‘Export’ button from the top menu bar.

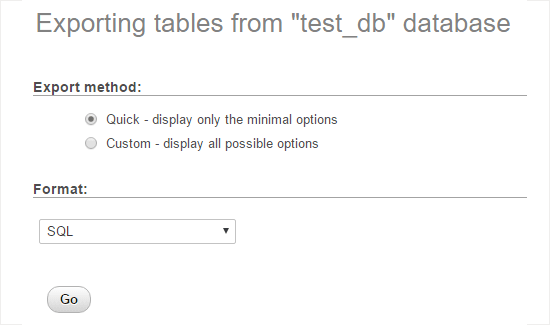
In the ‘Export method:’ option, you can choose ‘Quick’ or ‘Custom’. Custom will provide you with more options to export your database.
But we recommend choosing ‘Quick’ and then clicking the ‘Go’ button to download your database.
Step 2: Upload WordPress Files to Live Site
Now, we will need to move all your website files to the live site.
To get started, go ahead and open your FTP client and connect to your web hosting account.
Once you are connected to your live site, make sure you upload the files in the right directory. For example, if you want the site to be hosted on ‘yoursite.com’, then you will want to upload all the files in your public_html directory.
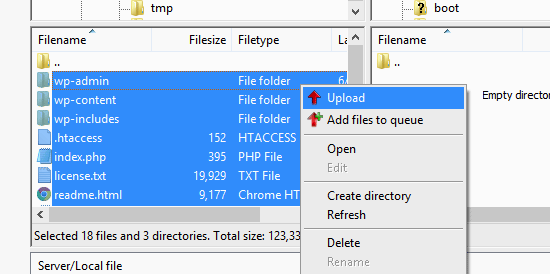
Now select your local WordPress files and upload them to your live server.
Step 3: Create a MySQL Database on Your Live Site
While your FTP client is uploading your WordPress files, you can start importing your database to the live server.
Most WordPress hosting providers offer cPanel to manage your hosting account, so we will show you how to create a database using cPanel.
First, you need to log in to your cPanel dashboard and click on the ‘MySQL Database Wizard’ icon, which can be found in the ‘Databases’ section.

On the next screen, you can create a new database.
You need to provide a name for your database, then click ‘Create Database’.

cPanel will now automatically create a new database for you.
Next, you need to enter a username and password for your new user, and then click ‘Create User’.
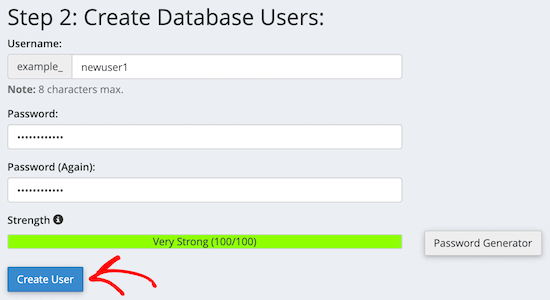
After that, you need to add the user you just created to the database.
First, check the ‘All Privileges’ checkbox.
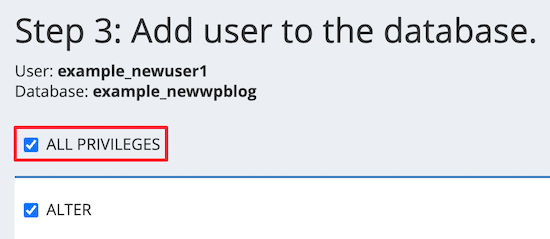
Then, scroll down and click ‘Make Changes’ to save your changes.
You’ve successfully created a new database for your live WordPress site.
Step 4: Import WordPress Database to Live Site
The next step in the process is to import your WordPress database.
Go to your cPanel dashboard, scroll down to the ‘Databases’ section, and click on ‘phpMyAdmin’.
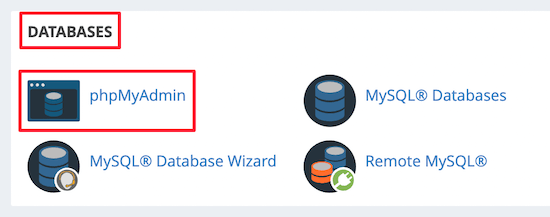
This will take you to phpMyAdmin, where you want to click on the database you just created above. phpMyAdmin will show your new database with no tables.
Next, click on the ‘Import’ tab in the top menu. On the import page, click on the ‘Choose File’ button and then select the database file from the local site you saved in the first step.
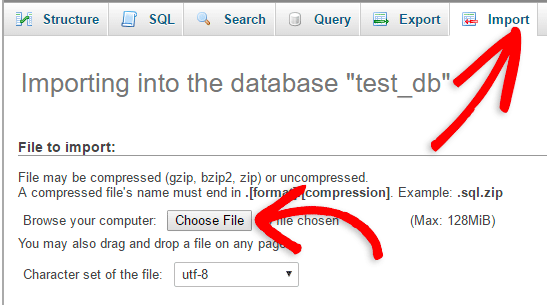
After that, click the ‘Go’ button at the bottom of the page. Your database will automatically be imported to phpMyadmin.
Step 5: Change the Site URL
Now, you need to change the site URL in your database so that it will connect with your live WordPress site.
In phpMyAdmin, look for the wp_options table in your database that you just imported above.
If you changed your database prefix, then instead of wp_options, it might be {new_prefix}_options.
Next, click on the ‘Browse’ button next to wp_options. Or, click the link in the sidebar to open up the page that has a list of fields within the wp_options table.
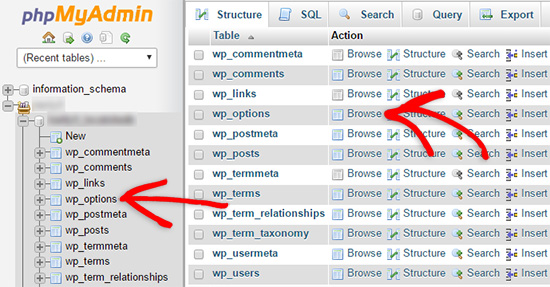
Then, in the options_name column, you need to look for the siteurl option.
Then, click the ‘Edit’ icon.

This brings up a window where you can edit the field.
In the input box for option_value, you’ll see the URL of your local install, which will be something like http://localhost/test.
You need to insert your new site URL in this field, for example: https://www.wpbeginner.com.
Then, you can save the field by clicking the ‘Go’ button.
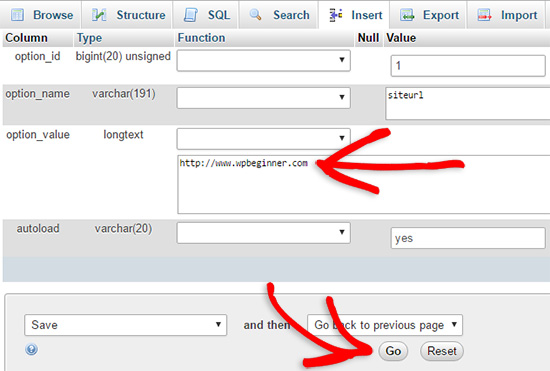
Next, you need to follow the same steps as above for the home option name. The wp_options menu can be a few pages long. Usually, the home option will be on the second page.
Then, update the home URL, so it’s the same as your live site URL.
Step 6: Set Up Your Live Site
Now that you’ve imported the database and uploaded your content, it’s time to configure WordPress.
At this time, your site should be showing an ‘Error establishing a database connection‘ error.
To fix this, connect to your website using an FTP client and open up the wp-config.php file.
You’ll be looking for the following lines of code:
// ** MySQL settings - You can get this info from your web host ** //
/** The name of the database for WordPress */
define( 'DB_NAME', 'database_name_here' );
/** MySQL database username */
define( 'DB_USER', 'username_here' );
/** MySQL database password */
define( 'DB_PASSWORD', 'password_here' );
/** MySQL hostname */
define( 'DB_HOST', 'localhost' );
You will need to provide the database name, username, and password you created earlier.
Next, save the wp-config.php file and upload it back to your WordPress hosting server.
Now, when you visit your website, it should be live.
After that, you need to log in to your WordPress admin panel and go to the Settings » General. Then, without changing anything, scroll to the bottom and click the ‘Save Changes’ button.
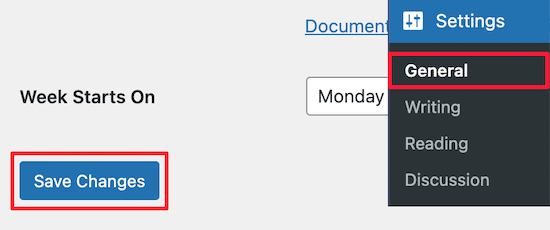
This will make sure that your site URL is corrected anywhere else that it needs to be.
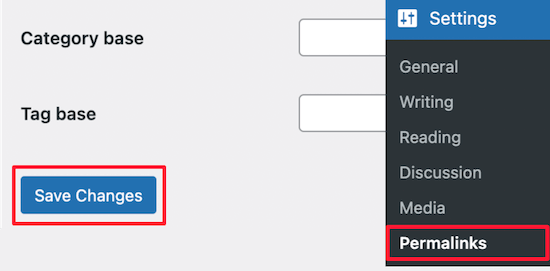
Once you’ve done that, go to Settings » Permalinks, then scroll down and click ‘Save Changes’ to ensure that all post links are working fine.
Step 7: Fix Images and Broken Links by Updating Paths
Whenever you are moving a WordPress site from one domain to another or from a local server to a live site, you’ll face broken links and missing images.
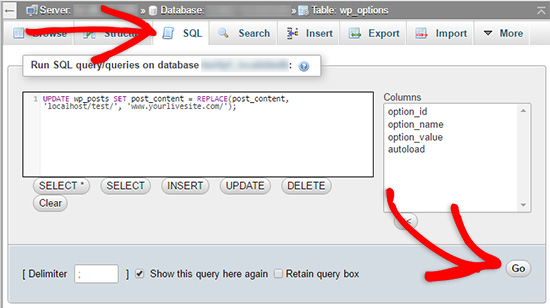
A simple way to update the URLs is by using the following SQL query:
UPDATE wp_posts SET post_content = REPLACE(post_content, 'localhost/test/', 'www.yourlivesite.com/');
Simply go to phpMyAdmin, click on your database, and then click on ‘SQL’ from the top menu and add the query above.
Make sure you change it to your own local site and live site URLs and click the ‘Go’ button.
That’s it. You have now successfully migrated WordPress from your local server to a live site.
Hopefully, your live website is up and running smoothly. If you notice any errors, then you can check out our guide to common WordPress errors for help with troubleshooting.
We hope this article helped you move WordPress from a local server to a live site. You may also want to see our guide on how to create an email newsletter the right way or see our comparison of the best GoDaddy hosting alternatives.
If you liked this article, then please subscribe to our YouTube Channel for WordPress video tutorials. You can also find us on Twitter and Facebook.


Syed Balkhi says
Hey WPBeginner readers,
Did you know you can win exciting prizes by commenting on WPBeginner?
Every month, our top blog commenters will win HUGE rewards, including premium WordPress plugin licenses and cash prizes.
You can get more details about the contest from here.
Start sharing your thoughts below to stand a chance to win!
James says
Hi!
Any tips on how I can fix a broken link that is still using localhost for a calendar plugin that I installed?
James
Karl says
I’ve bookmarked this page in the past for future reference after I had migrated my own site about a year ago. I dragged my feet getting backupbuddy and now, wow! That plugin is a bit too much for my budget. Will most likely use duplicator to migrate their site redesign from MAMP to live.
Unfortunately, the client’s current WP install is a mess. I’m counting 6 db from previous and current site designs. I’m guessing it would be easier for me to just sweep clean all the old dbs (delete) and create a new one for my migration rather than trying to run duplicator and then have to wade through with phpmyadmin to fix any problems.
I’ll keep this page up in my browser, just in case during migration, but I wish there was a way just to overwrite the current db with my redesign db without a need to then jump back in and make changes (via phpmyadmin). Would make the migration smoother.
Too bad backupbuddy has raised their prices.
fatemeh says
Hello \
I have followed all the steps but there is nothing shown on my website , I dont know whats wrong , I do appreciate your help.
Forbidden
You don’t have permission to access / on this server.
Additionally, a 403 Forbidden error was encountered while trying to use an ErrorDocument to handle the request.
This is an error I got,
Thank you
WPBeginner Support says
Please see our guide on how to fix the 403 forbidden error in WordPress.
Admin
Ian says
I really appreciated this tutorial – thanks. And following it to the letter has really helped solve most of my issues. However there is one that remains. The “live” site appearance looks very much like the “localhost” site, with one exception. When I go to the Dashboard and “edit” a page live, none of the text normally visible is available for me to edit. When I go to “Preview Changes” it shows a blank screen. Is there another flaw in the database structure I have missed in the conversion/upload process? Can you show me where I might have gone wrong for this to happen please? Ian
WPBeginner Support says
Try updating your permalink structure. Simply visit Settings » Permalinks and then click on the save changes button without changing anything.
Admin
peter says
After importing the local database to live server, my cpanel phpadmin is not working. cant access it anymore.please help
HTTP error 404
The requested page was not found.
Possible reasons why you are seeing this page:
A bookmarked URL may have changed since you last visited.
The URL was entered incorrectly.
The URL was entered with inaccurate capitalization (URLs are case sensitive).
Please re-check the URL you are trying to reach. (Go Back)
Copyright© 2016 cPanel, Inc.
WPBeginner Support says
Please contact your WordPress host for support, they will be able to help you better.
Admin
Rajeev says
Hi, this tutorial has worked very well and I have migrated a locally hosted wordpress site on to GoDaddy webhosting services however when I try to log in to my website (wp-admin) it redirects to a 404 error. Any suggestions on why this is happening and what to do to solve this?
Thanks
WPBeginner Support says
Have you changed site URL? Remember http://www.example.com and example.com are considered two different domains. Also make sure that you haven’t installed WordPress in its own subdirectory. In that case, your wp-admin login url will be something like example.com/wordpress/wp-admin/
Admin
Vinish Chaudhary says
Hello Rajeev,
Did you find the solution for this 404 error?
Gerald says
Hi Syed,
I did all that was required and encountered a HTTP ERROR 500 with the notification “…currently unable to handle this request”. I’m not sure if it’s the theme I’m using that has a problem. It’s worked fine for me on another web server.
Ant recommendations on how to fix this?
The server seems to be running on php 5.5 while my localhost ran version 5.6. Does this affect it in anyway?
WPBeginner Support says
Try steps mentioned in our guide on how to fix the internl server error in WordPress.
Admin
vinay says
after completing 5th step when i go to the link mysit/wp-admin for next step I get these error plz help
This either means that the username and password information in your wp-config.php file is incorrect or we can’t contact the database server at . This could mean your host’s database server is down.
i hv alredy udated my wp_config.php
Kasoma says
thanks for the post but my log is not displaying and when i click the pages it shows internal server error. please help to fix that
Sharon says
Your instructions were great, and love that you provided pictures as well.
However, I am having an issue. I can see my site, I can see the images for the logos and pictures I have added, but the themes are not loading. They are showing up as blank. I am not sure where to start?
When I ran your sql script through my database I get a an error #1146 – Table ‘mcintyre_wp.wp_posts’ doesn’t exist.
Any help would be greatly appreciated!
Owen says
This is a great tutorial, easy to follow and gets the job done!
JESH says
Hi there, thank you heaps, I have sorted it out. My website domain is now stuck on mywebsitename.preview.services . How do I get rid of the preview.services? I am worried that if I change the URL on WordPress it will stuff everything up and I want to be sure I know what I’m doing. Appreciate the help.
Najeeb says
Hi,
Very good tutorial.
I would like to know is it better to design a website on a local wordpress server then upload on a server like hostgator or it is also better to buy a domain on hostgator and create a wordpress website in live environment?
Please let me know i am new to this.
Jesh says
Hi there,
absolute frustration has caused me comment for help. I have been trying to upload my site from local to live using MAMP and FileZilla. I have followed your steps as well as others MANY times but still to no avail. Your guide is very good and I have followed the whole thing to the end but every time I go to view my site it comes up with the domain then .preview.services . The page is an “index of” page and it won’t let me go any further. I have tinkered around with the settings but really don’t know what to do except smash my computer. Can you recommend anything? …a sledgehammer?
WPBeginner Support says
When uploading files from your computer to your website, make sure you are uploading them in the correct directory. If you are not sure, then ask your web hosting service provider. Typically its called /public_html/ but it varies from one web host to another.
Also make sure that you are uploading only your WordPress files and not including the MAMP files and directories in the upload.
Admin
Gale says
Just wanna let you know, you guys are freaking awesome! This is such a great tutorial! I’d been stuck for days with the links not working and you’re the only ones mentioning saving the settings! Thank you so much!
Rajat says
Hi,
I just started using Hostgator. I had created a website using WAMP. I have the .sql file and the wordpress files. I am still not able to get that website show up on my domain. Can you please tell me what can i do in this regard.
Thanks for your help.
Gary Pippin says
Hi,
I have created a wordpress website and it is still not live. When i open the url in browser it says “This url is under construction : Coming Soon”.. Could you please help me with this issue.
Thanks
Gary
WPBeginner Support says
1. Your site may have a plugin installed that is used to display this page.
2. Your domain name may not be pointing to the directory where you have your WordPress site.
Please contact your web host, they will be able to help you better.
Admin
nick says
i dont get it. like my site is live but it still have broken links and images. im trying to fix it with the my sql quary way but everything i fill in as local site and live site URLs it says 0 rows affected and theres nothing that changed. So can you explain which urls i have to fill in exactly
Julian says
Hello Nick,
Are you using the query on the live phpmyadmin dashboard?
Make sure you do it on the live site through Cpanel and not on your local environment.
Kishokumar says
Great word buddy, i didn’t know about this until now. Thank you so much.
Learner says
Hi, I’m learnin wordpress, I’m trying to migrate my website to a new domain and new host. Should I need to activate wordpress on my new hosting account before I load from my backup website. Thanks for your help.
WPBeginner Support says
Depends on what kind of backup you have. If it is an XML or RSS file, then you should first install WordPress and then import your content from those files. If the back contains database and complete WordPress files, then you need to extract and upload WordPress files to your new host and then import database from backup.
Admin
Priyangga says
All works great!! but the theme doesn’t completely loaded, is the any issues? please help!!
Yuri says
Thanks for the article, but ima kinda desperate here…
Lost 4 hours of working trying to figure out why in my webserver the index page keeps BLANK, even after connected the database. And my admin page gives me the error not found, i’ve been searching for a solution and nothing helps.
thanks in advance
Steve says
Worked perfectly! Thanks.
Croiche Jim says
thanks a lot
cheers!
precious osasumwen says
pls help. i get this error when i try to access my phpadmin in my wamp server.
phpMyAdmin – Error
Cannot start session without errors, please check errors given in your PHP and/or webserver log file and configure your PHP installation properly. Also ensure that cookies are enabled in your browser.
what do i do sir
Sneha says
Hi,
I have created my website on my local server and also I have used action method to navigate to different pages. But on these action methods I have given localhost permalinks only as destination address. So do I have to replace it with live address everywhere in the code or is there some method by which i can replace it at once.
Chris Cal says
I’m not one to usually comment but this is an excellent post.
Great work Syed and team. Greatly appreciated.
Cheers, Chris.
WPBeginner Support says
Thanks, we are glad you found it helpful.
Admin
Leslie says
It was the .htaccess file!!! But I had to upload a completely new file. Thanks!!!
Courtney says
Any tutorials for when you have forgotten your phpMyAdmin login info? I am stuck at the beginning! It has been a while since I have needed to login and cannot for the life of me remember. I used this site as a tutorial to set up but cannot figure out how to reset. I have seen some tutorials to reset but I am afraid it is going to mess things up as I am not an expert. Any suggestions or tutorials you can point me to? TIA
WPBeginner Support says
You can login to phpMyAdmin from your hosting control panel as well.
Admin
Tyane says
I’m stuck on step 6. I edited the wp-config. file and uploaded it. It gave me six errors, with most of them beginning with, ” unexpected beginning of statement” followed by the position each error is listed. I’m very new to this and my IT husband is out of town till Friday.
barshan hassan says
Thanks… I love u
leon says
works really well!
geeuy says
great tutorial!
worked like a charm!
ashkan says
hi there tnx for this article
i did all these steps and my site is up now but when i click on other pages or links i faced this eror
(Internal Server Error)
in fact I just can see the homepage
can You tell me about This?
Thatguy91 says
I had the same issue, go to the permalinks page and click the save button. I think it needs to “resave” the permalinks again somewhere once migrated.
mtahirian says
Hello,
I have uploaded my site live. but unfortunately i can’t go to wordpress admin. the wordpress admin is working fine on local server. it has problem keep telling that : Warning: Cannot modify header information – headers already sent by (output started at /home/………/public_html/wp-content/plugins/js_composer_theme/js_composer.php:1) in /home/porseshresearch/public_html/wp-includes/pluggable.php on line 1228
Please Help
WPBeginner Support says
Seems that js_composer_theme plugin is not working. Connect to your website using FTP and then download the plugin to your computer. After that you can delete the plugin from your server. This should resolve the issue.
Admin
mtahirian says
Thanks for responding.
I did, as told. but the whole site is smashed up and can’t get the design correct. I need the COMPOSER.
wpbeginner says
Thank you very much for your wonderful tutorial.
I am having a problem where my website is only accessible through blog.example.com but not accessible through example.com/blog
May I know what can be done to solve this?
WPBeginner Support says
Your blog is hosted as a subdomain. You will need to export it to your main domain.
Admin
wpbeginner says
My subdomain folder is in public_html folder.
May I know where should I export it for it to be in my main domain?
Your help is greatly appreciated.
awoyemi ayomide says
thanks it help me a lot
Lars Breum Hansen says
I am stuck at step 6. My site is live, but instead of going to my main page, It show my themes default main page, at gives me an 404 (because it can’t find posts, but my main page is set to be static). And I can’t login as admin, becuase then it gives me the 500 internal error?
Kim Macc says
Hi.
This article is great thank you!! I have done everything and the site is live but the pages are not linking/working i get an ‘internal server error’
please help me fix this as soon as possible. have done the SQL query but to no avail.
AP says
Make sure hidden files are copied over as well as part of Step 2
Ebune says
i had a problem in the step where i am to change localhost/test. to my site name. i cant really see an edit but to change that stuff. also, when i try to upload my database, it gives me an error. please can anyone help??? am in a deep shit right now
Dang Ng says
You could try writing an SQL statement to modify that cell and see what MySQL say
Mayur says
My website is
I have changed my server , i took backup of wp files and mysql before my server service expired. Now i am on a new server, uploaded and extracted wp files in public_html, i am. Getting an error – error establishing database connection, hoe should i solve this error?
WPBeginner Support says
Please take a look at how to fix the error establishing a database connection in WordPress.
Admin
Caitlin says
Hi! I ran into a problem in step 6: “To fix this, connect to your website using an FTP client and edit wp-config.php file. Provide the database name, user and password you created earlier in Step 3. Save the wp-config.php file and upload it back to your server. Visit your website, and it should be live now.”
I did that and it didn’t work, so I started to edit where it said “localhost” and changed it to my domain.
I’m a totally newbie so any help would be appreciated!
WPBeginner Support says
Try using localhost as your MySQL Host
define( ‘DB_HOST’, ‘localhost’ );
Admin
ananta says
owh… maan… this is what i am looking for all day long… finally found your article. it’s very helpful. now, my site is live. thank you. good work by the way.
Raj jain says
Hi,
How can I solve this error. Reply urgently.
Fatal error: Allowed memory size of 67108864 bytes exhausted (tried to allocate 32 bytes) in /home/sitename/public_html/wp-includes/pomo/mo.php on line 236
WPBeginner Support says
See our guide on how to fix WordPress memory exhausted error.
Admin
Elise says
Hello, I’ve been following all these steps but when I’m doing the export but when I’m importing in my OVH database I can only see wp_commentmeta and wp_comments instead I’ve selected all tab during the export and choose custom and the gzipped format
Do you know what’s happening here?
Amey mankar says
Thank You so much. It help me alot.
Mboule A says
I tried changing localhost to my domain name but it isn’t going. I need help. I’ve tried both methods. Both the plugins and using the SQL code
Bessong william says
thanks you for you tutorial, but am still a beginner in web developping, i need you to teach me with a plugin like BackupBuddy or Duplicator or what ever!!!, how to migrate my website from local to live production site
cmunozro says
Can’t access my website.
Error al establecer una conexión con la base de datos (unable to connect to data base)
I try accessing thorough the IP as the domain is not transfered yet. I’m not sure in the wp_options and in wp_config what data should I use.