Many WordPress users prefer to work on their websites using a local server on their computer before transferring it to a live hosting server.
It allows you to work on your website privately before making those changes available online.
Eventually, you’ll need to move it to a live server to make it available for online visitors.
In this article, we will show you step-by-step instructions on how to move WordPress from a local server to a live site.
Why Move WordPress From a Local Server to a Live Site?
Building your WordPress blog on a local server is a safe way to test changes on your website without affecting visitors.
When you have finished perfecting your website, the next step is to move from your local server to a live site.
Let’s show you two ways to move your site from a local server to a live site.
The first method uses a WordPress migration plugin and is recommended for beginners.
In the second method, we will show you how to manually move WordPress from a local server to a live site.
You can choose the method that works best for you:
Before You Migrate Your WordPress Site
To migrate WordPress from a local server to a live server, you need to have a few things in place.
First, we are assuming that you have a WordPress site running on a local server (also called localhost) on your computer and you have full access to it.
Next, you’ll need to have a domain name and web hosting.
To make your decision easier, we recommend using Bluehost. They are an officially recommended WordPress hosting company, and they are giving WPBeginner users an exclusive discount + free domain and SSL.
Basically, you can get started for as little as $1.99 per month.
If you want a great Bluehost alternative, you can look at Hostinger. They are also offering an exclusive discount to WPBeginner users with a free domain name.
If you can afford to pay a little more, then check out SiteGround. They also have a special deal for WPBeginner readers.
If you need help setting up your website, then follow our step-by-step guide on how to make a website.
Finally, you will need an FTP program and know how to use FTP to upload your local server site to the live site.
Ready? Let’s begin migrating your WordPress site.
Video Tutorial
If you’d prefer written instructions, then just keep reading.
Method 1: Transfer WordPress From The Local Server to Live Site Using a Migration Plugin (Recommended)
This method is easier and recommended for beginners. We will be using a WordPress migration plugin to move WordPress from localhost to a live site.
Step 1: Install and Set Up the Duplicator Plugin
First, you need to install and activate the Duplicator plugin on your local site. For more details, see our step-by-step guide on how to install a WordPress plugin.
Pro Tip: There is also a pro version of Duplicator that offers secure backups, cloud storage, easy site restore, and more.
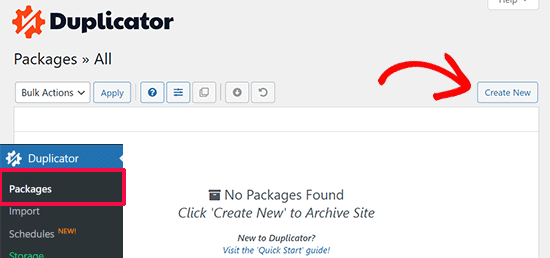
Upon activation, you need to go to the Duplicator » Packages page and click on the ‘Create New’ button.
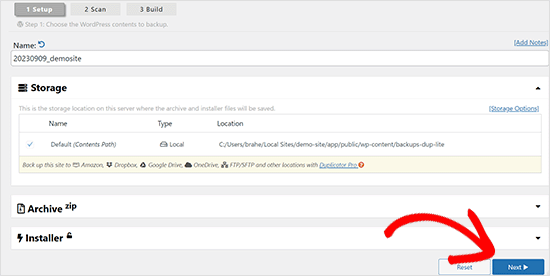
This brings you to a screen where you can give your backup a name.
Then, click the ‘Next’ button.
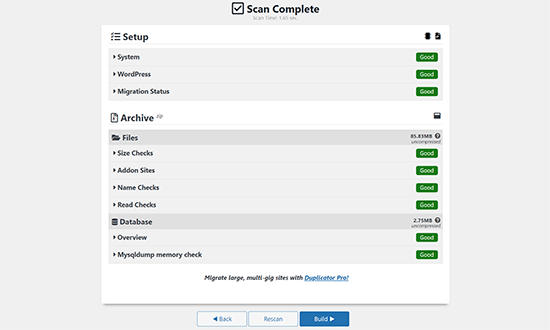
Duplicator will now run some tests to see if everything is in order.
If all items are marked ‘Good’, then click on the ‘Build’ button.
This process may take a few minutes, depending on the size of your website. You need to leave this tab open until the process is complete.
Once finished, you’ll see download options for ‘Installer’ and ‘Archive’ packages. You need to click on the ‘One-Click Download’ link to download both files to your computer.
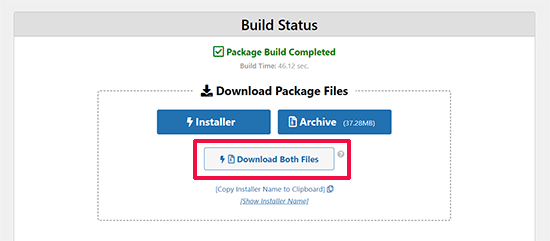
The ‘Archive’ file is a complete copy of your WordPress site. It includes all WordPress core files as well as your images, uploads, themes, plugins, and a backup of your WordPress database.
The ‘Installer’ file is a script that will automate the entire migration process by unpacking the archive file containing your website.
Step 2: Create a Database for Your Live WordPress Website
Before you can run the installer or upload the WordPress website from localhost to your hosting server, you need to create a MySQL database for your new live website.
If you have already created a MySQL database, then you can skip this step.
To create a database, you need to visit your hosting account’s cPanel dashboard. Then, locate the ‘Databases’ section and click on the ‘MySQL Database Wizard’ icon.
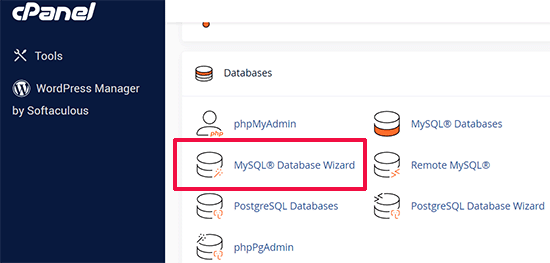
On the next screen, there’s a field to create a new database.
Simply provide a name for your database and click on the ‘Create Database’ button.

cPanel will now create a new database for you.
After that, you need to enter a username and password for your new user and then click the ‘Create User’ button.
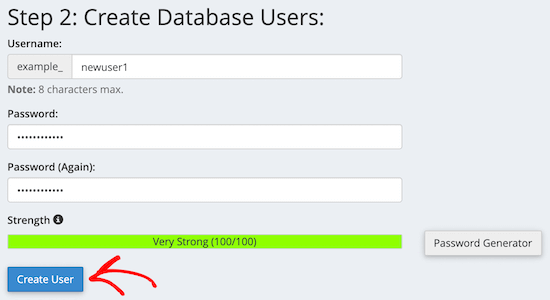
Next, you need to add the user you just created to the database.
First, click the ‘All Privileges’ checkbox.
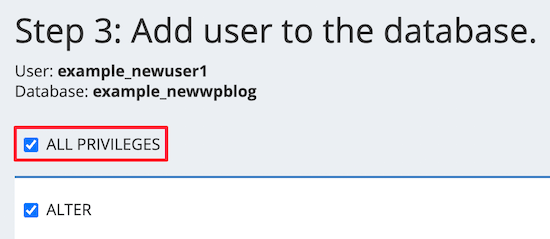
Then, scroll down and click the ‘Make Changes’ button to save your changes.
Your database is now ready to be used with your WordPress site. Make sure to note down the database name, username, and password. You’ll need this information in the next step.
Step 3: Upload Files from Local Server to Live WordPress Website
Now, you need to upload the archive and installer files from your local site to your hosting account.
First, connect to your live site using an FTP client. Once connected, make sure that the root directory of your website is completely empty.
Normally, the root directory is the /home/public_html/ folder.
Some WordPress hosting companies automatically install WordPress when you sign up. If you have WordPress files there, then you need to delete them.
After that, you can upload the archive.zip and installer.php files from Duplicator to your empty root directory.

Step 4: Running the Migration Script
After you have uploaded the migration files, you need to visit the following URL in your browser:
http://example.com/installer.php
Don’t forget to replace ‘example.com’ with your own domain name.
This will launch the Duplicator migration wizard.
The installer will run a few tests and will initialize the script.
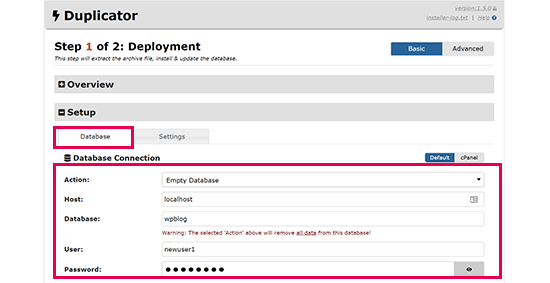
Under the Setup section, you will be asked to enter your MySQL host, database name, username, and password.
Your host will likely be localhost. After that, you will enter the details of the database you created in the earlier step.
Then, click on the ‘Validate’ button to make sure the details you entered are correct.
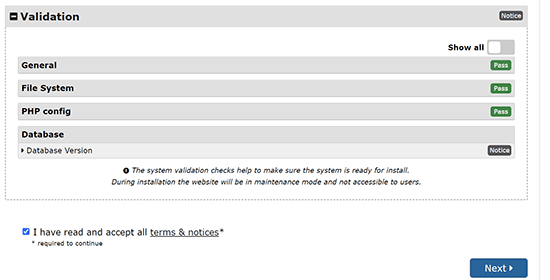
After that, click on the ‘Next’ button to continue.
Duplicator will now import your WordPress database backup from the archive into your new database.
It will also update URLs pointing to the local site to your new live site.
You can now click on the ‘Admin Login’ button to enter the WordPress admin area of your live site.

Once you log in to your live site, Duplicator will automatically clean up the installation files.
That’s all. You have successfully moved WordPress from the local server to your live site.
Method 2: Manually Transfer WordPress From the Local Server to the Live Site
In this method, we will show you how to manually move WordPress from the local server to your live site. It will be useful if the first method doesn’t work or if you prefer to do it manually.
Step 1: Export Local WordPress Database
The first thing you need to do is export your local WordPress database. We will be using phpMyAdmin to do that.
If you are unfamiliar with it, then you might want to take a look at our guide to WordPress database management using phpMyAdmin.
Simply go to http://localhost/phpmyadmin/ and click on your WordPress database. Next, click on the ‘Export’ button from the top menu bar.

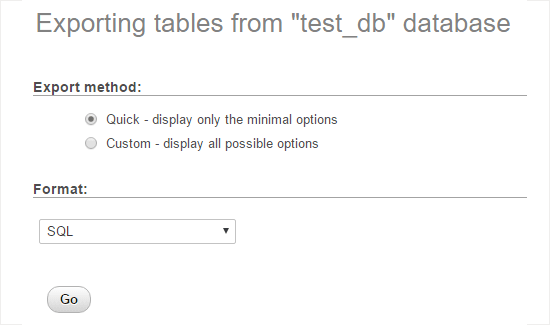
In the ‘Export method:’ option, you can choose ‘Quick’ or ‘Custom’. Custom will provide you with more options to export your database.
But we recommend choosing ‘Quick’ and then clicking the ‘Go’ button to download your database.
Step 2: Upload WordPress Files to Live Site
Now, we will need to move all your website files to the live site.
To get started, go ahead and open your FTP client and connect to your web hosting account.
Once you are connected to your live site, make sure you upload the files in the right directory. For example, if you want the site to be hosted on ‘yoursite.com’, then you will want to upload all the files in your public_html directory.
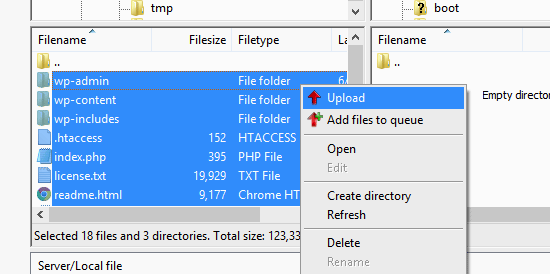
Now select your local WordPress files and upload them to your live server.
Step 3: Create a MySQL Database on Your Live Site
While your FTP client is uploading your WordPress files, you can start importing your database to the live server.
Most WordPress hosting providers offer cPanel to manage your hosting account, so we will show you how to create a database using cPanel.
First, you need to log in to your cPanel dashboard and click on the ‘MySQL Database Wizard’ icon, which can be found in the ‘Databases’ section.

On the next screen, you can create a new database.
You need to provide a name for your database, then click ‘Create Database’.

cPanel will now automatically create a new database for you.
Next, you need to enter a username and password for your new user, and then click ‘Create User’.
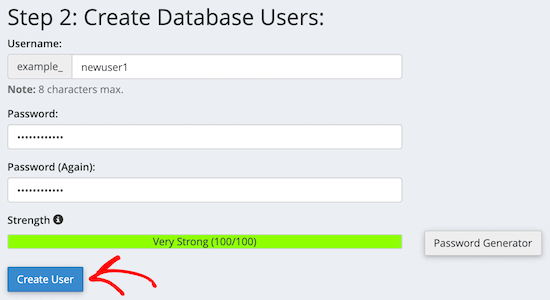
After that, you need to add the user you just created to the database.
First, check the ‘All Privileges’ checkbox.
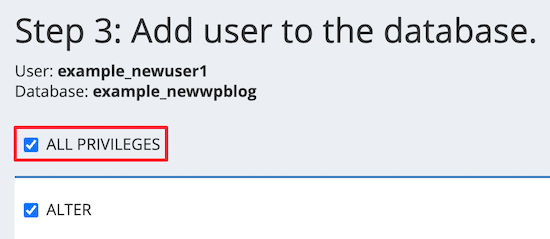
Then, scroll down and click ‘Make Changes’ to save your changes.
You’ve successfully created a new database for your live WordPress site.
Step 4: Import WordPress Database to Live Site
The next step in the process is to import your WordPress database.
Go to your cPanel dashboard, scroll down to the ‘Databases’ section, and click on ‘phpMyAdmin’.
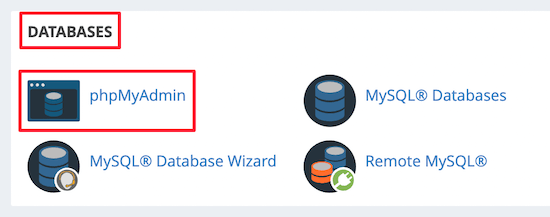
This will take you to phpMyAdmin, where you want to click on the database you just created above. phpMyAdmin will show your new database with no tables.
Next, click on the ‘Import’ tab in the top menu. On the import page, click on the ‘Choose File’ button and then select the database file from the local site you saved in the first step.
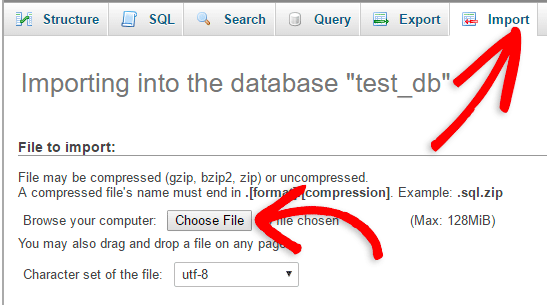
After that, click the ‘Go’ button at the bottom of the page. Your database will automatically be imported to phpMyadmin.
Step 5: Change the Site URL
Now, you need to change the site URL in your database so that it will connect with your live WordPress site.
In phpMyAdmin, look for the wp_options table in your database that you just imported above.
If you changed your database prefix, then instead of wp_options, it might be {new_prefix}_options.
Next, click on the ‘Browse’ button next to wp_options. Or, click the link in the sidebar to open up the page that has a list of fields within the wp_options table.
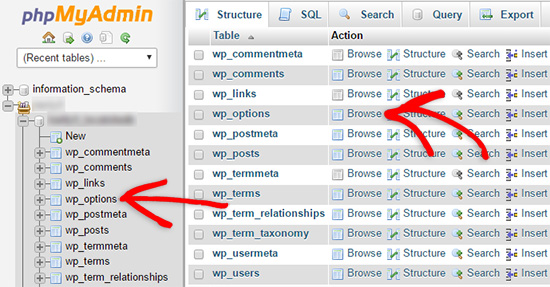
Then, in the options_name column, you need to look for the siteurl option.
Then, click the ‘Edit’ icon.

This brings up a window where you can edit the field.
In the input box for option_value, you’ll see the URL of your local install, which will be something like http://localhost/test.
You need to insert your new site URL in this field, for example: https://www.wpbeginner.com.
Then, you can save the field by clicking the ‘Go’ button.
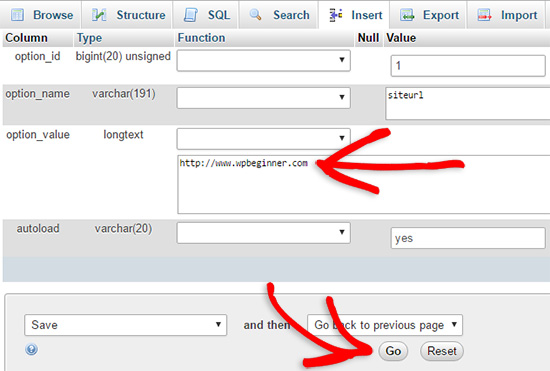
Next, you need to follow the same steps as above for the home option name. The wp_options menu can be a few pages long. Usually, the home option will be on the second page.
Then, update the home URL, so it’s the same as your live site URL.
Step 6: Set Up Your Live Site
Now that you’ve imported the database and uploaded your content, it’s time to configure WordPress.
At this time, your site should be showing an ‘Error establishing a database connection‘ error.
To fix this, connect to your website using an FTP client and open up the wp-config.php file.
You’ll be looking for the following lines of code:
// ** MySQL settings - You can get this info from your web host ** //
/** The name of the database for WordPress */
define( 'DB_NAME', 'database_name_here' );
/** MySQL database username */
define( 'DB_USER', 'username_here' );
/** MySQL database password */
define( 'DB_PASSWORD', 'password_here' );
/** MySQL hostname */
define( 'DB_HOST', 'localhost' );
You will need to provide the database name, username, and password you created earlier.
Next, save the wp-config.php file and upload it back to your WordPress hosting server.
Now, when you visit your website, it should be live.
After that, you need to log in to your WordPress admin panel and go to the Settings » General. Then, without changing anything, scroll to the bottom and click the ‘Save Changes’ button.
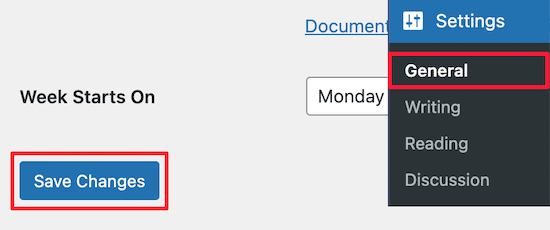
This will make sure that your site URL is corrected anywhere else that it needs to be.
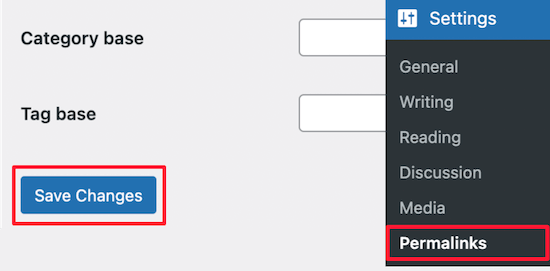
Once you’ve done that, go to Settings » Permalinks, then scroll down and click ‘Save Changes’ to ensure that all post links are working fine.
Step 7: Fix Images and Broken Links by Updating Paths
Whenever you are moving a WordPress site from one domain to another or from a local server to a live site, you’ll face broken links and missing images.
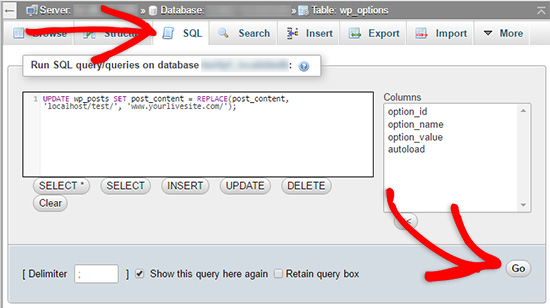
A simple way to update the URLs is by using the following SQL query:
UPDATE wp_posts SET post_content = REPLACE(post_content, 'localhost/test/', 'www.yourlivesite.com/');
Simply go to phpMyAdmin, click on your database, and then click on ‘SQL’ from the top menu and add the query above.
Make sure you change it to your own local site and live site URLs and click the ‘Go’ button.
That’s it. You have now successfully migrated WordPress from your local server to a live site.
Hopefully, your live website is up and running smoothly. If you notice any errors, then you can check out our guide to common WordPress errors for help with troubleshooting.
We hope this article helped you move WordPress from a local server to a live site. You may also want to see our guide on how to create an email newsletter the right way or see our comparison of the best GoDaddy hosting alternatives.
If you liked this article, then please subscribe to our YouTube Channel for WordPress video tutorials. You can also find us on Twitter and Facebook.


Syed Balkhi says
Hey WPBeginner readers,
Did you know you can win exciting prizes by commenting on WPBeginner?
Every month, our top blog commenters will win HUGE rewards, including premium WordPress plugin licenses and cash prizes.
You can get more details about the contest from here.
Start sharing your thoughts below to stand a chance to win!
Christian says
In step 6, wpbeginner support said, need to update these lines in wp-config.php file for an answer of comment (In Nov 2, 2017 at 12:34 am). Here are lines.
define(‘WP_HOME’,’http://example.com’);
define(‘WP_SITEURL’,’http://example.com’);
My question is, After which line should i need to updates these lines in wp-config.php file?
Here is wp-config.php file without comments.
<?php
define('DB_NAME', 'db');
define('DB_USER', 'user');
define('DB_PASSWORD', 'pass');
define('DB_HOST', 'localhost');
define('DB_CHARSET', 'utf8');
define('DB_COLLATE', '');
define('AUTH_KEY', 'put your unique phrase here');
define('SECURE_AUTH_KEY', 'put your unique phrase here');
define('LOGGED_IN_KEY', 'put your unique phrase here');
define('NONCE_KEY', 'put your unique phrase here');
define('AUTH_SALT', 'put your unique phrase here');
define('SECURE_AUTH_SALT', 'put your unique phrase here');
define('LOGGED_IN_SALT', 'put your unique phrase here');
define('NONCE_SALT', 'put your unique phrase here');
$table_prefix = 'wp_';
define('WP_DEBUG', false);
if ( !defined('ABSPATH') )
define('ABSPATH', dirname(__FILE__) . '/');
require_once(ABSPATH . 'wp-settings.php');
WPBeginner Support says
Hi Christian,
You can add them any where before the comment line that says:
/* That’s all, stop editing! Happy blogging. */
To be more precise, you can add these lines after:
define('WP_DEBUG', false)1-click Use in WordPress
Admin
Ian Billingham says
Hi there.
Would somebody be able to tell me if this ‘how to’ would overwrite an existing established website? I’m guessing it would.
WPBeginner Support says
Hi Ian,
Yes, it will overwrite an existing established website.
Admin
Ravishankar says
You are awesome!!! Thank you so much, this was super helpful!
Kate says
Hi
Thanks for this informative post. I followed all the instructions carefully and when I tried to see if the site was live at step 6, it came up with the same page that it was had originally. It says ‘Index of/’ as the heading and then has 2 options below (with details of date modified etc). The 2 options are cgi-bin which brings up a 403 error and wordpress which goes to a blank page. Any ideas on what I might have done wrong? I’m very new to this so might have got something confused!
Thanks
Ahmed says
Thank you very much, this is very useful
Kritika says
Nice and helpful. Thanks
Muhammad Azhar says
Hi
i am trying to upload my localhost word press site to live.
I am stuck at where it said “error database connection” i edit the wp-config file and now the only white screen appearing on my web site. I am confused what to do next? “Next, you need to login to your WordPress admin panel and go to Settings » General. be.” I have to install word press at my hosting to perform this step. Please guide.
CK Cheung says
Hi,
Many thanks for the instruction. I would like to ask is it possible that I just copy the exported database and upload to the FTP site?
Then I can keep the local host for the future upgrade and testing?
If yes, in future which file I should upload to the ftp and make it live??
Many thanks.
kathy says
Hi, I wonder if you can help. I’ve got all the way to editing the config file and uploading i would now appear to be at a sticking point – any ideas on the below? Everything has gone fine to this point. I’ve amended the name, user and password as advised. Would really appreciate any pointers. Thanks
Server Error in ‘/’ Application.
Runtime Error
Description: An application error occurred on the server. The current custom error settings for this application prevent the details of the application error from being viewed remotely (for security reasons). It could, however, be viewed by browsers running on the local server machine.
Amelia says
Hi There. I just want to thank you for such an informative site you are running. I feel like you guys literally held my hand the whole way through, and every glitch I had, you had an article about how to fix it.
I’m happy to say my site is now up and running, while I still have to do a few finishing touches though. Just a great big thank you, I could not have done it without following your website step by step.
Nick says
I am having issues with step 6, mainly the part where it says “Next, you need to login to your WordPress admin panel and go to Settings » General. Without changing anything, scroll to the bottom and click the Save Changes button. This will ensure that the site URL is corrected anywhere else that it needs to be.
After that go to Settings » Permalink and click Save Changes to ensure that all post links are working fine”. I cannot go into the settings because I cannot login, I have gotten to the login page but it won’t let me login and I cannot create an account because the link is not connected. How would I get around this problem.
WPBeginner Support says
Hi Nick,
You can update the URLs in wp-config.php file as well. Connect to your live website using an FTP client and then add these two lines:
define('WP_HOME','http://example.com'); define('WP_SITEURL','http://example.com');1-click Use in WordPress
Don’t forget to replace example.com with your own URL.
Admin
Nisa says
Thank you very much its was very helpful, I was moving WP files from one server to another.
But I cannot compete the 6th step latter part, I can type the Admin username and password, so the site shows I am logged in as the admin from right hand side corner up, but I cannot access the admin panel
I get the error message : “Sorry, you are not allowed to access this page.”
Judit says
Hello,
I took ages to set up my website locally, and now I am ready to move it to a live site. However, when I go to I get an error message:
#1045 – Access denied for user ‘xxx'(my username)@’localhost’ (using password: YES)
I’m pretty sure my username and password are correct and yet I cannot log in or change my password.
Please help – I’m afraid that I invested so much time into setting up WP and now I cannot move it to a live site because of this issue.
WPBeginner Support says
Hi Judit,
You will need to edit the phpmyadmin’s configuration file:
c:\wamp\apps\phpmyadmin4.1.14\phpmyadmin.conf
Try root for username and leave password field blank. Set ‘AllowNoPassword’ to true. Save your changes and restart WAMPSERVER
Admin
TH says
Hi. I moved my site from my local host wamp to my hosting service.
I did all the steps 1-7 but am facing the following problems:
(I had deleted all my plugins to ensure no conflicts)
– when I login as admin, it shows me the login page instead of the homepage and the admin dashboard.
– header menu bar tabs are working OK except for the HOME tab. When I click on HOME it takes me to localhost. Other tabs take me to the right pages.
– Top bar menu tabs (Favorites, Notifications, Logout) are not working. When I click on Favorites it shows: domainname/login/?redirect_to=http%3A%2F%2domainname%2Fdashboard%2Fprojects%2F#favorites and still shows the login page.
– when I click on logout, it shows domainname/login/domainname/wp-login.php?action=logout&_wpnonce=942fbc8980
– when click on > domainname>dashboard it goes to : domainname/login/?redirect_to=http%3A%2F%2Fdomainname%2Fwp-admin%2F and still shows login page
1. What are the problems with the setup? How do I fix them?
2. Should I delete all the WP files and DB on the live server and try again?
Please help.
Thanks.
TH
WPBeginner Support says
Hi,
You may want to follow the steps in our WordPress troubleshooting guide. It will help you figure out what’s causing the issue and how to fix it.
Admin
Tara Giltner says
Hi,
I followed these directions, they were great. Thank you. My problem is that I still have an error establishing database. I realize it’s probably because the old website is still on the public_html files as well. Is it ok to delete them?
WPBeginner Support says
Hi Tara,
Make sure you download the files as backup on your computer before deleting them.
Admin
Jheel says
Kindly revert soon.
Jheel says
i followed all the steps mentioned above. the website is blank. and i cant even log in my wordpress website i created offline. after doing all the steps when i try to see if the site is live. i get PAGE NOT FOUND & the page contains the home page without bimage & captions. Please tell me what am i suppose to do?
Klaas Cornelis says
I Get the “Forbidden: PHP engine is disable” error after completing this steps, I recon i’ve done something wrong. Anyone has an idea of where the fault can be located?
Jolie King says
Hello,
I will like to ask if it possible to upload my wordpress website files by zipping all the folders & files, using the upload button in the cpanel to upload it, and then unzipping it after the upload.
Has anyone tried this? Are there any problems encountered after doing this??
Thanks.
Jim Thorne says
Jolie, yes…I Zipped my entire WordPress folder and uploaded it using cPanel and then decompressed it into the public_html folder. It worked fantastic.
alan says
wow. i better do it again since this look so difficutl
Amirreza says
Very useful. Thanks!
Abneer says
Hi,
I successfully moved my website from localhost to live site (with a few exceptions). But i had to work on my localhost also so i used update options method given on Codex . I am able to use my admin panel on localhost and only the frontpage. if i click on any other page on the website i get the wamp configuration page. How can i resolve this issue?
Please help me soon!
Thankyou!
Vince says
I could really use anyones help desperately; I spent 2 weeks putting a site together and now I can’t get MAMP to work!!!
I had everything working, built the site then had a power outage. Hadn’t used my computer over the weekend and when I came back had the MySQL Error #2002 in the browser window. None of the other windows had content in them as well.
I’ve tried even going back in my Time Machine and still can’t get it to work. When I start MAMP the Apache Server starts but the MySQL Server doesn’t. I even tried things like restarting Apache and MySQL in Terminal and clearing the cache, but still nothing. And I’ve tried fiddling with the preferences in MAMP.
I’ve used MAMP before, a few years ago without any issues or problems. Loved it!!! Worked Great!!!
I’m using Sierra 10.12.6. I first installed MAMP 4.1.1 then when I started having problems I tried to upgrade to 4.2 to see if that help, but no. Had a few problems at first, but did get it to work.
I have another computer running El Capitan and the MySQL Server just doesn’t start on that either. I thought maybe it was the version of PHP that runs on MacOS, so I ran an upgrade and still nothing!
I’m really despise because the site has a scheduled live date, and the customer will freak if it’s not up and running, not to mention my employer!!! Any help would be greatly appreciated!!!
Cheers, Vince
WPBeginner Support says
Hey Vince,
It is a common issue with MAMP and you’ll find various solutions online that have worked for other users. The most common solution is to delete the log files located in MAMP/db/mysql directory and then restarting MAMP.
Admin
Sarah says
Hello my web page is still showing blank after enabling WP-DEBUG to true
Chamini says
I did every step and now my site is in live.
But now I have another two issues,
1.all of my styles and images were not in the site
2.When I’m trying to go to other menus I can’t go to them.It shows 500 Internal Server Error.
Please help me to get out from here
Chris says
Hi, did you fix this? I’m having the same problem.
I’ve deleted .htaccess and created a new one. I’ve changed permalink structure to %postname%, I’ve used the velvet blues AND SQL links update but still get this error. Not sure where else to go from here…
Maiyo says
I recommend changing the WP_DEBUG option to true value in the wp_option doc to see what errors are occurring if you have a blank page or HTTP 500 error message
Jordan says
I followed the steps exactly, but when I got to step 6 when I loaded the website, it worked, but all the information and templates and pages I designed were not there.
I was still able to access my localhost website and I tried to use WP Migrate to transfer all the information across, but that didn’t work. So I followed this guys instructions:
Now my localhost website does not work anymore…..
I guess I’m just going to have to redesign the entire website online now.
WPBeginner Support says
Hi Jordan,
Please review your database settings. Go to phpMyAdmin to compare your live site database with your local server database.
Admin
Nou Kanvanny says
Hello sir my appearance dnt see tool option, pleas help me
thank you
Craig says
I recieve this error when trying to import my database:
Error
SQL query:
—
— Database: `wordpress_test`
—
CREATE DATABASE IF NOT EXISTS `wordpress_test` DEFAULT CHARACTER SET utf8 COLLATE utf8_general_ci;
MySQL said: Documentation
#1044 – Access denied for user ‘craigpar4_root’@’%’ to database ‘wordpress_test’
Can someone help me?
Thanks
Liv says
This seems to have worked, but only on my local computer. The new WordPress website shows up at the proper domain on my computer. But when trying the same domain on my phone or a different computer, the old website still pops up.
Patricia LaCroix says
Did you clear the cache on those other computers? Sometimes, that’s the issue.
Susan Keogh says
I’m failing at Step 1! I type in the phpmyadmin address – and nothing is found. What am I doing wrong?
MrPET says
Dear,
everything you said worked for me. Had some problem with admin back end page but after deleted .htaccess file and refresh, everything is just fine.
Jason says
Dear WPBeginner,
I had followed all your steps correctly but now my wp-admin page is gone! it says 404!
Even tho the wp-admin folder exsisted.
Please help
WPBeginner Support says
Hi Jason,
Try refreshing your WordPress permalinks structure. Since you can’t access admin area, you will need to do it via FTP. Connect to your website, and locate .htaccess file. Download it to your computer as backup, and then delete the file from your server. Visit the homepage of your website and WordPress will regenerate the .htaccess file for you. You can then try to login.
Admin
Jason says
Yeah, you are too late 19 days to respond to my comment…
I had moved my site with pain… that means re-install and copy and pasting stuff from old one to the new one T-T
WPBeginner Support says
Hi Jason,
Our apologies for the late reply. We try to respond to comments and questions in a timely manner but due to large number of comments we can sometimes miss legit questions.
Tiernan says
Many thanks for the very helpful advice that has really simplified an otherwise tricky process
Kariena says
Hi, very useful thanks.
Just a question, when adding content to a plugin on my localhost wp-admin, do I need to import my database again to my live site in order to update changes. (I mean do I need to import my database every time I make changes ?)
Laura says
Hello, thanks for the post, it’s super helpful!!! Quick question – should I create my XML sitemap and submit it to Google / Webmaster tools while my site is still on my local server or should I upload it to the live server first?
WPBeginner Support says
Hey Laura,
Your would need to upload your site to a live server first.
Admin
jenny says
Thank you this is very usefull thank you again
Kim Sofo says
I am having problems with this. I think its step 2. Can you please clarify where I should be uploading the wordpress files from? Are they installed as part of WAMP? So thats where I would find them? Or are they elsewhere? Thanks
Rohit Gogoi says
Can you make a video on this please…Some steps are not clear. Like the second step. I didn’t got it. Please help me out.
WPBeginner Support says
Hey Rohit,
We will try to add a video soon. Meanwhile, you will need an FTP client for the step 2. Once you are connected to your website, you will then upload local WordPress files from your computer to the live website.
Admin
Collins says
Thanks a lot, the write up was helpful. However after exporting my database and importing it to my live server, i lost some database files. Is there any possible means or tools to retrieve them back? Help please
Rizki Suciana says
Very useful.. thank you so much!
Ari says
Thanks for the outstanding post. It really was comprehensive and allowed me to successfully transfer my site from local to server!
The only part I had to be ‘externally resourceful’ on was the save settings when exporting my SQL database, to make sure it didn’t create a new one (as you correctly speculated, my ISP only allowed for one database).
Ritul says
Is it safe to transfer website from localhost to live server??because I want to know whether I should start with live hostingOrLocal Server for making my blog??
Kirsty says
Please helpppppp
When I changed my url from the .dev to .com it’s telling me 404 site not found and I can’t event get back to wordpress to fix it. :'(
WPBeginner Support says
Please see our guide on how to fix 404 error in WordPress.
Admin
Tony Clarkson says
Hello, I’m having trouble importing the localhost db content in to the new database, I’ve double checked the step-by-step and as far as I can see I’m doing the right thing but I’m getting this error when importing:
Error
SQL query:
—
— Database: `push_db`
—
— ——————————————————–
—
— Table structure for table `wp_commentmeta`
—
CREATE TABLE `wp_commentmeta` (
`meta_id` BIGINT( 20 ) UNSIGNED NOT NULL ,
`comment_id` BIGINT( 20 ) UNSIGNED NOT NULL DEFAULT ‘0’,
`meta_key` VARCHAR( 255 ) COLLATE utf8mb4_unicode_520_ci DEFAULT NULL ,
`meta_value` LONGTEXT COLLATE utf8mb4_unicode_520_ci
) ENGINE = INNODB DEFAULT CHARSET = utf8mb4 COLLATE = utf8mb4_unicode_520_ci;
MySQL said: Documentation
#1273 – Unknown collation: ‘utf8mb4_unicode_520_ci’
When I choose the custom option for exporting the local database, I’m assuming all the other settings remain as default, just change to ‘Save output to a file’
What do you think it could be?
Tony
Tony Clarkson says
I got past this bit, the version of MySQL on the local site was newer then the server, however, I’ve come to a halt again at step 6. When I browse the site I just get an Http Error 500. Not sure where to start…
Peter Singh says
Hi Tony,
I had a similar problem with another site that I had to get live a while ago. I found that the root of the http 500 error was due to insufficient memory allowance in the php.ini file. I know you cant really get in and change that about on a webserver. I found a little trick by defining it within the wp-config/php file. Just stick this in at the top line.
define( ‘wp_max_memory_limit’ ‘256m’ )
and bob’s your uncle.
Dawn says
I tried this and there was no change… Still either a 500 error or a blank page. :'(
WPBeginner Support says
Hey Dawn,
Please try these WordPress troubleshooting steps to figure out what’s causing the issue.
Victor says
Hey, Tony. How do you managed the problem with MySQL version? I’m getting the same error here and have no idea where to start. Could you clarify this for me?
Victor says
Hello, I managed to bypass this issue, but now I’m with a different one.
All my pages, including WP admin (login, dashboard etc) are showing in plain HTLM. As if there no layout and styling. What could it be?
goutam majumder says
Thanks so much for this detail steps. You saved my day.
God bless you
Che Devert says
Such a wonderful write up. Thanks.
H Finn says
This tutorial is excellent. As long as you follow the steps, and you have no problems on your own end – it works like a charm.
Thank you for this post.
Mohanraj says
Hello Friends,
I have done one WordPress project in Local Server. I need to upload wp project in a Sub-Directory. Tell me the Procedures
Stephanie says
Hi
I transfered a local website to my live server and followed all steps. I just updated all the URL found with localhost:888 by my final URL
All pages are fine except one where I lost one slider and one table on the page.
Anyone to help me please?
Alex Hammerschmied says
I also appreciate this post very much!
It becomes handy everytime i need to walk threw a migration…
Thx for that! And keep on the good work!
Best,
Alex
WPBeginner Support says
Hey Alex,
We are glad you find it helpful Don’t forget to join us on Twitter for more WordPress tips and tutorials.
Admin