


We’ve worked with WooCommerce store owners a lot over the years, and in our experience, stores with well-implemented upselling strategies consistently outperform those without them.
The key isn’t just about showing more products – it’s about showing the right products at the right time to the right customers.
We’ve identified the most effective ways to implement upselling without annoying customers. Whether you’re selling digital products, physical goods, or services, the right upselling strategy can significantly impact your bottom line.
In this guide, we’ll share proven methods for adding upselling to your WooCommerce store. These techniques are based on real-world testing and feedback from thousands of successful online stores.
💡Quick Answer: Upsell Products in WooCommerce
In this guide, we’ll share five proven methods for adding upselling in your WooCommerce store. If you’re in a hurry, here are the easy ways we’ll cover:
- Adding Upsells on Product Pages: Use the built-in WooCommerce feature or the Merchant plugin to suggest higher-value alternatives.
- Creating Upsell Popups: Grab attention with targeted popups when users take specific actions or are about to leave.
- Offering One-Click Upsells at Checkout: Add higher-value “order bumps” that customers can accept with a single click.
- Using a Custom Thank You Page: Encourage a second purchase by showing relevant offers after an order is complete.
- Adding a Free Gift with a Coupon: Automatically add a promotional product to the cart when a coupon is used.
What Is Upselling in WooCommerce?
Upselling in WooCommerce means encouraging customers to purchase a higher-value version of a product or upgrade their current selection.
For example, if a customer is viewing a basic hiking backpack, you might recommend a premium version with more storage, waterproof materials, or additional features.
The goal of upselling is to increase the value of the order while also helping customers discover products that better fit their needs.
Why Upsell Products in WooCommerce?
Upselling in WooCommerce helps increase your average order value and overall revenue. It encourages customers to choose a higher-value product or upgrade their purchase, while also highlighting your premium offerings and giving customers more value.
For example, let’s say a customer adds a hiking shoe to their cart. You can offer them higher-quality hiking shoes that are more comfortable, durable, and versatile. Similarly, if you’re selling software or plugins on your WooCommerce store, then you can offer upgrades and addons to customers.
Since upselling persuades customers to buy a higher-priced product, you get to increase your average order value and boost the revenue of your online store. It also helps to increase the visibility of products that aren’t purchased frequently.
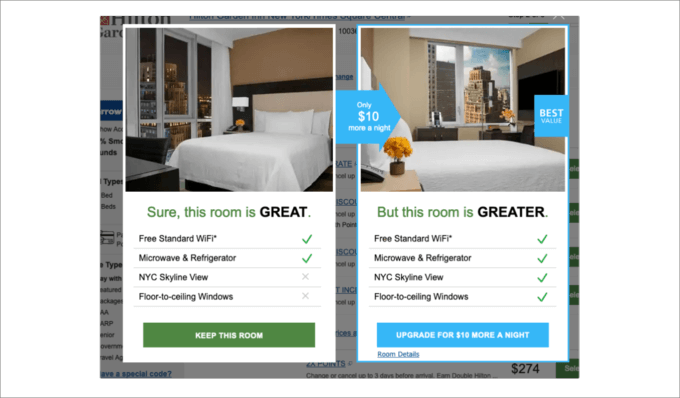
Here’s an example of what an upsell looks like. You can show them how good their current selection is, but provide an upgrade that includes even more features or products.
Make Your Upsells Helpful (Not Annoying)
To keep your upsells effective, focus on adding real value instead of interrupting the shopping experience.
- Keep it Relevant: Show upsells that match what the customer is already buying
- Offer a Clear Upgrade: Highlight better features, quality, or benefits
- Add Real Value: Suggest products that save time or improve the purchase
- Limit Frequency: Avoid showing too many popups or repeated offers
- Use Smart Targeting: Display upsells only on the right pages or at the right time (e.g., cart or product page)
This way, your upsells feel helpful and natural, not pushy.
Upsell vs. Cross-Sell: What’s the Difference?
Upselling and cross-selling are both popular strategies for increasing sales in WooCommerce, but they work in different ways.
Here’s a quick comparison to help you understand the difference:
| Feature | Upselling | Cross-Selling |
|---|---|---|
| Goal | Encourage customers to buy a more expensive or upgraded version of a product | Encourage customers to add related or complementary products to their order |
| Focus | Upgrade the main purchase | Add extra items to the purchase |
| Example | Suggesting a premium coffee machine instead of a basic model | Suggesting coffee beans, filters, or mugs alongside the coffee machine |
| Typical Placement | Product pages, checkout pages, upsell popups | Cart pages, checkout pages, “Frequently Bought Together” sections |
| Best Used For | Highlighting premium features, upgrades, or bundles | Increasing cart value with useful add-ons |
| Main Benefit | Higher average order value from a single product | More items added to the cart overall |
With that in mind, we’ll show you how to upsell products in WooCommerce. We’ll cover multiple methods, so you can click the links below to jump ahead to your preferred section:
- Method 1: Adding Upsell Products in WooCommerce
- Method 2: Creating a WooCommerce Popup to Upsell Products
- Method 3: Offering One-Click Upsells on the Checkout Page
- Method 4: Upselling Products on a Custom WooCommerce Thank You Page
- Method 5: Automatically Adding Products to the Cart Using a Coupon
- Which Upsell Method Is Right for You?
- Bonus Tip: Showing Product Recommendations
- Frequently Asked Questions About Upselling in WooCommerce
Let’s get started!
Method 1: Adding Upsell Products in WooCommerce
This is the simplest way to get started, as it uses a free feature already built into WooCommerce. You can link different products and show them as an upsell on the product page.
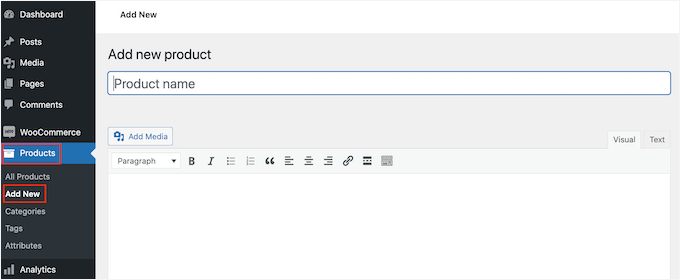
To start, you’ll need to go to Products » Add New from the WordPress dashboard. You can also edit an existing product.
Next, you can scroll down to the ‘Product Data’ section and click on the ‘Linked Products’ tab.
You can add different products under the ‘Upsell’ section here. Simply enter a name and search for the product you want to upsell.
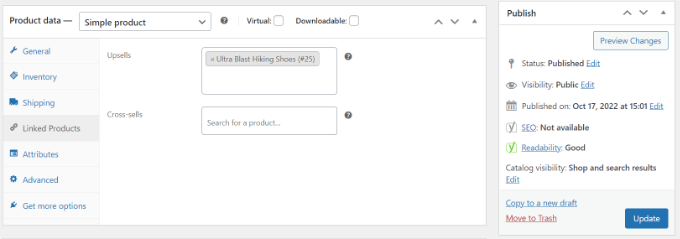
Go ahead and update your product page.
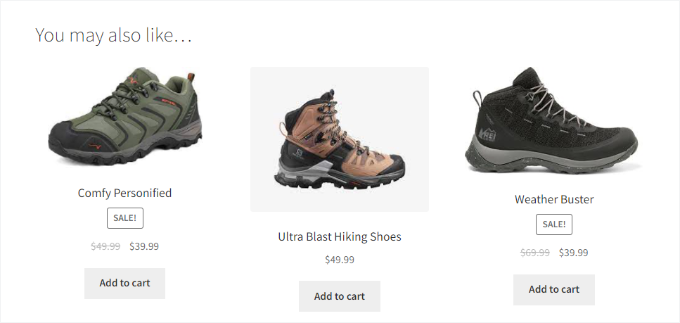
You can now visit your WooCommerce store and see the upsell products under the ‘You may be interested in’ section (or similar wording depending on your theme).
Use the Merchant Plugin for More Flexible Upsells
The default WooCommerce upsell feature works well for simple suggestions on the product page. However, if you want more control over your upsells, then you can use the Merchant plugin by aThemes.
It is an all-in-one suite that offers far more flexibility than WooCommerce. While you can display complementary product recommendations on the product page, the plugin also has modules for things like trust badges, product bundles, pre-orders, and more.
This makes it a better option if you want more control over how and where you optimize your sales funnel, beyond just basic upsells.
To get started, install and activate the Merchant plugin. For more details, you can see our guide on how to install a WordPress plugin.
Note: While Merchant offers a free version, you will need the pro plan to use the Complementary Products feature.
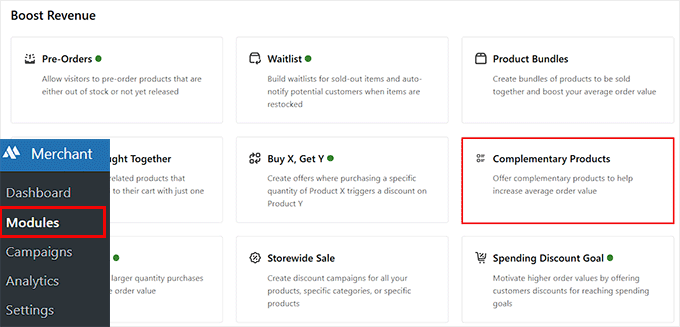
After activation, go to Merchant » Modules from your dashboard and open the ‘Complementary Products’ section. Then, click the ‘Enable’ button to turn it on.
Next, you’ll need to create a campaign. This controls where your upsell recommendations appear.
Set the campaign status to Active and give it a clear name so you can easily identify it later.
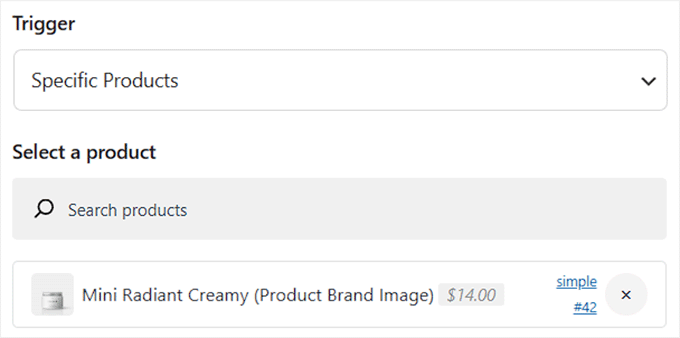
After that, choose a trigger. You can display recommendations on all products or only on specific products. If you choose specific products, then simply search for and select the items where you want the upsell section to appear.
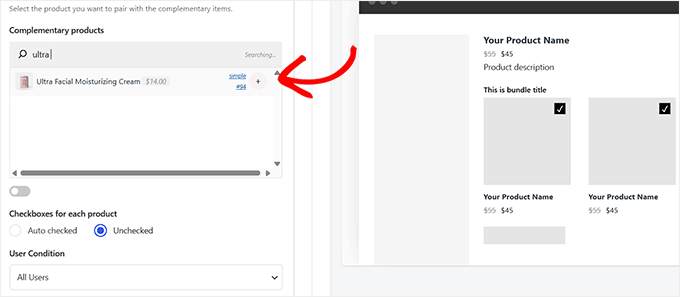
Now, scroll down and add the products you want to recommend.
These can be related items, accessories, or premium alternatives that go well with the main product.
Finally, you can customize the design to match your store. Once you’re done, click the ‘Save’ button and visit your product page to see your upsell section in action.
For complete step-by-step instructions, follow our full guide on showing product recommendations in WordPress.
Method 2: Creating a WooCommerce Popup to Upsell Products
This method is perfect for grabbing your customer’s attention with a targeted, high-visibility offer.
Displaying your products in a lightbox popup can instantly grab your users’ attention and help boost sales, especially if they are about to leave your site.
You can offer discounts or limited-time offers on high-value goods. Plus, you can show it on specific pages when a user spends a particular time on a page or is about to exit your store.
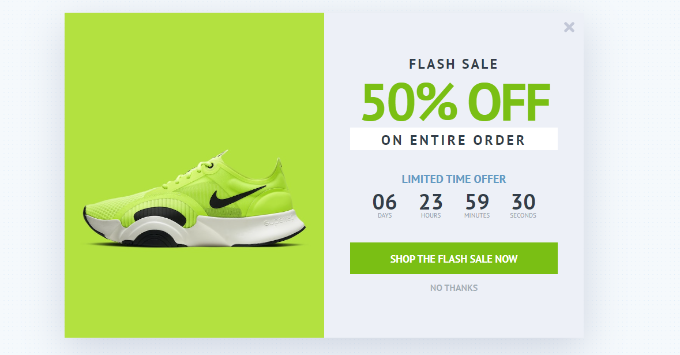
The best way to create a WooCommerce upsell popup is using OptinMonster. It is trusted by over 1.2 million websites and is highly rated as the best WordPress popup plugin (4.8/5 stars on G2).
At WPBeginner, we’re a huge fan of OptinMonster; we use it on our website to display lightboxes, header banners, slide-ins, and inline popups for special offers. If you want more information about the platform, you can refer to our OptinMonster review.
You can choose from multiple pre-built popup templates and campaign types.
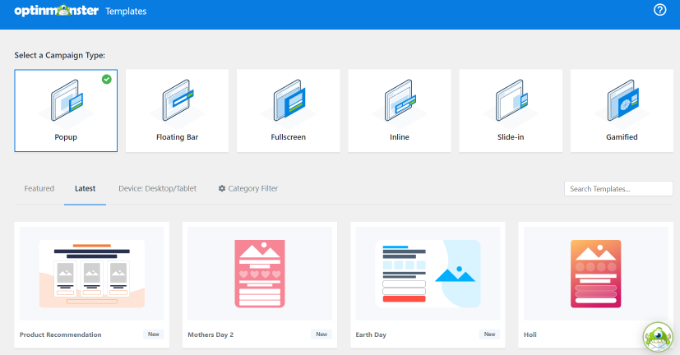
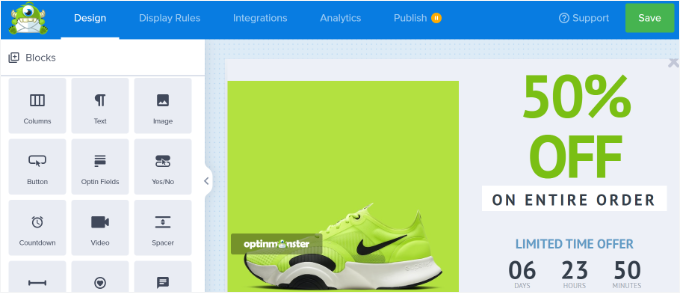
Plus, you can use the drag-and-drop campaign builder to customize your upsell popup.
You can edit different blocks, including the existing ones in the template.
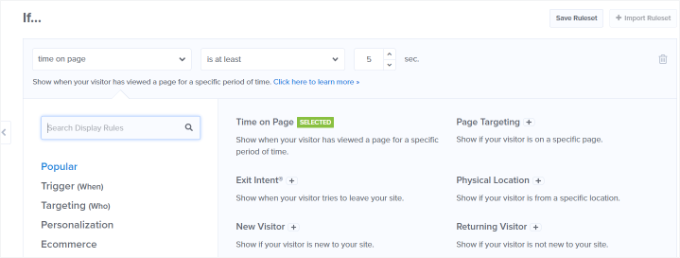
After customizing your popup, you can head to the display rules tab and configure when you’d like to show it to your customers.
OptinMonster offers powerful options, including their Exit-Intent® technology. This allows you to show your campaign just as the user is about to leave your website. Plus, there are many eCommerce-related display options.
For example, you can display your campaign when a visitor views a particular product on your WooCommerce store or adds a certain number of items to a cart.
For more details, you can see our guide on how to create a WooCommerce popup to increase sales.
Method 3: Offering One-Click Upsells on the Checkout Page
Another way to upsell in WooCommerce is by showcasing your products at different points in the customer journey.
For instance, you can display high-priced products on the checkout page and allow users to instantly add them to the cart before placing an order. This helps you optimize your sales funnel, boost sales, and earn more revenue.
The easiest way to upsell products during checkout is by using FunnelKit, formerly known as WooFunnels.
Trusted by over 20,000 businesses and rated 4.7/5 stars on G2, it’s the best WordPress sales funnel and automation plugin, offering an order bump option that you can add to your checkout.
Plus, during testing, we found it was super easy to use for this purpose. To get more information about the platform, you can read our complete FunnelKit Automations review.
First, you’ll need to install and activate the Funnel Builder Pro plugin. If you need help, then please see our guide on how to install a WordPress plugin.
Upon activation, you’ll see the FunnelKit setup wizard. You can start by entering the license key and following the onscreen instructions to configure the plugin.
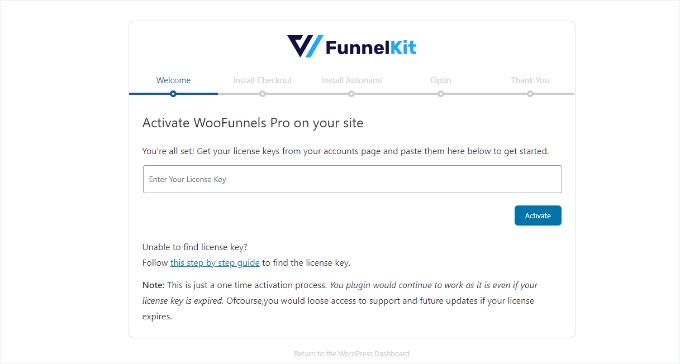
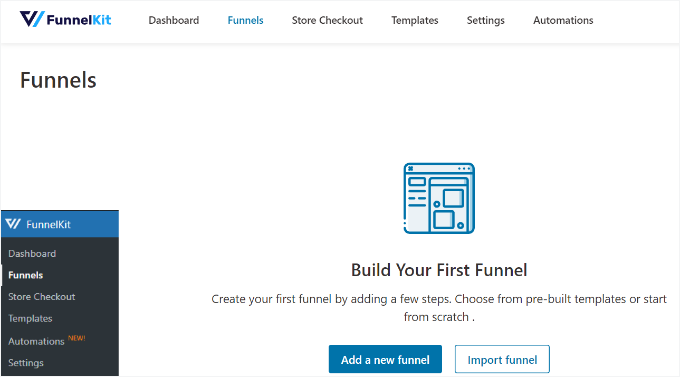
Once the plugin is set up, you can go to FunnelKit » Funnels from your WordPress dashboard.
After that, simply click the ‘Add new funnel’ button.
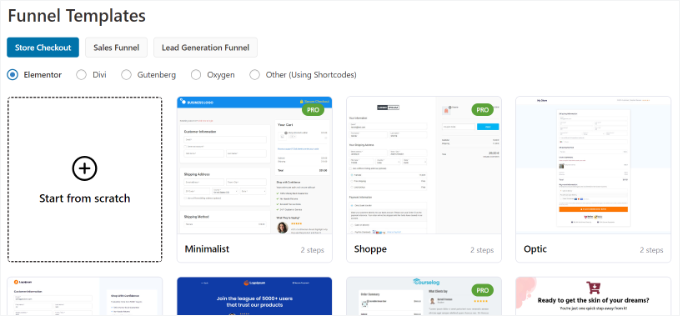
FunnelKit offers different funnel templates for your WooCommerce store, including store checkout, sales funnel, and lead generation funnel.
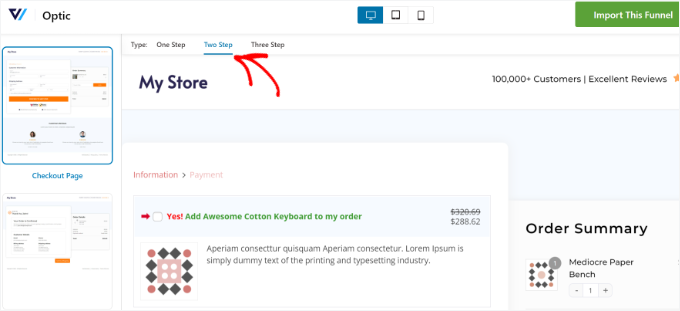
Go ahead and select a template for your online store. We’ll use the ‘Optic’ store checkout template for this tutorial.
Next, you can preview the template and choose whether you’d like a one-step, two-step, or three-step funnel. The difference between these is that you can show different checkout steps on other pages.
For example, in one-step checkout, all the information is displayed on a single page. On the other hand, a three-step checkout would show basic information, shipping details, and payment on multiple pages.
After that, just click the ‘Import This Funnel’ button at the top.
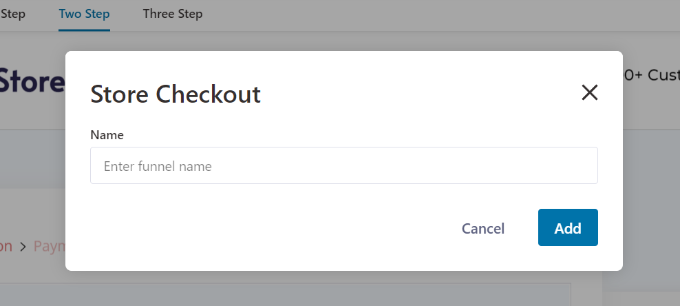
Next, a popup window will open where you’ll need to enter a name for your funnel.
Go ahead and click the ‘Add’ button.
FunnelKit will now import the template.
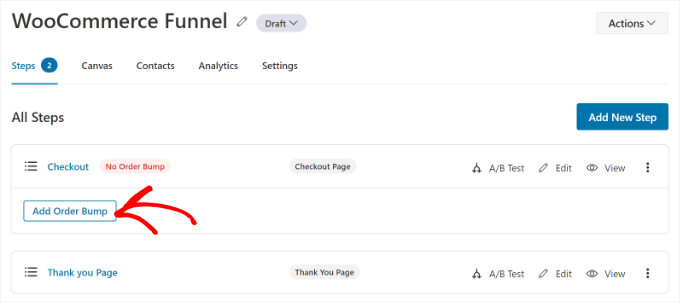
On the next screen, you’ll see different pages in the funnel. You can edit each of these pages and add additional steps.
To add an order bump, simply click the ‘Add Order Bump’ button under the Checkout step.
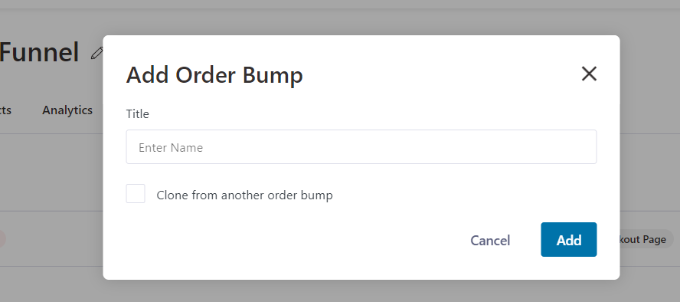
After that, a popup window will open.
Go ahead and enter a name for your ‘Order Bump’ and click the ‘Add’ button.
You should now see your ‘Order Bump’ as a sub-step under the ‘Checkout’ page.
To add products for upselling, you can edit the order bump page.
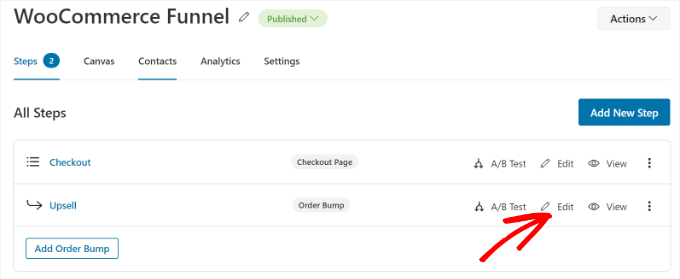
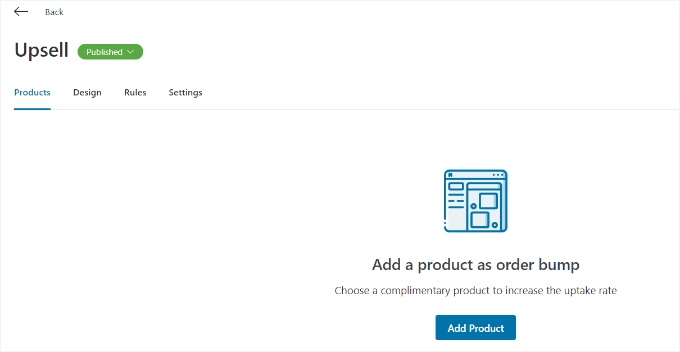
Next, you’ll need to add products you’d like to show on checkout.
Simply click the ‘Add Product’ button to continue.
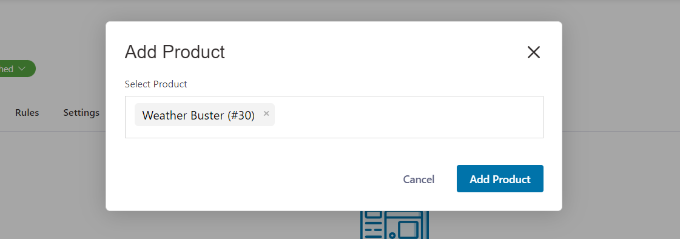
After that, a popup window will open to add your products.
You can search for the products and then click the ‘Add Product’ button.
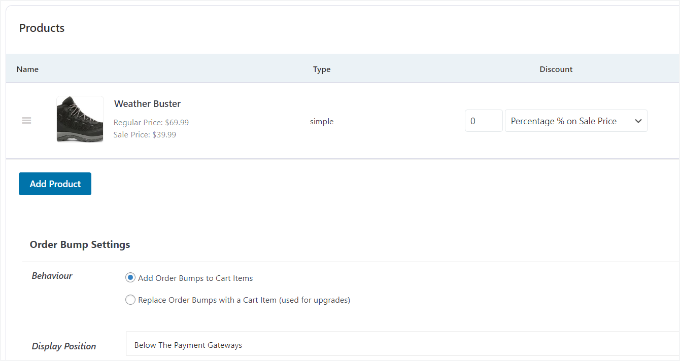
Next, you will see the products you just added. FunnelKit lets you rearrange its order if there are multiple items.
You can also change the behavior and display position of the goods you’d like to upsell on the checkout page. For example, the plugin lets you show upsell products below the payment gateways, above or below the order summary, inside the mini cart, or above the checkout form.
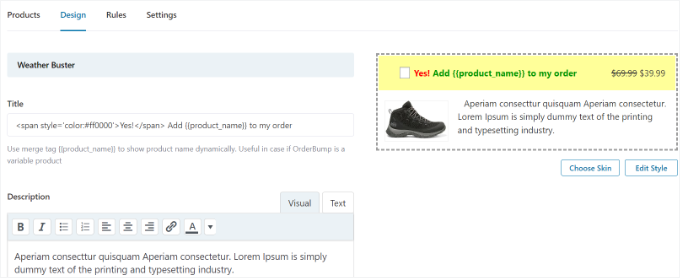
FunnelKit also offers options to change the design of your order bump.
Simply switch to the ‘Design’ tab to edit the title, description, and style. There are different skins to choose from and additional options to further customize each skin.
Once you’re done, you can go back to the ‘Store Checkout’ dashboard in FunnelKit.
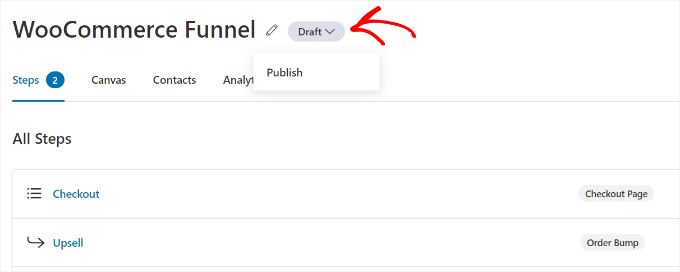
Next, you’ll want to click on the dropdown menu next to the title of your store checkout and change the status to ‘Publish.’
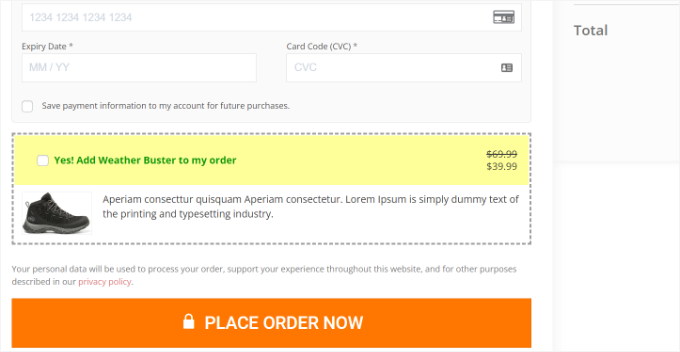
Your order bump will now be active on your WooCommerce store. You can now visit your online store to see it in action.
For instance, our upsell offer appears after the payment gateway on the checkout page. Customers can add the item to their order with a single click.
Method 4: Upselling Products on a Custom WooCommerce Thank You Page
Your thank you page is a great opportunity to encourage a second purchase from a happy customer.
In addition to showing products during checkout, you can create a custom thank you page to offer a related product or exclusive deal. This helps build loyalty and increase customer lifetime value.
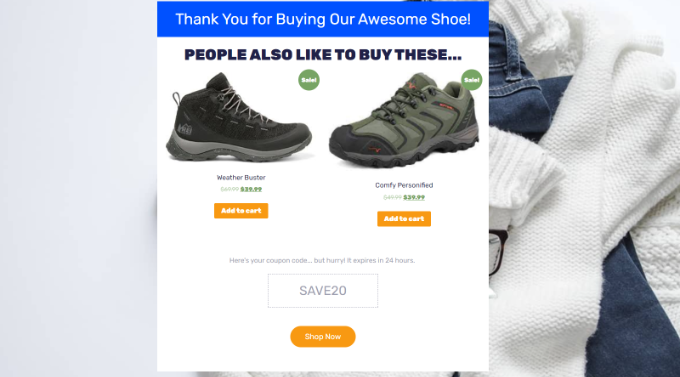
With SeedProd, you can easily create a custom WooCommerce thank you page.
Some of our brands’ sites use this plugin, and with over 1 million active installations, we’re confident to say it’s the best landing page plugin for WordPress.
For more details, you can check out our SeedProd review.
The plugin offers different pre-built page templates and lots of customization options.
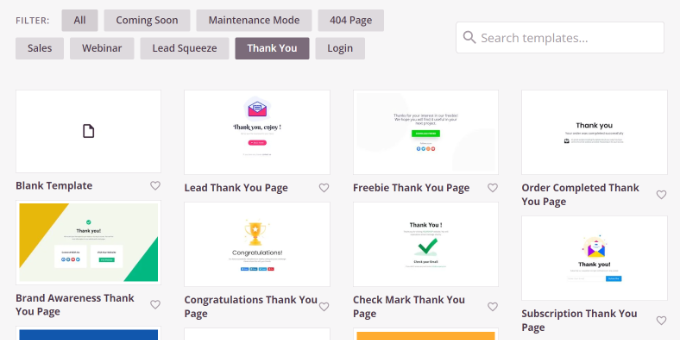
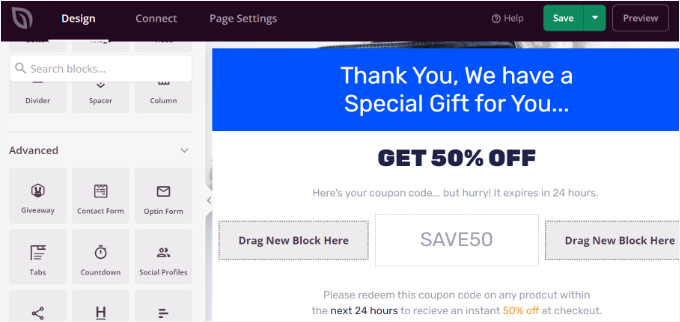
You can use the drag-and-drop page builder to customize your thank you page.
For example, there are blocks for adding text, images, buttons, contact forms, countdown timers, social profiles, and more. Plus, you can control and edit each element on your template.
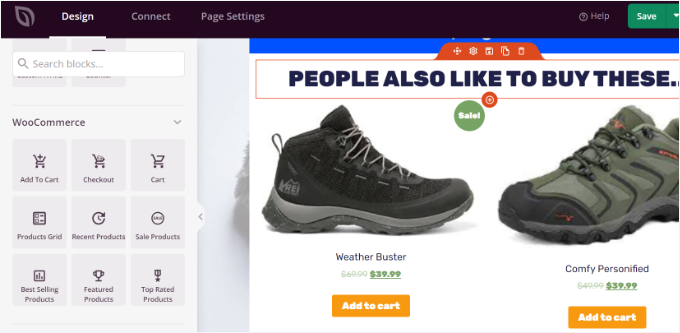
The best part is that SeedProd offers WooCommerce blocks as well.
You can add a product grid or simply add your best-selling, recent, featured, or top-rated products to the thank you page.
For step-by-step instructions, please see our guide on how to create a custom WooCommerce thank you page.
Method 5: Automatically Adding Products to the Cart Using a Coupon
Did you know that you can upsell products by automatically adding them to the customer’s cart?
For example, if a customer buys a basic software license, you could offer them a discounted upgrade to the premium version automatically when a specific coupon is applied.
With the help of the Advanced Coupons plugin, you can set up personalized coupons in WooCommerce and automatically add products to the cart when a coupon is applied.
We did a deep dive into its features, which you can see in our Advanced Coupons review.
You’ll need at least the Advanced Coupon Growth plan to add products via coupons. Once you’ve set up the plugin, go to Coupons » Add New from your WordPress dashboard.
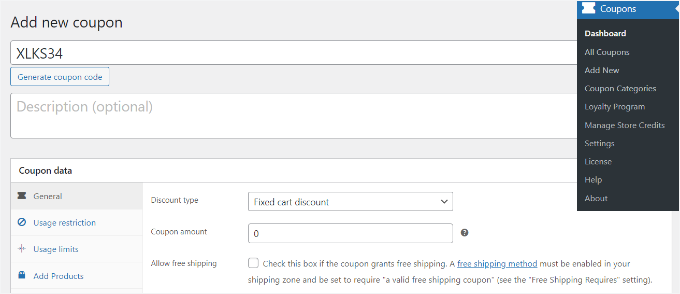
Next, you can enter a coupon code at the top or click the ‘Generate coupon code’ button to automatically create a random code.
After that, scroll down to the ‘Coupon data’ section and switch to the ‘Add Products’ tab.
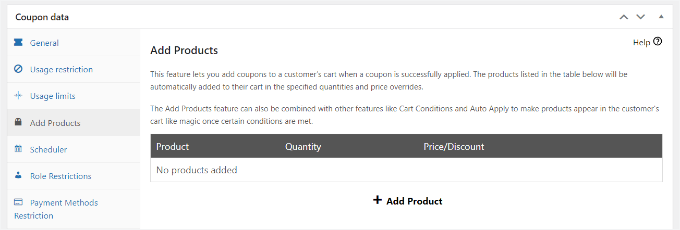
From here, you can search for the product you’d like to automatically add to your cart when the coupon code is applied.
There are also options to set the order quantity and add a price or discount for the selected product.
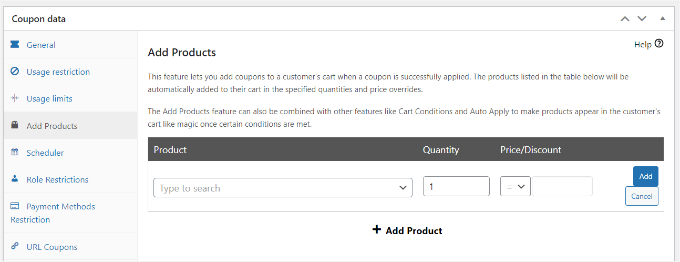
Once you’ve selected a product, go ahead and click the ‘Add’ button.
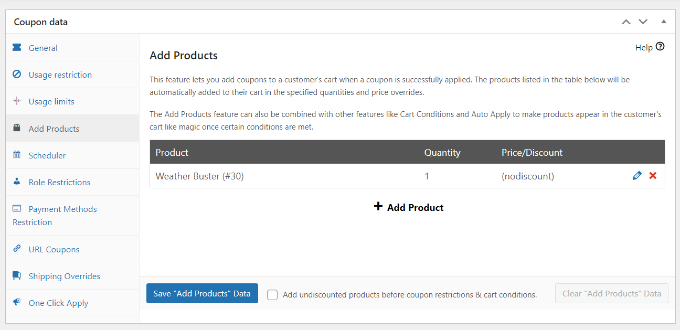
You should see your product under the ‘Add Products’ section. Don’t forget to click the ‘Save Add Products Data’ button.
Besides that, Advanced Coupon also lets you set up cart conditions.
This way, you can set up rules for applying your coupon code. For example, the coupon code will only work if the cart quantity or subtotal is more than a certain amount or if a customer adds products from a specific category.
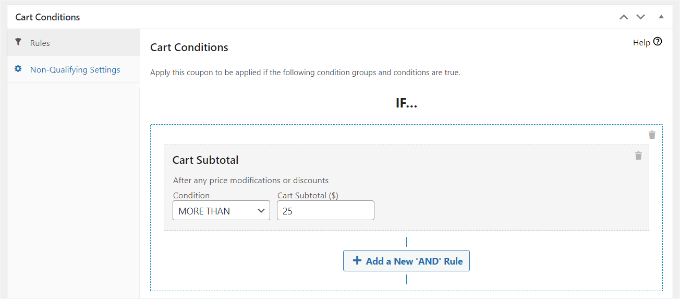
After setting up these conditions, you can publish your coupon code.
Now, your product will automatically be added to the cart whenever a customer enters the discount coupon on checkout.
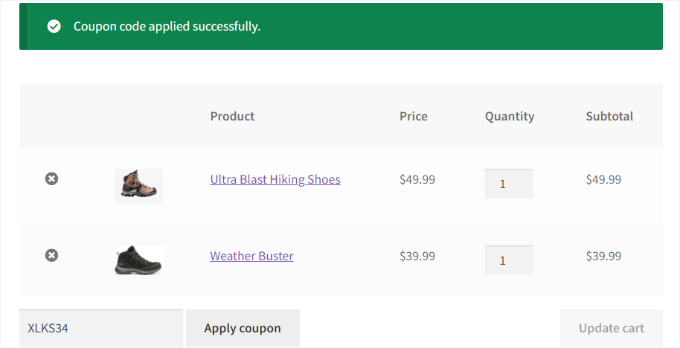
For more details, please see our guide on how to auto-apply coupons in WooCommerce.
Which Upsell Method Is Right for You?
We’ve covered several powerful ways to increase your store’s revenue. Here’s a quick guide to help you choose the best strategy for your goals:
- For beginners: Start with Method 1. It uses WooCommerce’s built-in features and doesn’t require any extra plugins.
- For high-impact offers: Use Method 2. A popup with OptinMonster is the best way to make sure your offer gets seen, especially with exit-intent campaigns.
- To reduce checkout friction: Choose Method 3. A FunnelKit order bump is a seamless way to add complementary items without interrupting the payment process.
- To encourage repeat business: Implement Method 4. A custom thank you page from SeedProd turns a simple confirmation into a new sales opportunity.
- For special promotions: Try Method 5. Advanced Coupons lets you create “buy one, get one” or free gift offers that are automatically applied.
Bonus Tip: Showing Product Recommendations
To further boost your store’s average order value, you can consider suggesting relevant products on your cart or checkout page.
For instance, if someone adds a jacket to their cart, recommending a hat or a pair of gloves as a complementary item makes perfect sense. Both are essential for staying warm in colder weather and often go hand in hand.
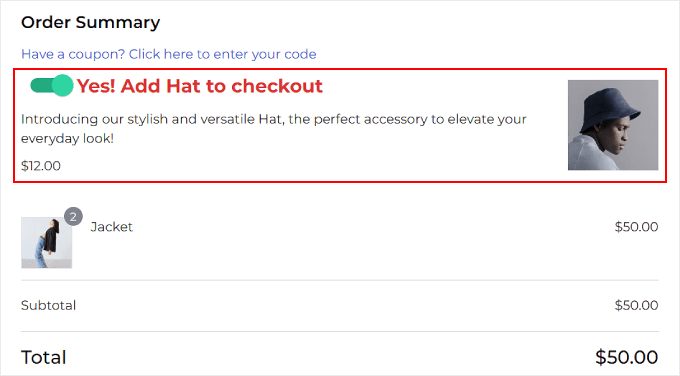
You can show these recommendations with tools like slide-in carts, order bumps, upsells and cross-sells, or even automated emails after a purchase.
For details, you can check out our guide on how to show product recommendations in WordPress.
Frequently Asked Questions About Upselling in WooCommerce
Here are some questions that our readers have frequently asked us about upselling products in WooCommerce:
Will adding popups and offers annoy my customers?
This is a common concern, but if done correctly, offers can be helpful rather than annoying. The key is relevance. Make sure your offers provide real value, like a complementary product that saves the customer time or a genuinely better version of an item they want.
Tools like OptinMonster also have powerful display rules. You can limit how often a popup appears to a single visitor or only show it on specific pages, which prevents it from becoming intrusive.
How can I track the success of my upsell offers?
Most of the plugins mentioned have built-in analytics. For example, OptinMonster shows you conversion rates for your popups, and FunnelKit tracks how often your order bumps are accepted. This allows you to see exactly which offers are working.
For a complete picture, you can use MonsterInsights to set up eCommerce tracking in Google Analytics. This lets you see how these offers contribute to your store’s overall revenue.
Can I offer a discount on an upsell product?
Yes, offering a small discount is a great way to make your offer more attractive.
Plugins like FunnelKit and Advanced Coupons allow you to set a custom discounted price for the product being offered. This can increase the chances of a customer accepting the offer at checkout.
We hope this article helped you learn how to upsell products in WooCommerce. You can also see our expert picks for the best WooCommerce plugins and our guide on how to speed up your WooCommerce performance.
If you liked this article, then please subscribe to our YouTube Channel for WordPress video tutorials. You can also find us on Twitter and Facebook.


Mrteesurez
This article is an insightful one.
It thought me more of marketing strategies to apply to my woocomerce store. I will like to implement this add upsell to my ebook store as this can increases the chance s of making more sales and getting visibility to other products that users might not have seen and might even better than what he is ordering.